How to get started with TrueConf API
With TrueConf, you can use video conferencing to facilitate your business processes: from video communication with your website visitors to video contact center services. This article explains how to implement different video conferencing scenarios using TrueConf APIs.
Getting Started
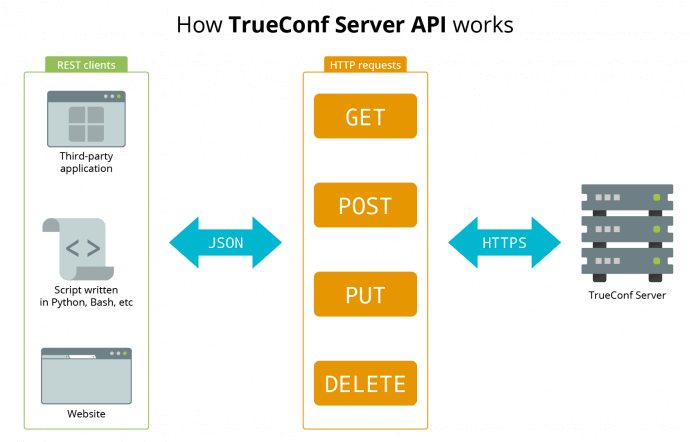
TrueConf Server API is an application programming interface designed for interaction of your applications with TrueConf Server. It implements RESTful API architecture and is based on GET, POST, PUT and DELETE HTTP requests which are returned in JSON format by the server. To see the full list of TrueConf Server API features, please read our documentation.
We recommend using OAuth 2.0 protocol for APIs. You can find more information about it in our server documentation.
The application interacts with API in the following way:
- The application requests a temporary access token.
- The application receives the access token.
- The access token is used to perform requests from the application to the server.
You do not have to create an OAuth application, but rather use the Secret key from the Web → Web security section of the TrueConf Server control panel, but we do not recommend this method.
This Secret key is an unlimited time access token. This means that it is valid until you manually recreate it with the Generate a new secret key button. The token provides full access to all API functions without pre-authorization using the OAuth protocol. Therefore, we recommend using the secret key only for API testing or for use only by a server administrator with rights that you can’t specify when creating an OAuth application (e.g. reading logs).
Step 1. Creating OAuth Application
Open TrueConf Server control panel and proceed to API → OAuth2. Create a new OAuth 2.0 application and check the list of necessary permissions.
To perform the following examples, you will require the following permissions:
- conferences
- conferences:read
- conferences:write
- conferences.participants
- conferences.participants:read
- conferences.participants:write
Application ID and Secret key will be automatically generated when the application is being created.
To test the API features, you can use cURL utility (built-in Windows 10 version 1803 or higher) or Postman software. We recommend using Postman as one of the most convenient options.
Step 2. Creating an Access Token
- In Postman, enter the request in a new workplace:
|
1 |
https://server.company.name/oauth2/v1/token |
where server.company.name is an IP address or an external IP address that is set in Web → Settings section of TrueConf Server control panel.
- Choose the HTTP method POST on the left side of an entry field.
- Open the Body tab and set the following parameters:
- type x-www-form-urlencoded
- the following KEY – VALUE pairs:
| KEY | VALUE |
|---|---|
| grant_type | client_credentials |
| client_id | 96f2973300c9b7740dd315b3d7890c60fb787fd5 |
| client_secret | e19769eb12f6cad7847260dfaa0e94f4a9537f2e |
where client_id and client_secret are Application ID and Secret key respectively (they were obtained when the application was created).
- Press Send to proceed.
- If processed successfully, the server returns JSON object with the access token details:
|
1 2 3 4 5 6 |
{ "access_token": "e696b81ca99f267fe92ced3c6baaabcd3b964db6", "expires_in": 3600, "token_type": "Bearer", "scope": "conferences conferences:read conferences:write conferences.participants conferences.participants:read conferences.participants:write" } |
Description:
access_token– the access token itself.expires_in– expiration period in seconds from the moment the conference was created (1 hour).token_type– a type of access token, always equals “Bearer”.scope– the list of permissions granted to this application.
Step 3. Creating a Multipoint Conference
Please use the Create Conference method to create a new video conference.
- List the properties of the created conference in the JSON object ObjectConference by specifying these parameters:
"topic":"My Conference"– conference name."type":0– conferencing mode; in this case “all on screen”.Keep in mind that with the help of thetypeparameter we can create only one general type of a role-based conference (a meeting with appointed speakers and attendees) on the server side by specifying the value“type”: 3. To select the subtype of this conference (a moderated role-based conference or smart meeting), one has to set the separate parametervad_selector: if its value equals1, a smart meeting will be created, if the value is set to0, a moderated role-based conference will be created. So, to create a smart meeting, one has to specify two parameters:”type”: 3and”vad_selector”: 1."auto_invite":1– automatic invitation of participants to a virtual room when any person (not only from the list of invited users) connects to this room, as a result, participants will be automatically invited when the room is launched."max_participants":10– the maximum number of participants."invitations"– the list of participants in format{"id":"user_id"}, whereuser_idis a username of the participant."schedule":{"type":-1}– conference schedule; in this case room (without schedule)."owner":"helen"– username of the conference owner.
- JSON object of the conference will look in the following way:
|
1 2 3 4 5 6 7 8 9 10 11 12 13 14 15 16 17 18 |
{ "topic":"My Conference", "type":0, "auto_invite":1, "max_participants":10, "invitations":[ { "id":"helen" }, { "id":"dean" } ], "schedule":{ "type":-1 }, "owner":"helen" } |
- Enter the request:
|
1 |
https://server.company.name/api/v3.8/conferences?access_token=e696b81ca99f267fe92ced3c6baaabcd3b964db6 |
- Choose the HTTP method POST.
- In Body tab:
- set the raw type
- add the JSON request in entry field.
- Send the request. If the request has been successfully processed, the server returns the JSON object containing the details of the created conference:
|
1 2 3 4 5 6 7 8 9 10 11 12 13 14 15 16 17 18 19 20 21 22 23 24 25 26 27 28 29 30 31 32 33 34 35 36 37 38 39 40 41 42 43 44 45 46 47 48 49 50 51 52 53 54 55 56 57 58 59 60 61 62 63 64 65 66 67 68 69 70 71 72 73 |
{ "conference": { "id": "4219111751", "type": 0, "topic": "My Conference", "owner": "helen@ruwu1.trueconf.name", "description": "", "max_podiums": 10, "max_participants": 10, "schedule": { "type": -1 }, "invitations": [ { "id": "dean", "display_name": null }, { "id": "helen", "display_name": null } ], "allow_guests": false, "auto_invite": 1, "state": "stopped", "url": "https://server.company.name/c/4219111751", "webclient_url": "https://server.company.name/webrtc/4219111751", "created_at": 1573653531, "multicast_enable": false, "multicast_address": "224.0.1.224:4000-6000", "tags": [], "recording": 0, "stream_recording_state": 0, "rights": { "guest": { "chat_send": true, "chat_rcv": true, "slide_show_send": true, "slide_show_rcv": true, "white_board_send": true, "white_board_rcv": true, "file_transfer_send": true, "file_transfer_rcv": true, "desktop_sharing": true, "recording": true, "audio_send": true, "audio_rcv": true, "video_send": true, "video_rcv": true }, "user": { "chat_send": true, "chat_rcv": true, "slide_show_send": true, "slide_show_rcv": true, "white_board_send": true, "white_board_rcv": true, "file_transfer_send": true, "file_transfer_rcv": true, "desktop_sharing": true, "recording": true, "audio_send": true, "audio_rcv": true, "video_send": true, "video_rcv": true } }, "broadcast_enabled": false, "broadcast_id": null, "broadcast": null, "allow_only_planned_participants": false } } |
The server creates a conference ID which is displayed in the idfield.
In case of an error, the server returns the JSON object with the error message.
Step 4. Getting the Conference List
You can get the list of conferences with the help of Conferences method. Please use the HTTP method GET to perform the request:
|
1 |
https://server.company.name/api/v3.8/conferences?access_token=e696b81ca99f267fe92ced3c6baaabcd3b964db6 |
The JSON object returned to you by the server will contain the room you have previously created.
Step 5. Getting the Information About the Conference
To obtain the information about the conference, use the Conferences method, the conference ID and the HTTP method GET for the request:
|
1 |
https://server.company.name/api/v3.8/conferences/4219111751?access_token=e696b81ca99f267fe92ced3c6baaabcd3b964db6 |
The server returns the JSON object containing the required information.
Step 6. Launching the Conference
To start a video conference, use the Conferences method, the conference ID and the HTTP method POST for the request:
|
1 |
https://server.company.name/api/v3.8/conferences/4219111751/run?access_token=e696b81ca99f267fe92ced3c6baaabcd3b964db6 |
If the request has been successfully processed, the server starts the conference immediately. The participants will immediately be invited to the conference, as you have previously set the automatic invitation during creating the conference.
Step 7. Inviting a New Participant to the Conference
Once the conference is started, you can invite new participants. To send an invitation, use the Conferences_Participants method and HTTPS method POST:
|
1 |
https://server.company.name/api/v3.8/conferences/4219111751/participants?access_token=e696b81ca99f267fe92ced3c6baaabcd3b964db6 |
Enter the JSON {"participant_id":"user_id"}, где user_id is a username, e.g. {"participant_id":"kevin"}in Body tab in Postman.
If processed successfully, the server returns ObjectParticipant object of the invited participant.


