Migrating TrueConf Server from Windows to Windows
If required, you can easily create a full backup of all your TrueConf Server data and move it to a different PC. Below you can find a brief outline of all information you can back up.
- Use the configuration file and the system registry to save the following data:
- Server settings
- User and group settings
- Created conferences and templates.
- Save the certificate files (if you use HTTPS connection).
- Move database files to save reports.
- Save additional data if necessary:
- Conferences recording files
- Files shared in chats
- Server logs
- User avatars.
Step 1. TrueConf Server update
To migrate successfully, you need to make sure that the new server installed on Windows and the current server are of the same version. On our website, only the latest version of the installation file is available for download. We do not provide earlier versions of the server due to security reasons. So, we suggest updating the current TrueConf Server instance to the latest version. Read this article to learn how it can be done.
Step 2. Data export
To migrate your TrueConf Server instance you will need your registration key and the backups listed below. In this case the migration will be performed with the help of the registry because this approach can speed up the whole process and reduce downtime.
Please note that you will not be able to move your TrueConf Server from your current PC to a different one without taking these steps.
Registration Key
Due to security reasons, the registration key cannot be retrieved from the TrueConf Server control panel. So, in case you do not have the registration key at this point, you may find it in the email you received during registration. If you cannot find this email, you can enter the TrueConf Server ID in the search box.
Server configuration
You can do this action for safety reasons, because the system registry stores the same settings as the configuration file does.
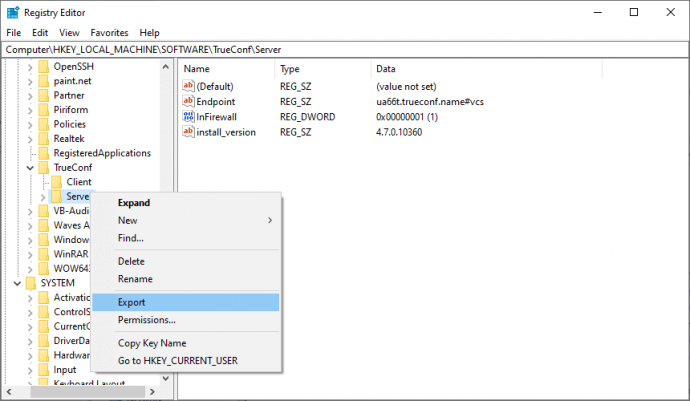
To open Registry Editor, click Win + R, type regedit in the window that opens and click OK.
In the left panel of the Registry Editor, right click on HKEY_LOCAL_MACHINE → SOFTWARE → TrueConf → Server branch and select Export from the context menu.
Save *.reg file with the registry status.
HTTPS settings
If you have HTTPS configured, the key and certificate files are stored in the directory [installation_path]\httpconf\ssl, where [installation_path] is the server installation path. Save a backup copy of this directory on your server, for example, D:\backup\.
If you need all the data listed below, you can simply copy the TrueConf Server working directory to the device where you are going to move your TrueConf Server instance.
Database
The database stores information from the Reports section of the TrueConf Server Control panel (it also includes the chat history). By default, it is located in the working directory of TrueConf Server at the path C:\TrueConf , but you can specify another path in the Dashboard → Settings section (Work path block).

Copy the database directory from the work path to a convenient location on your server, for example, D:\backup\.
Conference and call recordings
If you enable automatic recording of all video conferencing sessions on the server side, files are saved in the Recordings directory that is located in the TrueConf Server working directory by default. To check their location, see the Path field in the Recordings section of the TrueConf Server control panel.
If you need to move them to a new server, just copy necessary recordings.
Chat files
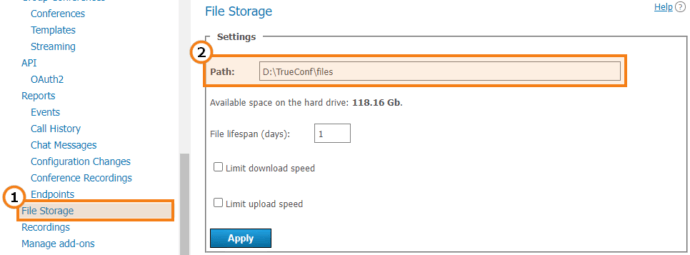
All files shared by users in chats on your TrueConf Server instance are saved in the files directory in the TrueConf Server working directory by default. To check their location, see the Path field in the File Storage section of the TrueConf Server control panel. If you want to move the files to a new server, save a backup copy of this directory.
Log files
Log files may be needed when submitting a ticket to TrueConf technical support (e.g., to analyze the issues you had when using the previous versions of TrueConf Server).
The log files are located in the TrueConf Server working directory. To transfer them, create a backup copy of all directories and files listed in the article about logs.
User avatars
Avatars the users registered on your TrueConf Server instance are stored in the avatars directory in the TrueConf Server working directory. Copy this directory to a convenient location on your server.
Step 3. Install TrueConf Server
Read this article to learn how TrueConf Server can be installed from a file or repository.
If you want to move TrueConf Server to a virtual machine, first use the instructions for configuring virtual machines to work with TrueConf Server:
- How to configure Hyper-V on Windows Server 2012 R2?
- How to configure KVM Hypervisor on Ubuntu Server?
- How to configure Xen hypervisor on Ubuntu Server 14.4.05?
We do not recommend using TrueConf Server on virtual machines, since there are multiple difficulties with setting their parameters, and configuration requires an experienced administrator.
Step 4. Data import
Finally, you need to move the files created in step 1 to the new machine and restore the server configuration with their help.
Server Configuration
Double-click on the registry file (*.reg) saved previously. This file includes the configuration of your server. You will see a standard dialogue window warning you about potential consequences. Click Yes.
Settings will start to be restored and if import is successful, the following window will be displayed:
HTTPS Settings
- Copy the previously saved
sslkey and certificate folder to thehttpconfdirectory on the TrueConf Server work path. - Go to the TrueConf Server control panel.
- In the Web → HTTPS section of the control panel, apply the same key and certificate settings that were previously used on the server.
Move additional data
Copy the remaining data saved in step 1 to the appropriate directories of your new server:
- Reports – to the
databasedirectory in the working directory - Conferences recordings –
recordingsdirectory in the working directory (by default) - Chat files – to the
filesdirectory in the working directory (by default) - Log files – working directory using the paths described in this article
- Avatars – to the
avatarsdirectory in the working directory.
When all settings have been imported, restart the following TrueConf services in the task manager:
- TrueConf
- TrueConf Database
- TrueConf Web Manager
- trueconf-manager.
Step 5. Testing data migration
Go to the control panel and check if all the data (avatars, reports, chat messages, users, conferences and other types of information) were correctly imported. If some errors occurred , for example, you mistyped a command and some of the data was not exported, uninstall the server completely and repeat steps 2 and 3.
If all the data was successfully imported, please contact the technical support to reset the hardware key (HW key) to which your license is bound. TrueConf technical support will reset the hardware key for free. You will need to submit a ticket and specify the ID of your server. When the technical support resets the hardware key, please register the server again.
Happy video conferencing!


