Migrating TrueConf Server from Linux to Linux
Sometimes, it may be necessary to migrate TrueConf Server to a different virtual machine or computer. This also includes the cases when a Linux-based OS is used. You will be able to save the following types of data:
- Database export:
- Server settings
- User and group settings
- Conferences and templates
- Reports.
- If you are using HTTPS, you will be able to export the certificate files.
- It is also possible to export such additional data as:
- Conference recordings
- Files sent via chats
- Server logs
- User avatars.
This guide can also be used for migrating TrueConf Server from one Linux-based system to another, e.g., from Debian to Red Hat Enterprise.
sudo -V.Step 1. TrueConf Server update
To migrate successfully, you need to make sure that the new server installed on Linux and the current server are of the same version. Our Linux repository always includes only the latest version of the distro. We do not provide earlier versions of the server due to security reasons. So, we suggest updating the current server to the latest version. Read this article to learn how it can be done.
Step 2. Server data export
To migrate TrueConf Server, you will need the registration key of your TrueConf Server instance and the backup copies listed below.
Registration key
The registration key cannot be found directly in the control panel due to security reasons. This key was sent to you in the email confirming the registration of your TrueConf Server instance. To find this email, search by content and specify Server ID which can be found in the Summary → License info section.
Main data
Database
The database stores all TrueConf Server settings, including chat history and reports.
How to check the current port number
To export the database, you will need to specify the port needed for connecting to the database. The 5444 port is used by default.
Since the port could be changed at some point in the past (e.g., the port could be set to 5433 after updating TrueConf Server from versions earlier that 5.2.9), run this command in the terminal to check the current port number:
|
1 |
grep port /opt/trueconf/server/etc/database/postgresql.conf |
Export
Then, complete the following steps to export the database:
- Open the terminal (if it was previously closed).
- Sign in as the postgres user:
1sudo su postgres - Go to the database directory:
1cd /opt/trueconf/server/bin/database - Run the following command and specify the port that will be used:
1./pg_dump -p 5444 -c -C -d tcs -f tcs.dumpData export may take much time if a large number of chats is stored on the server. - Sign out of the postgres user account by running this command:
1exit - Move the file to the home directory or to a portable drive:
1sudo mv /opt/trueconf/server/bin/database/tcs.dump /home/$USER/server_backup
Later, we will refer to this folder as an example. To access it, run this command after copying all the data:
|
1 |
sudo chmod -R 777 /home/$USER/server_backup |
HTTPS settings
If you have configured HTTPS, the key and certificate files will be stored in the directory:
|
1 |
/opt/trueconf/server/etc/webmanager/ssl |
To save the backup copy of this folder, run this command:
|
1 |
sudo cp -R /opt/trueconf/server/etc/webmanager/ssl /home/$USER/server_backup |
Additional data
Conference and call recordings
When calls or conferences are automatically recorded on the server side, they are saved in the recordings folder. To find out the exact location, check the value of the Path field in the Recordings section of the control panel.
If you need to move them to a different server, just save the copy of the selected conference recordings. To do it, run this command:
|
1 |
sudo cp -R /opt/trueconf/server/var/lib/recordings /home/$USER/server_backup |
Chat files
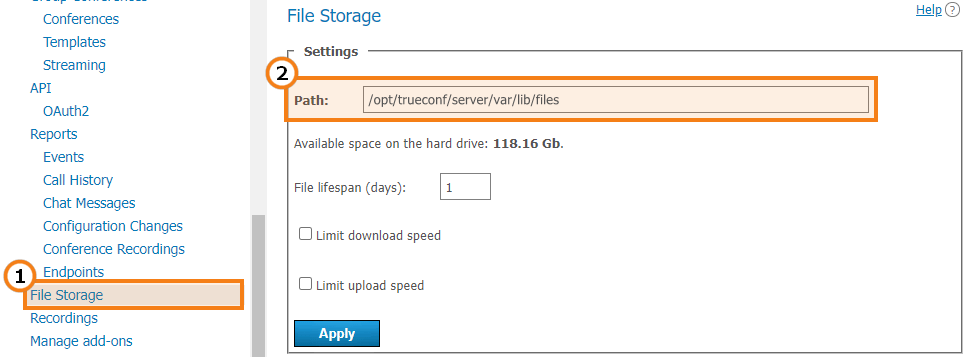
By default, the files sent by users in chats are saved in the files folder of the TrueConf Server working directory. To find out the exact location, check the value in the Path field of the File Storage section in the control panel:
If you want to move the files to a different server, save the backup copy of this directory. For example, to copy the chat files to the home directory of the current OS user, run this command:
|
1 |
sudo cp -R /opt/trueconf/server/var/lib/files /home/$USER/server_backup |
Log files
Log files are needed when contacting the technical support. For example, they may be needed to analyze the potential issues that could occur when using the previous instance of TrueConf Server.
The log files are stored here /opt/trueconf/server/var/log. To move, create the copy of all directories and files with the cp command:
|
1 |
sudo cp -R /opt/trueconf/server/var/log /home/$USER/server_backup |
User avatars
The avatars of registered users are stored in the avatars folder of the TrueConf Server working directory. Copy this folder to the selected location.
By default, this folder can be found here /opt/trueconf/server/var/lib. But, you can check it in the Dashboard → Settings section in the Work path sub-section.
Run this command to copy the directory:
|
1 |
sudo cp -R /opt/trueconf/server/var/lib /home/$USER/server_backup |
Step 3. Install TrueConf Server
Check out this article to learn more about the installation of TrueConf Server from a file and repositories.
Step 4: Importing data
Database
How to check the current port number
To ensure successful data import, you will need to specify the port used for.connecting to the database. The 5444 port is used by default.
Since the port could be changed at some point in the past (e.g., the port could be set to 5433 after updating TrueConf Server from versions earlier that 5.2.9), run this command in the terminal to check the current port number:
|
1 |
grep port /opt/trueconf/server/etc/database/postgresql.conf |
Import
Disable TrueConf services and restart the database service to close all active connections:
|
1 2 3 |
sudo systemctl stop trueconf-web sudo systemctl stop trueconf-manager sudo systemctl restart trueconf-db |
Later, to import the database, you will need to complete the following steps:
- Open the terminal (if it was previously closed).
- Copy the exported file to the directory with the database:
1sudo cp /home/$USER/server_backup/tcs.dump /opt/trueconf/server/bin/database - Sign in as the postgres user:
1sudo su postgres - Go to the database directory:
1cd /opt/trueconf/server/bin/database - Run the import command and specify the current port:
1./psql -p 5444 -f tcs.dumpThe data import may take much time, if a large number of chats is stored on the server. - Sign out of the postgres user account by running this command:
1exit
When all the data is imported, restart the following TrueConf Server services by running these commands consecutively:
|
1 2 3 |
sudo systemctl restart trueconf-db sudo systemctl start trueconf-manager sudo systemctl start trueconf-web |
HTTPS settings
- Copy the folder with the ssl key and certificate to this directory
/opt/trueconf/server/etc/webmanager/ssl. - Go to the TrueConf Server control panel.
- In the Web → HTTPS section, apply the same settings for the key and certificate.
Additional data
Copy other data saved in Step 1 to the corresponding directories:
- Calls and conference recordings — to the
recordingsdirectory of the working directory (set by default) - Chat files — to the
filesdirectory in the working folder (set by default) - Logs — to the
/opt/trueconf/server/var/logdirectory - User avatars — to the avatars directory in the working folder.
When all the settings are transferred, restart TrueConf Server:
|
1 2 |
sudo systemctl start trueconf-manager sudo systemctl start trueconf-web |
Step 5. Testing data migration
Go to the control panel and check if all the data (avatars, reports, chat messages, users, conferences and other types of information) were correctly imported. If some errors occurred , for example, you mistyped a command and some of the data was not exported, uninstall the server completely and repeat steps 2 and 3.
If all the data was successfully imported, please contact the technical support to reset the hardware key (HW key) to which your license is bound. TrueConf technical support will reset the hardware key for free. You will need to submit a ticket and specify the ID of your server. When the technical support resets the hardware key, please register the server again.
Happy video conferencing!


