How to configure Hyper-V on Windows Server 2012 R2?
TrueConf Server can be run on a virtual machine. However, it is complex and inadvisable to implement for inexperienced users, as enabling a virtual machine to operate correctly can be quite difficult at times.
This manual will teach you how to configure Hyper-V virtualizer on a Windows Server 2012 R2.
This article is for informational purposes only and does not guarantee an indispensable and full operation of TrueConf Server after following this instruction. TrueConf Technical Support does not advise users on configuring virtual machines and running TrueConf Server on them. A virtual machine is an external system, which does not depend on TrueConf application. Its configuration and support are entirely user’s responsibility.
Step 1: Verify hardware virtualization support
Hyper-V virtualizer is a hardware virtualization tool which uses a special processor-based architecture for virtualization purposes. Therefore, it cannot be launched on those processors which are not based on this architecture.
To check if your hardware supports hardware virtualization, open Windows PowerShell console, type systeminfo.exe, and press Enter.
After entering this command, a long list of current system settings will be displayed on the console screen. Check if Virtualization Enabled In Firmware is marked “Yes” in the last paragraph.
If this item is not marked as “Yes”, Hyper-V cannot be installed on your system.
Step 2: Add the server to the list of components
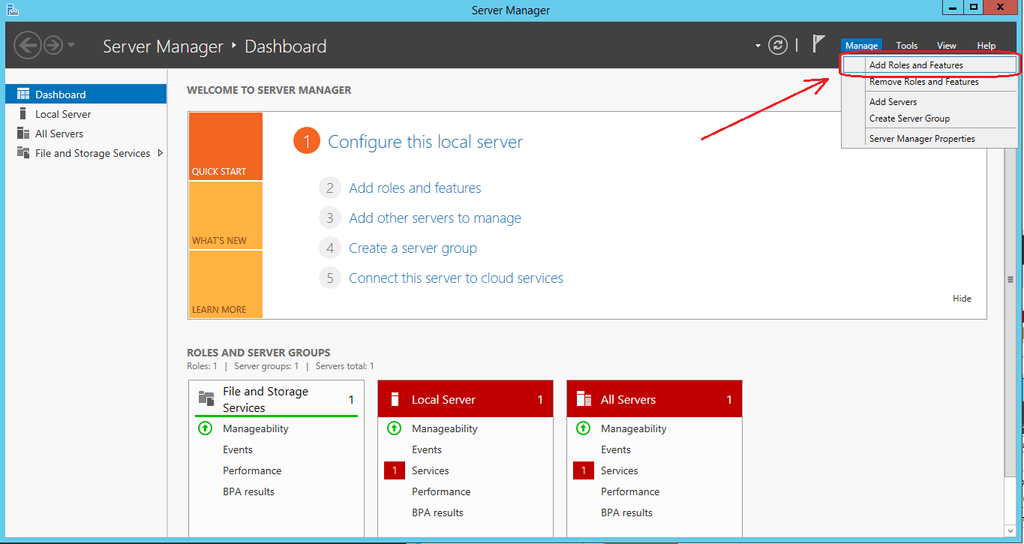
Open the Server Manager. Select Manage > Add Roles and Features in the top menu.
Select a server
In the Add Roles and Features Wizard, select Server selection and choose the required server in the left panel. If there is only one server, you don’t need to choose anything.
Server Roles
Proceed to Server roles menu on the left panel and check Hyper-V option. In the opened window check Include management tools (if applicable). After that, click Add Features button.
Components
In the Features menu, select the checkboxes required for Hyper-V operation:
- Remote Server Administration Tools
- Role Administration Tools
- Hyper-V Management Tools (both subitems)
Virtual Switches
In order for the virtual machine to interact with the network, you need to establish a connection between the virtual machine and the physical device that provides access to the network. Go to the Virtual Switches menu and select the network adapter that you want to use.
Default stores
In the Default stores section, select the default folders for the virtual hard drive files and virtual machine configuration files. To do this, create two separate folders. It is recommended to first format the drive they are located on.
Confirmation
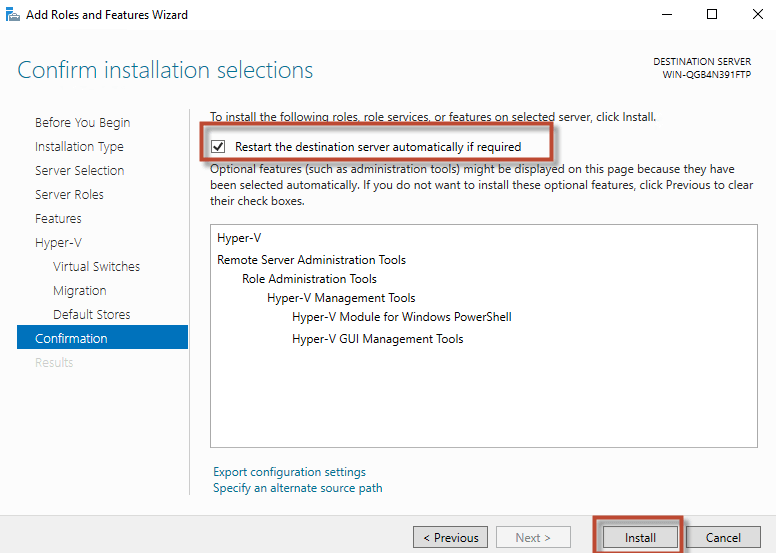
In the Confirmation menu, select the Restart the destination server automatically if required checkbox.
After that, click Install button below and wait until the installation is complete.
Add Roles and Features Wizard will inform you when the installation is complete after several system reboots.
Step 3: Create a virtual machine
Open Hyper-V Manager. On the right panel, click New > Virtual machine and fill in all the fields in the New Virtual Machine Wizard.
In the Configure Networking section, select the virtual switch we have chosen when adding a component to the Virtual Switches menu.
Step 4. Turn on the virtual machine
After finishing the configuration, return to the Hyper-V Manager. Click Connect in the right menu in your virtual machine group of buttons (in our example it’s called vm1).
In the opened window the message «Virtual Machine Disabled». will appear. To turn it on, click Action > Start in the window menu.
Step 5. Install TrueConf Server
After the successful configuration of the virtual machine, the last step is to install TrueConf Server it and start using it. With our simple manual, it won’t take you more than 15 minutes.


