


How to install TrueConf Server on Debian Linux
TrueConf offers you an opportunity to take full advantage of corporate video conferencing on various Linux-based operating systems including Debian. Only 64-bit versions of the OS are supported.
Security updates for versions older than 5.5
This section is specifically for users who are unable to install the latest stable release of TrueConf Server.
Security updates for other operating systems can be found in the corresponding articles linked at the beginning of this page.
If you want to update TrueConf Server which has already been installed, read this article.
TrueConf Server can also be installed:
- In a Docker containers
- On CentOS Stream
- On Windows
Mandatory preliminary steps
- TrueConf Server contains its own web server. To prevent any possible conflicts or clashes, please deploy TrueConf Server on a computer running on Linux without a pre-installed web server.
- Add the user who will install TrueConf Server and get access to the TrueConf Server control panel to your OS. You can use the account that was created when installing your OS.
To install TrueConf Server successfully, please make sure that there is no OS user whose login or name is trueconf.
- Fill out all the fields in the registration form.
- Click Submit & Download to receive your registration key on the email address you’ve specified.
The email containing your registration key will be sent within 15 minutes. If you cannot find the email containing your registration key in your inbox, please check the SPAM folder. You can also request the key via live chat or contact us in any other way convenient to you.
To run the commands listed below on behalf of the administrator, use the sudo program. Please note that by default sudo may not be available on your OS. To check if it is available, run the command sudo -V. If this program is not available, install it following the guide for your OS.
Step 1. Install TrueConf Server for Linux
Select the installation option for Debian
Two installation options are possible:
- Install manually from the downloaded file
- Add the TrueConf repository to your system.
Any TrueConf repository is available both via https and http. It is only necessary to replace the prefix in the repository address. The use of http may be helpful if https access is restricted at the OS level due to some reason.
Please note that if TrueConf Server is installed manually from a package (installation file), the repository will not be automatically added to the list of sources.
Manual installation from the package
Download the file for your OS:
Proceed to the directory with downloaded TrueConf deb-package and start the installation by running the following command in the admin mode:
|
1 |
sudo apt install -yq ./trueconf-server-name.deb |
where trueconf-server-name.deb is the name of the installation package.
During installation you will see the input field for entering the logins of those OS users who will be allowed to access the control panel as administrators. Enter the login of the user created before. It is possible to specify multiple logins (separated by commas) at the same time.
Install from repository
Debian 11, 12
- Run the following command to create the file
/etc/apt/sources.list.d/trueconf.listfilled with required content:1echo "deb [arch=$(dpkg --print-architecture)] https://mirror.trueconf.com/debian $(lsb_release -cs) non-free" | sudo tee /etc/apt/sources.list.d/trueconf.list > /dev/null - Run the sequence of the following commands in the admin mode:
1234wget -O- https://mirror.trueconf.com/deb.trueconf.asc | sudo gpg --no-default-keyring --keyring gnupg-ring:/etc/apt/trusted.gpg.d/trueconf.gpg --importsudo chmod 644 /etc/apt/trusted.gpg.d/trueconf.gpgsudo apt -y updatesudo apt -y install trueconf-server
Debian 13+
- Run the following command to create the file
/etc/apt/sources.list.d/trueconf.sourcesfilled with required content:123456echo "Types: debURIs: https://mirror.trueconf.com/debianSuites: $(lsb_release -cs)Components: non-freeSigned-By: /usr/share/keyrings/trueconf.gpg" | sudo tee /etc/apt/sources.list.d/trueconf.sources > /dev/null - Run the sequence of the following commands in the admin mode:
1234wget -O- https://mirror.trueconf.com/deb.trueconf.asc | sudo gpg --no-default-keyring --keyring gnupg-ring:/usr/share/keyrings/trueconf.gpg --importsudo chmod 644 /usr/share/keyrings/trueconf.gpgsudo apt -y updatesudo apt -y install trueconf-server
Attention! If you previously installed TrueConf application from the repository by using the .pub key (or an error occurs during public key verification), you first have to delete the old key by running this command:
1sudo rm /etc/apt/trusted.gpg.d/trueconf.gpgAnd repeat key installation.
Step 2. Add a user to get access to the control panel
The OS user for accessing the control panel (web-based interface) has to be specified when installing the package from a file or repository. When the input window is displayed, just enter the login of the user created before.
If TrueConf Server is installed on the machine which is added to the domain with the pre-existing user group tcadmins, you will not see the window for entering the logins needed for accessing the control panel. However, you need to make sure that the domain group tcadmins includes required users so that you can access the server settings.
Step 3. Installation test
Multiple TrueConf services (called daemons in Linux) will be added to the OS. Two of them are the web server trueconf-web and trueconf-manager, the manager working with the database and settings files. They are supposed to start automatically after installation. Run the following commands to check their status:
|
1 2 |
systemctl status trueconf-web systemctl status trueconf-manager |
If necessary, you can start them manually by running these commands:
|
1 2 |
systemctl start trueconf-web systemctl start trueconf-manager |
The main trueconf service cannot be started until the server is registered. So, at first, one should configure access to the control panel.
Step 4. Access to the control panel
If you are within the local (corporate) network, take these steps:
- Learn the IP address of the computer with Linux by running this command
ip a. - From another computer within the local network, go to the page of the installed server by using its IP and proceed to registration. If the page is unavailable, try changing the access port.
If you are installing TrueConf Server on a remote computer outside the local network, e.g., a cloud-based virtual machine, you will need to edit the settings file to access the control panel. Due to security reasons, the control panel is available only inside the local network. To get access to this virtual machine from your computer, you will need to:
- Learn the external IP address of your PC with the help of any suitable service; for example, you can open this hyperlink in your browser https://whoer.net/
- Open the file below with any text editor (e.g., nano) as an administrator:
1/opt/trueconf/server/etc/webmanager/opt/local_only_admin_24.conf
- Add this line
Require ip x.x.x.x/32wherex.x.x.xis the external IP address. As a result, the file should look like this:12345678910111213<Location /admin>Require localRequire ip 10.0.0.0/8Require ip 192.168.0.0/16Require ip 172.16.0.0/12Require ip x.x.x.x/32</Location> - Restart the TrueConf Server web service with this command:
1systemctl restart trueconf-web
If you keep getting redirected to the login page after typing in your username and password, give incognito mode a shot (sometimes your browser cache can mess with the authentication flow).
Step 5. Register your server
- Since TrueConf Server is not registered yet, an admin login page will first be displayed when accessing by IP (check step 4). Sign in with the user account you have previously created:

- On the page that opens enter your registration key in the corresponding field and register your server.

If you want to update TrueConf Server to a major version (the first two digits change, e.g., from 4.5 to 4.7 or from 4.7 to 5.0) you will need to re-register your TrueConf Server instance. Contact our technical support in any convenient way and share your server ID for us to reset the binding. After that you can re-register your TrueConf Server instance with your key.
Step 6. Start your server
After you’ve registered your server, it will restart automatically. The corresponding message will be displayed in the Server status field.
You can also view your server status directly in Linux by running the following command:
|
1 |
systemctl status trueconf |
Step 7. Add users and create conferences
Read the TrueConf Server documentation to take further steps:
🆘 FAQ
Error with gnupg while installing on Debian
If the operating system does not have the gnupg cryptographic utility pre-installed, the following error will appear:
|
1 |
E: gnupg, gnupg2 and gnupg1 do not seem to be installed, but one of them is required for this operation |
In this case, install the missing package by running the following command:
|
1 |
sudo apt install gnupg2 |
Error after entering the administrator login
If you type a non-existing login by mistake when entering the administrator login, the installation on Debian may end with the following error:
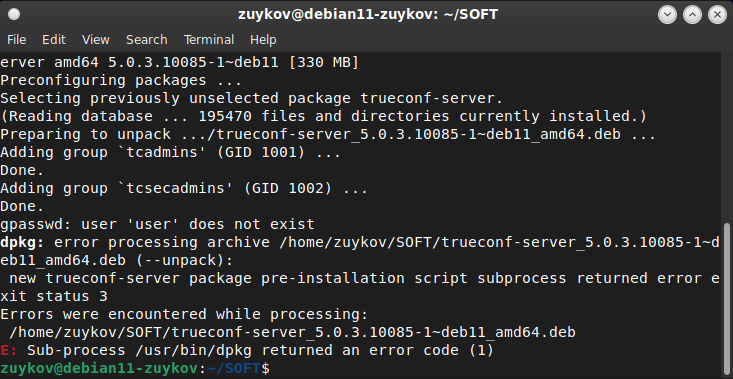
In this case you need to run the following command as a superuser:
|
1 |
echo PURGE | sudo debconf-communicate trueconf-server |
This command will clear all the data about the package settings from the OS. Please check the official documentation for more details.
Then, start the installation process once again.
Changing the access port for the control panel
By default, the server control panel is available via the standard HTTP 80 port and it does not have to be specified. However, if you cannot access the panel by IP, it means that the port 80 had already been taken at the moment when TrueConf Server was installed, and it is necessary to replace the port with a different one (e.g., 8080 or 8888).
- Go to the
/opt/trueconf/server/etc/webmanager/directory with superuser rights. - Open the
httpd.conffile with any text editor. - Change the port number in the
Listen </port number>parameter (e.g.Listen 8888) and save changes. - Open the
/opt/trueconf/server/etc/manager/manager.tomlfile with any text editor and specify the same port in theconnectionparameter:12[web]connection = "http://127.0.0.1:8888" - Please restart trueconf-manager and trueconf-web services using the following commands:
12sudo systemctl restart trueconf-managersudo systemctl restart trueconf-web
After changing the port and restarting the web service, try again to access the control panel.
How to add users allowed to access the control panel after installation
- Run this command:
1adduser [user_login]
where
[user_login]is the login of the user who will be added. - When a command prompt is displayed, enter and confirm your password.
- If necessary, you can provide additional information about the user, e.g., his/her full name, phone number, etc.
More useful articles
Find other helpful guides on TrueConf software solutions in our knowledge base.
If you have any questions, please contact us at sales@trueconf.com or reach us by phone at +1 (833) 878-32-63. We are always happy to help!
Other Resources:
Dimitrii Zuikov
Date published: 09.06.2025