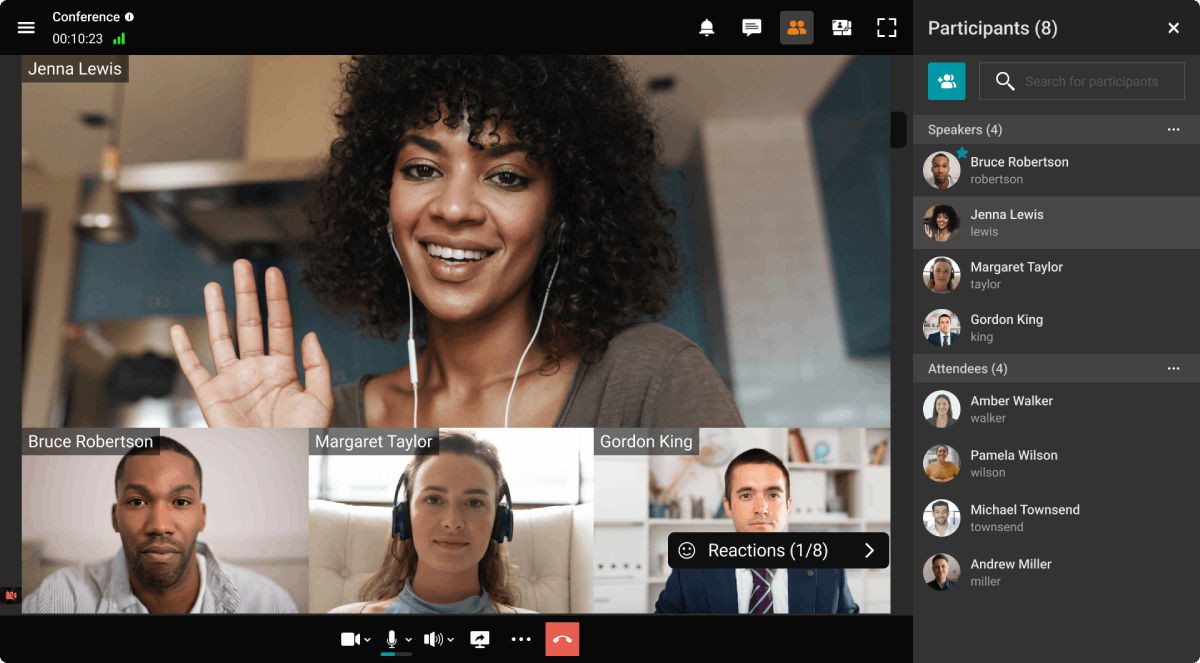
How to integrate Jitsi video conferencing into Rocket.Chat. Full Guide
Why should I integrate Jitsi with Rocket.Chat?
Rocket.Chat is a free messenger designed to be deployed in the local network (on premises). This form of deployment ensures full security of user communications since they are completely inaccessible to outsiders.
By default, this messenger does not support video conferencing. If necessary, this feature has to be added manually. A popular approach is to try the official integration of Rocket.Chat with the Jitsi video conferencing platform. After some configuration, this solution will allow users to make calls and hold group conferences right in the Rocket.Chat application.
In this article we will show how to deploy Rocket.Chat and Jisti in the local network and configure integration between them.
Advantages of video conferencing in a business chat
Integration of video conferencing into a corporate messenger can offer multiple advantages:
- Personal interaction: video communication allows participants to see each other which makes communication more close and effective.
- Get your points across quicker: instead of writing long chat messages, you can show slides and display your product.
- Effective meetings: video conferences can replace in-person meetings, save time and resources, and enable managers to organize teamwork in a geographically distributed company.
Integration problems and solutions
Below, you can find the list of problems that may occur when integrating Jitsi with Rocket.Chat. We have also described a possible solution to each of these problems:
- Technical complexity. To configure integration correctly, one has to have in-depth knowledge of OS administration (including Linux). If configuration is done by a regular employee without experience in system administration, he/she will have to study technical documentation or contact an expert in this field.
- Compatibility issues. Since Jitsi and Rocket.Chat are two separate solutions, many features may work incorrectly after integration. So, one should thoroughly test all features before the full-scale adoption of video conferencing.
- Security of communications. To ensure secure video communication, one has to deploy and configure the Jitsi server in the local network. Otherwise, video conferencing will be set up in the cloud Jitsi service which is often not the best option for business users.
Out-of-the box alternative
There are alternative solutions that provide similar or even more features; besides, they do not require any additional configuration. TrueConf Server is one of these solutions. Similar to Rocket.Chat, it is intended to be deployed on premises which ensures full security and confidentiality of your communications. Besides, TrueConf Server offers users many advantages:
- Video conferencing is supported by default and no additional configuration is needed.
- Multiple video conferencing modes each of which may be helpful under some circumstances.
- Corporate messenger providing features comparable to those of Rocket.Chat.
- Webinars with guest participants who are not registered on your server.
- Higher security of communications due to the use of the proprietary protocol for transmission of audio and video streams.
- 4K (UltraHD) conferences.
- Full support of SIP/H.323 including streaming via BFCP/H.239.
- Ability to set mandatory registration for guest participants of your webinars.
- Video recording tools (available to participants and the server administrators).
- Automatic syncing of the user list on the video conferencing server via LDAP, for example, from Microsoft Active Directory.
- Extended meeting management capabilities available to moderators: they can control participants’ AV devices and change the video layout on the go.
- Use of multiple cryptography algorithms and protocols (AES, HTTPS, SSL/TLS, SRTP, H.235) which removes the need for additional modules and time-consuming configuration.
So, TrueConf Server will offer you a corporate-grade meeting solution that works right off the shelf.
Rocket.Chat installation
There are multiple ways of deploying Rocket. Chat on your server. We will discuss the deployment in a Docker container. According to the official documentation of Rocket.Chat, this installation method is a recommended option as it offers multiple advantages:
- In comparison with native installation, the use of Docker allows Rocket.Chat to be deployed on a larger number of operating systems.
- Deployment takes much less time.
- This form of deployment will remove all difficulties that may arise during manual installation. For example, manual installation does not guarantee stable performance when all dependencies are installed and updated. The use of Docker will eliminate these risks.
- It is possible to control the state of the container on the fly without having to make any changes in the OS.
Step 1. Docker installation
First, you need to install Docker on your system. The official guide provides detailed instructions for different operating systems. Later, we will show how to deploy this solution on Debian 11 as it is one of the operating systems supported by Jitsi.
-
Update the lists of repositories:
1apt update
-
Install the packages needed for downloading Docker files from the repository via HTTPS:
1apt install apt-transport-https ca-certificates curl software-properties-common
-
Add a GPG key for the Docker repository:
1curl -fsSL https://download.docker.com/linux/ubuntu/gpg | sudo apt-key add -
-
Also add the Docker repository to your system:
1sudo add-apt-repository "deb [arch=amd64] https://download.docker.com/linux/ubuntu focal stable
-
Next, update the repository once again:
1apt update
-
Install Docker:
1sudo apt install docker-ce
Step 2. Docker Compose installation
We will use the official Docker image of Rocket.Chat. To control the deployment of the software, use Docker Compose, the software needed for running multi-container applications.
Since the Docker repository has already been added to the system at the previous step, you will only have to run the following command to install Docker Compose:
|
1 |
apt install docker-compose-plugin |
Step 3. Creating Docker Compose configuration file
Docker Compose requires a configuration file. This file is needed for starting Docker containers. Here is how you can create it:
-
In the home directory, create the directory
rocket.chat:12cd ~mkdir rocket.chat && cd rocket.chat -
Create the configuration file
docker-compose.yml:1touch docker-compose.yml -
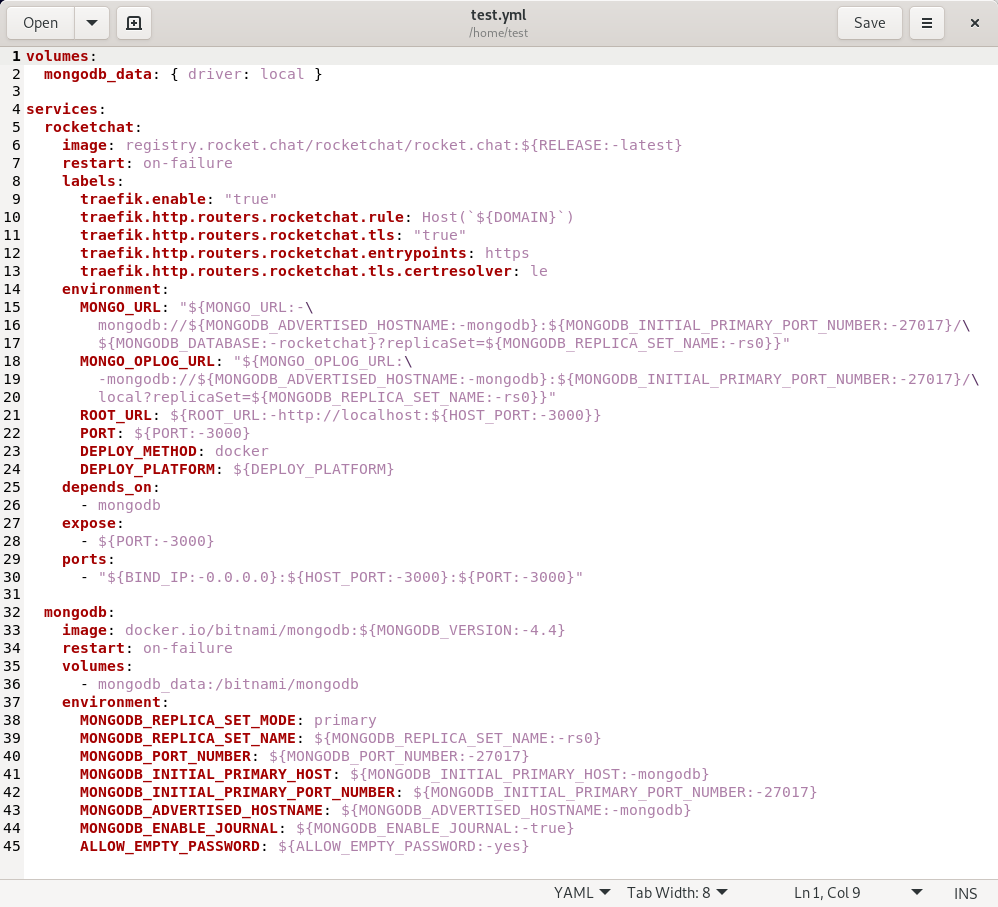
Open the file in the preferred text editor and insert the configuration template from the official Rocket.Chat repository at GitHub.
This configuration consists of multiple fields needed for setting various properties of Docker Compose. Every field is represented as a key:value pair, but some of them are represented in the following format:
${PARAM_NAME:-POSS_VAL}where:
PARAM_NAME– the parameter namePOSS_VAL– the possible value of the parameter.
All similar constructions should be replaced with the corresponding data. For example, if the template includes the following line:
1path/to/your/server:${PORT:-3000}you need to insert the port number in this line. In case you want to specify 3000 as a value for the port, you will need to modify the line in this way:
1path/to/your/server:3000Please note that all such instructions should be replaced with the data corresponding to your environment; otherwise, it will be impossible to run the Rocket.Chat container. -
In the services → rocketchat→ image field, enter the version number of Rocket.Chat that you want to use. You may also enter the latest keyword if you do not want to use any specific version. In this case, the field will look in the following way:
1image:registry.rocket.chat/rocketchat/rocket.chat:latest
-
In the services → rocketchat → environment → MONGO_URL field, specify the URL for connecting to MongoDB. By default, it will look in the following way:
1mongodb://mongodb:27017/rocketchat?replicaSet=rs0If you are not going to make any additional configuration of the database, you can use the default URL.
MongoDB uses the port 27017 by default. If this port is taken, specify a different port in the connection URL However, in this case, you will need to specify this port in the MONGODB_PORT_NUMBER and MONGO_OPLOG_URL fields. -
In the services → rocketchat → environment → MONGO_OPLOG_URL field enter the URL for connecting to MongoDB logs. By default, it will look in this way:
1mongodb://mongodb:27017/local?replicaSet=rs0
- In the services → rocketchat → environment → ROOT_URL field enter the URL for accessing Rocket.Chat. In the services → rocketchat → environment → PORT field enter the port that will be listened to by the Rocket.Chat server.
- In the services → rocketchat → expose field you will also need to specify the port that the Rocket. Chat server will listen to. In the services → rocketchat → ports field, enter the IP address of the machine where Rocket.Chat is deployed and the range of ports that it will be able to use.
-
Next, you will need to configure the settings for starting and replicating MongoDB.. To do it, specify the version of MongoDB that you want to install in the services → mongodb → image field. Then, enter the following values in the fields from the services → mongodb → environment section:
- In the MONGODB_REPLICA_SET_NAME field, enter the name of the MongoDB server cluster. If you do not want to use any specific name, you may select the default name rs0.
- In the MONGODB_PORT_NUMBER field, specify the port number that will be listened to by the MongoDB server. It will be 27017 by default.
- In the MONGODB_INITIAL_PRIMARY_HOST field, specify the alias for the machine where the primary instance of MongoDB is deployed.
- In the MONGODB_INITIAL_PRIMARY_PORT_NUMBER field, enter the number of the port that will be listened to by the main instance of the database.
- In the MONGODB_ADVERTISED_HOSTNAME field, you can enter the default value mongodb.
- In the MONGODB_ENABLE_JOURNAL field, enter the true value, if you need to log the database or false if logging is unnecessary. This value should be put in quotation marks.
- In the ALLOW_EMPTY_PASSWORD field, enter yes if you want to access the database without having to enter the password and no otherwise.
Step 4. Start Rocket.Chat
-
Open the terminal and go to the directory when the configuration file of Docker Compose was previously created:
1cd ~/rocket.chat
-
Run this command as a superuser:
1docker compose up -dDocker will launch all the containers needed for Rocket..Chat.
- If the above command was successfully executed, you will see the notification indicating the start of Rocket.Chat. Open the browser and go to the URL address specified in the ROOT_URL configuration file of Docker Compose.
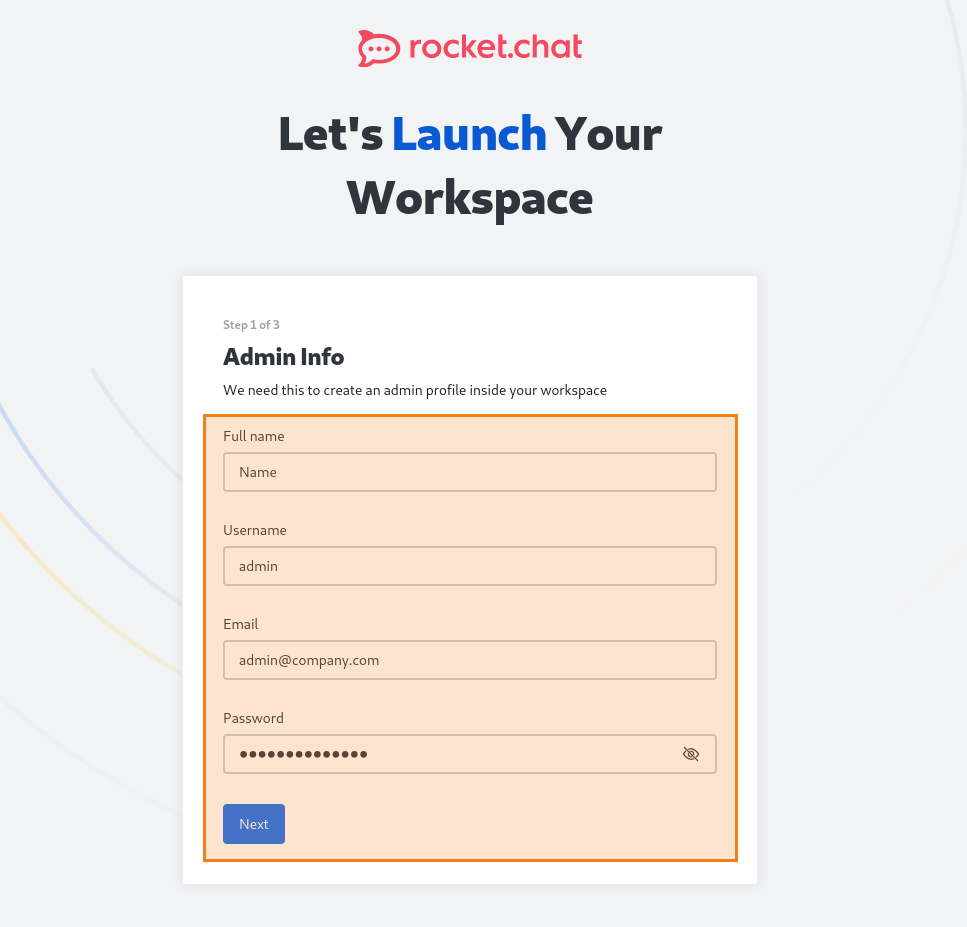
- Before using the Rocket.Chat, create the administrator account.
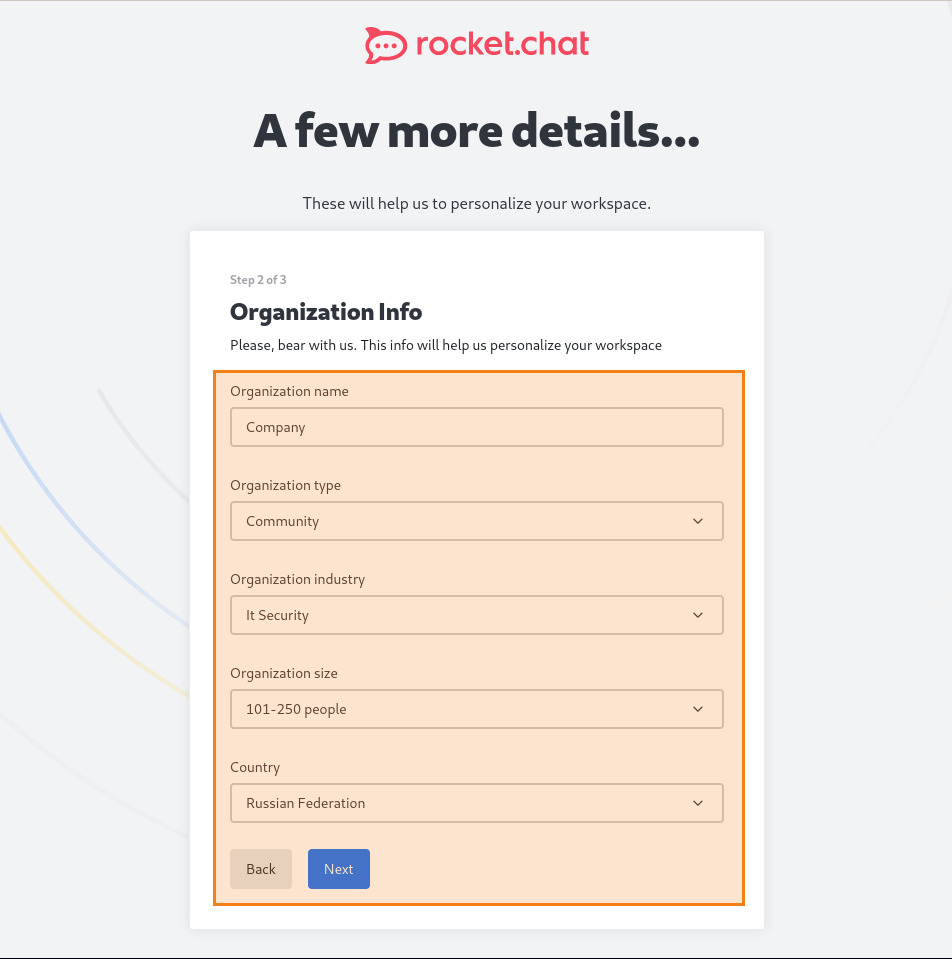
- Next, provide information about your organization:
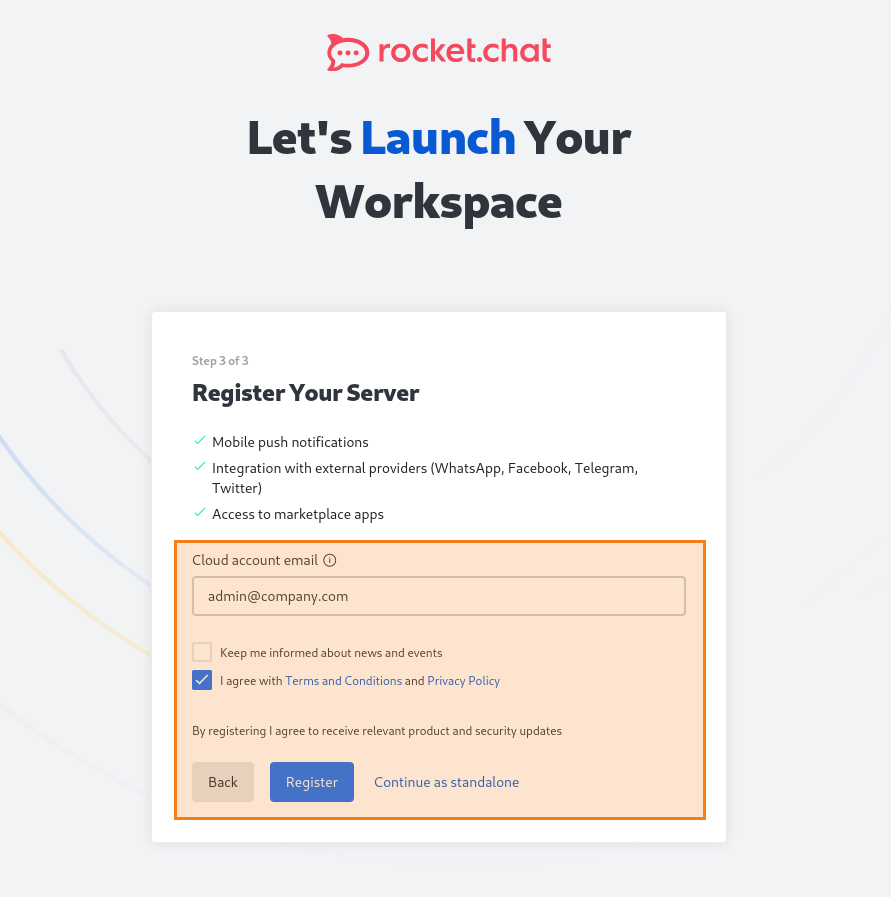
-
You will also be offered to create a workspace. This task is required. To do it, click on the Register button.
Then, follow the link sent to your email from Rocket.Chat. After that, your workspace will be registered.
Integration with Jitsi will be impossible without creating a Rocket.Chat workspace.
Jitsi Installation
There is an article in our knowledge base describing the deployment of the Jitsi video conferencing server. Check this article to find the corresponding instructions.
Jitsi integration into Rocket.Chat. Step-by-step guide
To integrate Jitsi video conferencing into Rocket.Chat, please take the following steps:
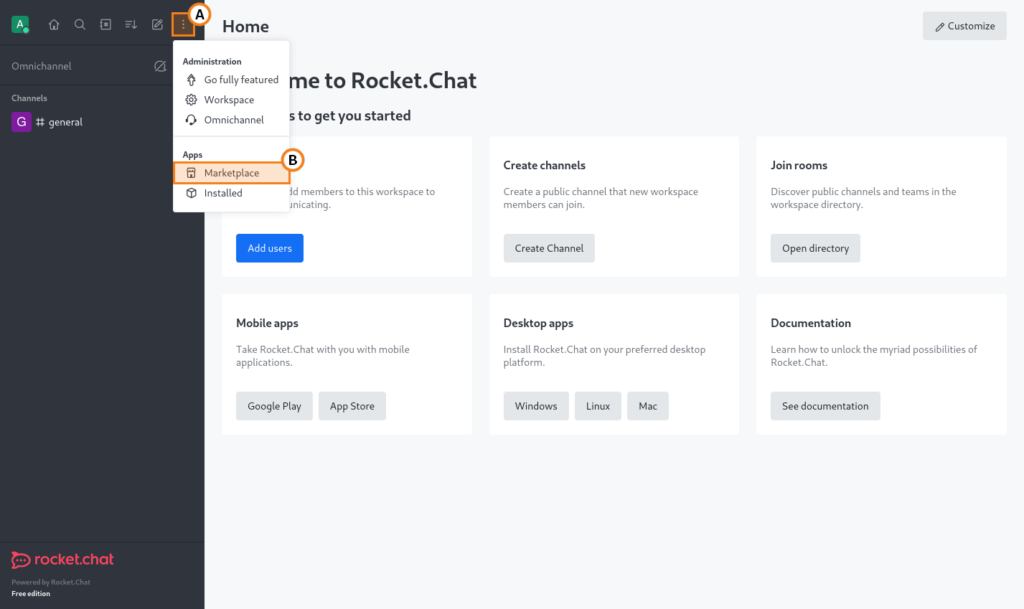
- Sign in to Rocket.Chat as the administrator.
-
Click on the button
 in the main main menu and select Marketplace in the drop-down menu:
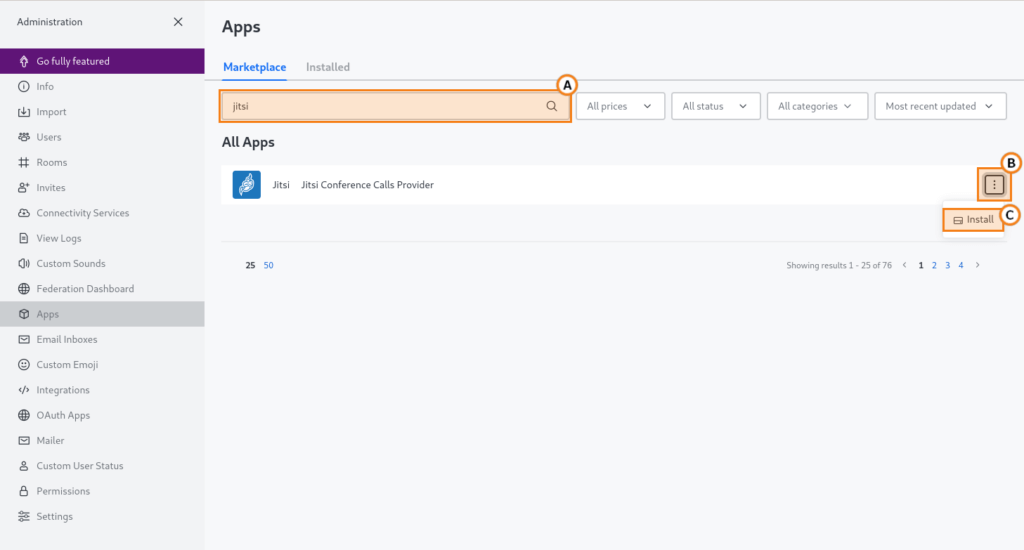
-
Enter the word Jitsi in the search field and then click on the icon button
 near the search line and select the Install option in the opened menu:
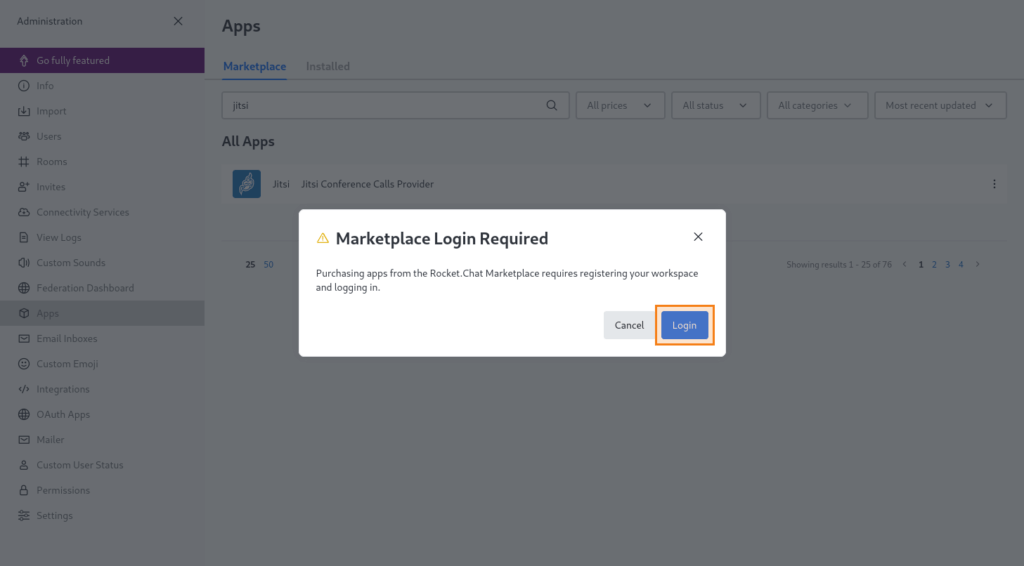
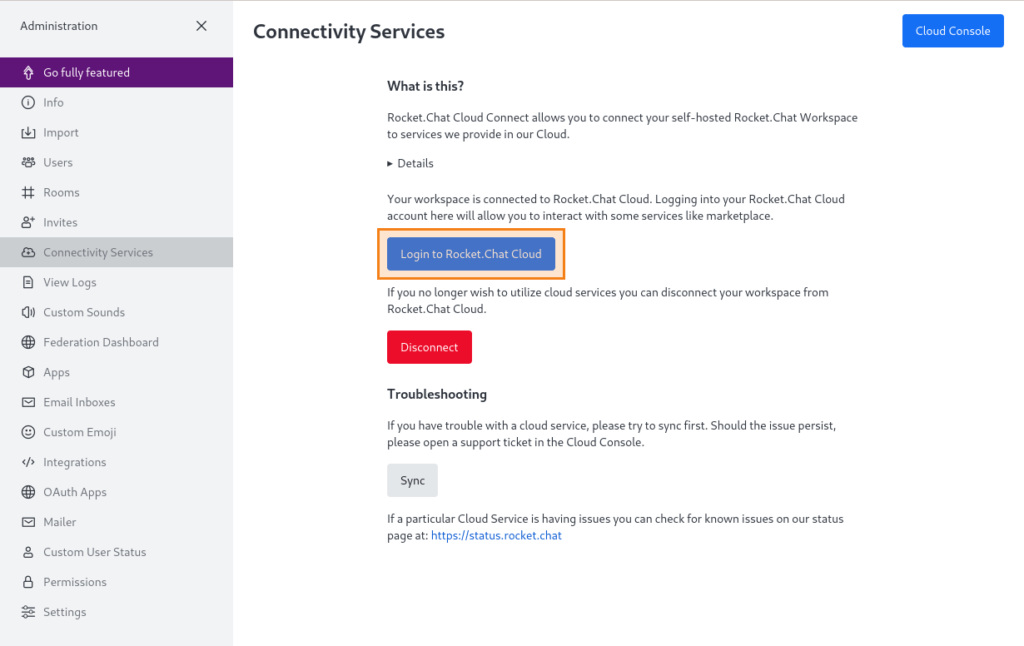
- If you see a pop-up window requiring workspace authorization, click on the Login button; otherwise proceed to Step 8.
- Click Login to Rocket.Chat Cloud:
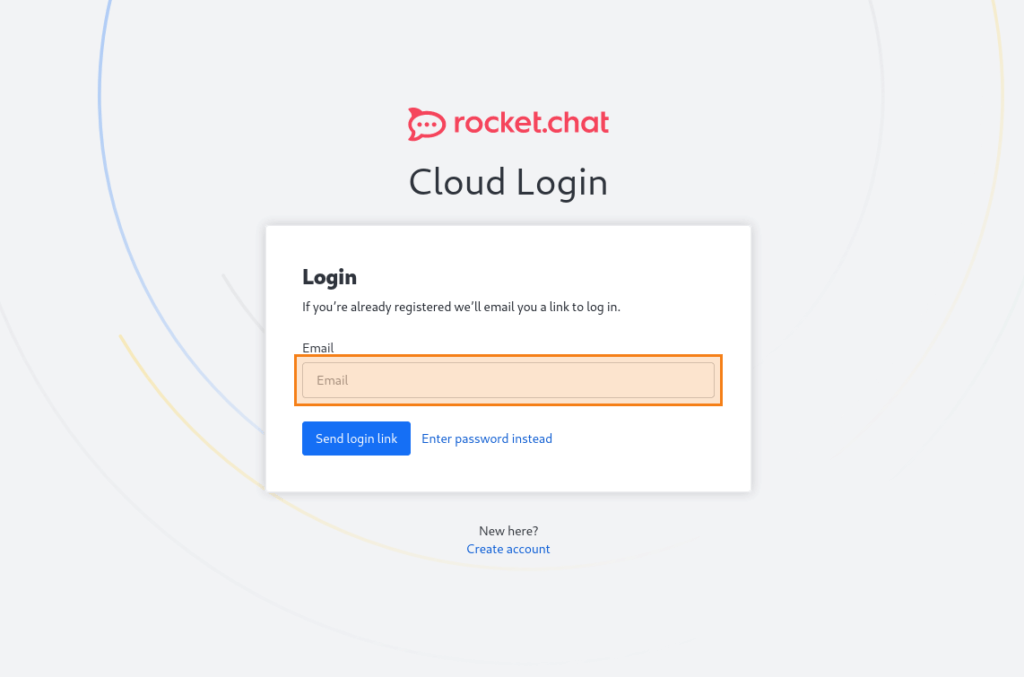
- On the opened page, enter the email address used for registering the workspace and then click on Send login link:
- Then, follow the link sent to your email. Sign in to the workspace. Now go back to the Rocket.Chat homepage and take steps 2 and 3 from this instruction.
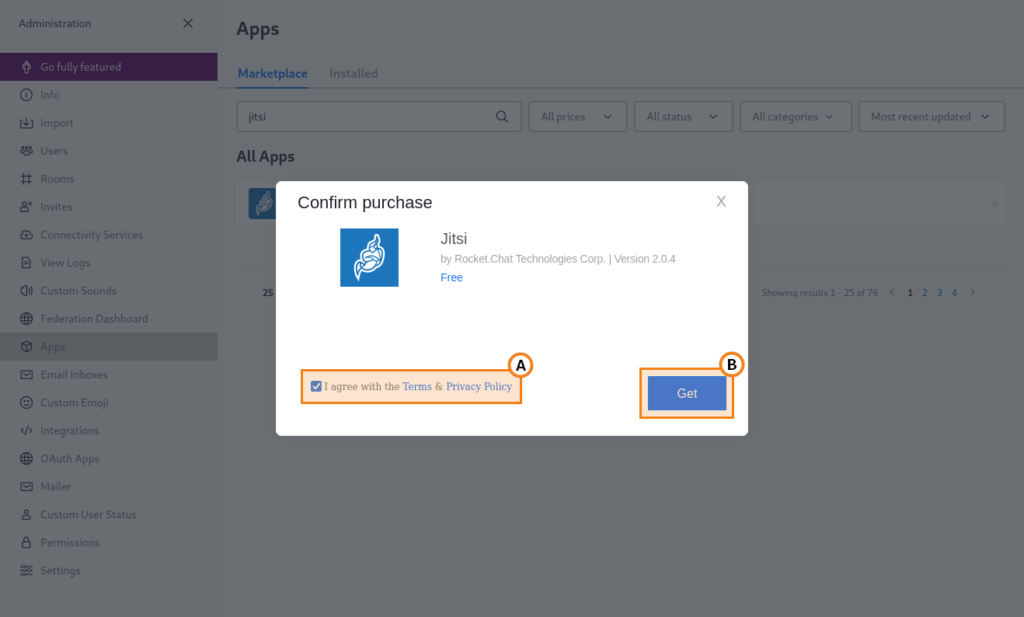
- In the pop-up window mark the flag to give your consent to the terms of use and click on the Get button:
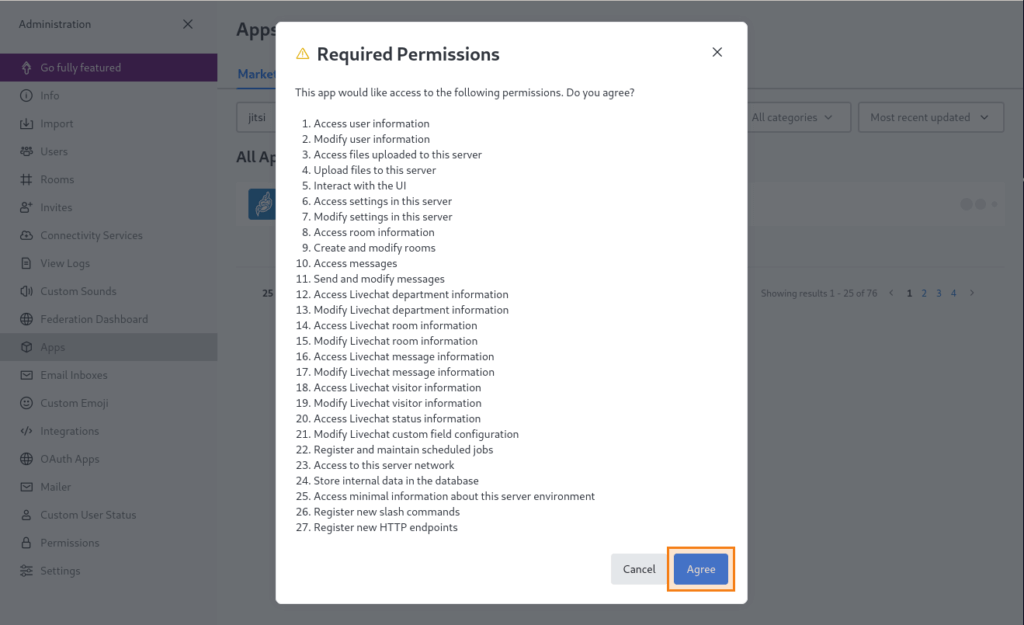
- Give all permissions required by Jitsi and click on the Agree button:
- Go to the page providing information about Jitsi (click on its name in the list applications).
-
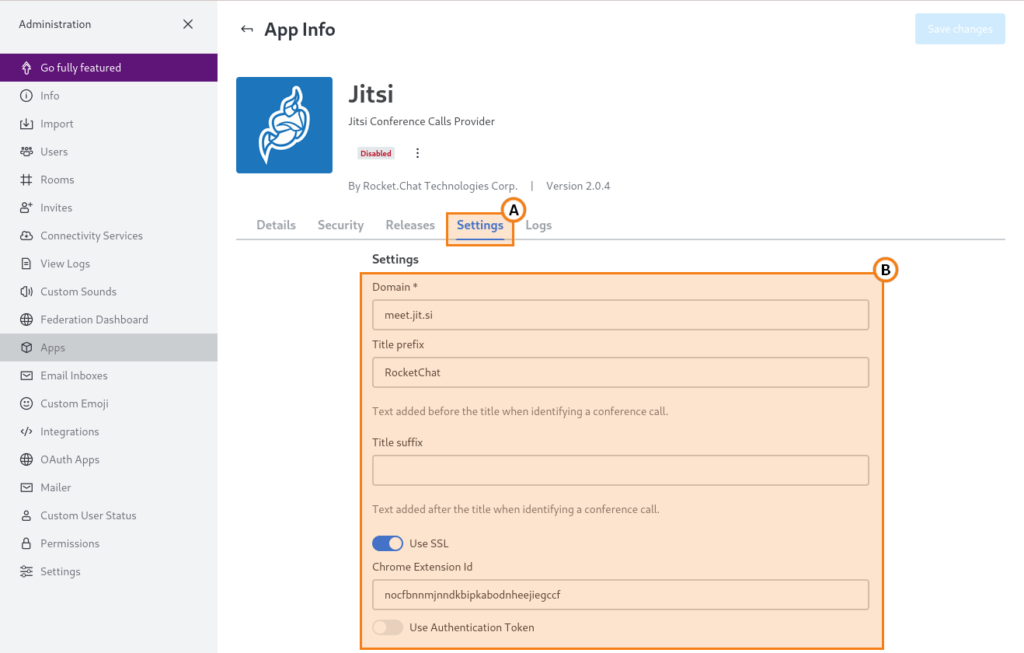
Select the Settings tab to configure parameters for connecting to the Jitsi server:
Domain is the only required field in this form: here, you will need to enter the address of the Jitsi server that you want to connect to. Other fields are not required. Their use is described in the official documentation. After completing the configuration, click on the Save changes button.
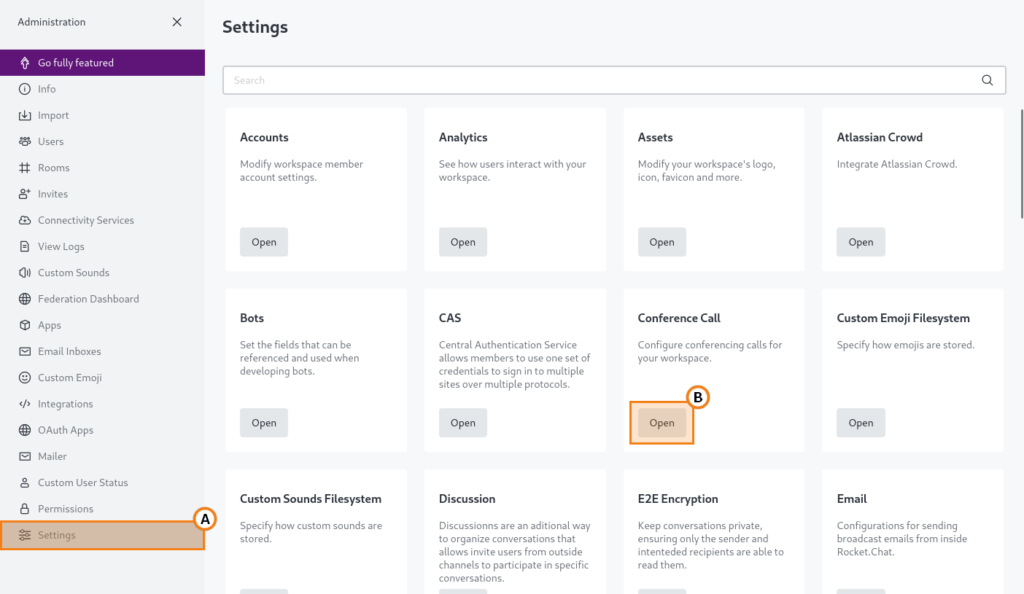
- Then, select the Settings option in the lower part of the Rocket.Chat control panel. In the Conference call section, click on the Open button.
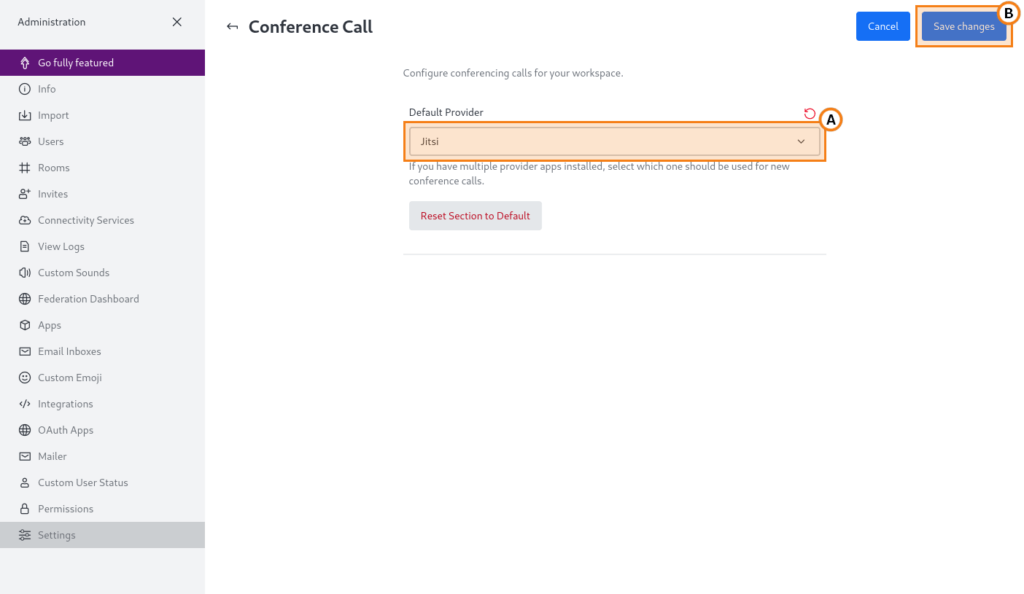
- On the opened page, select Jitsi in the Default Provider drop-down list and then click Apply:
Testing Rocket.Chat and Jitsi integration
Now the users of your Rocket.Chat instance will be able to make one-on-one video calls and hold conferences with the help of Jitsi right from Rocket. Chat. To test this feature:
- Sign in to Rocket.Chat with any user account. Check the official developer documentation to learn how a new account can be added.
-
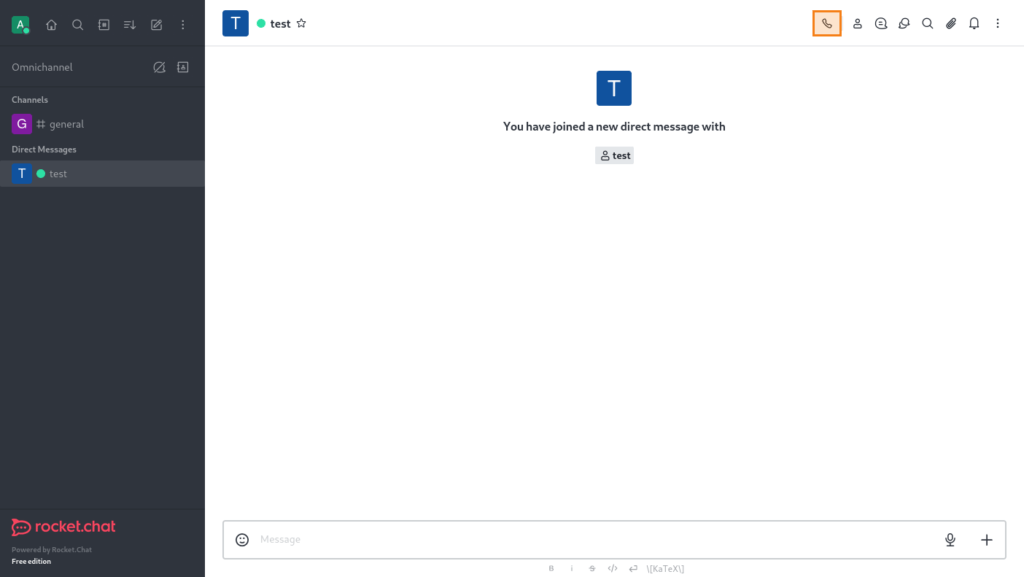
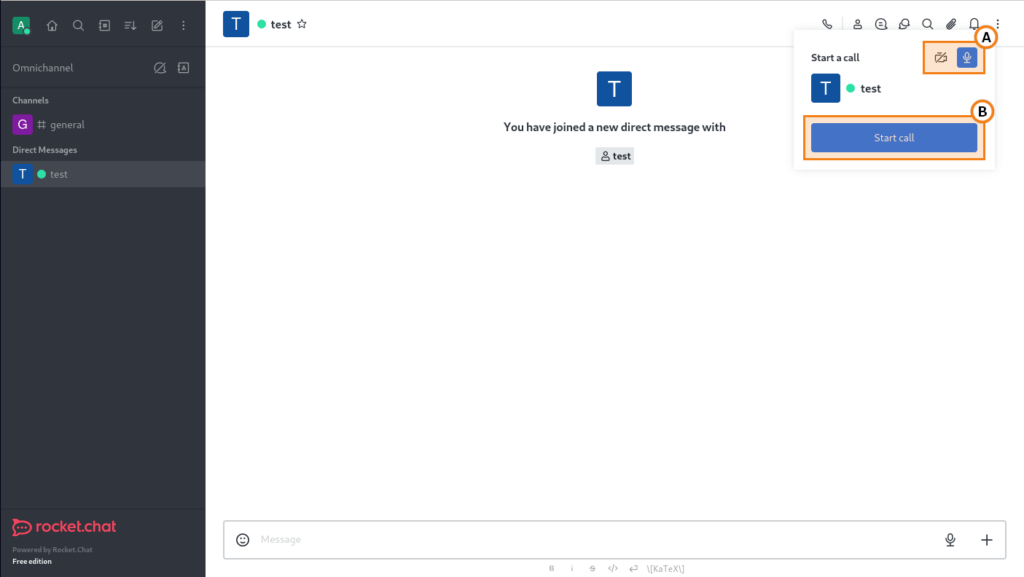
Go the the chat with any other user and click on the call button
 in the control panel.
- You can select audio and video devices that will be used during a call in the new menu. Then, click on the Start Call button.
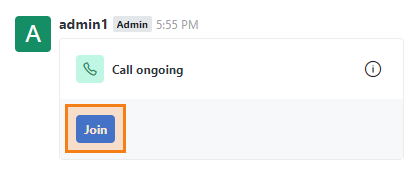
- Allow the application to access the selected AV devices (you will see the corresponding request). Then, you will be able to continue with the video call.

