How to set up conference streaming via Wowza Streaming Cloud
With TrueConf Server, you can stream your conference to Wowza Streaming Cloud via the RTSP protocol. Streaming is available for both private and public conferences.
To hold such events, you will need to add the Live streaming extension to your license.
In this article, we will discuss the main stages of conference streaming.
Stage 1. Adding a stream
- Go to Wowza Media Systems website. Sign up, if you do not have an account on this platform.
- Open the website of Wowza Streaming Cloud. To authorize, you will need to use the account created previously. Select Add Live Stream
 in the menu on the left side.
Stream configuration
- In the first tab Live Stream Setup, enter the stream name, select the location which is nearest to you and click Next.
- In the Video Source & Encoder tab:
- Select RTSP as a camera/encoder.
- Specify Push Stream as a stream mode.
- Select the resolution in which your video will be streamed.
- Check the box Save to Asset Management to record the stream.
- If necessary, disable authentication by unchecking the box in the Source Security section.
- Configure the stream player in the Playback Settings tab.
- Customize the UI in the Player Appearance section: play button, availability of additional buttons, (audio volume, mute, full screen mode).
- Choose the date, time, and timezone of the stream.
- If necessary, set a countdown by checking the box Display a countdown clock in the player before the event.
- Select a poster (image that will be displayed in the player before the start of the stream), logo and its position (the logo will be displayed in the player during the entire stream).
- Configure the stream page in the Hosted Page Settings tab.
- Heading and logo.
- Brief description.
- Display of additional icons for contacts (the host’s social network accounts and email).
- Check information about the stream in Review Settings. If everything is specified correctly, click Finish.
Stage 3. Scheduling on the conference page
When the stream is created, its page will automatically open. One can also go to this page by clicking on the button in the Available streams ![]() menu which is on the left side.
menu which is on the left side.
There are two important tabs on the stream page:
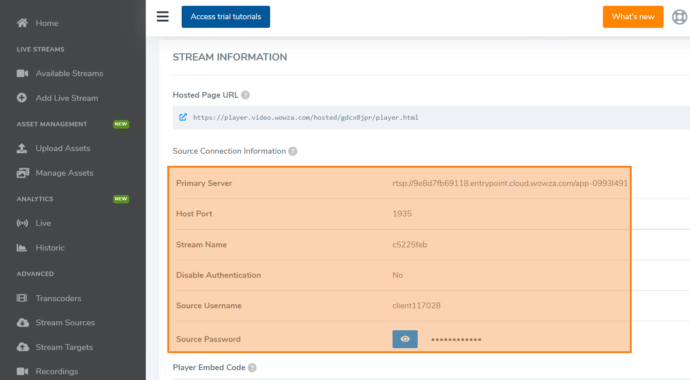
- Overview: here, one can find the data that will be later needed for the configuration of TrueConf Server.
- Hosted Page: here, you may check the link to the page with the media player, if the display of this link was not set up previously.
Stage 4. Stream configuration on the side of TrueConf Server
Getting the stream template ready
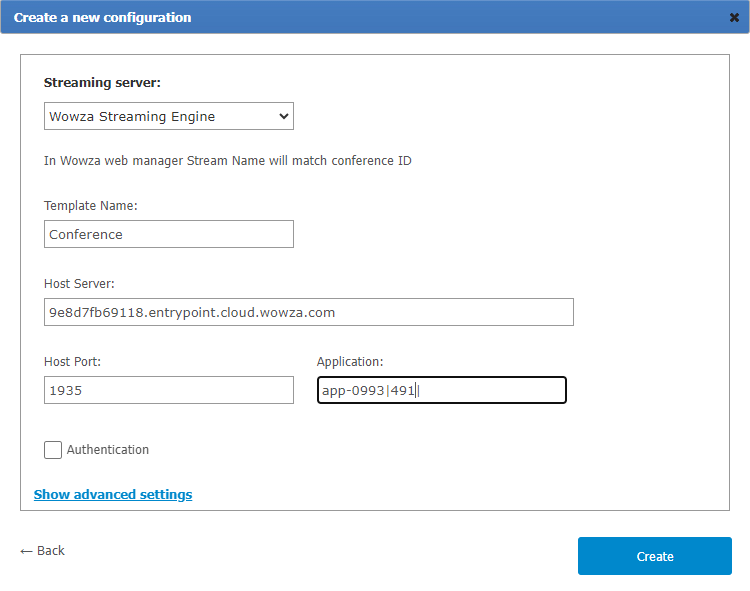
- In the TrueConf Server control panel, go to the Group Сonferences → Streaming section and click the Add a configuration button.
- Select the Add preset option in the opened menu.
- Fill out the form for the stream configuration template by specifying:
- Wowza Streaming Cloud in the Streaming server field.
- Data received at stage 3 in the Primary Server, Host Port, and Stream Name fields.
- To save the template, click Create.
Creating a conference
Create a conference in the Group Сonferences section by following TrueConf Server documentation guidelines.
- Go to the Advanced tab on the conference edit page.
- Check the Enable streaming box.
- Select the stream template created during Stage 4 in the preset selection field.
- Save the conference.
Stage 5. How to launch streaming
Click Start Live Stream on the stream page of Wowza Streaming Cloud (see stage 3).
- Open the TrueConf Server control panel (Group Conferences → Conferences List section), select the conference you created and click Start.
- The stream of the selected conference will start automatically via Wowza Streaming Cloud and will be available on the page of this event.


