How to Register SIP and H.323 Devices on TrueConf Server
You can easily register an SIP and H.323 device on TrueConf Server. Once the registration is complete, calling this device from our client applications will be no different from calling a regular user.
We will explain how to register SIP and H.323 devices on TrueConf Server. Such applications as PolyCom RealPresence Desktop, Yealink VC Desktop and Bria will be used as an example (these applications are available for Windows, macOS, and iOS/Android). In the case of Linux, you can use Linphone; it can be configured in a similar way.
Registering SIP and H.323 Devices on TrueConf Server
The process involves two steps:
- TrueConf Server administrator creates a user account for an SIP or H.323 device to be registered on the server.
- The device is authorized with the newly created account.
Next, we bring only the second step into focus. Learn more about the first step in TrueConf Server documentation.
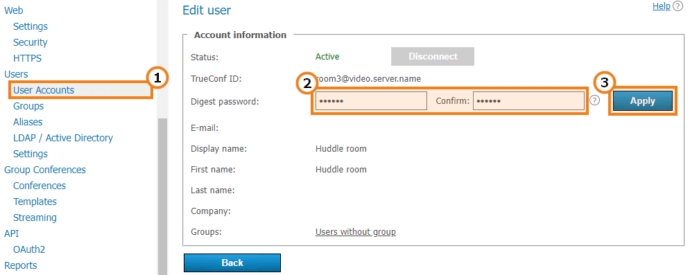
Please note that if TrueConf Server is run in LDAP mode, a user account has to be created for an SIP/H.323 endpoint on the LDAP server. Then, you will need to take the following steps:
- Go to the user profile created for the device.
- Enter the digest password.
- Click on the Apply button.
The digest password should be used later when authenticating on the endpoint side.
Authorization on the side of SIP/H.323 Device
Polycom RealPresence Desktop via SIP
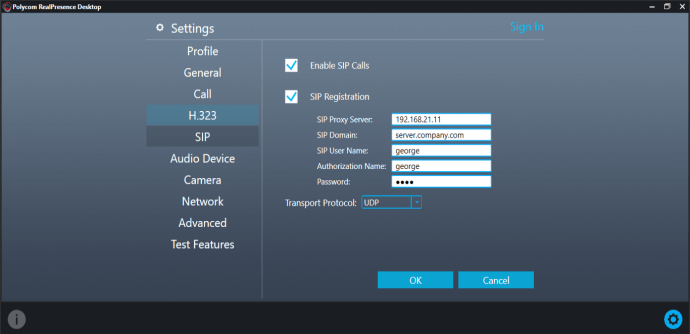
- Go to settings by clicking
 .
. - Go to the SIP section.
- Check the SIP Registration box.
- Enter:
- SIP Proxy Server and SIP Domain — IP address or domain name of a TrueConf Server instance you are registered on.
- SIP User Name, Authorization Name — your username in the account on your TrueConf Server instance (the first part of TrueConf ID).
- Password — password for this account.
Our blog post will also help you understand how to call TrueConf users from a Polycom endpoint.
Bria Application via SIP
Bria (formerly X-Lite) is an application for SIP calls. It should be configured in the personal area on the vendor website. When the program is used, the settings are downloaded via the Internet from Bria servers; so this software cannot be used in a private corporate network. Please note that security can be compromised since connection settings are stored on a third-party service.
- Go to the website https://www.counterpath.com/ and click on the Start my free trial button in the upper right corner.
- Click on Choose my plan on the opened page and select the plan that best fits your needs. In our case the Bria Solo Free plan will be enough. Select the Bria Solo tab to start using this plan.
- Click Start a free 21-day trial to specify the email, password, and username needed for account registration. When the trial period expires, you will still have a lifetime free account and you will be able to continue using the application.
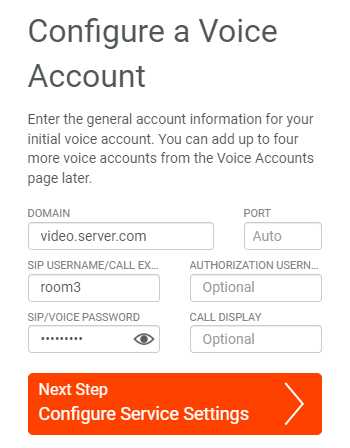
- After registration, you will see the window where one can select the type of connection. Click Configure SIP settings:
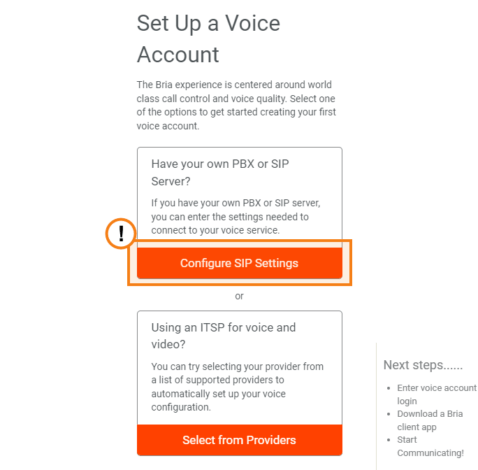
- Fill out these required fields:
- Domain — the IP address or domain name of your TrueConf Server instance
- SIP username — the username for the account created on TrueConf Server
- SIP/voice password — the password for the user account.
- Click Next Step and specify additional parameters if necessary, for example, SIP proxy address.
- Click Next Step to download the application.
- After installing Bria, start the application, authorize with the email and password specified during registration (check Step 3).
- The settings specified during Steps 5-6 will be automatically downloaded via the Internet and you will be able to start communication.
Yealink VC Desktop via H.323
RealPresence Desktop and Bria do not support registration via H.323. To use this protocol, you can configure Yealink VC Desktop.
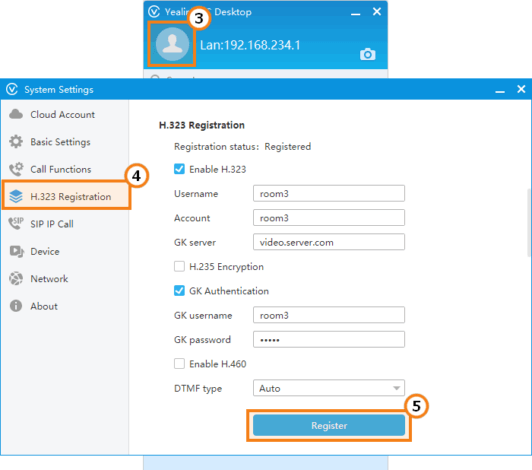
- Start Yealink VC Desktop.
- The application will recommend authorization on the server or Yealink service. Click Skip.
- Click on the icon
 in the upper left corner to access settings.
 - Take these steps in the H.323 Registration section:
- Check Enable H.323 and GK Authentication boxes
- Specify the IP address or domain name of your TrueConf Server instance in the GK server field
- Enter the username of a TrueConf Server account in the Username, Account and GK username fields
- Enter the password for the account in the GK password field.
- Click Register and if the settings were correctly configured, you will see Registered in the Registration status field.
