How to Share Audio During Meetings
With TrueConf, you can share your audio during meetings, e.g. YouTube videos or browser windows. In this case, you won’t need to interrupt communication with other users. Here’s how you can take advantage of this option:
- by joining video call meetings from TrueConf web application in your browser
- by connecting a virtual microphone to the TrueConf desktop application (using VB-Audio software as an example).
Content and audio sharing in browser
If you join a conference from the TrueConf web application (via WebRTC in your browser), you can share both audio and video streams when displaying your screen without installing additional software.
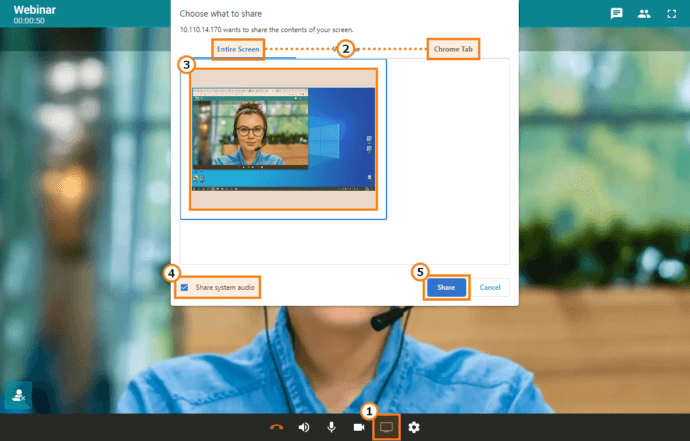
- During the meeting, click the
 button in the toolbar to open the screen sharing menu.
 - Select Entire Screen to share the content from any of the connected monitors, or the Chrome Tab to display content from one of the tabs open in the same browser. Please note that if you choose Window to display a separate application window, audio sharing will be unavailable.
- Select the desired screen or browser tab from the list.
- Check the Share system audio box to share the audio stream in addition to the video stream.
- Click Share to start sharing audio and content.
Please note that the audio from all currently running applications is shared if you choose the Entire Screen option.
Video and audio transmission during content sharing in TrueConf client app
To share audio content in the TrueConf client application, you will need to install additional software to set up a virtual microphone in the system.
Please note that users will be able to hear sounds from all the applications launched by the presenter when a virtual microphone is on, including system sounds. Therefore, it may be better to disable them in the Start Menu → Settings → System → Sound → Sound Control Panel (Related Settings section) menu. You can also select the No Sounds option from the Sound Scheme list on the Sounds tab.
Step 1: Installing VB-Audio Software
- Download an archived VB-Cable driver package from the VB-Audio official website and undo your created zip files.
- Select a distribution kit depending on your operating system type and install it as an administrator.
- Reboot the computer so that the OS recognizes the new virtual devices correctly.
- Download and install VB-Audio Voicemeeter software for controlling audio streams.
- Restart your PC.
If you want Voicemeeter to start automatically at the system startup and minimize the program to tray when closing, go to the program menu in the upper right corner and enable the Run on Windows Startup and System Tray checkboxes.
Step 2: Setting up virtual audio devices
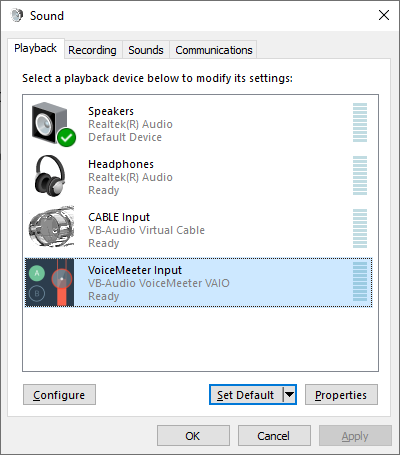
- Go to Start Menu → Settings → System → Sound → Sound Control Panel (Related Settings section).
- On the Playback tab, select VoiceMeeter Input and click the Set Default button.
- On the Recording tab, select VoiceMeeter Output (VB-Audio VoiceMeeter VAIO) and click the Set Default button.
Step 3. Configuring audio mixing
Voicemeeter is an audio mixing software. Every input channel has two buses (directions) you can channel the sound on: A is an output into a hardware playback device, B is an output into a virtual output channel. In this case, your operating system and running applications sounds are sent into the Virtual input channel. Hence, you can control audio mixing in different directions by selecting the bus.
- Launch Voicemeeter
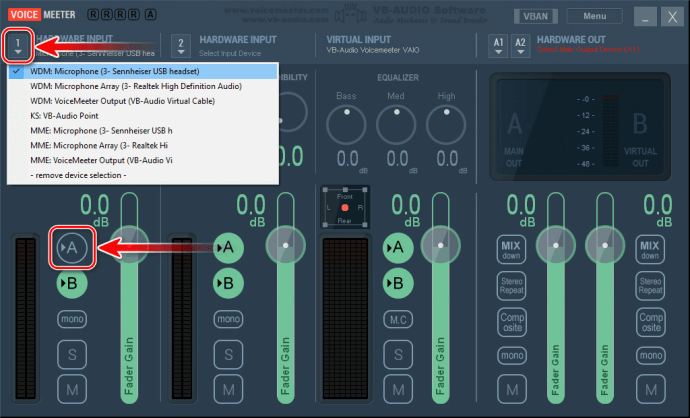
- Select your microphone in the first Hardware input section and disable the output on the bus A. Now, the microphone sound will be sent only to the VoiceMeeter Output.
We suggest using the WDM driver for better audio quality and small delays. If this driver is unavailable, please use the MME driver.
- Select VoiceMeeter Output (VB-Audio Virtual Cable) in the second Hardware input and disable bus B, so the sound could be sent to the main playback device.
- Select the main playback device in the drop-out list A1 in the Hardware out section.
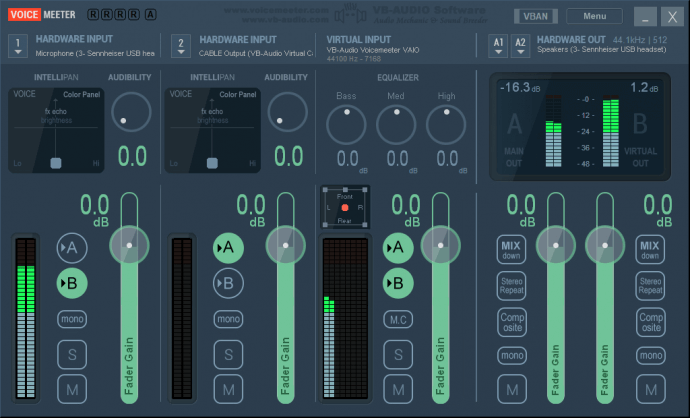
On the picture below, you can see an example of the VoiceMeeter main window after applying settings. Please note that the microphone audio is sent only to the virtual audio output B, so the volume level on the corresponding meter is higher.
Step 4.Configuring TrueConf client application
Proceed to TrueConf client application → Settings → Hardware. On the General tab, select Cable Input as a playback device and VoiceMeeter Output as a recording device. After this, conference participants will be able to hear not only your voice while screen sharing, but also the content sound without echo or any extra sound.


