How to install MSI package of TrueConf client application with predefined settings on Windows
When managing a corporate network, administrators often have to install and configure software on multiple workstations at the same time so that one does not have to spend time on manual configuration of each computer.
One of the ways to do this task on Windows is to use group policies for installing the configured application on all computers within the domain. However, this solution is possible only if the MSI package of the application is available.
In this article we will show how to install TrueConf client application with predefined parameters on all machines within the domain and locally on one of these machines.
Why MSI packages are needed
An .msi file (abbreviated from Microsoft Installer) is an installer for Windows. Under the hood, it is a container with instructions and data needed for installing the specific application.
For a regular Windows user, it is more common to install software with executive (.exe) files. MSI installation is more widespread in business settings because this approach offers the following advantages:
- Ability to deploy an MSI package on multiple computers within the corporate network with group policies.
- Ability to configure the installation process with the help of parameters (in the context of MSI, these parameters are called keys) and pass these parameters to the application (this feature has to be supported by the developers).
Where can I find MSI installer of TrueConf client application?
You can download the MSI installer of TrueConf client application from the official website. To do it, follow this link and click the Download for free button. In the pop-up window, click on the button for downloading the MSI application installer.
List of installation keys
When TrueConf client application is deployed from an MSI package, all specified parameters will be included in the settings.json file stored in the folder where the application is installed. One can edit it to add/change/delete certain settings. However, you should keep in mind that the name of an MSI key that determines one of the application settings, may not match its identifier in the JSON file. The list of all MSI keys and corresponding JSON identifiers is included in the PDF file which can be downloaded by clicking on the button below:
Getting ready MST file to specify settings when installing with group policies
The keys for the MSI package installed with the help of group policies have to be specified in the .mst file. One can create such a file with the help of the Orca tool which is part of the Microsoft Windows Installer SDK.
The steps that will be described below can be performed on any machine. It does not have to be located in the target domain:
- Download the Windows SDK installer from the official Microsoft website and run it.
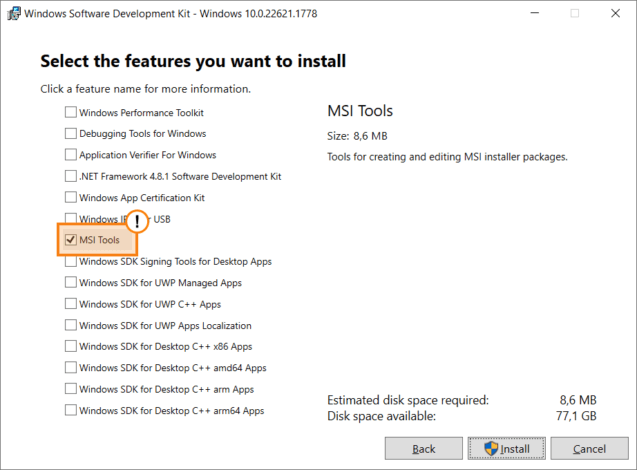
- Within the context of this task, one only needs to check the box MSI Tools when selecting the components to be installed.
-
Next, go to the directory where Windows SDK tools were installed (by default, it is
C:\Program Files (x86)\Windows Kits). From this folder, follow this path\bin\sdk_version\x86(sdk_versionwill be replaced with the version of your Windows SDK). Here, you can find the MSI installer of the Orca tool. As a rule, it is the file namedOrca-x86_en-us.msi. Install and run this tool. - Open the MSI package of TrueConf client application by going to File → Open in the menu:
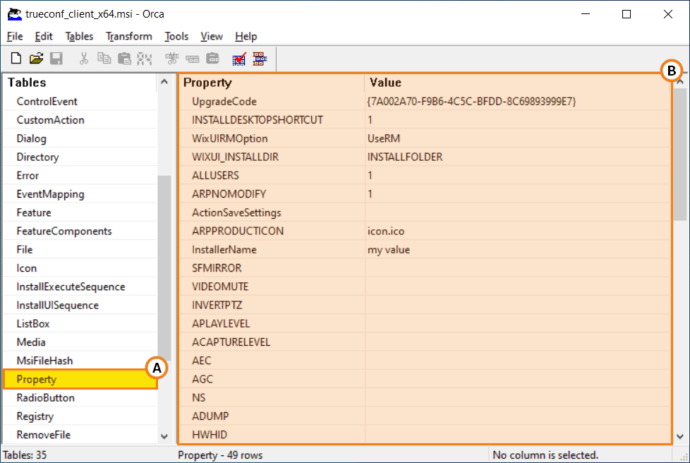
- In the Tables section, select the Property option. In the right part of the window, you will see the list of the application MSI keys and some supporting information.
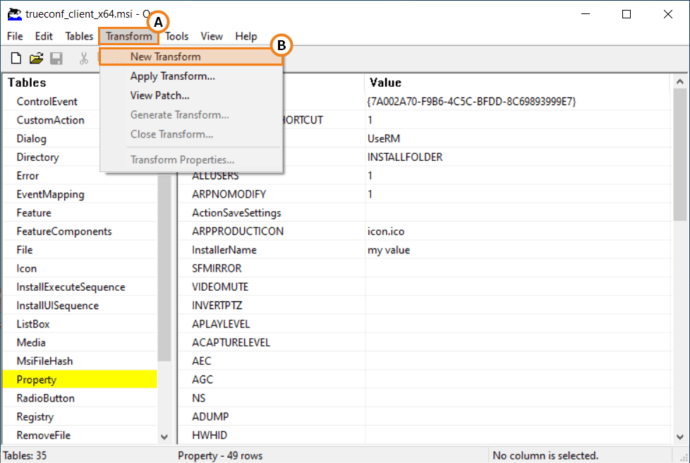
- Next, you will have to switch the tool to editing mode by selecting the Transform → New Transform option:
-
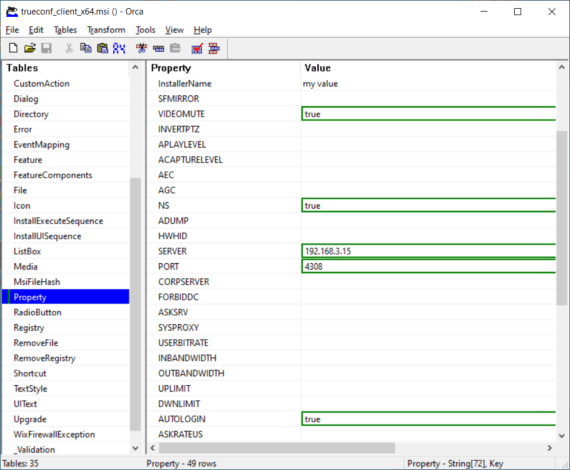
Specify the values of the required keys in the Value column.
The values of some parameters can be used only in combination with other parameters. For example, if the value of the
corporateServerparameter is set totrue(this parameter is responsible for automatic connection to the server when the application is started), you have to specify theuserDefinedServerHostparameter with the required address. All the parameters that have to be used in pairs are marked in the PDF file mentioned above. - Save the configured parameters in the .mst file by selecting the Transform → Generate Transform option:
Installing MSI package with group policies
To deploy TrueConf client application on all the machines included in the domain, one has to perform the following actions on the controller of this domain:
-
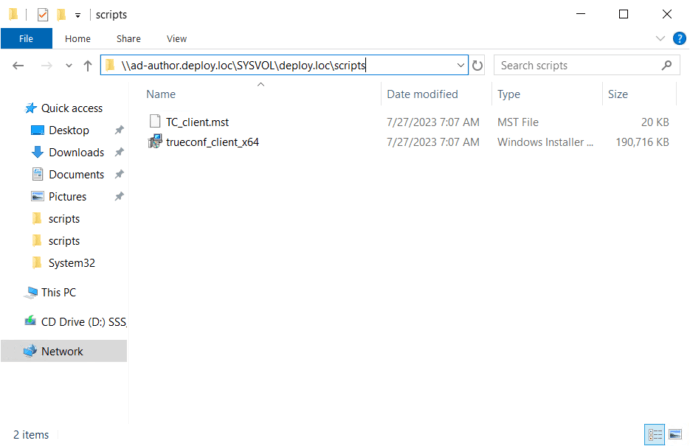
Place the MSI installer of the client application and the MST file with predefined keys on the domain controller at the following path:
\\your.domain\SYSVOL\your.domain.controller\scriptsTheSYSVOLdirectory must be available for detection by client machines in the domain. Otherwise, installation will be impossible. -
Go to the console for managing group policies. To do it, press
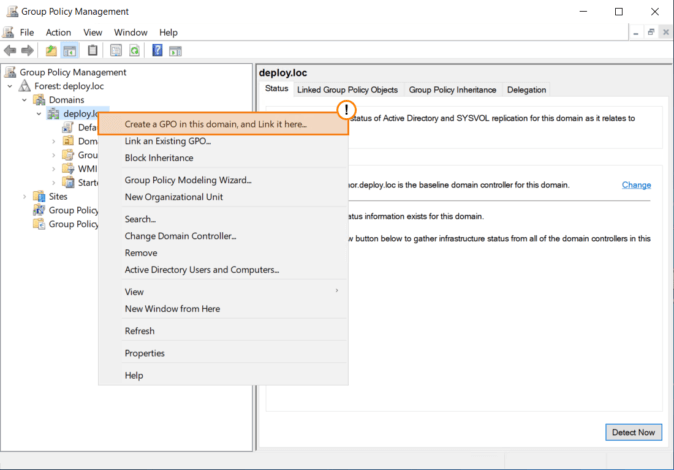
Win + Rand enter the commandgpmc.mscin the pop-up window. - Create a group policy object (GPO). To do it, right-click on the selected domain and select the option Create a GPO in this domain, and link in here in the context menu:
- Enter the name of the created group policy and click OK.
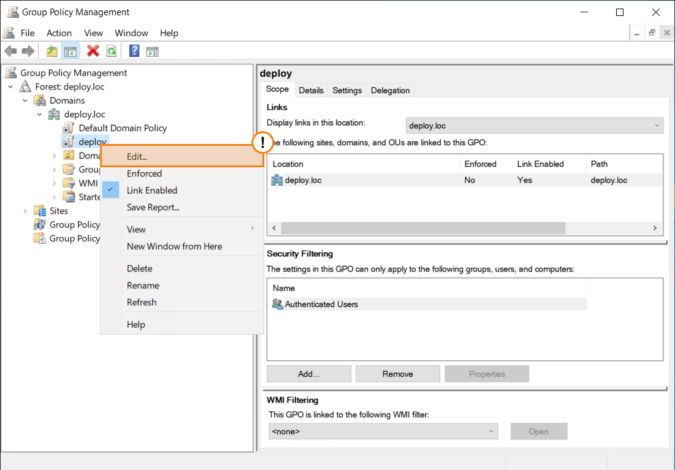
- Right-click on the created GPO and select the option Edit… in the context menu.
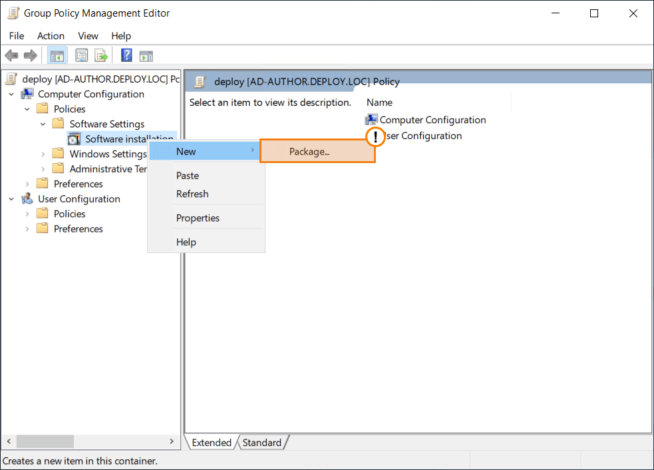
- You will see the pop-up window where the settings of a group policy object can be configured. In the left part of this window, there will be the settings navigation panel. Right-click on the option Computer Configuration → Policies → Software Settings → Software installation, and then select New → Package:
-
In the explorer window, select the MSI installer, located in the
SYSVOLnetwork directory from step 1 as it was described above. -
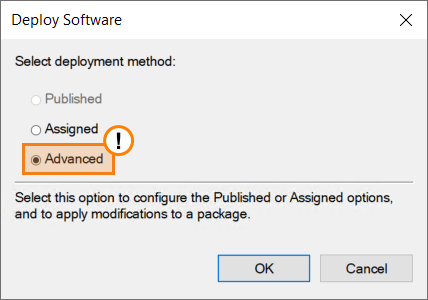
The pop-up window for selecting the type of deployment will open. Here, one should select Advanced:
If you do not select the Advanced option, it will be impossible to add an MST file with settings.
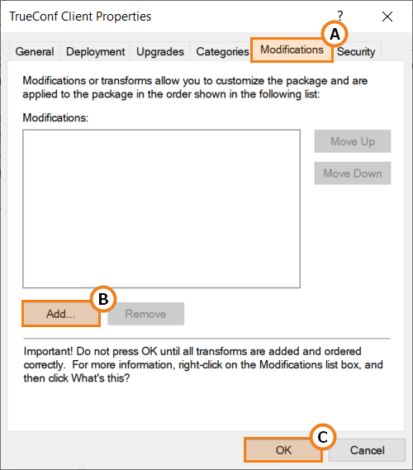
- Then, a new pop-up window will be displayed. Here, one can configure the deployment process. Go to the Modifications tab, click the Add button and select the settings file in the explorer window. When the file is uploaded, click ОК.
-
Update the GPO settings by running this command in the console:
1gpudate
GPO settings will be updated and applications will be installed on client machines as soon as users sign in to their accounts.
Deleting the application from all machines in the domain
To delete the application installed on all the machines in the domain, take these steps:
- Open the console for managing group policies
gpmc.msc. - Right-click on the group policy object used for the domain deployment of the MSI package.
- Select the Edit… option in the context menu:
- The window for configuring the group policy object will open. Select the option Computer Configuration → Policies → Software Settings → Software installation in the settings navigation which is in the left part of the window.
- On the right side, you will see the list of applications, installed within the group policy which is currently being edited. Right-click on TrueConf Client application and select All tasks → Remove in the context menu.
- In the pop-up window, select the option Immediately uninstall the software from users and computers and click OK:
-
Next, update the GPO settings by running this command in the console:
1gpudate
As soon as users sign in to their accounts on their machines, TrueConf application will be uninstalled.
Local installation of MSI package
An MSI package can also be installed locally on a single machine. To do it:
- Download the package from the TrueConf official website.
- Open the command line and go to the directory where the downloaded MSI installer is stored.
-
Run the following command to install the application:
1msiexec /i trueconf_windows_client_x64.msi /qn your_params
Instead of
your_paramsspecify the required parameters consisting of an MSI key and its value in the following format:msi_key=valueThe parameters should be separated by spaces. Here is an example of installation with parameters:
1msiexec /i trueconf_windows_client_x64.msi /qn ns=true hidedn=false lang=ru server=192.168.0.15
After that TrueConf client application with specified settings will be installed on the selected machine.

