
How to create a “Let’s Encrypt” certificate on Windows

Cryptographic certificates are the digital equivalent of website validation, which enables you to encrypt connections using TLS protocol and thus provide a secure link between server and client.
There are both paid and free certification centers. Let's Encrypt is one of the free centers, which provides certificates for 90 days with an automatic renewal option.
For TrueConf Server users, a TLS certificate is required for:
- join web meetings via WebRTC application
login to the personal area;
ability to schedule conferences through the application;
displaying the polls and transcripts sections in the application;
- sync TrueConf Server with Active Directory.
In Windows Defender Firewall, go to Advanced Settings → Inbound Rules → New Rule → Port; enter 80 and 443 ports separated by comma in the Specific local ports field and click Next. Then select Allow the connection, click Next again, specify which profiles the rule will apply to (for all by default) and after clicking Next, save the rule under any name.
Step 1: Getting started
First, you need to stop the TrueConf Server web service. To do this, execute the following command in the command line:
sc stop TrueConfWebManagerTo create a TLS certificate on Windows, download the ACME Simple (WACS) program. Then follow the instruction:
Extract the downloaded archive to a convenient folder, such as C:\simple-acme.
Create a crt directory in the same folder.
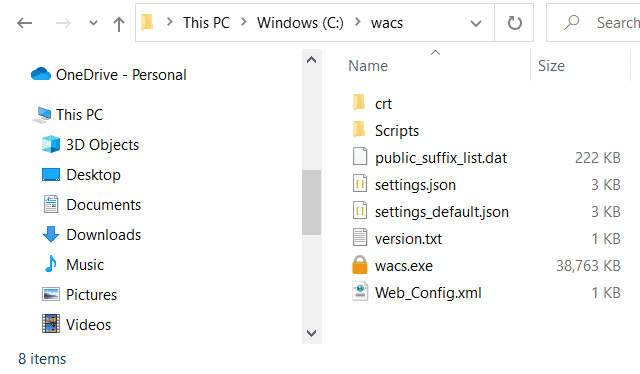
- In Windows Defender Firewall, go to Advanced Settings → Inbound Rules → New Rule → Port; enter 80 and 443 ports separated by comma in the Specific local ports field and click Next. Then select Allow the connection, click Next again, specify which profiles the rule will apply to (for all by default) and after clicking Next, save the rule under any name.
Step 2: Creating a certificate
Open the command line (cmd) as administrator and run the following program:
C:\simple-acme\wacs.exeNext, run the following commands sequentially by entering the letters and digits corresponding to the menu options that you want to select. For example, to run the command Create certificate (full options), you will need to type m and press Enter:
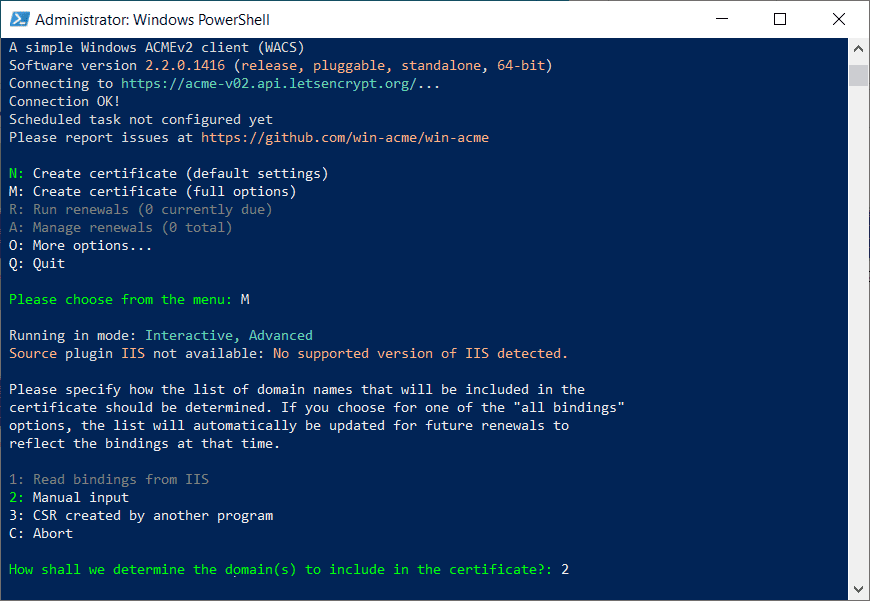
Start creating the certificate by manually specifying the parameters. To do it, select: Create certificate (full options), Manually enter host names.
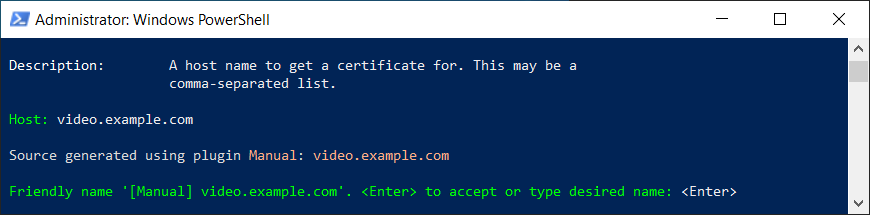
Specify your domain name and press Enter twice to confirm.
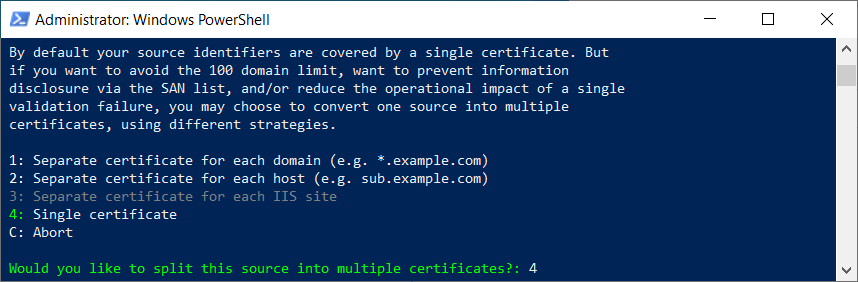
If necessary, you can create separate certificates for subdomains and hosts. In our case, we will select Single Certificate:
Next, select:
[http] Let simple-acme answer HTTP validation request;
Generate an RSA public/private key pair;
Create PEM encoded files (for Apache, nginx, etc.);
Specify a folder for saving certificates C:\simple-acme\crt.
You will be offered to create the password for the private key. Select None.
Next, select:
No (additional) store steps;
No (additional) installation steps.
In the next step, select classic: https://letsencrypt.org/docs/profiles#classic
Answer additional questions as follows:
type
nofor the question Open in default application?type
yesfor the question Do you agree with terms?.Specify an email address for error notifications.
When you successfully create the certificate, you will see the Authorization result: valid message. Answer no to the question Do you want to specify the user the task will run as? question.
If a certificate has already been generated for the specified domain name, there will be the corresponding notification in the Existing renewal line. The certificate expiry date will be provided as well. You can create the certificate again by entering yes in response to the question Overwrite settings?.
Three files will be generated in the C:\wacs\crt folder:
domain_name-crt.pem is the certificate itself
domain_name-key.key is the key file
domain_name-chain.pem is the trust chain, it includes Let's Encrypt root and intermediate certificates.
Now you can use them in TrueConf Server, as shown in our article.
Step 3: Configuring automatic certificate renewal
After successfully obtaining the certificate, the simple-acme utility automatically adds a certificate verification task to the Windows Task Scheduler. It is essential to edit this task so that after the certificate is updated, the files are copied to the TrueConf Server directory. You can also add an automatic restart of the TrueConf Server web service after the certificate is updated. By default, you will need to manually restart the service after updating the certificate.
Press Win + R and enter taskschd.msc, then press Enter. In the window that opens, navigate to Task Scheduler Library.
To edit an automatically created task:
In the main window, find the task simple-acme-renew.
In the side menu on the right, click Properties.
Be sure to create an action to copy the certificate files to the TrueConf Server directory:
Go to the Action tab and click Create.
In the dropdown menu, select Program Launch, then configure the settings:
In the Program or Script field, enter
Powershell.exe.In the Add arguments field, enter:
-NoProfile -WindowStyle Hidden -Command “Copy-Item -Force C:\simple-acme\crt\cert.pem 'C:\Program Files\TrueConf Server\httpconf\ssl\custom.crt'; Copy-Item -Force C:\simple-acme\crt\privkey.pem 'C:\Program Files\TrueConf Server\httpconf\ssl\custom.key'”${**PARAM_NAME**:-**POSS_VAL**}
-NoProfile- prevents the loading of PowerShell profiles, which is needed for greater stability when executing the command;-WindowStyle Hidden- launch PowerShell in a hidden window;-Command- a command for PowerShell, allowing multiple commands to be listed within quotes, separated by semicolons;Copy-Item -Force C:\simple-acme\crt\cert.pem 'C:\Program Files\TrueConf Server\httpconf\ssl\custom.crt'- copying and renaming the certificate file to the server directory;Copy-Item -Force C:\simple-acme\crt\privkey.pem 'C:\Program Files\TrueConf Server\httpconf\ssl\custom.key'- copying and renaming the private key file to the server directory.Then click OK.
If needed, modify:
Description in the General tab.
Set the time and frequency in the Triggers tab.
Other settings can be found in the remaining tabs.
If for any reason the certificate update task was not created, you can do it manually by following these steps:
In the right sidebar menu, click Create a simple task.
Fill in the fields in the window that opens: Name, for example, simple-acme-renew. Add a Description if necessary, then click Next.
In the Trigger section, select the daily option and proceed to the next step.
Navigate to the Action section and select Start a program, then configure the parameters:
In the Program or script field, enter the path to the utility's executable file, for example,
C:\simple-acme\wacs.exe.In the Add arguments field, enter:
--renew --baseuri “https://acme-v02.api.letsencrypt.org/”${**PARAM_NAME**:-**POSS_VAL**}
--renew- initiate the renewal process for all tasks that are due;--baseuri- specifies which server simple-acme should use;“https://acme-v02.api.letsencrypt.org/”is the main production server for Let's Encrypt.In the Completion section, review the configured task and click Finish.
In addition to this, add an action to copy the certificate files to the TrueConf Server directory:
Select the simple-acme-renew task and click Properties on the right sidebar.
Go to the Action tab and click Create.
In the dropdown menu, select Program Launch, then configure the settings:
In the Program or script field, enter
Powershell.exe.In the Add arguments field, enter:
-NoProfile -WindowStyle Hidden -Command “Copy-Item -Force C:\simple-acme\crt\cert.pem 'C:\Program Files\TrueConf Server\httpconf\ssl\custom.crt'; Copy-Item -Force C:\simple-acme\crt\privkey.pem 'C:\Program Files\TrueConf Server\httpconf\ssl\custom.key'”${**PARAM_NAME**:-**POSS_VAL**}
-NoProfile- prevents the loading of PowerShell profiles, which is needed for greater stability when executing the command;-WindowStyle Hidden- launch PowerShell in a hidden window;-Command- a command for PowerShell, allowing multiple commands to be listed within quotes, separated by semicolons;Copy-Item -Force C:\simple-acme\crt\cert.pem 'C:\Program Files\TrueConf Server\httpconf\ssl\custom.crt'- copying and renaming the certificate file to the server directory;Copy-Item -Force C:\simple-acme\crt\privkey.pem 'C:\Program Files\TrueConf Server\httpconf\ssl\custom.key'- copying and renaming the private key file to the server directory.Then click OK.
You can enhance convenience by adding the command to restart the TrueConfWebManager service Restart-Service TrueConfWebManager to the task arguments. We recommend scheduling this for a time when the server is minimally used:
In the main window, find the task simple-acme-renew.
In the side menu on the right, click Properties.
Go to the Action tab, select the previously created action, and click Edit.
In the Add arguments field, enter:
-NoProfile -WindowStyle Hidden -Command “Copy-Item -Force C:\simple-acme\crt\cert.pem 'C:\Program Files\TrueConf Server\httpconf\ssl\custom.crt'; Copy-Item -Force C:\simple-acme\crt\privkey.pem 'C:\Program Files\TrueConf Server\httpconf\ssl\custom.key'; Restart-Service TrueConfWebManager”${**PARAM_NAME**:-**POSS_VAL**}
-NoProfile- prevents the loading of PowerShell profiles, which is needed for greater stability when executing the command;-WindowStyle Hidden- launch PowerShell in a hidden window;-Command- a command for PowerShell, allowing multiple commands to be listed within quotes, separated by semicolons;Copy-Item -Force C:\simple-acme\crt\cert.pem 'C:\Program Files\TrueConf Server\httpconf\ssl\custom.crt'- copying and renaming the certificate file to the server directory;Copy-Item -Force C:\simple-acme\crt\privkey.pem 'C:\Program Files\TrueConf Server\httpconf\ssl\custom.key'- copying and renaming the private key file to the server directory;Restart-Service TrueConfWebManager- restart the service to apply changes.Then click OK.