Users and groups. Integration with LDAP/Active Directory
Users and groups. Integration with LDAP/Active Directory
Here are the minimum steps needed to set up a working corporate communication system:
Select a machine (PC, physical or virtual server) with suitable hardware.
Configure HTTPS (it is used for many key features such as integration with the AI server, conference scheduling, etc.) and specify the external server address (the address of the guest page).
Configure access to the server for users within the corporate network and, if necessary, from an external network (outside the corporate network).
Create user accounts or integrate the server with a directory service via the LDAP/LDAPS protocol. ◀️ You are here!
Install client applications for users and show them how to connect to your server (check the documentation for the desktop application).
Accounts
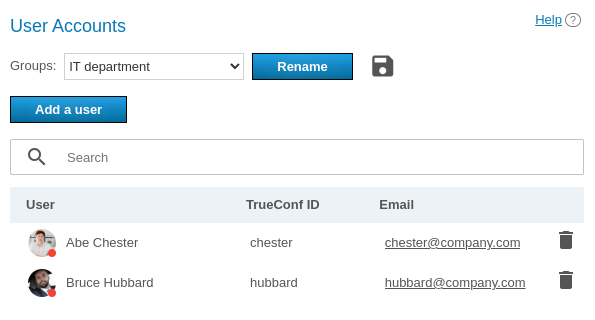
In section User Accounts, you can add new user accounts, as well as edit and delete existing ones.
You cannot edit user details in LDAP mode. User data entry form is available only in Registry mode.
In the free version of TrueConf Server Free, there are limitations on the maximum number of accounts, which are detailed on the page of this solution.
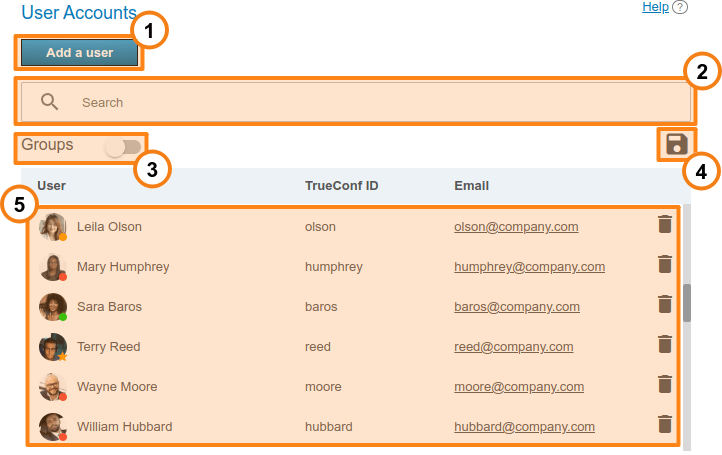
Click the Add user button to start creating a new account.
The Search field allows filtering users by TrueConf ID, first name, last name, display name, and email.
The Groups toggle allows you to display the list of user groups available on the server. You can expand each group to view its members. The groups have to be configured separately.
Use the
 button to export the user list to a CSV file for subsequent import into the TrueConf Group address book. The import itself is performed in the section of the Maintenance terminal control panel. This button is available only in Registry mode. The CSV file is saved in UTF-8 encoding, using ";" as the delimiter, thus ignoring preference settings.
Below you will find the list of users registered on the server. The status of each user is displayed at the bottom of the avatar:
 - online;
 - offline;
 — is in a conference or video call;
 — is the conference owner;
 — The account has been deactivated by the administrator (see field Status in the profile).
To modify user information, click on their name. To delete a user, press the  button.
Endpoint authentication under the user's account
It is possible to register an SIP/H.323 endpoint on the server under a user’s account. This can give you several advantages when working with this endpoint:
automatic export of the address book for codec TrueConf Group (detailed configuration is described in the terminal documentation);
Tracking the status of the endpoint as a regular user in the address book (online, busy, offline).
Please take into account that when each of the endpoints is authenticated, one online license is taken in addition to the gateway license (for more details, refer to the licensing section).
We do not recommend registering the endpoint on the same server using both SIP and H.323 protocols.
User Profile
If you create a user or click on any existing user in the list, you will be redirected to the page for entering or editing information about this person:
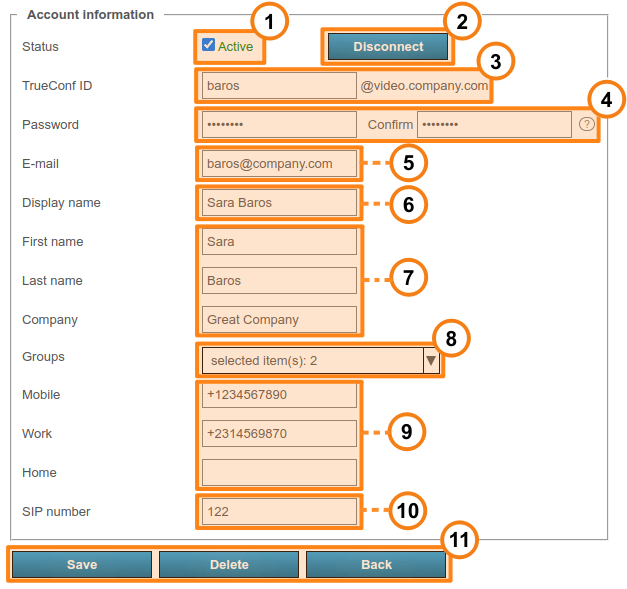
Using the checkbox Active, you can set the user to an "active" or "inactive" state (see below). These users will be displayed in the general list with a semi-transparent appearance and a grey status.
Use the Disconnect button to disconnect a user from TrueConf Server in all client applications. This feature may come in handy if you need to quickly connect a different user and the maximum number of connections is already reached (according to the license).
Click the View link next to the History of devices item to view information about the user's connections to the server (more details below).
TrueConf ID is the unique identifier used for authentication in client applications and making calls. The user's login (the part of TrueConf ID before
@) can include only Latin and Cyrillic letters, digits, underscores, hyphens, and periods. The full TrueConf ID with the server name specified after the login (the extra part in the format@servernext to the input field) is needed for making calls to a user from a different server. The login is set when a user account is created and cannot be changed later.Enter the user's password. This password cannot be viewed when the account is created or edited, but it can be changed. Use the
 button which is next to the password confirmation field to view the password requirements.
Next, specify the email address for sending notifications to the user, distributed TrueConf Server via the SMTP linked to the server.
- Display name is another required field which will be displayed in the address book of other users. This field is pre-filled with the username entered during Step 3. However, its value can be changed.
Next, comes a group of fields for various data about a user and his/her position in an organization. These fields are optional.
In the Groups drop-down list, you can add a user to the selected groups. Click on the arrow icon to view the list of groups available on the server. To add a user to one or more groups, just check the box to the left of a group name.
If necessary, you can specify the user's phone numbers. When you access the user profile in the client application TrueConf, you can call any of these numbers by simply clicking on it.
If SIP telephony is used, it is possible to specify a SIP call number in the corresponding field. If you do it, this field will be displayed in the user profile in TrueConf client application. When a user clicks on this field, the call will be started in the format
#sip:<number>. The number can be specified as<number>,sip:<number>or#sip:<number>.
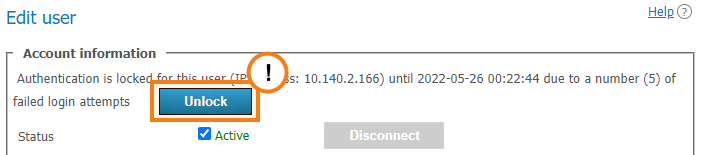
If the user enters the wrong password consecutively as many times as specified in section Users → Settings, web application login will be blocked for 24 hours. You can manually enable login access by clicking the Unlock button on the user's profile page.
User Deactivation
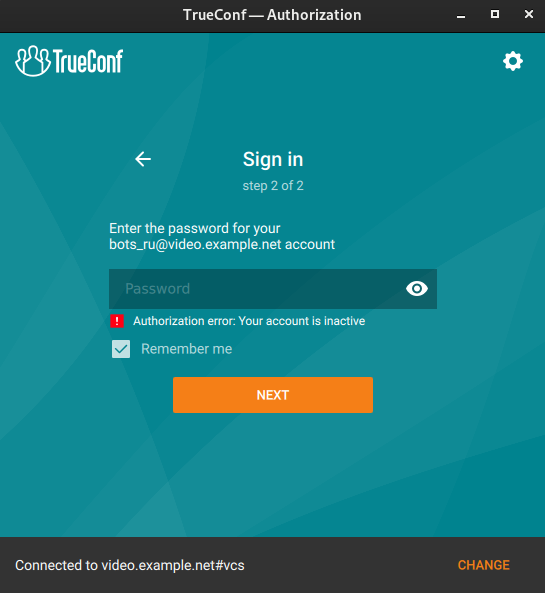
The Active checkbox in a user’s account can determine if this user should be able to authorize. If the user account is inactive, it will not be deleted, but one will not be able to use it for authorization. The following message will be displayed in all client applications:
User device history
In the History of devices list, you can view a table of each user's active and completed authorizations on your server. Essentially, this list represents information from the Reports → Endpoints log, filtered for a specific user:
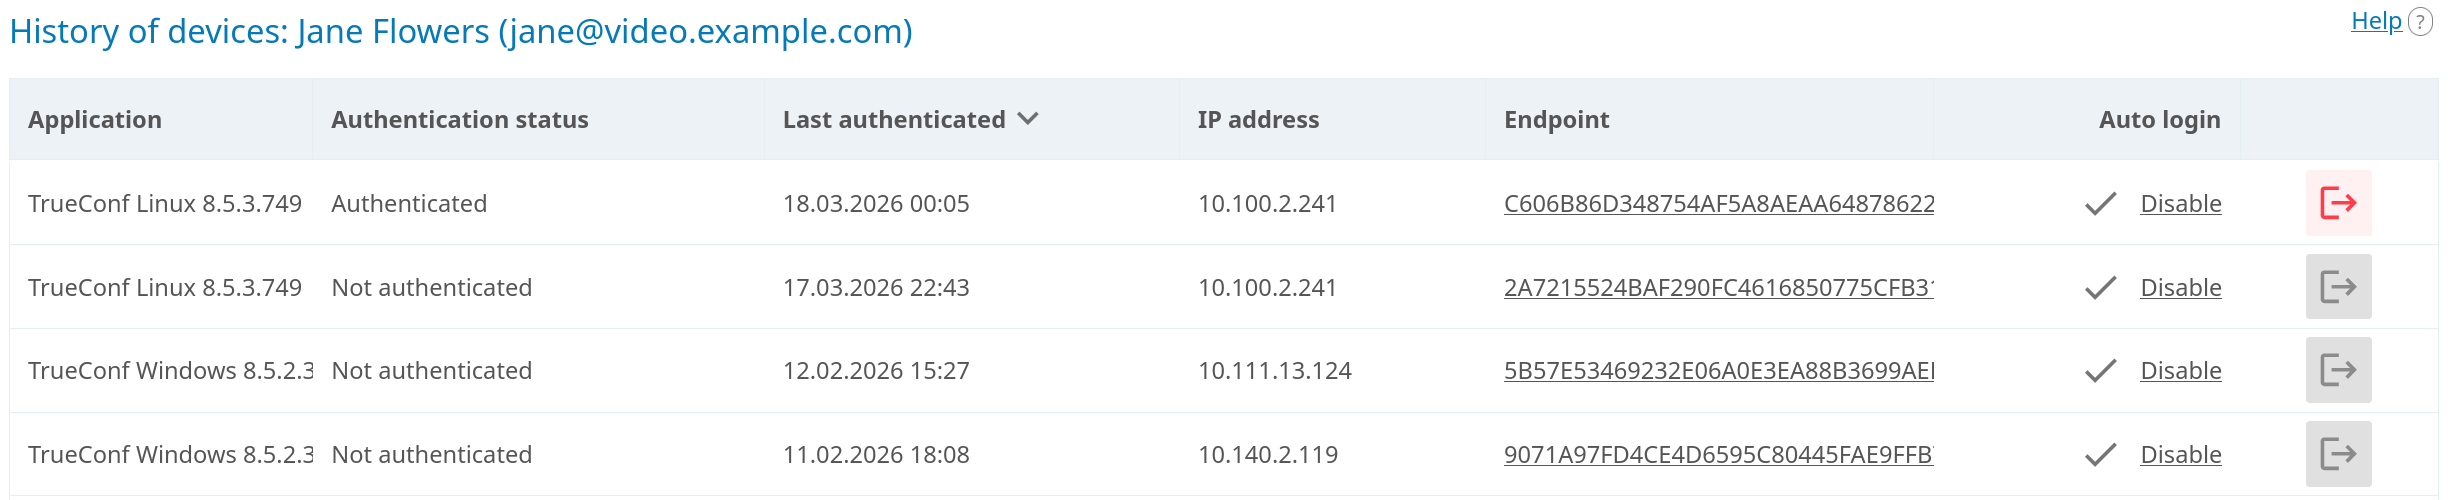
The list displays all active connections, with the application version shown in the first column Application. For browser connections, variant TrueConf WebClient will be displayed.
You can forcibly terminate a specific active connection which will effectively log out the user. For instance, you may log out the user on a lost smartphone for security purposes. To do it, click the  button next to the selected device in the list. A confirmation pop-up will be displayed. Here, you can also disable auto-login; as a result, the user will be required to enter his/her password during the next authentication. Additionally, you can disable auto-login without logging the user out from the server by clicking the Disable link in the corresponding row.
Calls and Conferences
If you are editing a previously created user account, you will see a block Calls and conferences with links for navigation right below the user's information.
Call history of the selected user
The general list of scheduled conferences and virtual rooms created on this server and filtered by this user. It will include only those meetings where this user is one of the participants.

The call history will include all user sessions in one-on-one calls and conferences:
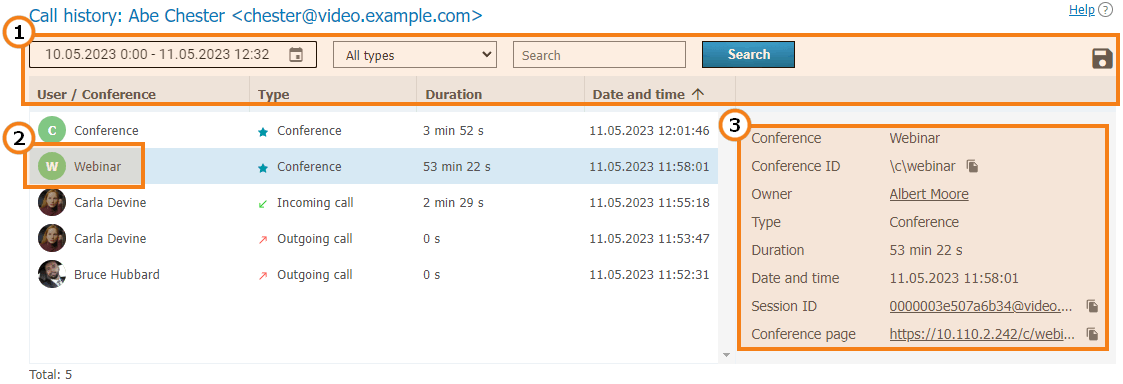
General UI for working with the table (check the description of the reports section). Events can be filtered by the following types:
- All types (by default);
- Incoming call;
- Outgoing call;
- Missed call;
- Conference.
2. To view full information, select session (communication session) in the list on the left, Recurring conferences and virtual rooms may have multiple sessions depending on the number of times these conferences were started.
3. When selecting a session linked to the specific conference, you will see the following information in the card on the right:
Conference name and ID
The owner’s display name
Current session duration
Session start and end time
a link to detailed session information in section Call history;
Link to the web page of a conference linked to the session. It will not be available for the meetings created ad hoc in TrueConf client applications.
Application Settings
On the page where a user account is either edited or created, the administrator can set special parameters that will be activated in the client application when a user authorizes on the server. These parameters can determine the restrictions for incoming and outgoing bitrate and can be found in the Application settings section.
If such settings have not been configured, group settings (if any) are applied to the user (the member of the group). User group settings are displayed next to the user settings field. They are displayed for preview only and cannot be changed. If a user is a member of multiple groups, the scope of the user rights will be defined by the group with fewer rights.
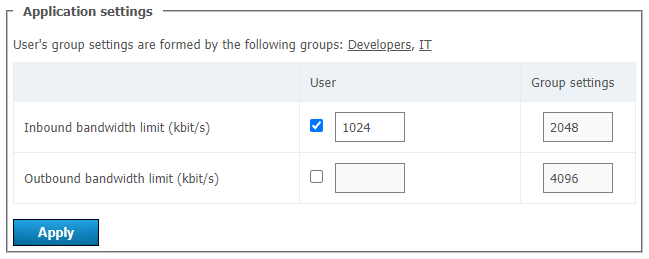
If bitrate restrictions are set at the user or group level, users will not be able to change them in TrueConf client applications, but will be able to see what parameters were selected.
User application settings have higher priority than group settings: if you put user restrictions lower than group restrictions, user restrictions will be applied.
User's Address Book
At the bottom of the page you can find the address book and edit buttons. The address book contains all the users who are located in the address books of the user groups where the user belongs.
You can add individual entries to the list, which will be displayed only to the user being edited. Please note that you can add not only TrueConf Server users, but any call string, such as conference ID, SIP/H.323 or RTSP in the address book. Subsequently, you can delete them using the button. The user can delete them in the address book of the client application or in the personal area.
If address book editing is allowed at the group level, a user will be able to add contacts and organize them into groups in the client applications. Such groups are displayed only for the current user and are not included in the list of groups displayed in the control panel. However, the contacts added by the user will be displayed in the address book for his/her account in the control panel and the administrator will be able to edit this list.
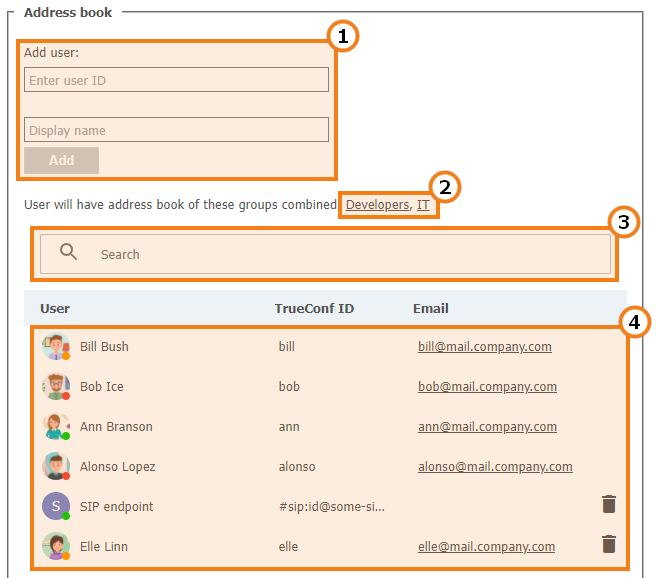
Add a user to the address book. To add a user, start typing the username or display name. From the drop-down list, select the user that matches your search (if the user is registered on your TrueConf Server instance).
The list of groups that the user belongs to, as well as the address books which are included in the user’s contact list and cannot be removed.
Search for users.
The list of users displayed in the address book. Click on the user registered on your TrueConf Server instance to edit their profile.
For examples of call strings that can be added to the address book, refer to the documentation for the user's personal area.
Groups
In Groups tab you can create, rename, edit and delete groups. You can also add or remove users from the group, set up their address book and configure individual settings for the users of any group.
Manual editing of the user list and settings (e.g., group name) is not available in LDAP mode. You can only import groups from the LDAP directory as shown below.
Regardless of the data storage mode (Registry or LDAP), the following groups are included in the list by default:
- Users without group — it automatically includes users who have not been explicitly added to any groups either during account setup or in this section as shown below;
- Federated users for users who make calls to users and conferences of your TrueConf Server through federation;
- Guest users, where guests who join your public conferences (webinars) are placed.
It is impossible to rename or delete the default groups.
Each user group has specific permissions for using your video conferencing server.
List of rights for the user group
Please note that certain permissions cannot be given to the groups created by default. This restriction is set for security considerations (e.g., to make sure that operator rights are not available to everyone) and due to application logic reasons (e.g., since guests do not have a permanent account on your server, they cannot create conferences).
Federated users will have the same calling rights that are configured on their server. For example, if a user on a federated server is added to only one group, and this group is not allowed to make calls, this person will not be able to make calls to your users.
Below is a list of permissions that can be configured for user groups TrueConf Server:
 Editing address book. By checking this field, administrator allows users to change users display names of the users, delete/add users and perform any other changes in the group’s address book. If the box is not checked, group users will not be able to perform the actions mentioned above. In this case, all changes are performed by administrator in TrueConf Server control panel and extend to all address books of the users from this group.
 Making point-to-point calls. Users will be able to answer incoming calls.
 Creating group conferences.
 Display your desktop or individual application windows.
 The ability to send a request to control the interlocutor's desktop.
 Providing the ability to control your desktop.
 Presentation of slides can be imported from files or assembled from images by the user. This function does not depend on the right to share the desktop or applications.
 File transfer in chats of any type: both personal and group.
 Downloading files in chats. If this permission is not granted, the user will see a message in the chat indicating that this option is unavailable instead of the file and download option.
 Recording conferences in the client application. This does not affect the ability to enable recording when creating a conference in the application scheduler or in the personal area.
 Creating polls and distributing them across campaigns.
 Viewing and managing available transcripts. This permission grants access to the transcripts of a user from this group in the server's AI personal area and their TrueConf Server. In this context, a user's transcript is one that can be accessed through the following settings:
by the administrator in the general settings of TrueConf Server, see general settings in the control panel. For instance, by default, all participants have access to the conference transcript (moderators have full access, while others have read-only access);
by manually managing the settings from other users, see more in the description of working with transcripts in the personal area.
Restricting access does not remove the ability to manage audio recording for transcripts (see below).
If this checkbox is unchecked (the right is revoked), users will not see the Transcripts section in the app and in their personal area TrueConf Server, and when attempting to log in to the AI server, they will receive an access denied message.
 Full access to all event transcripts of this TrueConf Server. In this case, a user from this group will be able to view and manage any transcripts, including those of conferences they did not participate in. To enable this right, both checkboxes must be selected: this one and to view and manage available transcripts.
 The ability to enable audio recording for transcription when creating a conference and during real-time meeting management.
 Operator privileges. This right allows group members to act as moderators and access the real-time meeting management tool in any event they join.
How permissions restrictions work
If a user is a member of two groups: the permissive settings will override restrictive ones. For example, the user account is included in such groups as IT and DevOps. If the members of the IT group are allowed to show slides, the user will be allowed to show slides even if this feature is not permitted for the members of the DevOps group.
Group-level user rights can also be redefined by restrictions for authentication zones.
The persons who make a call to the users of your TrueConf Server via federation, will have the rights specified on your side (for the Federated users group) and on the side of their own server. For example, if you have disabled file sharing for federated users, they will not be able to send files when participating in the conferences hosted on your server, even if this right was given to them on their own TrueConf Server. Similarly, the federated user will be unable to send files if you have allowed this feature for federated users; but this right is denied to the group of this user on the side of his/her video conferencing server.
Configuring Groups in Registry Mode
Below, you can find an example of group settings for Registry mode, while some parameters will differ for LDAP mode.

To add a new group, click the Add button, enter its name in the pop-up window, and press Create.
At the group level, you can enable or disable certain features by using checkboxes in selected columns. These settings allow you to delineate the rights of different server users. A complete list of these permissions is provided above, and you can also check the description of how rights work when a user belongs to several groups. Rights management is also available when you are editing the settings of a group on the User rights tab.
Click on the desired group in the list to edit it. Clicking on the column Group Name allows you to sort the list alphabetically.
To delete one or more groups, check their boxes and click Delete. The accounts of group participants will not be deleted from the server.
Configuring Groups in LDAP Mode
Manual editing of the user list and settings (e.g., group name) is not available in LDAP mode. You can only import groups from the LDAP directory as shown below.
If you would like to centrally manage user information and enable LDAP synchronization on your TrueConf Server instance, the list of users and groups is imported from the LDAP catalog (e.g., Active Directory). Note that your designated user search catalog object must contain all necessary user groups. For instance, if when configurating LDAP you indicated in the Group field the string cn=UsersGroup,ou=People,dc=example,dc=com, on the LDAP side the UsersGroup object must contain the necessary account groups:
In this case, system administrators will not be able to create user groups and add group members in the TrueConf Server control panel. Instead, they can be imported from the LDAP catalog. To do it, follow the next steps:
In the server control panel, navigate to section Users → Groups.
Click Add above the group list:
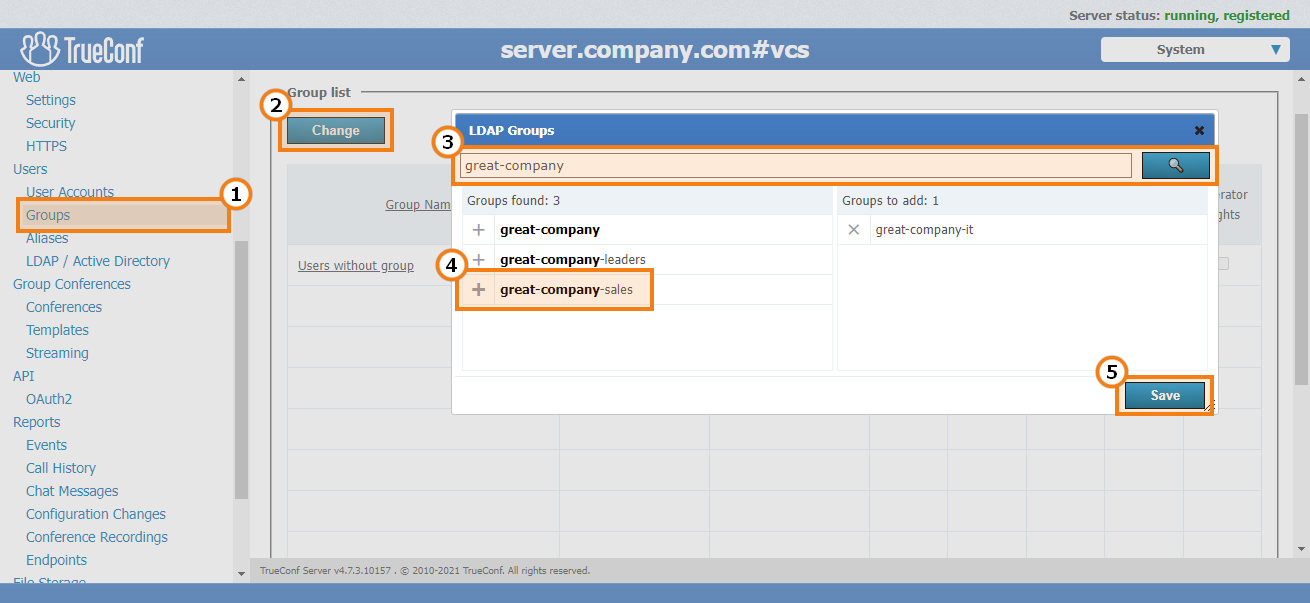
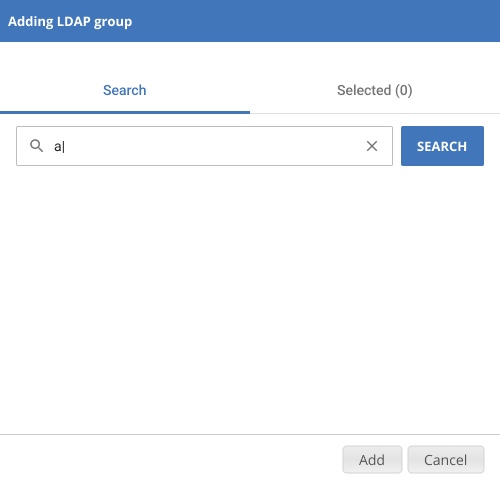
In the window that opens, enter part of the group name you want to add and click the Search button:
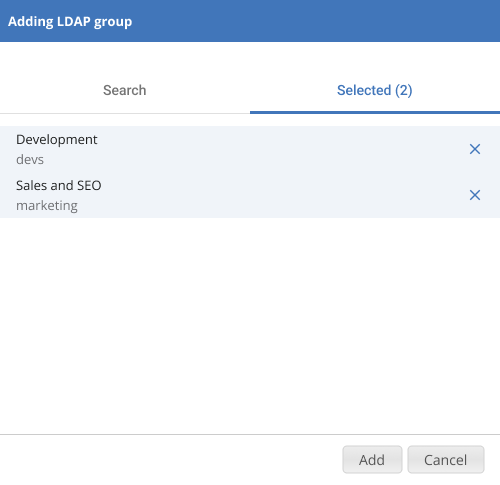
In the list of filtered groups, click on the names of the ones you want to add to the list. They will appear in the Selected list:
Click Add to apply the changes.
For groups imported from LDAP, as well as in Registry mode, settings for user rights, address book, client application restrictions, and group calls are available.
Editing a group
By clicking on a group name in the list, you will open the menu for editing information about the group:
Here you can do the following actions:
Rename the group
configure the address book for all group members;
select available permissions for the group on the User rights tab (all permissions are detailed above);
To change the group name, click the  button to the right of the name. In the window that opens, enter the new name and click Rename (or Cancel if you want to close the window without saving changes):

You can also click the button to export the list of users from a specific group to a CSV file for subsequent import into the TrueConf Group address book.
Editing the group participant list
In LDAP mode, the add button is not displayed on the Participants tab. In this case, the entire group is imported as shown above.
To add participants to the group:
Open it in the general list.
Go to the Participants tab.
Click the Add button.
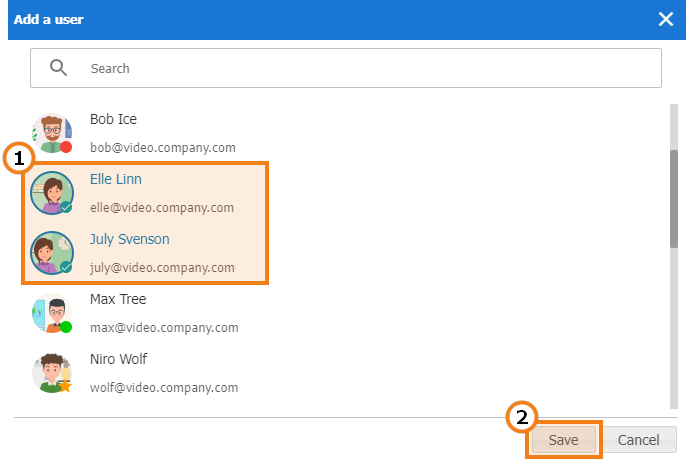
In the window that opens, select the users you want to add to the chosen group (a filter by name or TrueConf ID is available). Once all users are selected, click Save:
To remove a user from the group, click the  button on the right side of the line with their name.
Configuring the address book for group users
In the Address Book tab of each group, you can set a contact list that is shared among all users of that group:

Participants can also add new contacts to the address book on their own, but only if the box Address Book Editing is checked in the permissions settings. Please note that adding contacts to the address book by the administrator and manually by a user are applied independently of each other.
You can add all users from another group to the address book of the selected group (i.e., to the address book of each participant) at once. To do it:
In section Choose the users who will be displayed in the address book of group participants, select item User groups.
Click on the drop-down list next to it and select groups.
To save the settings, click the Apply button.
In the Group address book section, you can also manually add users of various types, similar to adding them to the address book in a user profile. However, a group member will not be able to delete them independently because these contacts are added for the entire group, not to their personal address book.
Configuring application settings for user groups
By clicking the Customize link in the Application column of the group row in the main table, a menu will open where you can set bandwidth limitations for users belonging to that group.
Please note that the user application settings take precedence over group settings.
If bitrate restrictions are set at the user or group level, users will not be able to change them in TrueConf client applications, but will be able to see what parameters were selected.
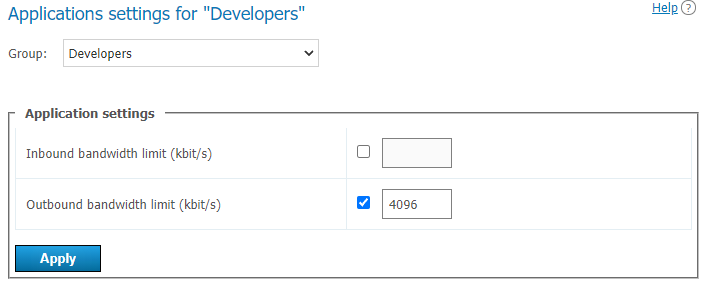
Please note that if channel limits for the application are set for a specific user, these settings will take precedence over the group settings.
Configuring Group Calls
The administrator can enable group calls for a user group. When this feature is activated, it will be possible to make calls to the entire group, rather than an individual user, so all group participants will see an incoming call. As soon as someone answers this call, it will be automatically declined for other users.
To activate group call pickup:
Select the desired group from the general list and go to the Call settings tab:
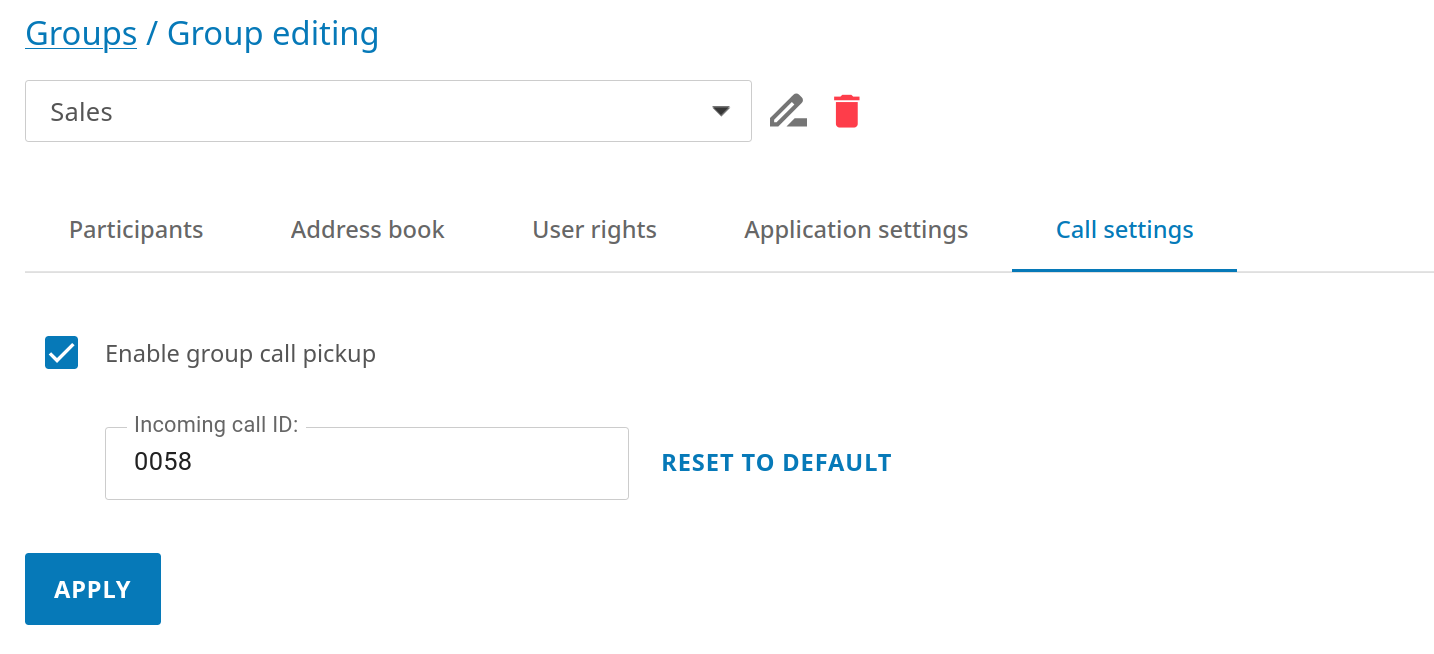
Check the box Enable group call pickup.
To start a call, specify an ID, which has to be unique within the server, meaning that it cannot match the IDs of other group calls or TrueConf ID of user accounts. To start a group call, use this ID in the format
id@example.com, whereexample.comis your server address, for instance,001@video.example.com. You can use letters, numbers, and characters. _ -in the ID. This call string can be added to the address book for future use. By default, the group ID is filled in, but you can specify your own (e.g., a short string for convenience).
To save the settings, don't forget to click the Apply button.
Alias
Description of operation
Aliases allow you to find a contact by entering a short string (a kind of filter) instead of the full string. Such a contact can be:
A user from the same server
A user from a federated server
A call string via SIP, H.323, RTSP protocols (endpoint, IP camera, etc.)
A conference (including a conference held on a different server).
By adding an alias, you essentially create a new filter for quick searches in client applications. In the control panel, the administrator CANNOT use an alias as a full-fledged ID; for example, you cannot add an alias for a user or group in the address book.
This feature is especially useful when making calls to TrueConf Server from mobile devices with a digital keyboard. Shorter aliases help users to quickly find a contact or add it to the address book. The contact can be of any type which was mentioned previously.
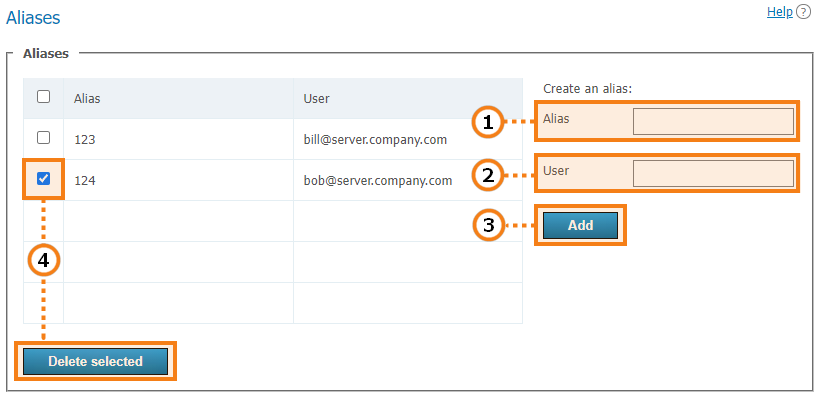
An alias may contain numbers, letters, hyphens
-and underscores_. The maximum number of characters is 32.Call string (including a server user’s login). Calls to this alias will be redirected to the user. To specify a conference, use the format
\c\ID@server.Press the button to add a new alias to the list.
To delete one or more aliases, select them using the checkboxes and click Delete selected.
Examples of call strings for alias configuration:
ceo_user— a user of your current server with the loginceo_userother_user@example.com— a user from a federated server with the addressexample.com\c\webinar— a conference on your current server. To copy the conference ID in this format, select the event in the general list and open the card of this event.\c\webinar@example.com— a conference held on a federated server with the addressexample.com#sip:@10.110.8.217— an SIP endpoint with the address10.110.8.217. If you need to call an endpoint registered on the server, when setting up the alias, you can specify the login of the user under which the endpoint is authenticated.
Using in Federation
In federation mode aliases can be used to make calls just like TrueConf ID. An alias will be resolved on the server which is specified after @ in the full alias@server alias , e.g., 122@video.server.name.
We will now discuss two examples of using aliases on federated TrueConf Server instances, one.name and two.name.
Case 1
Each of TrueConf Server instances has its own aliases. We have created an alias 111 for the user userA from the one.name server.
To make a call to userA from the two.name server, the following string should be entered in the address line:
111@server where server is the DNS name or IP address of the one.name server.
Case 2
Create an alias 111 on the two.name server for the user userA from the one.name server. It will correspond to the following call format:
userA@server where server is the DNS name or IP address of the one.name server.
In this case the users from the two.name server will be able to call users from the one.name server without its IP or DNS name. They will just have to enter aliases in the address line of their client application. For example, they can use 111 which we have discussed before.
The second option is more transparent for users, but in this case, it will be more difficult to configure a convenient system of aliases.
Authentication
In the Users → Authentication section, you can configure the authentication methods for your TrueConf Server.
Authentication is the process by which the service verifies the identity of a user/application. In other words, this process essentially has to confirm that the entity is what it claims to be. For example, authentication can confirm that the user is indeed who he/she claimed to be when connecting to the server. After the identity is verified, authorization takes place. At this stage, the user or application is granted permissions to perform certain actions on the service according to the settings.
With a login and password, in Registry mode (when accounts are stored on the server), you can set your own password complexity rules
Custom provider settings via OAuth / OpenID Connect protocols.
Authentication may occur in two different security zones: trusted (or Trusted network as it is called by default) and external (untrusted) (called Internet by default). They are included from the very beginning and cannot be deleted. However, one can configure them as it will be described below.
Everyone, who does not get into the trusted zone, will automatically be moved to the external zone. A user’s IP address will determine the zone to which this person will belong.

Security zones. To open the settings of the security zone, click on it.
Authentication methods specified for each zone.
Zone activation or deactivation. When a zone is deactivated, the users, who belong to this zone, will receive a notification that authorization is currently unavailable when they try to connect to your TrueConf Server. The users, who were connected previously, will be able to interact with the system up until the moment when the authorization token expires.
Verification methods that can be configured. The Login and password and NTLM SSO methods do not require configuration; they are simply activated with the toggles on the right side. For other added providers, you can edit the settings by clicking on the provider name. You can also remove unnecessary providers, but it is not possible to remove NTLM and Kerberos methods; they have to be disabled if needed.
The configuration and work status of each method.
Activation of authentication options.
Adding two-factor authentication providers: AD FS (Active Directory Federation Services), Keycloak, manual settings for adding a different provider.
For methods Kerberos SSO, NTLM SSO, AD FS, and Microsoft Outlook SSO to be available, the LDAP account storage mode must be selected and configured. For other authentication methods (Keycloak, manual settings), this is not necessary.
Access Zone Settings
Click on the name of a trusted zone to open its settings:
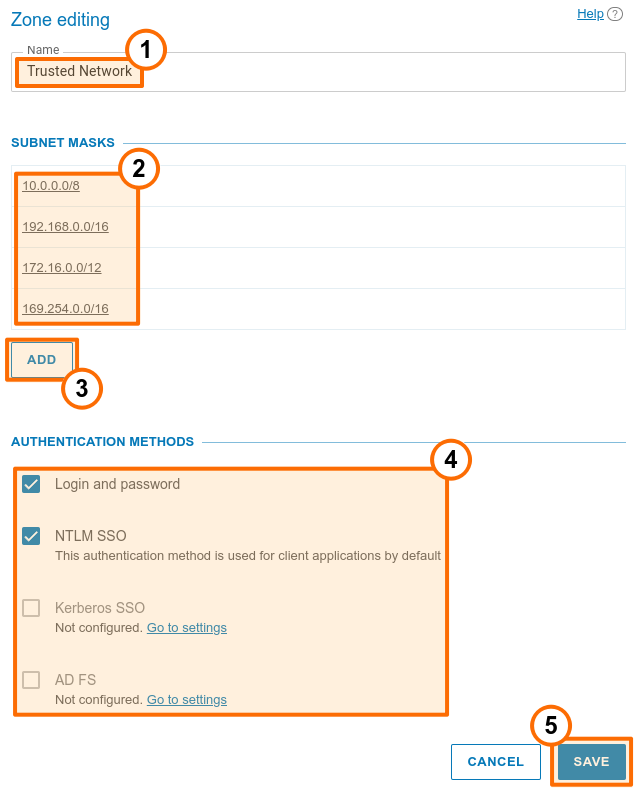
You can change the zone name, e.g., to “Corporate network”.
In the Subnet masks section, specify the network segments that are included in the current zone. By clicking on any entry, you will open the pop-up window for editing the address and subnet mask. Here, you can also delete the subnet. At least, one zone has to be specified for the trusted zone.
To add a new subnet to the list, click the Add button.
In the Authentication methods section, select required parameters by checking corresponding boxes. The list of zones is generated from the following options: login and password, NTLM SSO, Kerberos SSO, and other authentication providers which were added manually as shown below.
Below is the Available rights section where you can select the available permissions for each area. The list of available permissions is the same as in the group settings, and any restrictions are added to those for groups. In other words:
The right is given to a user if he/she is in a zone where this right is allowed, and belongs to at least one group that was granted this right.
The right is denied to a user if he/she is in an area where this right is prohibited or belongs to groups that were not given this right.
Don’t forget to save changes to apply them on the server.
It is possible to specify the name of the external zone, its authentication methods, and available rights, but one cannot specify subnets.
SSO Settings
Single sign-on (SSO) technology integrated with an LDAP server enables users of your TrueConf Server to be automatically authenticated on it after logging into the OS on their PCs and launching the TrueConf client application. You can use one of the following options for this: Kerberos, NTLM, or Outlook SSO (when integrated with Microsoft Exchange Server).
To make sure that SSO authentication works correctly via NTLM, add the machine, where TrueConf Server is installed, and users’ PCs to the domain. In the case of Kerberos, only users’ PCs have to be registered in the domain, but this is not mandatory for the machine with TrueConf Server.
To activate NTLM, simply enable it in block State. There are no additional settings required.
To configure the connection using the Kerberos protocol, click the link Kerberos SSO in the Authentication methods section (on the Authentication page with the list of security zones):
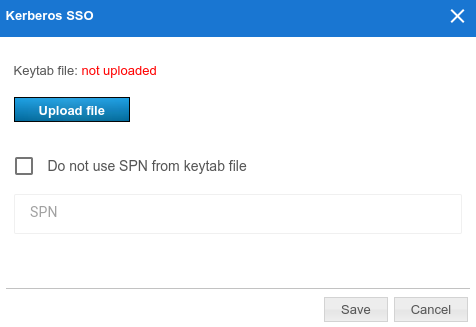
In the pop-up window, select:
The keytab file that will be used for authentication
If necessary, click More and enter your value ServicePrincipalName (SPN) in place of the one saved in the file.
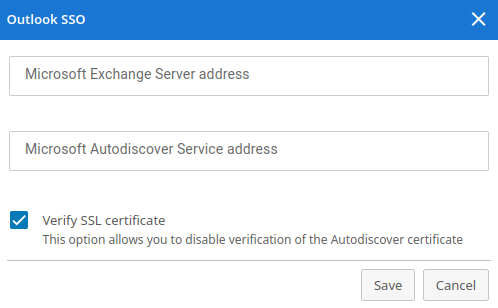
To configure SSO in the Outlook mail plugin, click on the Outlook SSO link. Specify the addresses in the pop-up window:
- Microsoft Exchange Server host for authentication token verification, it should be in the form of
{host}without the protocol prefix (i.e., withouthttp/https); - Microsoft Autodiscover Service host, appears as
{host}without specifying the protocol prefix (meaning withouthttp/https); Additionally, you can disable SSL certificate verification for the Autodiscover server.
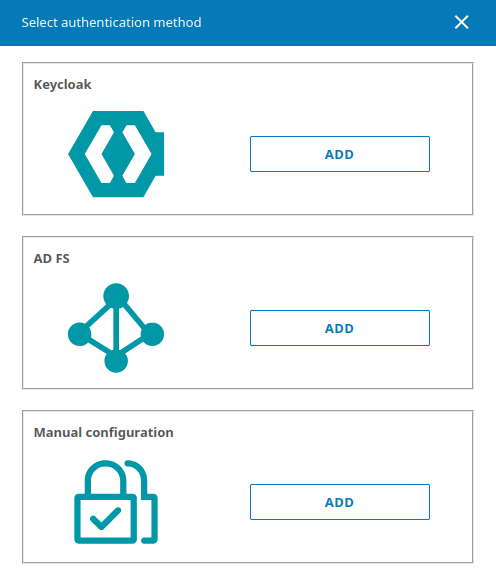
How to add two-factor (2FA) authentication providers
You can add one or more two-factor authentication methods (AD FS or OAuth 2.0 / OpenID Connect providers) to be selected later for the desired zone. There is no limit to the number of providers you can add. To do this, in the Authentication methods section, click Add and select the desired option:
To configure integration with the selected authentication provider, click on the Add button in the corresponding section and specify the following parameters in the settings window:
The identifier (Client ID) of the OAuth application created on the side of AD FS for receiving the access token.
URI set on the side of TrueConf Server used for receiving the response from the provider. This URI also has to be specified on the provider side.
- Authorization form URL on the provider side.
- Request token URL, is used when connecting users to TrueConf Server upon successful authentication.
- Logout URL.
Scope (Scope). Specify the
scopeselected when configuring the rule on the provider's side. For example, for AD FS, see Microsoft documentation for more details. You can specify multiple scopes by listing them separated by commas without spaces.The authentication provider name displayed in the list of authentication options on the page where access zones are configured and in TrueConf client applications when two-factor authentication is used.
You can disable SSL certificate verification on the TrueConf Server side from the provider.
To make it easier to distinguish one authentication method from another, you can set a custom image, by uploading it in the SVG format.
In addition to AD FS, other solutions such as Keycloak can be used to implement two-factor authentication via OAuth 2.0. The configuration settings will be the same as for AD FS.
LDAP / Active Directory
Two modes for storing user data are supported TrueConf Server: Registry and LDAP. You can switch between them at any time by clicking the Switch button:
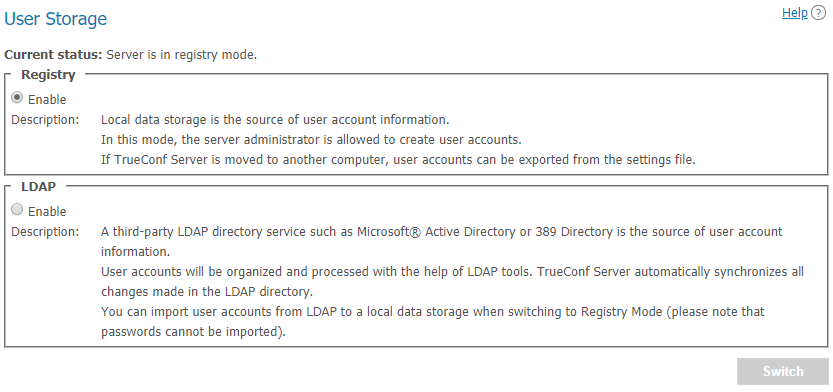
Registry Mode
Registry mode is used by default. In this mode, the server contains information about the users on the local server. You can add or remove users via control panel. If the server has been switched from Registry to LDAP data storage mode, existing user records will not be used anymore.
When switching to LDAP data storage mode, user records stored on the local computer will not be removed, so switching to another data storage mode will not damage saved information.
When the server is switched from LDAP to Registry mode, it is possible to import users from the directory service into the server local storage. This ensures you won't lose account data if you choose to stop using AD/LDAP or no longer need to synchronize accounts. To transfer accounts from the directory service to the Registry storage, check the box Import user information:
How transfer works:
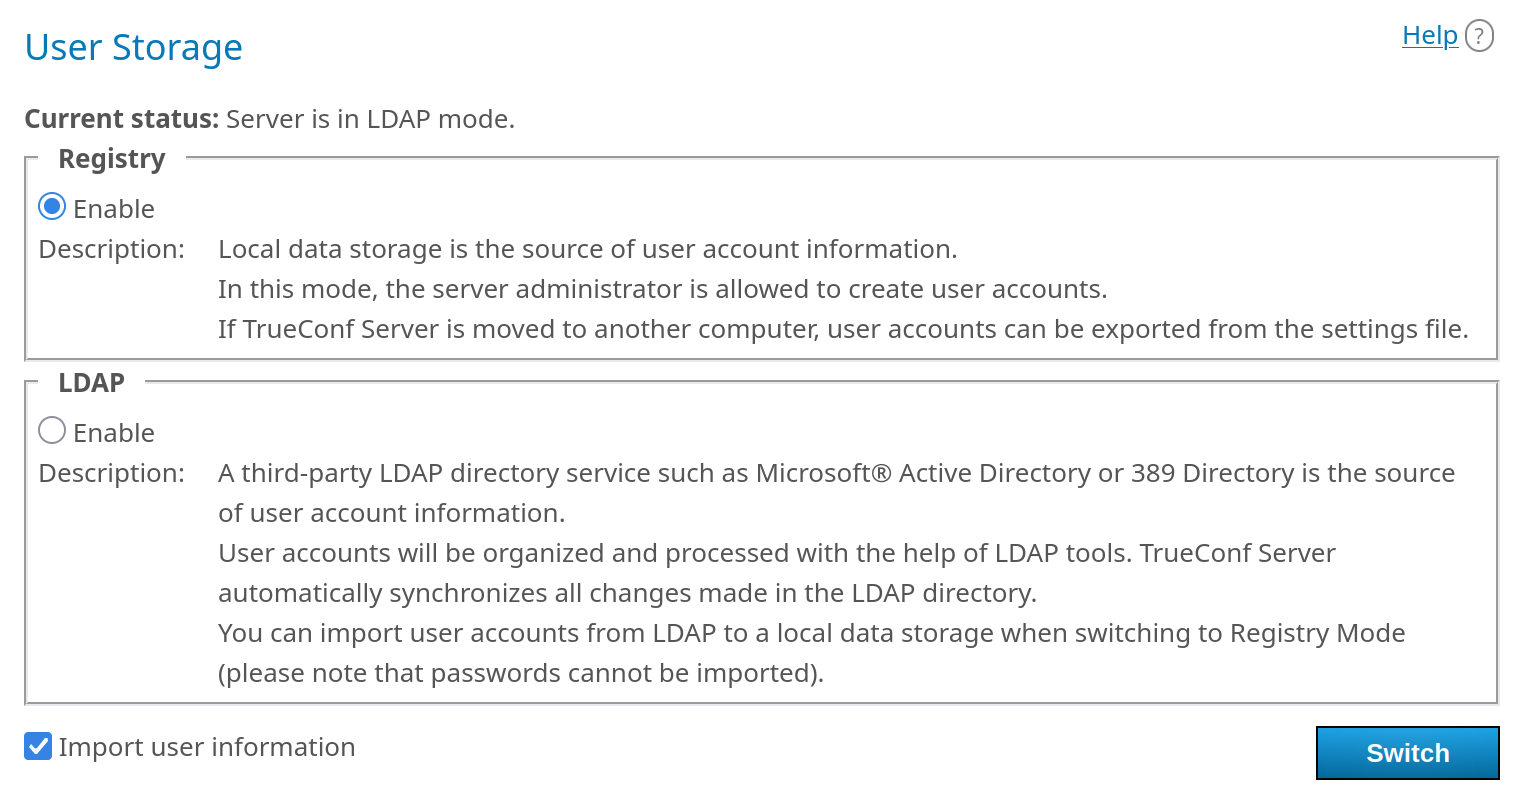
Data will be saved for the fields that were in LDAP/AD and are available in Registry mode (check the profile description).
The password will not be transferred, and a new one will not be created. This field will remain empty, and the administrator will need to manually set a new password.
Accounts will be deactivated.
LDAP Mode
In this storage mode, the server takes user information from a remote or local LDAP directory. This approach offers a number of advantages when the server is used in the corporate environment:
Automatic syncing of user information
No need for authorization within the network at the workplace
Transparency, speed, and ease of administration
Administration security
Support for various directory services: Microsoft Active Directory, FreeIPA, OpenLDAP, 389 Directory Server, etc.
In LDAP mode, you cannot edit the list of users and group settings in the server control panel. By default, the configuration settings for LDAP correspond to Microsoft Active Directory. User information is edited with the Active Directory management tools. However, when a user is deleted from the directory service, the avatar locally stored on the machine with TrueConf Server will also be deleted.
Additionally, in this mode a user will be able to set an avatar and change the display name in the application or personal area. This information will also be updated on the directory service side, but the following conditions have to be met:
Display NameandAllow Avatar Propagatingfields are correctly set in additional LDAP settingsThe account under which TrueConf Server connects to the LDAP directory has the permission to write these fields for objects.
To learn more about the LDAP protocol and the Microsoft Active Directory service, read our website.
In LDAP mode, user rights are determined by their membership in a particular Active Directory group. To activate this mode, check the box in field LDAP → Enable and click the LDAP settings button that will appear at the bottom. This will open the LDAP settings form:
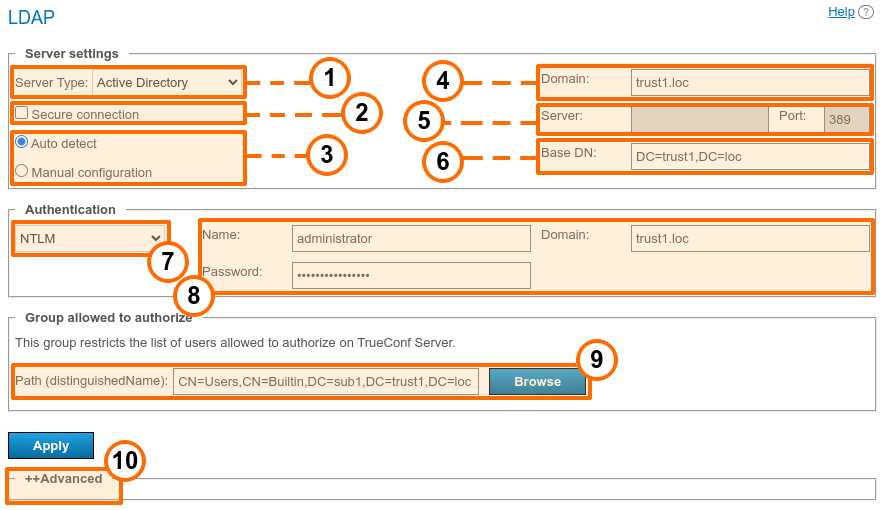
In the dropdown list Server Type, select your directory service, supported options are: Active Directory, OpenLDAP, 389 Directory Server, FreeIPA. This selection determines the default attribute names read by the server from the LDAP directory. You can also choose Custom to manually set the attribute names. After selecting the server type, to switch to its corresponding attribute names, expand the Advanced block below and click the Default button. You will see that the attribute names in the Value column have changed. If necessary, you can enter the required values and then click the Apply button, which is located in the same Advanced block.
Use the Secure connection option to connect to the LDAP server in protected mode (via LDAPS protocol) to ensure secure transfer of user data over the network.
Switches Auto detect define the mode for specifying the server address and port.
Specify your domain in the Domain field. In the automatic mode the LDAP server can be chosen among the servers by default of the DNS domain, specified in this field. Default servers are being chosen according to the relevant DNS-notes of SRV type. For Active Directory DNS domain name AD can be indicated here.
Specify the LDAP server address/port for manual configuration in the Server and Port fields. You can use the global directory to connect to the directory service. To do it, specify 3268 as the connection port for LDAP or 3269 for LDAPS.
Specify the directory object for user search in the Base DN field (Base Distinguished Name), for example,
ou=People,dc=example,dc=com.In section Authentication, select the authentication mode TrueConf Server on the LDAP server. The supported options are:
- Simple — by the specified login/password;
- NTLM — using a login and password, but via NTLM protocol;
- Current NT user (available only when installed on Windows) — the server will attempt to connect to the directory service using the account under which its services are running (more details described below);
- GSS — using a login and password, but through the GSS protocol;
- Kerberos Keytab — is detailed below.
In Active Directory, outdated NTLMv1 and LM protocols are disabled, so when using TrueConf Server on Linux OS, NTLM authentication may not work.
If necessary, specify the LDAP server authorization settings in fields Name and Password.
In the Path (distinguishedName) field, you can specify the LDAP user group that is allowed to authenticate on TrueConf Server, for example,
cn=TC_Users,ou=People,dc=example,dc=com. You can select a group using the Browse button. To enable this button, you must correctly fill in the LDAP server connection fields (in blocks Server settings and Authentication), including the Base DN field.
10. You can fine-tune the additional LDAP settings in block Advanced.
When switching server types (for instance, from Active Directory to OpenLDAP), the additional LDAP settings are not reset automatically. To revert to the default parameter values for the new server, expand block Advanced and click the Default button.
When switching from LDAP mode to Registry, you can import user records. To do this, on the User storage tab, select Registry mode and check the Import user information box, then click the Switch button.
User passwords are not imported. After import, the accounts remain in an "inactive" state (see the description in section User accounts).
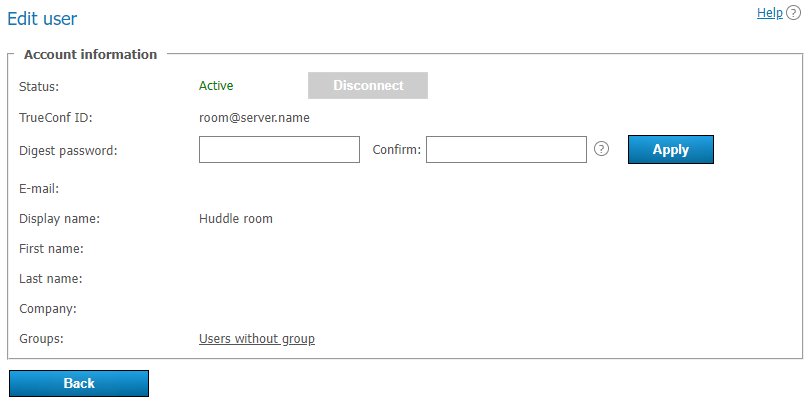
In LDAP mode, only the digest password will be available for editing in the user profile. This digest password must be specified when registering an SIP/H.323 endpoint on TrueConf Server. The same password should be specified in the authorization settings for the endpoint:
Directory of groups and users registered on TrueConf Server. This tab allows to create and manage the user’s groups. User Accounts tabs allows creating groups and managing rights. In the Registry mode a user can belong to one (or more) created groups. This parameter can be edited in the edit user information window. In the LDAP mode this window allows you to define rights for several LDAP groups. User attribute can be defined in the LDAP folder.
To import user groups from LDAP, go to section Users → Groups. Click the Change button and select the desired groups from the list that appears. For more details, refer to the article on configuring user groups.
When groups of users are imported from LDAP, the list will include only the groups that are included in it by default.
If you have several TrueConf instances connected to a common LDAP directory, users can log in to the personal area from a guest page of any of the connected servers. In addition, users can participate in private meetings hosted on a different TrueConf instance connected to a common LDAP directory using an auto-generated login.
Authorization as an NT user on Windows
If TrueConf Server is installed on Windows and you prefer not to provide authentication details in the control panel for LDAP directory integration, you can use the credentials specified in the OS. In this case, TrueConf Server will use the login under which its services are running:
Make sure that the machine with TrueConf Server is within the same domain with the required LDAP directory (e.g., AD). By default, AD objects (including PCs registered in it) are allowed to read the list of objects, which would be enough for getting the list of users/groups. However, if you want avatars to be updated on the directory side, when they are changed in TrueConf, you will need to create a new user account and give it required permissions. You should also make sure that
Allow Avatar Propagating: 1is set in additional parameters.Go to the OS service management (for example, by executing the
services.msccommand in the terminal/PowerShell):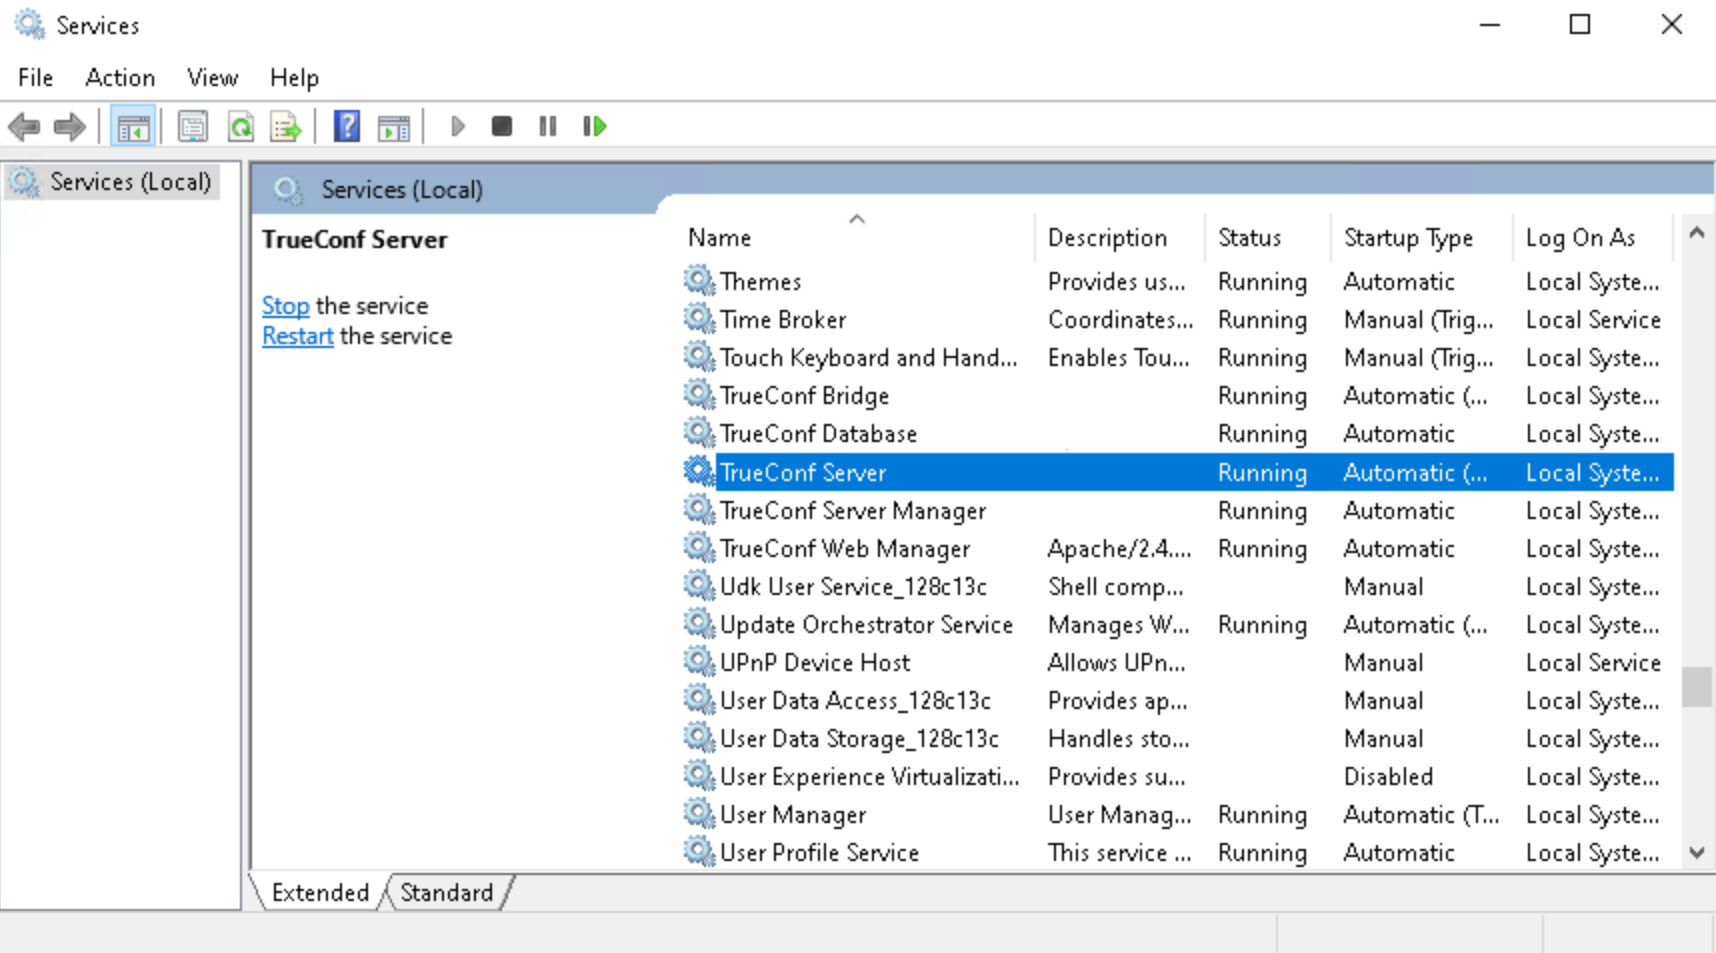
Double-click on the TrueConf Server service to open its properties and navigate to the Log On tab:
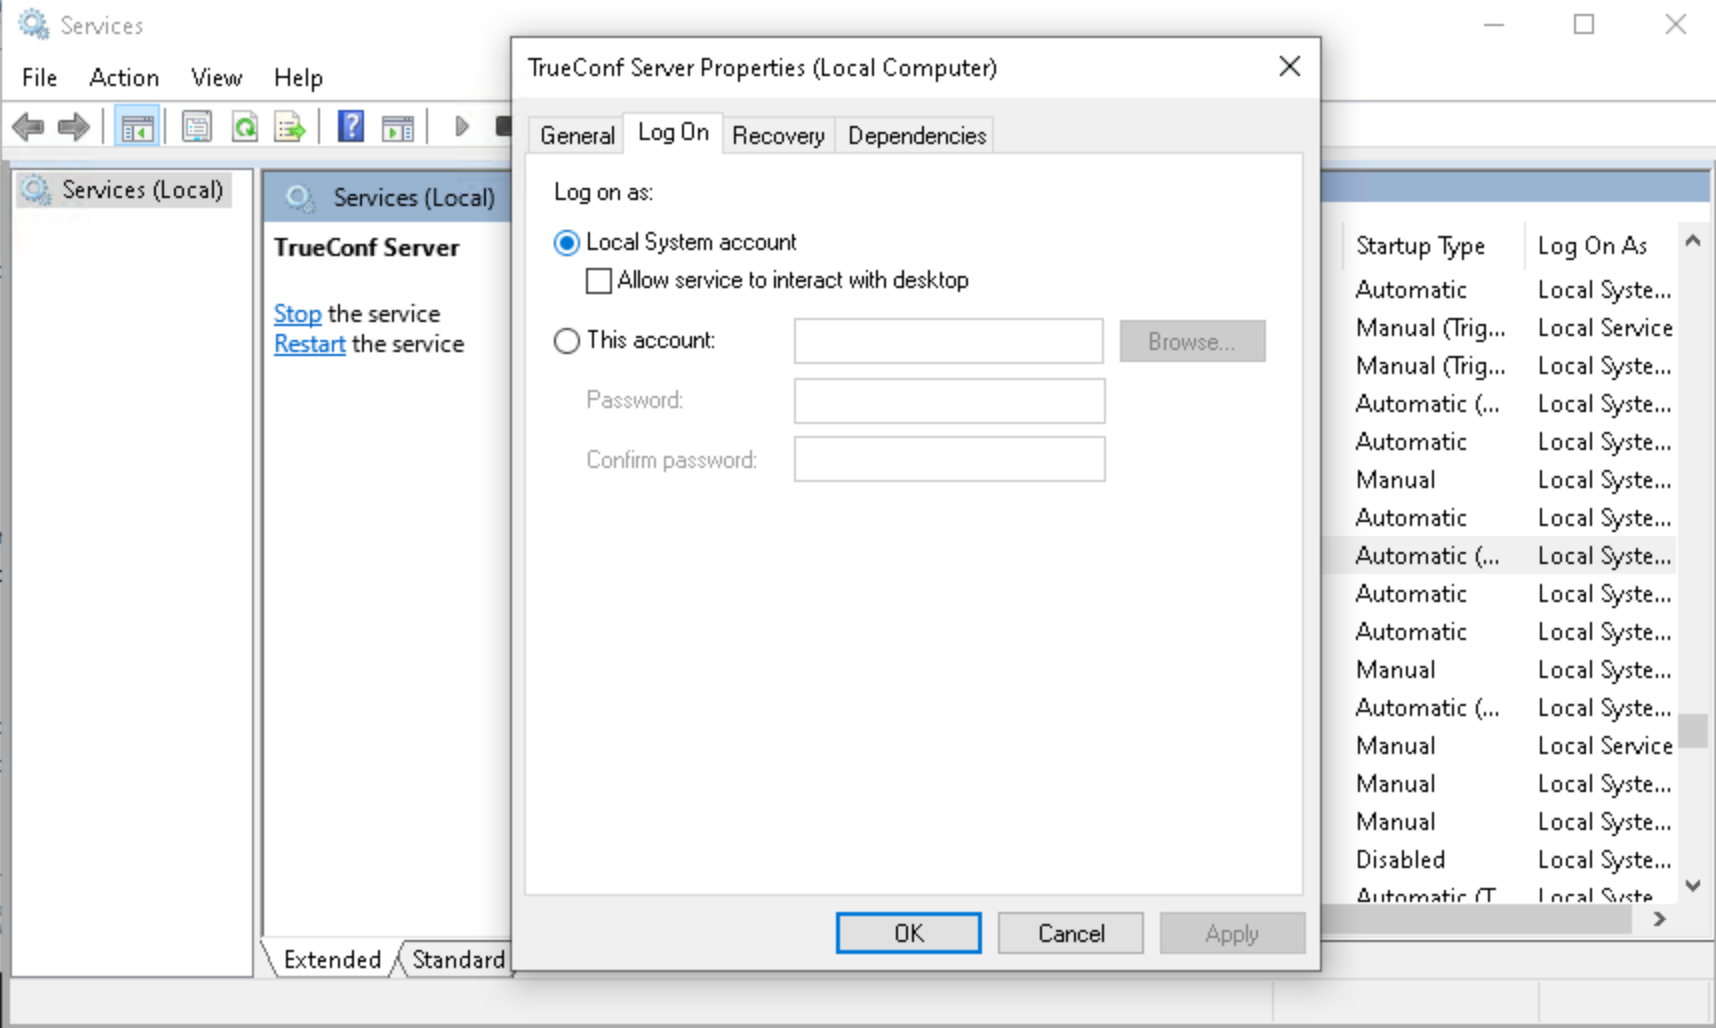
Select option This account and enter the required login/password:
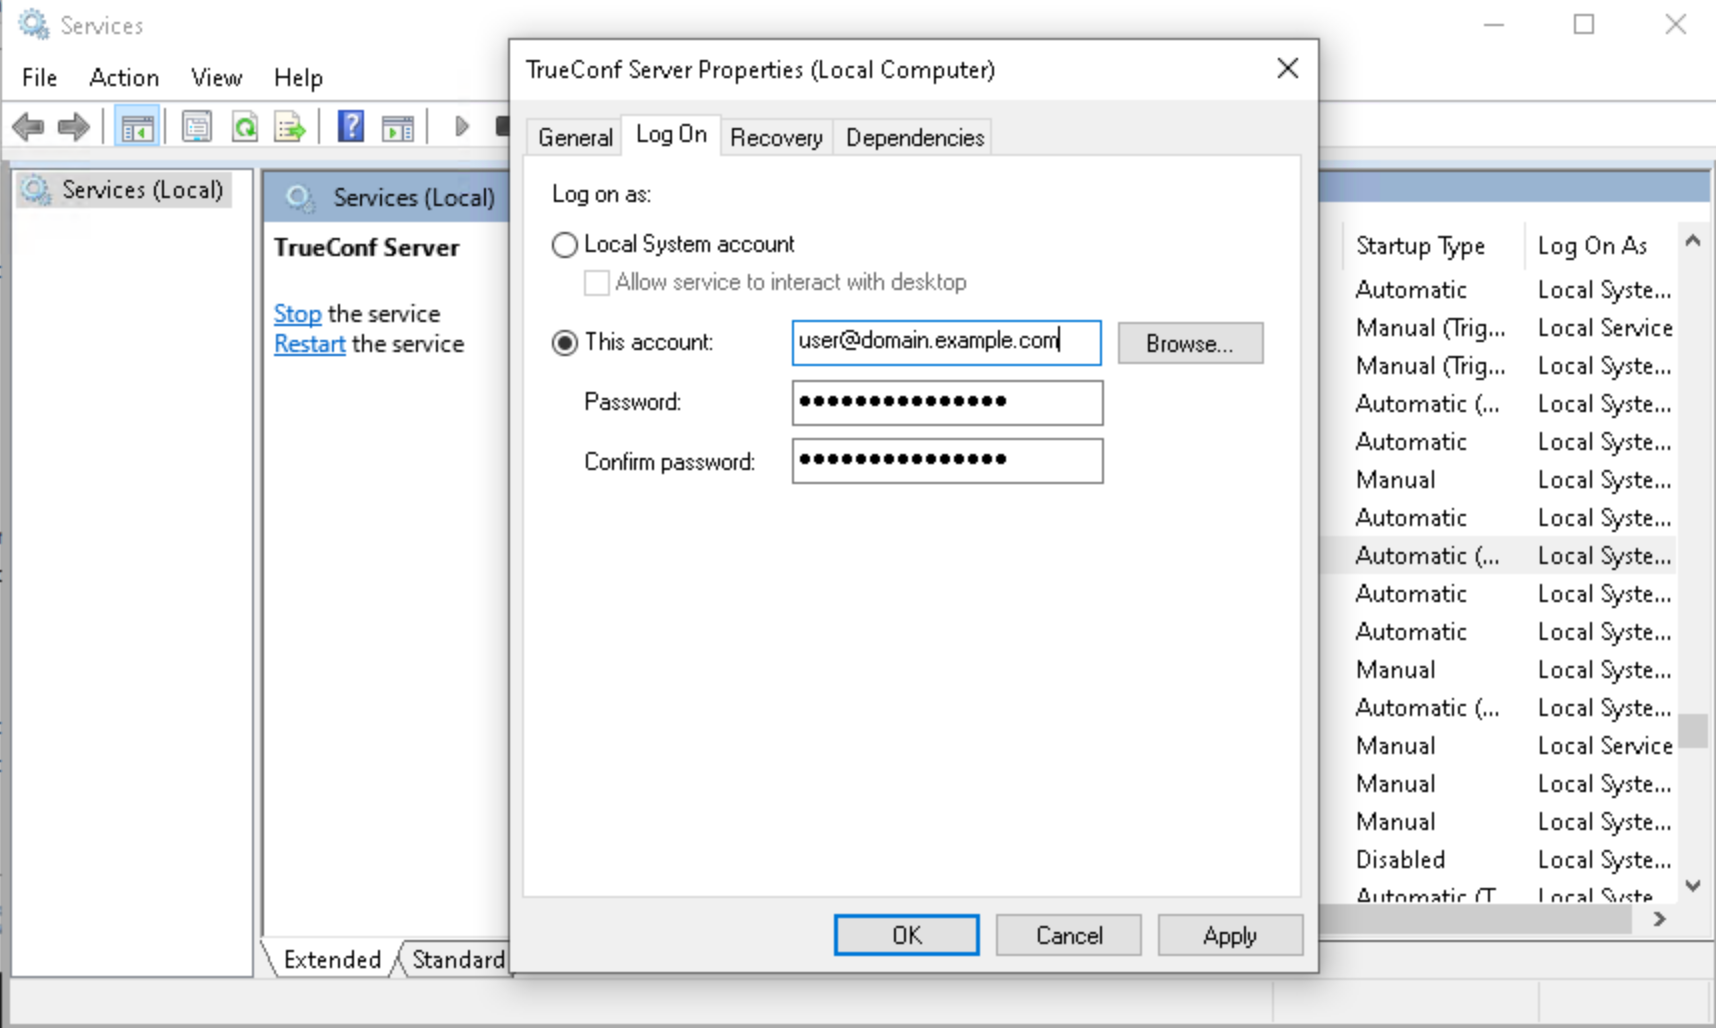
If you need to specify a particular user explicitly (when the default system account is not suitable), repeat steps 3-4 for the TrueConf Web Manager and TrueConf Server Manager services.
Generation of a keytab file for Kerberos server authentication
If the Kerberos protocol is used for connecting to the directory service via LDAP/LDAPS, a keytab file has to be uploaded for the connection of TrueConf Server. This file needs to be generated on the directory service side.
The keytab is issued for the user account (UPN) under which TrueConf Server will access the directory service, rather than for the SPN. So, such a user must be created on the directory service side.
Do not confuse generation of a keytab file for connecting a video conferencing server to a directory service with generating a keytab for user connection to the server. These are different tasks! Even if the server receives data via Kerberos, you can still use any convenient authentication methods for user connections.
Generation of a keytab file for Active Directory
If you are setting up integration with MS Active Directory (MS AD), you will need to take these steps to generate a keytab file:
Run PowerShell on the machine where AD is installed.
If a user has not been previously created for accessing the directory service, add one by running the command:
New-ADUser -Name "[user]" -SamAccountName "[user]" -Path "OU=example_ou,DC=example,DC=com" -AccountPassword (ConvertTo-SecureString "[pass]" -AsPlainText -force) -Enabled $truewhere:
[user] — the login of the new OS user
OU=example_ou,DC=example,DC=com — the user's LDAP group
[pass] — the new user's password.
3. For convenience, you can set a password policy for the user so that the password does not expire (has an indefinite validity period) and cannot be changed. Replace [user] with the login of the user which was created previously:
Get-ADUser [user] | Set-ADUser -PasswordNeverExpires:$True -CannotChangePassword:$true4. Execute the command to generate the keytab file:
ktpass -princ [user]@example.com -mapuser [user] -crypto ALL -ptype KRB5_NT_PRINCIPAL -pass [pass] -target example.com -out c:\ldap.keytabwhere:
[user] — the login of the previously created OS user
example.com — domain name
[pass] — user password
c:\ldap.keytab — the path to save the file on the machine with AD; if necessary, you can specify a different path.
After that, transfer the file to any PC from which you administer TrueConf Server, and upload it when configuring LDAP mode.
Additional LDAP Parameters
Below you can find additional LDAP parameters and their purpose (user fields, filter rules, etc.). Depending on the chosen provider type, some parameters may contain pre-filled values (which can be reset if necessary).
If both the PBX and TrueConf Server are integrated with the same LDAP directory (such as Microsoft Active Directory), you can use additional fields to make user dialing easier. For instance, you can configure aliases in the LDAP directory and specify a field from the directory in Additional → User Alias List. During the import of users, their aliases will be retrieved and immediately available for use in the TrueConf system. So, it will be possible to make direct calls to users by their aliases without an additional mapping configuration. This option may be helpful when a person has to use numeric aliases for quick dialing from SIP phones and SIP/H.323 endpoints.
- Login - username;
- Display Name - full display name;
- First Name — name;
- Middle Name - middle name / patronymic;
- Last Name - last name;
- Email — email;
- Company — organization name;
- Branch - branch name;
- Department - department;
- Job Title — position;
- Manager — manager's name;
- Address - user address;
- Max Results — the total number of pages returned in the search results (5000 is selected by default for all templates of LDAP providers)
- Max Request Limit — the number of pages returned by a single request (default for all templates is 1000), meaning this is the number of pages the server requests data from the LDAP directory until it accumulates Max Results results;
- Filter Disabled — indicates whether the user is enabled or not;
- Group Member — specifies which participants are in a specific group;
- memberOf — (for Active Directory only) the parameter which is responsible for linking an object to groups. It includes the list of group DN entries for each user (needed for filtering users by groups).
- Filter Login — search filter by login;
- Filter CallID — not used, retained for backward compatibility;
- Filter Group — the filter for searching by groups which prevents other objects with matching names from being loaded
- Attr primaryGroupId — (Active Directory only) group ID parameter;
- Attr primaryGroupToken — (Active Directory only) group token parameter;
- Attr objectSid — (Active Directory only) object ID parameter;
- Attr SIP Phone - SIP number for contacting the user;
- Mobile Phone — mobile number for contacting the user;
- Work Phone - work phone number for contacting the user;
- Home Phone — home (personal) phone for contacting the user;
- User Status Attr — an attribute that determines a user's absence status across different servers simultaneously;
- User ID Attr — an attribute that identifies the user's absence across different servers simultaneously by their ID;
- Full ID Attr — the attribute that determines the user’s absence status across different servers simultaneously with the help of the full user ID (with the domain name included)
- DetailedUserInfo Attribute — overriding fields to be displayed in user information;
- User Alias List — the list of attributes that will serve as user aliases after authentication (they have to be separated with commas
,) - TrustPartner Attr — (for Active Directory only) the filter that allows you to combine multiple domains into a trusted domain
- FlatName Attr — (for Active Directory only) the display name for the trusted domain, when multiple domains are combined into a trusted domain
- TrustedDomain Filter — (for Active Directory only) the filter that allows you to combine multiple domains into a trusted domain
- ForeignSecurityPrincipal Filter — (for Active Directory only) the filter that allows you to combine multiple domains into a trusted domain
- Trust Enabled — (for Active Directory only) the filter that allows you to combine multiple domains into a trusted domain
- FilterClientSearchByLoginGroup — (
boolean) used for searching contacts in a client application. If this attribute is not specified explicitly, it defaults totrue. Moreover, only the users who belong to the login group will be found. If set tofalse, it allows finding other users in the LDAP directory who, for some reason, are NOT yet part of the login group. - Use Avatars — should be set to
1for correct avatar loading in applications; - Allow Avatar Propagating — should be set to
1for correct avatar loading in applications; - AddressBook Refresh — a timer (in seconds) for periodic caching of relationships between groups and regeneration of address books. When the timer expires, it is assumed that the request did not yield any search results.
- Filter AddressBook — a filter that can be used to create a user's address book;
- TimeOut — the time allowed for connection/request execution (in seconds). When this time elapses, it is assumed that the request did not yield any search results.
- thumbnailPhoto Attr - avatar;
- jpegPhoto Attr — avatar storage location;
- Meeting Room Filter - filter to obtain a list of conference venues (such as meeting rooms), used in conjunction with Meeting Room Search Filter Attr;
- Meeting Room Search Filter Attr — LDAP attribute that contains conference locations;
- Meeting Room BaseDN — not used;
- LDAP Login with subdomain - Allow users from subdomains to log in, where their login will be in the format
sub.domain\user.
Additional phone numbers
For integration with Microsoft Active Directory (AD), it may be useful to specify multiple attributes for a single field. The thing is that AD can store several pieces of data under different attribute names, such as mobile and otherMobile. In such cases, to display multiple contact details of the same type in a contact card, you need to enumerate the required attributes separated by commas in the field under the Additional list.
For example, to display multiple phone numbers in a subscriber's card, specify the value mobile,otherMobile in the LDAP Property Name column for the Mobile Phone field.
For providers of a different type, this is not necessary because the directory service can already store multiple values separated by commas.
How to upload user accounts from different domains
The account used by TrueConf Server for authentication on the directory service should be given the right to read "Foreign Security Principals" objects from other domains and the right to authenticate on them.
You should use authentication type GSS or Kerberos Keytab.
On the primary domain that TrueConf Server will connect to, create a group with the scope (range) of Domain Local.
Move to this group the accounts of users (or user groups with the universal range; nested groups are supported only within a single forest) that you want to upload on the server.
Complete the steps 1 and 2 for all domains that will be used for uploading accounts.
In the LDAP settings, specify this group in the field Path (distinguishedName).
Ensure that the Advanced block in the LDAP settings has the Trust Enabled parameter set to 1 (default value).
Certificate installation for LDAPS connection
To ensure connection via LDAPS, one may have to upload the root SSL certificate on the physical or virtual machine where TrueConf Server is deployed. This certificate should correspond to the domain where the domain controller server operates. To do it, copy the root SSL certificate of the domain to any directory on the machine with TrueConf Server.
Please note that the certificate has to be in the .crt format. So, if a different format is used, you will need to convert the certificate as it is described in this article.
Next, install the .crt certificate depending on your OS:
For Windows OS
Double-click on the certificate.
In the certificate installation window that appears, click the Install Certificate button.
In the storage location selection window, specify Local Machine.
In the next storage setup window, select Place all certificates in the following storage and click Browse.
In the list of repositories, select Trusted Root Certification Authorities and click OK.
To complete the setup, click the Next and Finish buttons.
On Debian:
- Run the following command in the terminal as the administrator:
cp /home/$USER/cert.crt /usr/local/share/ca-certificates && update-ca-certificateswhere /home/$USER/cert.crt is the absolute path to the .crt certificate copied to the machine with TrueConf Server.
2. Restart the machine with TrueConf Server.
CentOS:
- Run the following command in the terminal as the administrator:
cp /home/$USER/cert.crt /etc/pki/ca-trust/source/anchors/ && update-ca-trustwhere /home/$USER/cert.crt is the absolute path to the .crt certificate copied to the machine with TrueConf Server.
2. Restart the machine with TrueConf Server.
How to address typical issues when using LDAP
When LDAP is configured, some errors may occur while connecting to the directory service. In such cases, after you click on the Apply button which is in the connection parameters block, the corresponding notification will be displayed in the upper part of the screen. Below you can find some typical issues:
Error LDAP error 81 (Server Down)
No connection with the directory service. Most likely, TrueConf Server cannot access this service via the specified address and TCP port (389 for the standard connection and 636 for the secure connection via LDAPS). To test the connection, you can use the console application telnet (available on Windows and Linux):
telnet [ldap-server] [port]where [ldap-server] is the address while [port] is the port of the server that acts as the domain controller. For example, if you need to test access via LDAPS, you need to run:
telnet ldap.example.com 636If there is no connection, it is necessary to check the network equipment settings or network-to-network software. One should also make sure that the server acting as the domain controller has been started.
Error LDAP error 49 (Invalid Credentials)
Unable to authorize on the LDAP server. Make sure to provide the correct service account data used for connection to the directory service (go to LDAP settings, the Authentication section).
Error LDAP error 53
This issue is typically due to policy restrictions set on the side of the directory service, for example, NTLM may be disabled for AD. You should also make sure that the Base DN field is correctly specified.
Error LDAP error -1
This error may occur when connecting to the directory service via the secure LDAPS connection. This problem may occur due to various reasons.
- It is necessary to make sure that the root SSL certificate of the domain, which includes the domain controller server, is uploaded on the physical or virtual machine where TrueConf Server is deployed. When the certificate is uploaded, you can test the connection with the openssl program: run the following command in a Windows or Linux terminal:
openssl s_client -connect [ldap-server]:[port]where [ldap-server] is the address while [port] is the port of the server acting as the domain controller.
2. If TrueConf Server is deployed on Linux, and connection to Microsoft Active Directory has to be configured, make sure to specify the fully qualified domain name (FQDN) of the machine, where the domain controller server is deployed, in the Domain field. It should include the name of this machine, for example, server-name.ldap.example.com. In this case, FQDN should be used in the command testing SSL connection (check the previous step).
Connection has been established, but the list of accounts is empty
Make sure that the set of filters in the Advanced tab corresponds to the selected server type (Active Directory, OpenLDAP, 389 Directory Server). To switch to the corresponding attribute name after the server type is changed, click the Default button and configure required filters.
The users from the main domain are displayed, but the users from trusted domains are missing
Make sure that:
In section Advanced of the LDAP settings, parameter Trust Enabled is set to 1.
The account used to connect to the domain controller server has read rights for the member of attribute from the ForeignSecurityPrincipals container.
Password and Lock Settings
Password Requirements
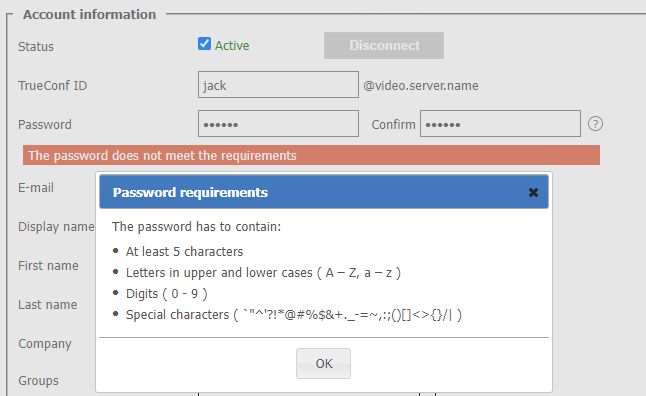
When using Registry mode in block Password requirements, you can specify the minimum password length (from 2 to 64) and the mandatory presence of certain characters (uppercase and lowercase letters, numbers, special characters) for your TrueConf Server users. These parameters will be checked when adding a new account and when changing the password for an existing one, including when the user edits it in their personal area:
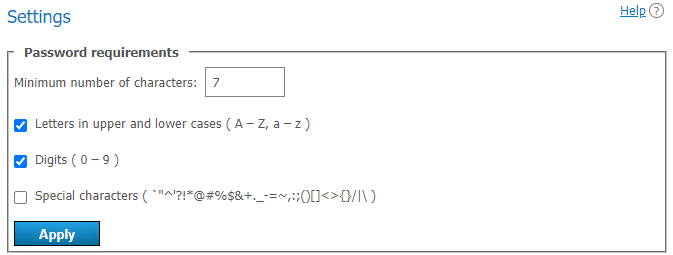
Additionally, the password may include characters that cannot be set as mandatory, including emojis, such as: ⚠️№ßÜ🕐.
If the password does not meet the requirements, an error message will be displayed. Click on the ![]() button (which is next to the input field) to view the password requirements:
button (which is next to the input field) to view the password requirements:
Automatic Lock
In the Account lockout policy section, you can enable the account lockout policy for those cases when a user enters an incorrect password during authorization.
Lockout settings are available both in Registry and LDAP modes. The lockout should be configured on the side of the video conferencing server; it is not related to AD/LDAP settings.
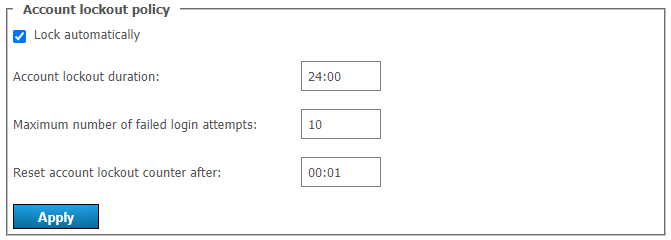
Here, you can specify:
account lockout period (a user can be manually unlocked at any time in his/her profile)
maximum number of failed login attempts
time interval between unsuccessful login attempts (if the interval is larger than the specified value, the counter for unsuccessful login attempts will be reset to zero).
Let us consider the following example. Here, we will use these settings:
- Account lockout duration = 6:00, meaning 6 hours;
- Maximum number of failed login attempts = 5
- Reset account lockout counter after = 00:10, which is 10 minutes.
If a user with an existing server login (TrueConf ID) makes five failed attempts to enter a password with less than 10 minutes between each attempt, the account will be locked for 6 hours. However, if there is a 10-minute gap after any attempt (e.g., after the 4th attempt), the counter will be reset to 1.
Display of fields from a user card
In section Fields visibility, you can select which profile fields of any user on your server can be viewed by different user types. Independent settings are available in the following columns:
- Users of your server — specify what your users can see when they view a contact card (information about another user) in the application or personal area;
- Federated users — what data participants of the federated server can view when accessing user contacts on your server;
- Guest users — what information about your users is disclosed to guests of public conferences (webinars).
In this case, the display name is always shown.
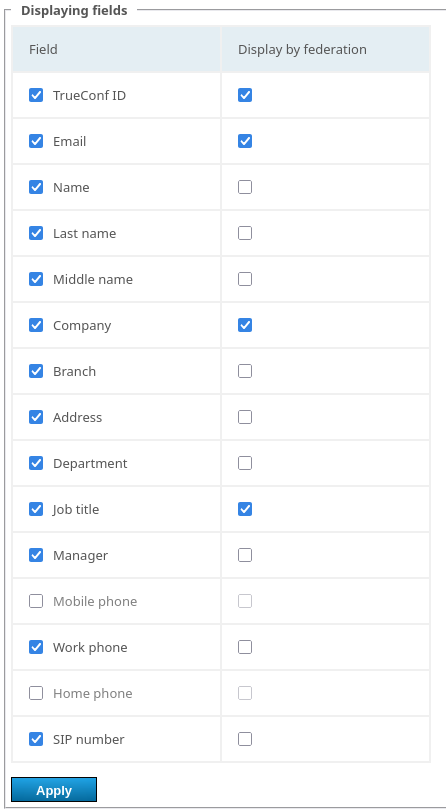
In the case of directory service integration via LDAP/LDAPS, this data is retrieved from the relevant attributes described in section Advanced.
After configuring settings for users, you can install client applications for them and teach them how to connect to your server (read the desktop application documentation). This will conclude the essential steps required to launch the corporate messenger with TrueConf video conferencing!