# Group conferences and streams
This section enables server administrators to schedule conferences, invite participants, and set other parameters.
Such conferences can be launched automatically (at a specified time or according to a schedule) or manually by server administrators.
In TrueConf Server Free the number of group conferences that can be held at the same time is restricted. To learn more, go to the web page of this solution.
# Conference list
This list includes the following events:
events created by administrator in this section of the TrueConf Server control panel
events added by users in the application or personal area
created in the TrueConf mail plugin
added with API commands from third-party scripts/applications
active conferences created ad hoc in the client applications (they will disappear from the list when they end).
Ongoing meetings are always displayed in the upper part of the list and are highlighted in orange.
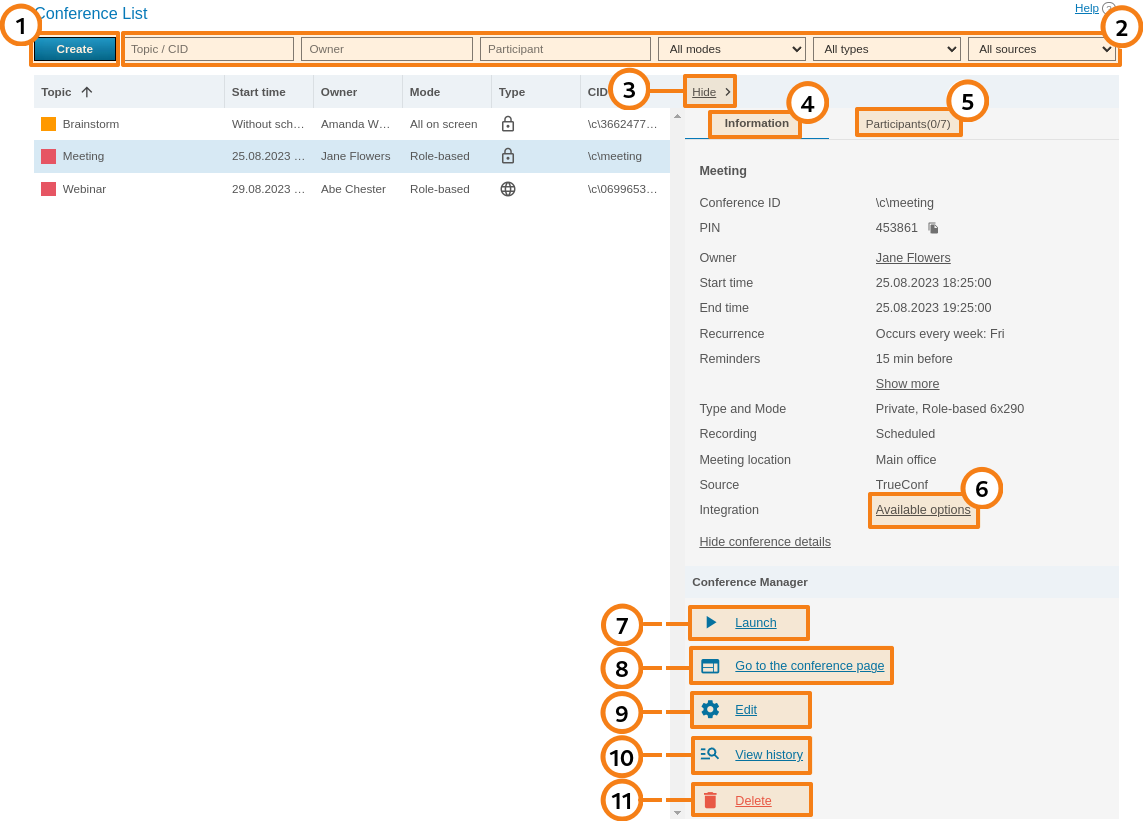
Here you can do the following actions:
Filter the list by the name (or ID) of the selected conference, as well as by its owner, any participant, mode, access type, or source (more about sources).
The conference card can be minimized; in this case, the control panel with multiple buttons will be displayed instead (the buttons on the panel will vary depending on the conference status, either active or inactive). The actions available for each scenario will be described below in more detail.
View information about the selected conference: its name, ID (unique identifier), PIN code (if set), owner's name, link to its web page, email reminders (if added), location (if specified), mode and launch type, source of its creation (TrueConf or mail plugin), and whether video recording is scheduled.
Open the list of invited participants.
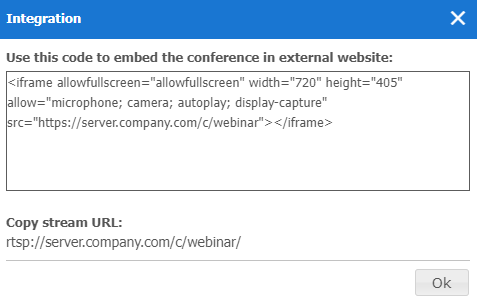
Click on the link to get the HTML code of the widget needed for embedding the conference on external websites. It wil be available only for webinars (public online events). If you have set a streaming configuration for the webinar, the corresponding link will be displayed below the widget code:
Start the conference manually. Before the start you will be offered to invite all the participants to the conference or select particular users. At conference forced start, only online users will be invited to the conference. Email invitations will not be sent out.
Go to the conference page.
Edit the selected conference (unavailable for an ongoing meeting). In the conference editing menu, you can use almost the same group of features that are available when a conference is created.
View the previous sessions (history) of the selected conference in the Call History section.
Remove selected conference.
# Sources of conferences
To make searching for events easier, we introduced a special filter based on the source of a conference. Conferences can be created in various ways, and accordingly, there are the following options for filtering the list of events by source:
TrueConf — events which were created:
In the control panel, in the user personal area, in the application scheduler
"On-the-fly" in a client application (quick conferences)
With the secret API token taken from the Web → Security section.
Please note that we do not recommend using this API token. It is safer to create OAuth applications with the necessary permissions for each task.
Email client — conferences created via email plugins
OAuth application — conferences created with OAuth applications (read API use description).
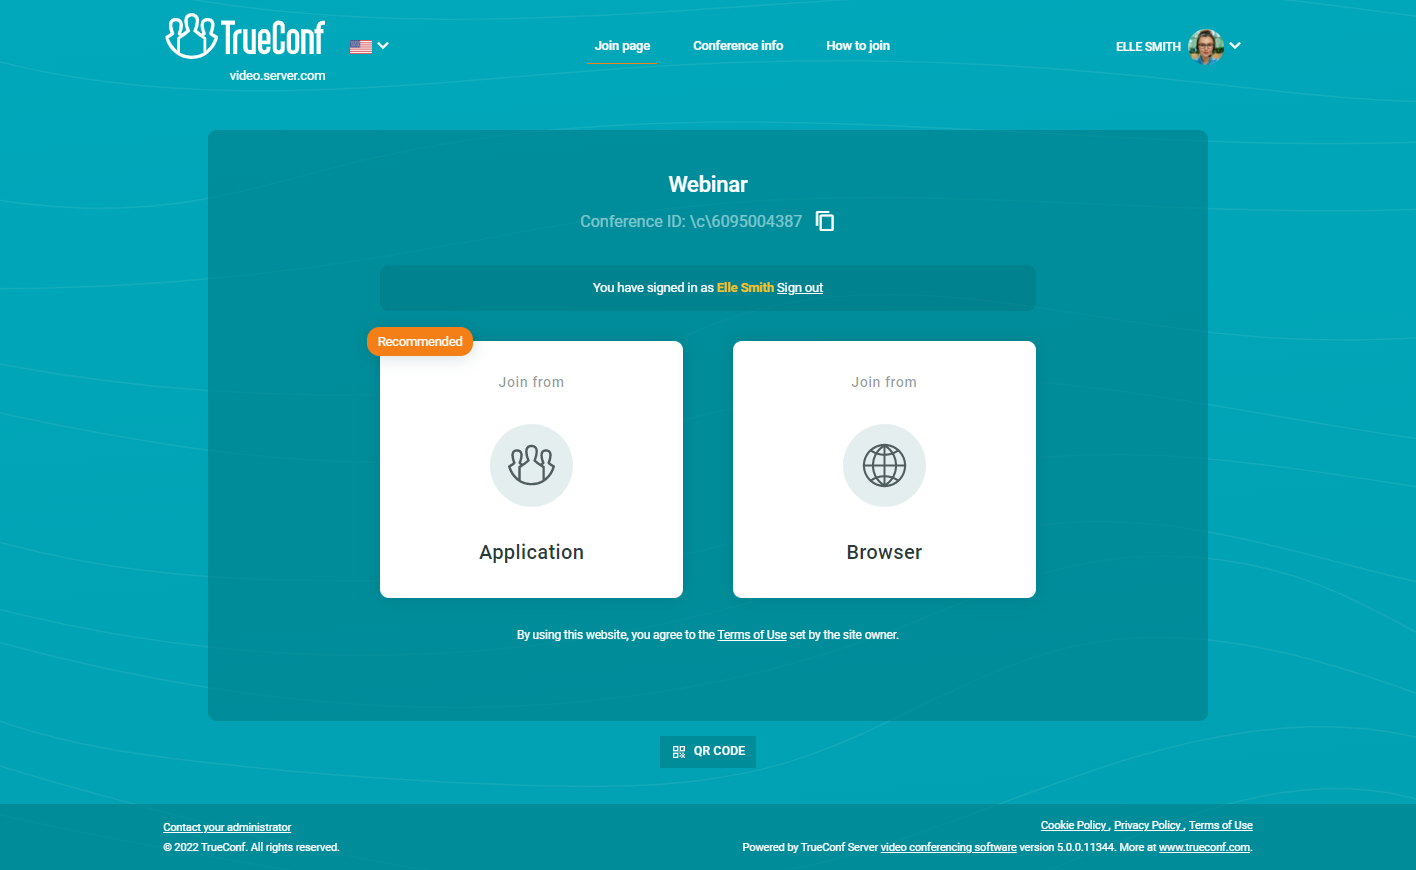
# Conference page
The conference page contains the main information about the event and some additional elements depending on the settings:
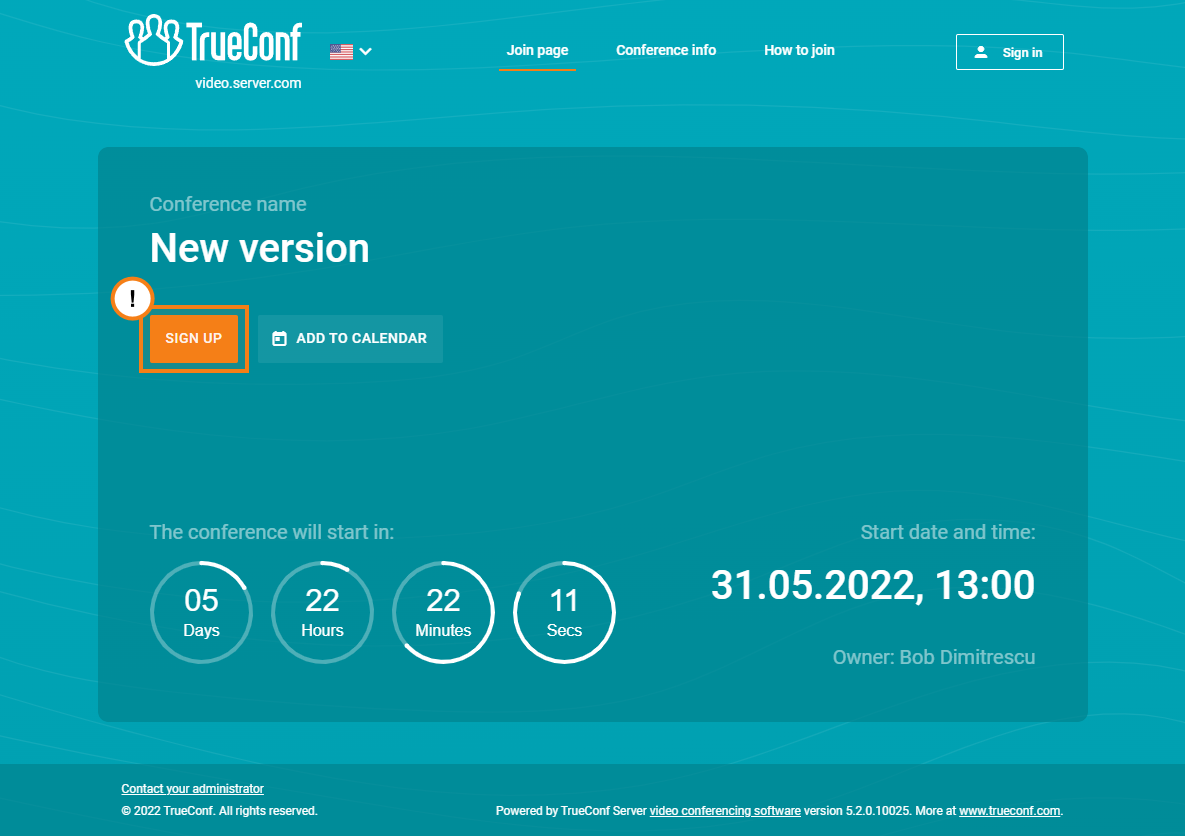
Registration button if the conference is public (a webinar) and participants are allowed to sign up for the event on their own
If the event is scheduled for a specific time, a countdown timer will be displayed along with a button to add the conference to the calendar
Buttons for joining the conference from a browser or application if this event has already started or if it is a virtual room.
Please take into account the specifics of joining a webinar with registration for SIP/H.323 endpoints, server users, and federated participants.
If the client application has already been installed, it will connect to the conference in the following way:
The application will try to connect to the conference with the authenticated user account (regardless of the name entered on the conference web page).
If the conference was created on a different TrueConf Server instance, the application will try to connect to the conference via federation.
If there is no connection via federation, the user will join the conference as a guest and then, when the conference is over, authorize automatically on the local server.
To learn more about connection options, check our article.
# Saving guest connection data
There are several convenient features available to the guests who join webinars:
The temporary internal ID (login) created for a guest is bound to the browser and client application (this ID may be displayed, for example, in the connection list on the page of a session). The guest ID will change if a different application is used (e.g., if a user signs in on a different device), if a different browser is used, or when connecting in incognito mode in the browser.
Since the ID is saved, it is possible to gather accurate data about the number of participants and other metrics for reports and analytics.
If a user is suddenly removed from a conference (e.g., if connection is lost) or if the user leaves the conference and then decides to join the meeting again, he/she will see all chat messages, even though these messages were sent when the user was not connected to the conference.
Thanks to saving the ID, you can leave the conference, quickly change the display name, and join the meeting again (for example, if a typo was made or the name which was entered previously does not meet the requirements set by the administrator). All messages sent under the previous name will also be displayed to all other participants with the new sender's name.
# How to configure an ongoing meeting
When selecting an ongoing conference, the administrator can view information about it or change some of its parameters (e.g., the layout or PIN code). Standard editing and deletion options will be unavailable.
# "Information" tab
Display conference information and the control buttons:
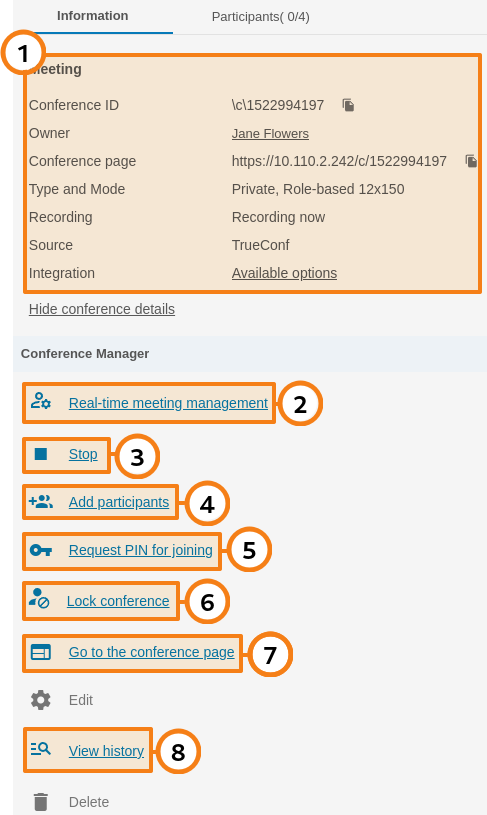
Basic meeting information and options for integration with third-party websites.
Proceed to real-time meeting manager.
Stop the meeting for all participants.
Click on the Add participants to select new users:
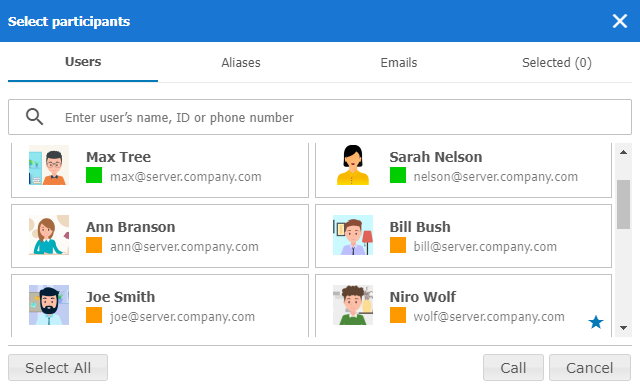
To add participants to a conference, select the users in the Users tab. You can select all server users at once by clicking on the Select All button. In the Aliases and Emails tabs, you can add a participant by his or her alias and send the invitation, specifying the email and the name displayed in the meeting. The resulting list is displayed in the Selected() tab. After the list is formed, click the Call button at the bottom of the window.
5. Changing or disabling a PIN for joining a conference. If the secure entry is disabled, you can activate it by clicking Request PIN for joining.
6. Locking a conference. In this case, a conference can be joined only by moderators (including the owner) and the users invited after the conference was locked. If a regular user was added to the list of invited participants, but could not join the meeting before it was locked, he/she will be unable to join. If a public conference is held, guests will be unable to join and it will be impossible to send email invitations.
Each time when a conference ends, its access status is switched to unlocked which is the default value.
7. Go to the conference page.
It is also possible to set a PIN for a conference or lock it in the real-time meeting management tool.
8. View the previous sessions (history) of the selected conference in the Call History section.
# "Participants" tab
Information about invited participants and those who have already joined the meeting:
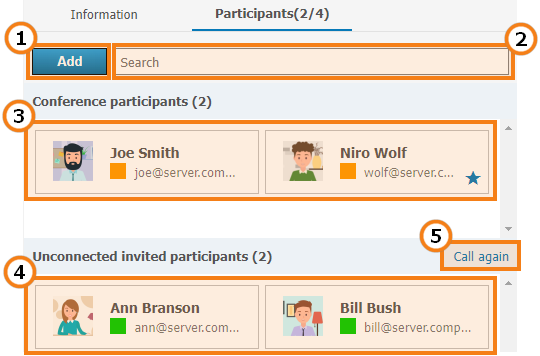
Adding new participants to a conference.
Quick search for participants.
The list of participants who have successfully joined and are present in the current meeting.
Users who have been invited to a meeting, but have not joined it yet.
To invite all non-connected participants to a meeting, click the Call again link. Then, click the Invite button in the opened window.
# Editing conference settings
To edit any inactive conference, the server administrator needs to select this event in the general list and open the editing menu. The ability to change conference parameters depends on whether the server is now integrated with the corporate mail via TrueConf Calendar Connector:
If there is no integration with the corporate calendar or the conference was not linked to an event (for example, the meeting was created before the integration was set up), you can set the same parameters that are available when an event is created.
If the server is run in integration with the corporate calendar and the conference was created as part of an event (refer to the TrueConf Calendar Connector documentation), editing capabilities will be limited:
it will be impossible to turn this meeting into a scheduled conference (calendar interaction supports only virtual rooms)
the sections related to conference ID, email invitations and reminders, time extension, and meeting location will be hidden
you will not be able to add or remove anyone from the participant list
it will be impossible to change the conference owner.
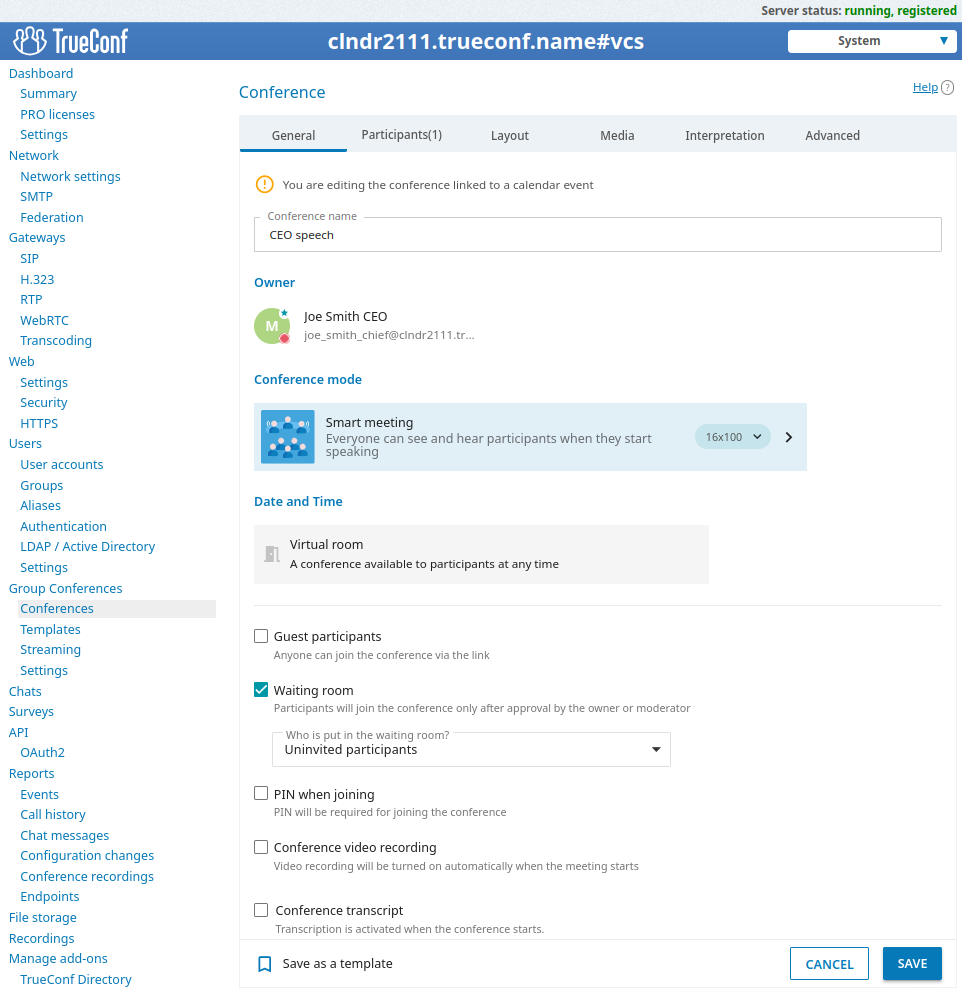
The remaining parameters of scheduled conferences linked to calendar events can be set just like for regular meetings, for example, you can activate video recording or audio transcription in the General tab.
# Creating a new conference
By clicking on the Create button in the Conference List menu, you will open the General tab where one can configure the most widely used settings.
It is also possible to create a conference from one of the templates saved earlier.
Apart from the conference settings listed below, it is possible to add a background and/or watermark to the conference layout. They can be selected for all events in the Gateways → Transcoding → Visual settings section.
# "General" tab
At the top of the General tab you can find the parameters required for creating a conference:
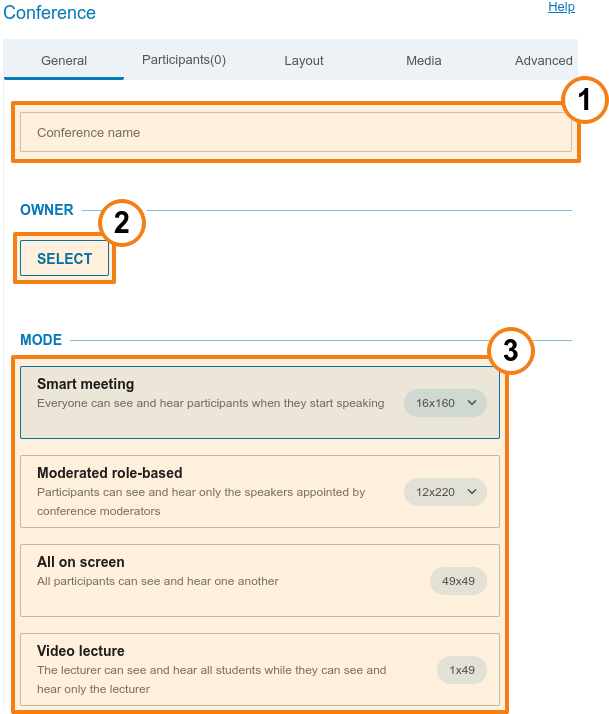
Conference name — for example, "Marketing department meeting".
When scheduling a conference, the administrator selects the owner (who is automatically given the moderator role) and other moderators. The remaining roles are given to users during the conference.
3. Conference Mode: all on screen, smart meeting, moderated role-based conference, video lecture. Just click on the option, which is currently selected, to choose a different mode.
Refer to the documentation on TrueConf client applications to get a better idea of how the layout is filled in a smart meeting with different types of connections.
For moderated role-based conferences and smart meetings, you can specify the number of speakers.
The maximum number of participants in a moderated role-based conference and smart meeting depends on your license type. The number of participants can reach 2000. The maximum number of speakers in a smart meeting or moderated role-based conference is 49.
- In the Date and Time section, choose the conference launch type: unscheduled (virtual room) or scheduled. If you choose to create a scheduled conference, select the time for a one-time or recurring conference. On the Additional tab, you can also configure time extension settings for a scheduled conference.
Below you can find access settings, server-side recording settings, and the parameters for speech recognition (available if the integration with the AI server is configured):
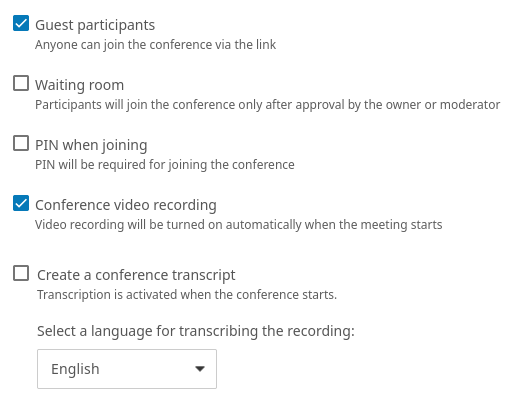
To make the conference public (create a webinar), check the Guest participants box.
The maximum number of guests in a webinar is determined by your license (and by overall restrictions depending on a specific conference mode). TrueConf Server Free has its own restrictions on the number of guests.
Learn more about webinars in our articles and videos:
To activate the waiting room for an event, check the corresponding box. You will be able to select which category of participants will be directed to this room. The list of participants, who can be put in the waiting room, varies slightly for private and public conferences.
SIP/H.323/RTSP connections are always treated as the participants from other servers. For example, if an endpoint makes a call to a conference or is invited to this meeting, it will be directed to the waiting room if all the settings are activated except Guests only for a webinar.
It is not possible to select the participants who will be directed to the waiting room, if registration is allowed for a public conference (webinar). In such a case, all participants except the owner and moderator will be directed to the waiting room if it is enabled.
Categories that can be selected for public conferences:
All participants (except the owner and moderators) – all participants except the owner and moderators will be moved to the waiting room (this includes the participants who signed up for the event)
Uninvited participants and guests (selected by default) – the following participants will be moved to the waiting room:
all users from your server, who were not invited in advance before the start of the conference and are now calling the conference/owner or are invited after the start of the event
all users from a federated server who were not invited in advance before the start of the conference
all guests.
The following participants will not be moved to the waiting room:
users from your server who were invited in advance before the start of the conference
users from a federated server who were invited in advance before the start of the conference
users who signed up for the conference (since they have already been added to the list of invited participants)
users from your server and federated server who were invited in advance, but did not join when the conference started and are now trying to join during a conference or receive another invitation call.
Uninvited participants from other servers and guests – only guests (if they did not sign up for the event) and users from a federated server, who were not invited in advance, will be directed to the waiting room.
Guests only – only guests, if they did not sign up for the event, will be directed to the waiting room.
Categories that can be selected for private conferences (the rules are similar to the ones set for webinars except guests and unregistered participants):
- All participants (except the owner and moderators)
Uninvited participants (selected by default)
Uninvited participants from other servers.
If necessary, you can save conference settings as a template so that you could later create an event with the same settings in one click. To do it, check the box Save as a template at the bottom of the conference editing window.
Activate the PIN when joining checkbox to enable the use of a PIN code when joining a conference. As a result, unwanted participants will be unable to join this event, even if they have a link, such as in the case of a webinar. When you check the box, a PIN code will be automatically generated, but you can change it in the field below or regenerate it using the  button. PIN protection is not available when registration for a public conference (webinar) is enabled.
To directly connect from an SIP/H.323 endpoint to a PIN-protected event, add the PIN code separated by a comma after the conference ID in the call string:
00<conf_id>,pin@<trueconf_server>:<port>
Check the box Enable conference recording to save the video recording of this event on the server (refer to the description of the Recordings section). If this feature is enabled, information about it will be displayed on the event page, and the owner can manage the recording (pause and resume) "on the fly" during the conference. Activate the indicator in the Recordings section to make sure that all participants (including SIP/H.323 endpoints and participants who join from browsers) know that the event is being recorded.
If your TrueConf Server is integrated with TrueConf AI Server, you can override some of the settings for a specific conference:
If the "on-demand" audio recognition option is selected in the general activation settings, you can check the box Create a conference transcript to save the audio track of this event for AI processing.
Below you can select the main language of the event, which will help the AI server in difficult speech recognition situations. The language is detected automatically, but some languages may be similar in terms of pronunciation, and under such circumstances, it is useful to explicitly specify the main language of the conference.
# "Participants" tab
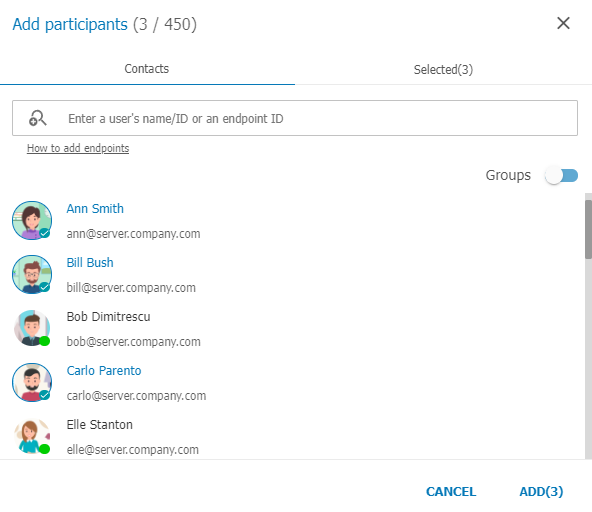
On the Participants tab, one can check the number of participants added to the conference (the maximum number depends on the selected conference mode and the server license). It is possible to add participants from the list of server users, by ID, with the call string (for SIP/H.323/RTSP devices) and by email (for a public conference).
Add by ID or call string
Enter the user ID or call string for an SIP/H.323 or RTSP device in the search field on the Contacts tab and click Select ID to make it a meeting participant.
Adding email notification recipients
This feature is available only in public conference mode.
To invite participants via email, create a list of meeting guests:
Go to the Email tab.
Fill in the Name and Email fields with the participant’s personal details.
Click Select to add the user to the guest list.
After selecting all users, click Add to include users to the list of meeting participants.
# How to Make a Participant a Moderator
Select a user from the list of added conference participants and click three dot button.
Press Assign as a moderator.
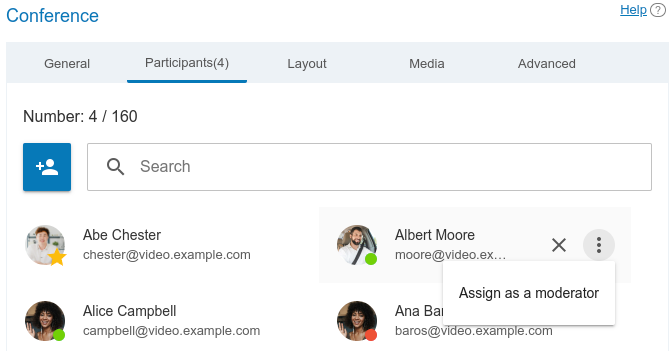
The participant appointed as a moderator is marked with a star icon:  .
.
A moderator can be selected not only from the users of your server but also from the users registered on other servers (federated). Guests cannot be appointed as moderators.
# Resending email invitations
Sometimes, only some of the participants have to be re-invited to the scheduled conference. To do it, go to the Participants tab, hover the mouse over the selected participant, and click on  . Select Resend invitation email in the context menu.
Emails are not sent immediately; they are sent only when conference settings are saved. So, if you change your mind, you can select the participant again and click to cancel the email invitation for this person.
# "Interpretation" Tab
TrueConf Server supports conferences with simultaneous interpreters. Thanks to this feature, the users, who speak different languages, can take full part in an event without missing any important details. Each participant can select the language of the presentation in a client application or in a browser (depending on the preferred connection method). The number of interpreters is limited only by the number of participants.
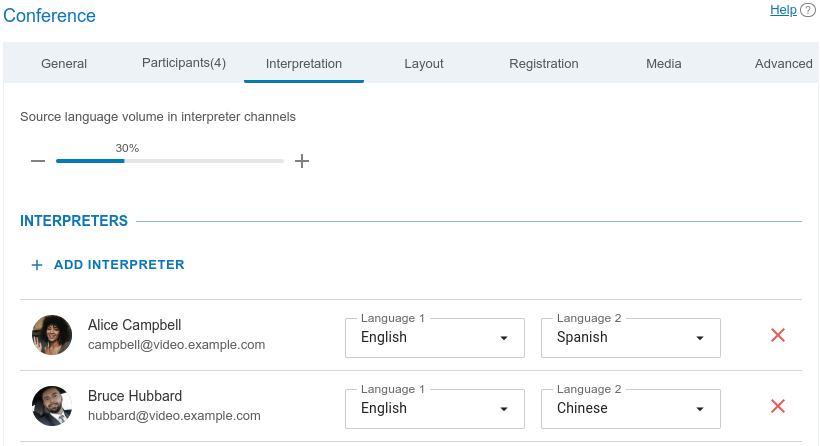
Check the box Language interpretation mode to create a conference that can be assisted by simultaneous interpreters. When a conference with simultaneous interpretation is recorded, several audio tracks will be created: a general track and separate tracks for each of the languages selected for interpretation.
Interpreters are selected either from the users, who were previously added to the list of participants, or from registered guests (in the case of a webinar). Just click the Add interpreter button and select the language pair for translation. In the example below, the English - Spanish pair is selected. The interpreter will be able to change the translation direction during the event in his/her TrueConf application:
As an interpreter, you can add a user from your TrueConf Server, a user from a federated video conferencing server, or guests of a scheduled public conference who manually signed up for this event if registration was required. Other participants, such as guests added manually via email, cannot be appointed as interpreters. Interpreters are not displayed in the video layout, and their video cannot be turned on during a conference (video settings are unavailable).
In this way, you can select several interpreters, including for the same language pairs (for example, one of the interpreters can rest while the other one works with the same languages). At any given time, only one person can interpret the selected language pair in one direction. For instance, only one person will be able to translate from English to Hindi, however, the second person can translate from Hindi to English.
In interpreter channels, participants will be able to hear the original audio track: its volume level will be set at 30 % by default. However, you will be able to reduce the volume level to 0 % (i.e. mute the track).
Please note that you can organize "relay translation" so that multiple interpreters can translate language pairs sequentially one after another for a wider audience. Read more in the client application documentation.
# "Layout" tab
Apart from the settings specified in the Layout tab, it is possible to add a background and/or watermark. They can be selected for all events in the Gateways → Transcoding → Visual settings section.
Keep in mind that to optimize screen space usage, TrueConf mobile client applications disregard video layout settings and display the layouts in their own style on multiple screens (more details on this topic can be found here).
# General list of video layouts
In the Layout tab, you can set up one or more conference layouts (the arrangement of participants' video windows). For more information about the types of video windows and their features, refer to the TrueConf Server user guide.
The video layout can be one of three types depending on the category of participants for whom it is created: general (for all participants), individual for a specific participant (including a separate SIP/H.323 endpoint), or the common layout for SIP/H.323 devices and browsers (WebRTC).
The video layout cannot be adjusted in video lecture mode. In smart meeting mode, there have to be at least 2 video windows of the "active speaker" type.
The list of layouts will be displayed if you previously created layouts for the event. When the mouse is hovered over any of them, you will see the buttons for editing the layout name  and deleting the layout
  . The checkbox on the left side of each layout will determine whether this layout should be selected as the main one in its category at the start of the event:
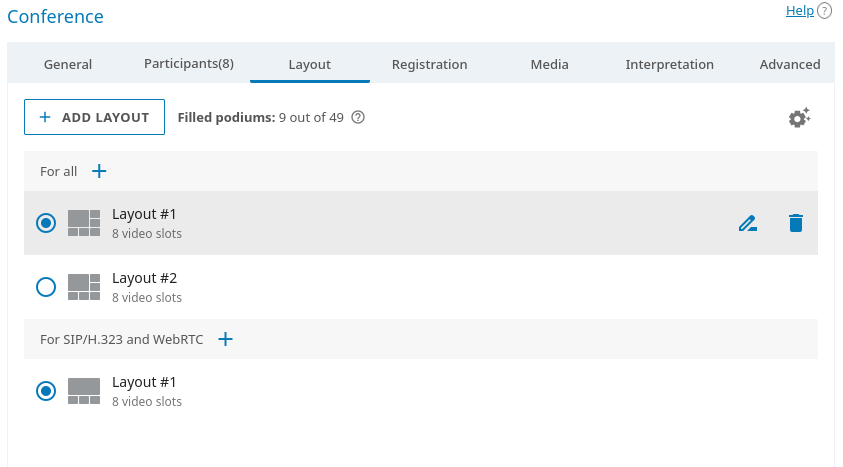
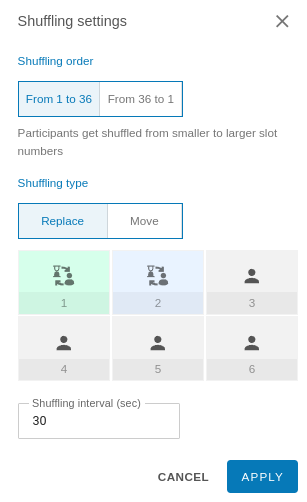
In the general list of conference layouts, you can configure display settings for video windows of the Time-based shuffling type. To do it, click the button  in the top right corner of the list. These settings will apply to all windows of this type in all layouts of the conference. You can choose the order of displaying participants who were not added to the layout. Besides, it is possible to select the type of shuffling (rotation) and set its speed.
# Layout editor
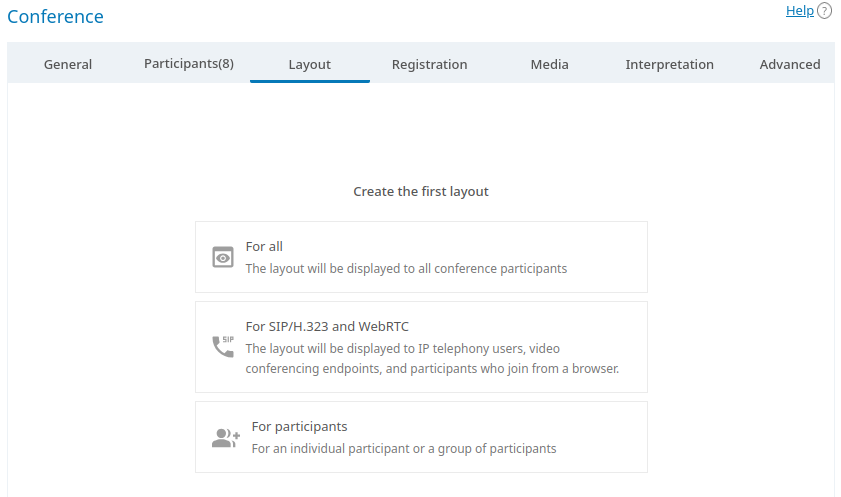
If the list is empty, you will first need to choose the category of participants for whom the layout will be created: a general layout (for all participants), an individual layout for a specific participant (including an SIP/H.323 endpoint), or the layout for all SIP/H.323 devices and browsers (WebRTC).
After adding a video layout, you will see the pop-up window where the layout can be edited:
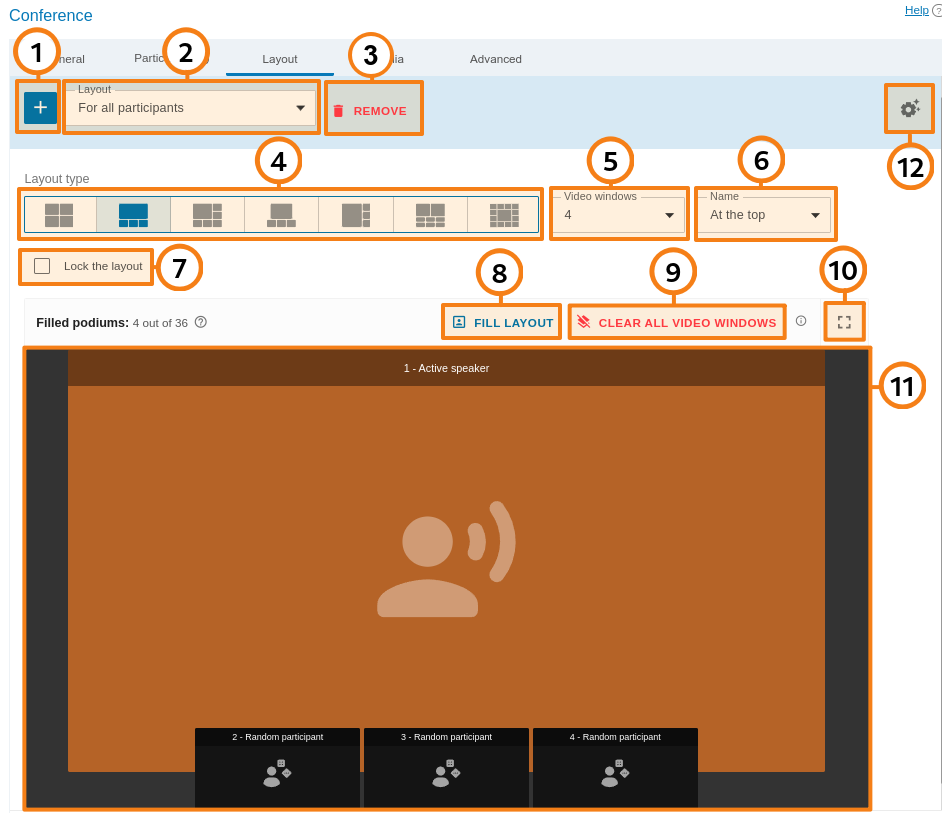
Edit the conference layout. You can move a participant's video window and prioritize it (enlarge) by double-clicking. When clicking on any video window, you can choose its type: Fixed, Random, Time-based shuffling, Active speaker, Content.
If the box
 at the top of the editor is checked, this video layout will be used by default when the conference starts (this box is checked automatically for the first layout in each category). Click on this box to disable activation of this layout at the beginning of the conference.
You can add a new video layout directly from the editor by clicking on the drop-down list next to the layout name and selecting Add layout.
In the Type dropdown list, select the arrangement of video windows in the layout.
In the Number drop-down list, select the number of video windows in the layout.
In the Name drop-down list, choose the position of the user's name in the video window.
Click the button
 to open the context menu with these options:
Fill layout — allows you to automatically fill the slots in the video layout with invited participants (this option becomes available only when the layout is cleared)
Lock layout — in this case, participants will be required to use this layout when it is activated and will be unable to change it locally. This option is especially useful for connections via third-party SIP/H.323 protocols since endpoints often have fewer options for managing slots.
Rename — set a convenient name for the video layout (up to 70 characters) so that it can be quickly found in the general list
Clear all video slots — removes all participants from the video layout so that it can be filled once again
Delete layout — deletes the selected layout. If the deleted layout was set as the main layout for its category (e.g., for everyone), a different layout will not automatically become the main one after deletion. It has to be selected manually.
# "Media" Tab
In this tab, you can set limits on video stream quality for different directions:
in the Limits for participants section — for the streams incoming to the server from participants of all connection types
in the Transcoding section — for the streams outgoing from the server via third-party protocols.
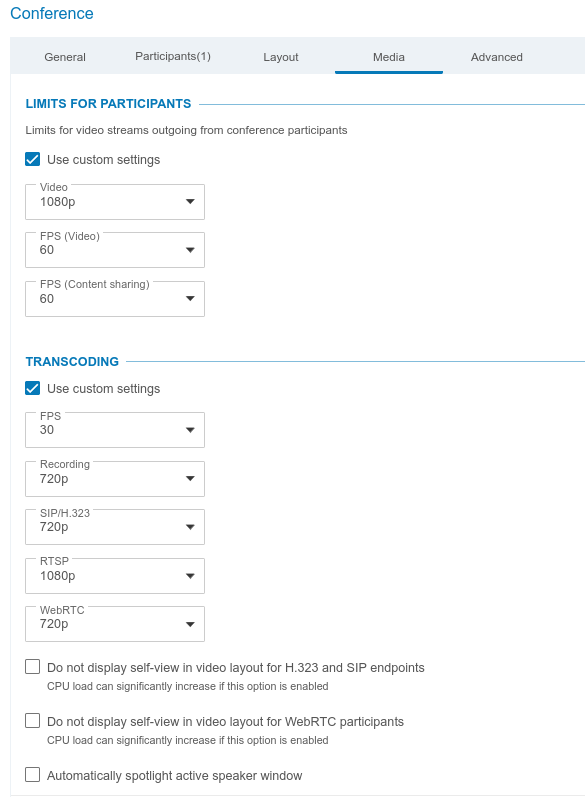
You can set custom quality parameters for video streams incoming to the server from all participants in a given conference: client applications, browser participants via WebRTC, and connections via SIP/H.323/RTSP. To do it, check the box Limits for participants → Use custom settings and select values in the drop-down lists. The frame rate limit for content sharing applies when content is displayed in a participant’s window and not in a separate stream. So, the quality limit is the same for a participant's video window, but you can specify different frame rates depending on whether the speaker or content is being displayed.
The settings in the Transcoding section are identical the settings in the Gateways → Transcoding section, except for the GPU acceleration option (this parameter has to be configured only once for the entire video conferencing server). Check the box Use custom settings to override resolution settings at the conference level independently for each direction: SIP/H.323 endpoints, WebRTC connections, recording, and streaming. The common frame rate is set for all directions. Below, one can specify additional settings which are activated if no layouts are created specifically for SIP/H.323/WebRTC participants when scheduling a conference or in the real-time meeting management section.
# "Advanced" tab
If necessary, you can configure additional conference parameters on the Advanced tab.
The content of this tab will vary slightly depending on whether the conference is public or private (i.e., the status of the Guest participants checkbox on the General tab):
If a conference is private, you will be able to configure access for users who were not added to the list of invited participants.
If a conference is public (webinar), you will be able to set restrictions for guests.
# ID, management of participants and streaming
Set the ID and security parameters for the conference:

Enter the conference ID manually to make it easier for participants to join the conference. This option can be disabled for all conferences in the Group conferences → Settings section.
Check the box Enable uninvited users to join the conference if you want to allow the users, who were not added the list of participants in advance, to join the event (this option is available only for private conferences).
Choose if it is necessary to automatically turn off the cameras and microphones of all participants when they join the conference. If needed, you can also disable audio remarks for participants (this option is available only in a moderated role-based conference).
On/off flag for camera and microphone is now ignored by SIP/H.323 endpoints when connecting to a conference to improve compatibility with smart meeting mode.
4. Below you can enable conference streaming. To do it, select one of the templates created previously in the drop-down list (check the description in the Streaming section).
Please note that stream templates can be created only in the TrueConf Server control panel. In the scheduler users will only be able to select one of the predefined templates.
# Connection methods, MCU mode, UDP Multicast
Configure the required parameters:
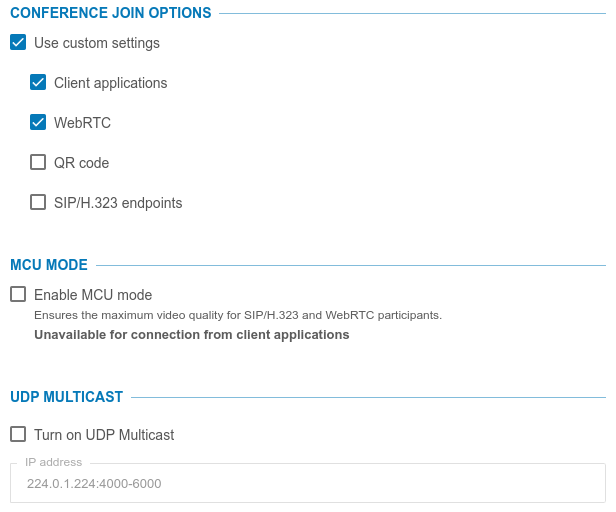
You can bypass general settings and select connection methods for the current conference. For example, if the license limits the number of connections through the gateway and no connections from endpoints are expected, this method can be completely disabled. Please note that this option will be unavailable when MCU mode is activated.
In regular conferences, SIP/H.323/WebRTC/RTSP streams from participants are transcoded on the server side into SVC streams for optimal distribution among other participants. If TrueConf applications will not be connected to the conference, this transcoding is not necessary and you can check the box Enable MCU mode. In this case, stream processing on the server will be optimized for handling streams without SVC support, and participants will not be able to choose a connection method. They will be able to join the conference only from a SIP/H.323 endpoint or browser; it will also be possible to connect an RTSP camera. Please note that if you activate MCU mode and then disable this option, the list of available connection methods will not be restored to its previous state. In other words, you will need to check the boxes for client applications and the QR code manually.
If necessary, enable UDP Multicast mode, more details on this mode are provided in the description of extensions. This feature will allow you to increase the number of speakers regardless of the number of podiums. For example, you can create a moderated role-based conference or smart meeting for 2000 participants and 36 podiums for speakers. However, there are many limitations listed below.
If UDP Multicast mode is enabled while you are trying to connect to the conference using third-party protocols (WebRTC, RTSP, SIP, H.323, etc), video conference recording and streaming will be unavailable.
Enabling this function is recommended only for those users who have hands-on experience in the sphere of network administration. Please note that it is your responsibility to check if this technology is available in your network.
If your network equipment is not configured to work in UDP Multicast mode, participants will see only a black screen during a conference.
4. If UDP Multicast mode has to be activated, specify the multicast/broadcast IP address. By default, this field is filled with the value 224.0.1.224:4000-6000.
# Sending invitations and conference time extension
It is possible to activate automatic email invitations to a scheduled conference and allow time extension for this event:
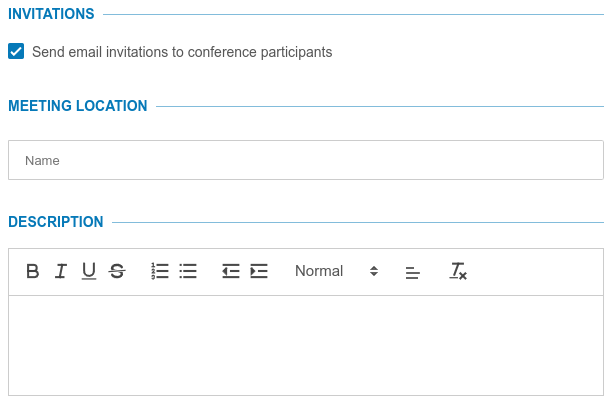
- Enable email invitations that will be sent to conference participants (activated by default). This option is available only for scheduled conferences if integration with an SMTP server is set up.
When editing a previously created conference, this option is disabled regardless of the conference settings configured earlier. This is specifically designed to prevent the invitations from being mistakenly resent when editing an event. If you need to reactivate conference invitations (e.g., when adding participants), please manually activate the Send email invitations to conference participants checkbox.
- By default, a scheduled conference will not end automatically when its allocated time expires. However, you can enforce automatic ending of the event by checking the box End the conference automatically according to the schedule. In this case, the option Enable conference time extension will become available so that moderators could extend the duration of a conference. This option will be accessible in the personal area, real-time meeting management section in client applications, and by clicking on the button in the notification about the upcoming end of the event (if this notification is enabled, see below).
3. You can configure notifications about the upcoming end of the event (see above) by checking the box Remind me 10 min before the conference ends. The notification time can be changed in the drop-down list. This option is available only for scheduled conferences. All moderators, not just the owner, will see such notifications.
A scheduled conference without a time limit will automatically end when certain conditions are met.
# Visual settings
In the Visual settings section, you can configure the settings for the conference background and watermark.
Here, the administrator can configure the same settings that are available in the Gateways → Transcoding section. The only difference is that one can use general settings or specify different settings only for a specific conference.
# Reminders and description
Below you can find the settings for conference reminders and description:

By checking the box Send reminder emails about conference start, you can enable email reminders that will be sent to event participants. This feature has to be enabled in advance in the SMTP settings. You can add up to 4 reminders for one conference by using the Settings button. To use global notifications settings, click the link Use administrator specified settings.
You can fill in the Meeting location field with information that will be displayed in the Information tab on the conference page and in the list of events. If the server is run in integration with an LDAP directory and the fields Meeting Room Filter and Meeting Room Search Filter Attr are configured (check the description of additional fields), you will be able to select a location from a predefined list or manually enter your own text.
In the Description field, you can add supplementary text for the scheduled event (for example, descriptions of participants' presentations or the event agenda). This text will be displayed on the conference page.
# Restrictions for webinars
If the box Public conference (webinar) was checked on the General tab, you can configure the following settings in the Advanced tab:
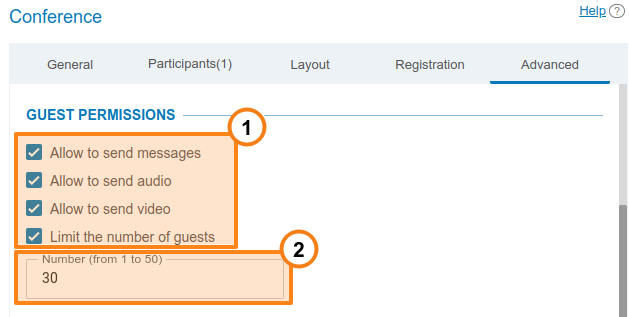
Permission settings for guest users
The Number parameter is used to restrict the number of guests in a webinar (by default they can join an event up until the moment when the license limit for guest connections is reached). This option may be helpful when multiple webinars are held at the same time, and it is necessary to distribute guest connections between them or if the rules of your event impose restrictions on the number of attendees (e.g., if it is a lecture).
Users of Mozilla Firefox, Safari, Google Chrome and other Chromium-based desktop and mobile browsers can participate in conferences via WebRTC. The number of guest connections is limited by your license.
# "Registration" tab
If a public conference (webinar) is created, you will be able to set the parameters on the Registration tab. Here, you can configure settings for self-registration of guest participants for your online event (available only for a scheduled conference).
Please note that registration for a webinar is not available for SIP/H.323 endpoints and RTSP devices (e.g., IP cameras). They will be able to participate in a public conference only if a moderator adds them to the list of participants when creating or editing the event, or invites them when the webinar has already started.
Registered server users also need to manually confirm their intention to participate in a webinar with registration. This means that even if you check the option Allow authorized users to join without registration, your users will not be able to join the conference via the link or ID. They will first need to visit the event page and click the Attend button.
Direct calls via the conference ID/link are also unavailable for federated users until they are explicitly added as participants or register as guests.
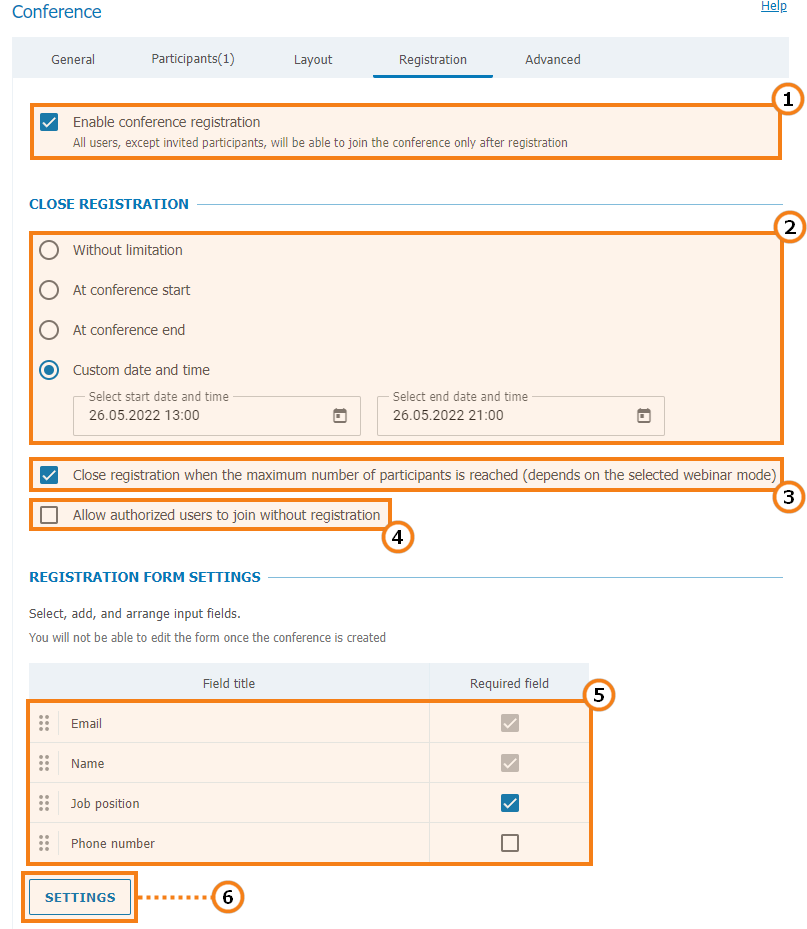
Check the box Enable conference registration.
In the Close registration section, you can select when registration will be closed and it will no longer be possible to sign up for the event:
Without limitation — available only for a recurring conference (registration for such an event will be constantly open)
At conference start — the registration will be closed right after the webinar start
At conference end — the registration will be available up until the conference end
Custom date and time — set a custom period during which the registration will be open.
3. To limit the number of participants in a webinar, check the box Close registration when the maximum number of participants is reached (depends on the selected webinar mode).
4. Check the box Allow authorized users to join without registration to enable users from your server to join the conference without filling out the registration form. In this case, any user from your server can authenticate on the conference page and add oneself to the list of invited participants by clicking the Attend button.
5. Settings for the input fields in the registration form. You can drag and drop input fields to create a custom registration form. Besides, you can mark the corresponding checkboxes to make sure that certain fields must be filled by participants. The customization of registration form is available only when a conference is created. This feature is not available when the conference is edited.
6. You can select the input fields that should be displayed during registration only when creating a conference. Сlick on the Add field button to specify both standard and custom fields (up to 10 ):
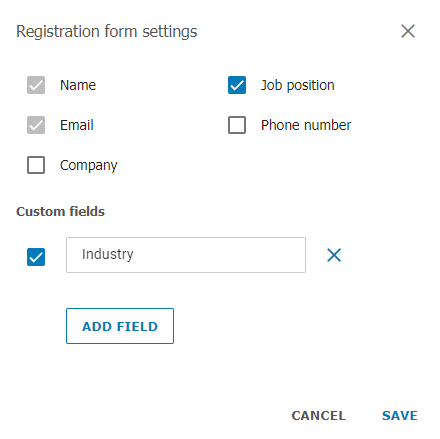
When the changes are saved, users will be able to sign up for a public conference on its web page. To learn more about this feature, check out the TrueConf Server user guide:
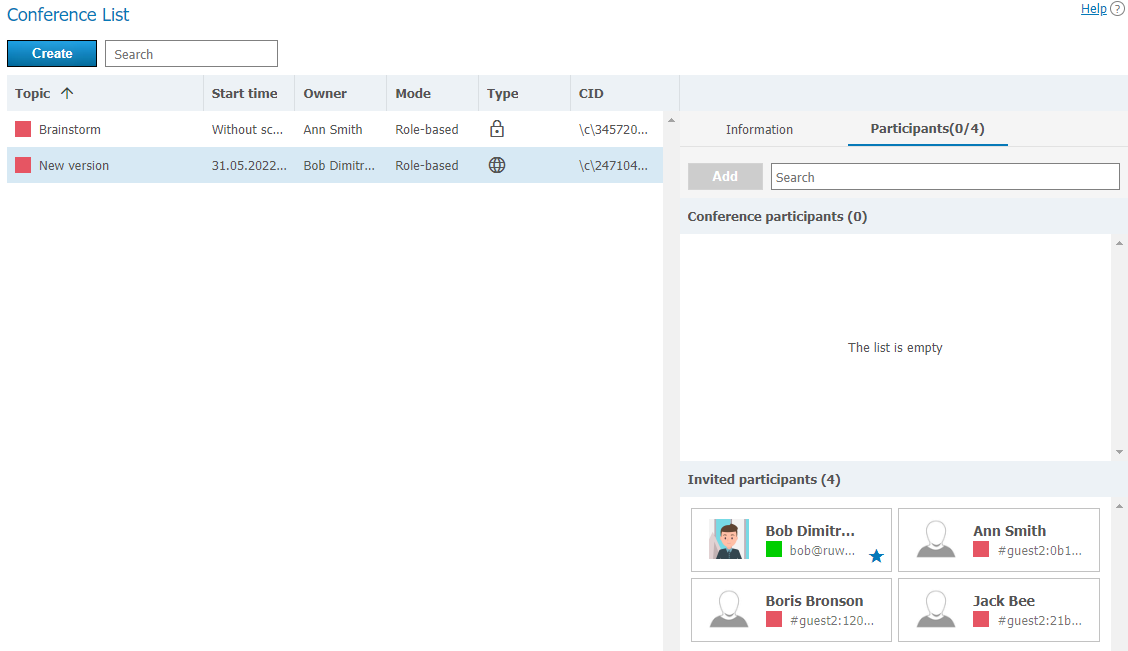
To view the list of participants who have signed up for the event, select your webinar in the list of conferences, and go to the Participants tab. The guest users' IDs will start with #guest2::
# Automatic conference ending
By default, scheduled conferences do not end at the specified time, but this behavior can be changed in the settings for each event.
To optimize the use of server resources, a scheduled conference will automatically end in two cases:
Time-based automatic conference ending is enabled. If it is possible to extend conference duration, but this option is never used, the meeting will also end.
Automatic conference ending is disabled, but only one participant remains and no one else joins the meeting for 15 minutes.
# Templates
This section allows server administrator to create new conference templates and edit saved ones. Templates can also be saved while editing conference.
When a conference is created from a template, its scheduling settings are cleared (it becomes a virtual room by default); however, the following parameters remain unchanged:
Information about the name, mode, and owner
List of participants
Simultaneous interpretation settings
Parameters from the Additional tab (except conference ID)
Settings for saving conference video recordings on the server side and recording audio for transcription purposes
PIN code settings
Waiting room settings
For a scheduled public conference (webinar) — registration settings saved in the template, except the time when participant registration will be closed.
Please note that the Owner field corresponds to the owner of the template (not the owner of the conference). In the example below, the administrator added two templates ("Meeting Template" and "Webinar"), while Ann Branson added the "Sales" template from the scheduler in her client application or from the personal area.
Creating and editing templates is very similar to creating and editing conferences.
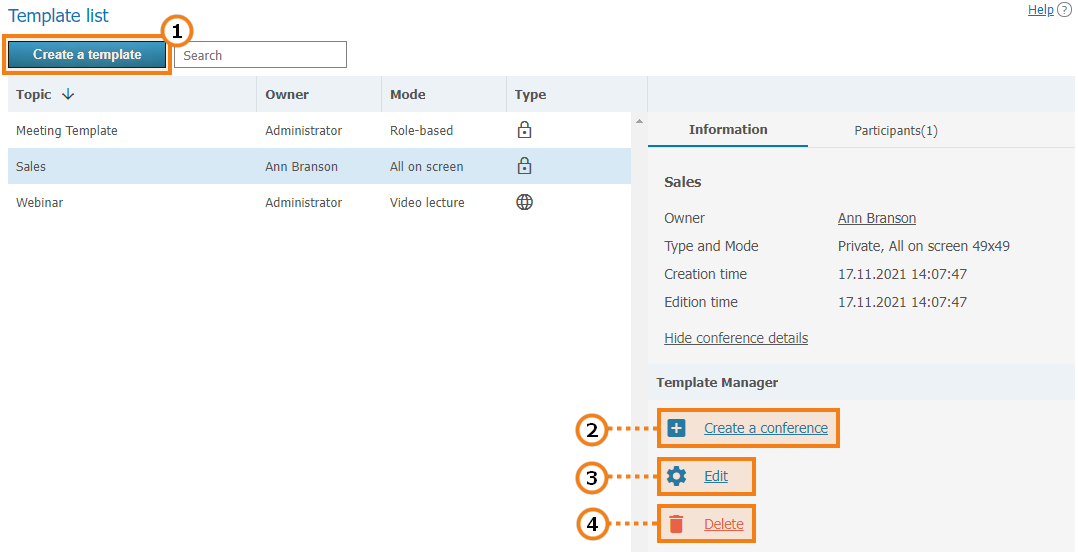
Create a new conference template.
Use a saved template to create a conference with typical parameters.
Edit saved conference template.
Delete unnecessary template.
# Streaming
In this section, you can create and set streaming configurations that are used when creating and editing conferences. You can also use templates for popular platforms which make configuration easier.
TrueConf knowledge base provides guides on how to organize streams to major platforms:
You can also manually set up conference streaming to other third-party services, for example, Facebook.
Click the Add a configuration button to create the configuration. In the window that appears, select your streaming type:
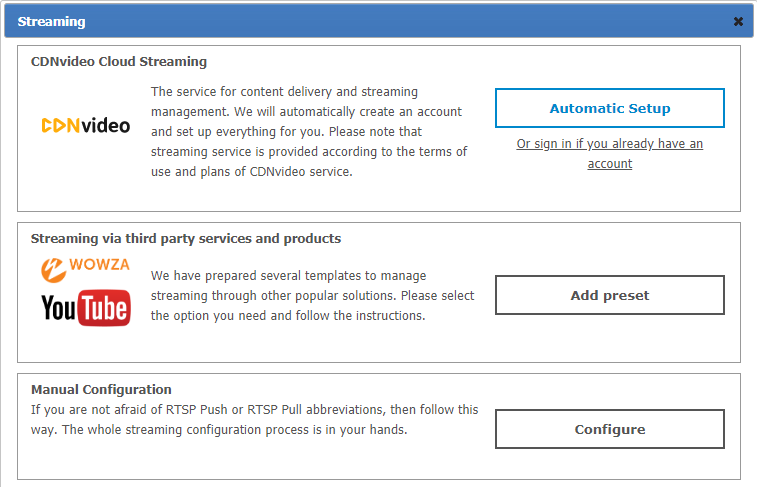
# Streaming on YouTube, Wowza
The section Streaming via third-party services and products includes our default configuration templates for popular streaming solutions both within corporate networks and over the Internet. To open additional settings, click the Add preset button.
In the configuration window select a required streaming service. Streaming service settings are listed below.
# Wowza Streaming Engine
To stream video to Wowza Streaming Engine, specify the following parameters:
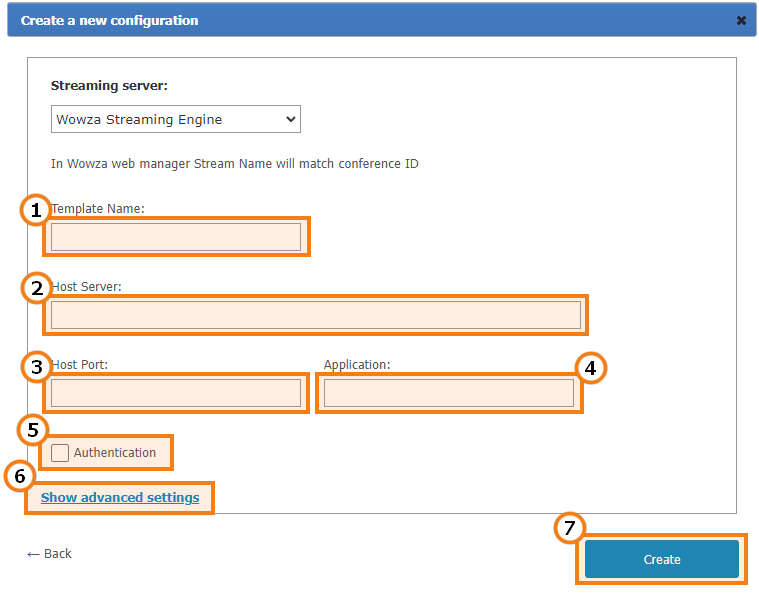
Template name — will be displayed in the list of stream configurations when a conference is created or edited.
Host Server — the address of the Wowza Streaming Engine server.
Host Port — the port through which the Wowza Streaming Engine accepts connections. As a rule, the ports
1935or1940are used.Application — refer to the Wowza Streaming Engine documentation for the description of this field.
Check Authentication to enter username and password to access Wowza Streaming Engine if required.
Click the link Show advanced settings to open the block with additional parameters for the current configuration (check the documentation section Additional stream configuration settings).
Next, click the Create button to save your changes.
# Wowza Streaming Cloud
The following settings will be helpful when streaming a conference to Wowza Streaming Cloud:
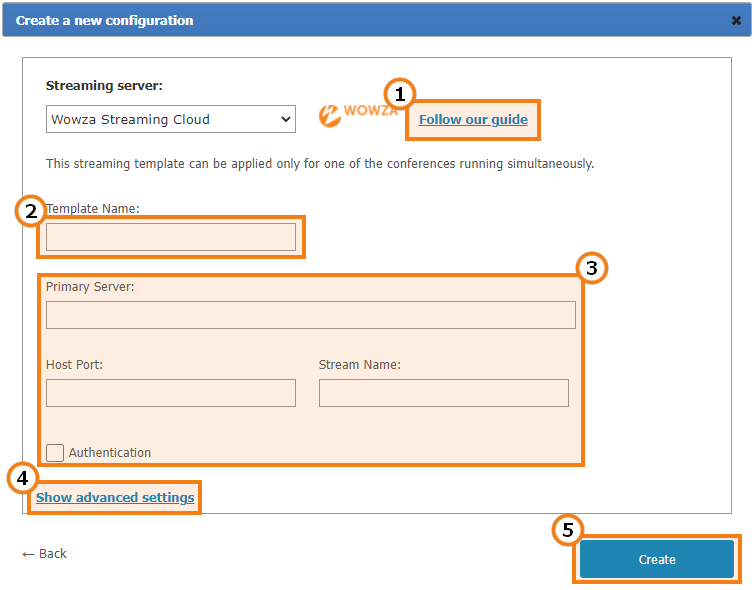
Template name — will be displayed in the list of stream configurations when a conference is created or edited.
In the fields Primary Server, Host Port and Stream Name, enter the stream data received from the Wowza Streaming Cloud service when configuring the stream.
If the Authentication box is checked, you can enter the login and password required for accessing Wowza Streaming Cloud.
Click the link Show advanced settings to open the block with additional parameters for the current configuration (check the documentation section Additional stream configuration settings).
Next, click the Create button to save your changes.
# YouTube
Specify the following parameters for YouTube streaming:
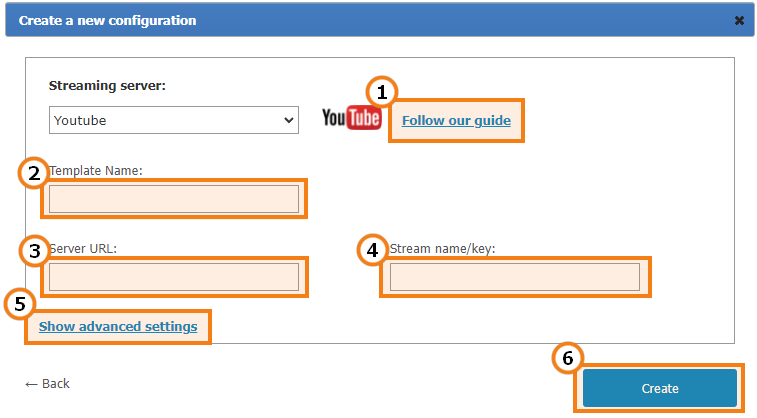
Template name — will be displayed in the list of stream configurations when a conference is created or edited.
Stream URL — the server address from the stream creation page on YouTube.
Stream key — the stream name/key from the stream creation page on YouTube.
Click the link Show advanced settings to open the block with additional parameters for the current configuration (check the documentation section Additional stream configuration settings).
Next, click the Create button to save your changes.
# Manual settings
Select the Manual setting option to manually configure streaming to the majority of existing solutions, including those listed above. TrueConf Server supports two content transmission methods: RTSP Publish (also known as RTSP Push) and RTSP Pull. If the first method is used, your server notifies the streaming system about the availability of a stream, while in the second case, the system retrieves (pulls) the stream from your server.
RTSP Publish manual settings
Available parameters:
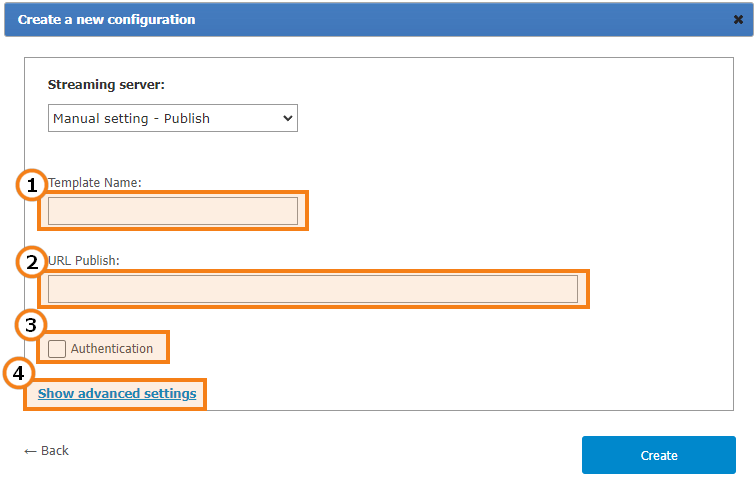
Template name — will be displayed in the list of stream configurations when a conference is created or edited.
URL Publish — the address used by our server to notify about available streams via the RTSP ANNOUNCE protocol.
Check Authentication to enter username and password and gain access to the service.
Click the link Show advanced settings to open the block with additional parameters for the current configuration (check the documentation section Additional stream configuration settings).
RTSP Pull manual settings
This method can used to get an RTSP link to the conference stream and to specify this link directly on a third-party service or convert the stream with additional software, e.g., OBS Studio.
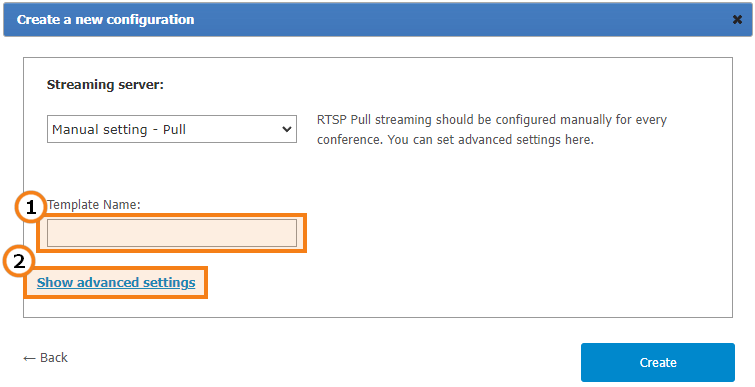
Template name — will be displayed in the list of stream configurations when a conference is created or edited.
Click the link Show advanced settings to open the block with codec settings for the current configuration (check the documentation section Additional stream configuration settings).
Additional stream configuration settings
The availability of certain parameters depends on the selected template.

You can change video and audio codecs used for the stream encryption.
Check the box Send outgoing RTP streams over TCP if you need to send outgoing RTP streams via TCP instead of UDP.
In the field Waiting time for a response from the server, you can set the waiting time (in seconds) for the external streaming system to confirm the reception of information about the published conference stream.
The Number of retries parameter enables you to specify the maximum number of reconnection attempts in cases when connection with the streaming system is lost. This will allow TrueConf Server to restart stream publication.
The parameter Delay before retry is needed for setting the delay (in seconds) between attempts to publish stream information.
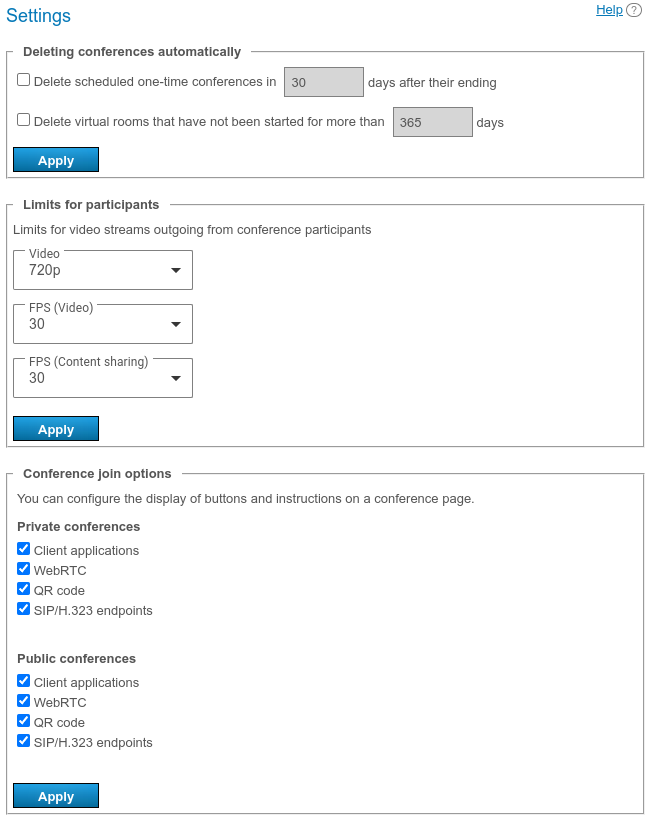
# Conference settings
In the Group Conferences → Settings section, you can configure automatic deletion of conferences and select meeting connection methods available to participants.
# Automatic conference deletion
Sometimes, it may be helpful to delete events from the general list if they were held a long time ago, and are no longer needed. TrueConf Server allows you to configure automatic deletion of such conferences:
The history of conferences, which were started in this way. is not deleted from the Reports → Call History section.
The following features are available:
Deletion of scheduled one-time conferences. You can specify a period from 1 to 10,000 days after the conference ending. Conferences with scheduled repetitions are not automatically deleted.
Delete virtual rooms that have not been launched for a certain number of days (from 1 to 10 000 days). The virtual rooms that were created, but were never launched during the specified period will also be deleted.
The list of conferences is evaluated for deletion once every 60 minutes. The countdown timer works in the following way:
If a conference was created, but not started, the countdown will be based on the time when the conference was last saved (including after editing).
If the conference had been started at least once, the countdown will start from the time of the last launch (even if the settings were changed after the conference start).
If the start date of a scheduled conference is set beyond the expected deletion date, it will not be deleted (in other words, a scheduled conference that has never been started will not be deleted).
# Limiting the quality of outgoing video from participants
You can set general quality parameters for video streams outgoing from all participants in all conferences. This includes client applications, participants, who join from a browser via WebRTC, and connections via SIP/H.323/RTSP. As a result, the server will explicitly instruct participant’s devices/applications on the quality of the video to be sent. This will be the upper limit on the incoming video quality. The resolution limit applies only to the quality of the camera video, but not the content which is being shared in a participant’s window. Content (screen/application window) is always shared with the resolution at which it is captured, with a maximum quality of FullHD 1080p. SVC works for fps/bitrate but not for resolution.
You can set the frame rate limit for two different scenarios: when a speaker is displayed in the video window or when this person is sharing content in the same stream. This limit does not affect content sharing settings for the second stream, where FullHD 1080p quality is always used with a low FPS, prioritizing resolution.
The server administrator can set individual quality settings for a conference when creating or editing this event.
# Ways of joining conferences
In this section, you can choose which ways of joining conferences should be available to all participants. These general settings will apply to the following conferences:
Web pages of quick conferences created in client applications
Pages of scheduled conferences.
The parameters for private and public conferences have to be specified separately. Please note that quick conferences created in client applications are always private. Conferences can be joined from client applications, browsers (via WebRTC), by QR code from the event page, and from hardware or software SIP/H.323 endpoints.
# Conference ID and the rules for calling participants
In the Conference ID section, you can set rules for automatic generation of unique IDs when events are created. It is also possible to disable ID modification, so that neither an administrator nor a user can change the ID in the scheduler on the Advanced tab.
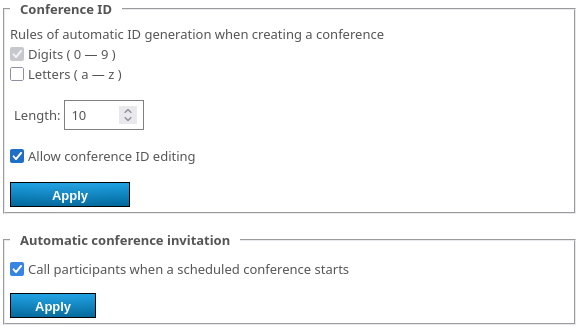
Below you can disable the automatic invitation of all users who were added to the list of participants for a scheduled conference. To do it, uncheck the box Call participants when a scheduled conference starts (enabled by default).