Permissions of the administrator with the Security Admin role
Permissions of the administrator with the Security Admin role
To enable limited access to the TrueConf Server control panel, a local TrueConf Server Security Admin user group on Windows and tcsecadmins on Linux is automatically added to your operating system during the server installation process. TrueConf Server administrators can add to this group the accounts of admins with view-only rights that should not be allowed to access TrueConf Server settings. Security admins only have the permissions to view:
in the case of integration with TrueConf AI Server — access to transcript management;
How to add a Windows account to the Security Admin group
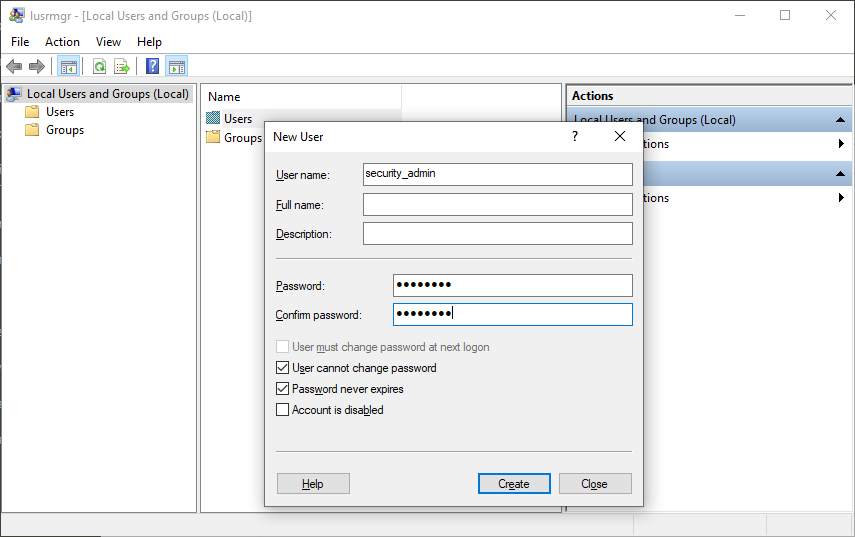
To create a new local Windows account with necessary rights:
Go to the Local Users and Groups snap-in. To do this, press Win+R and run the
lusrmgr.msccommand in the window that appears.Right-click on the Users list and select New User....
Fill in the required fields and configure the password change settings.
Go to the Users list.
Right-click on the created account and navigate to Properties.
On the Member Of tab, click Add....
Specify TrueConf Server Security Admin as the name of the object to be selected and click OK.
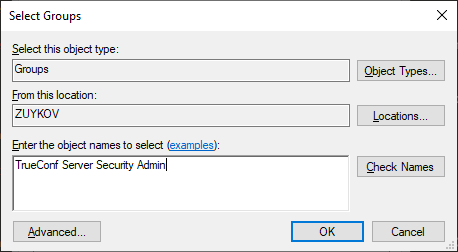
Accounts imported from Active Directory/LDAP can also be added to the local group TrueConf Server Security Admin.
How to add an account to the Security Admin group on Linux
The commands listed below need to be executed with superuser privileges or using sudo (e.g., sudo command). Please note that sudo may be unavailable by default in your operating system. You can check its availability using the sudo -V command.
For Debian
Run the following command:
sudo adduser --ingroup tcsecadmins [new_admin]where
[new_admin]is the username of the admin.Enter your password in the corresponding field and confirm it.
Optionally, provide additional information for the admin (full name, phone number, etc.).
For Debian
Run the following command:
sudo adduser --ingroup tcadmins [new_admin]where
[new_admin]is the username of the admin.Enter your password in the corresponding field and confirm it.
Optionally, provide additional information for the admin (full name, phone number, etc.).
For CentOS
Run the following command:
sudo adduser -G tcadmins [new_admin]where
[new_admin]is the username of the admin.Set the password for the new user
[new_admin]with the following command:
sudo passwd [new_admin]In a similar way, you can add a user to the administrators group TrueConf Server with full access to the control panel.
How to configure rights for an existing user
You can also assign the appropriate access level to a user already existing in the OS.
For Windows OS
Simply go to the Local Users and Groups snap-in and complete steps 4-7 from the section on adding an account.
For Linux OS
To configure system accounts, use the usermod command. For example, to add the user [user] to the tcsecadmins group, run the following command (as a superuser or using the sudo utility):
usermod -aG tcsecadmins [user]On Linux, one can view the list of user's groups or check if the user is actually available by running a single command:
groups [user]If the account [user] is included in the system, you will see the list of its groups; otherwise there will be a notification indicating that such a user has not been found.
The following instructions are intended for server administrators whose accounts are added to the user group TrueConf Server Security Admin on Windows and tcsecadmins on Linux operating systems.
How to access TrueConf Server control panel
Go to the guest page TrueConf Server. You can get the address from the server administrator.
Click the Administrator login button at the bottom of the page.
Enter your username and password, then click Enter.
Server status
Current status of your TrueConf Server performance is displayed in the upper right corner of the control panel. It shows server status and registration information.
When the server is functioning normally, you will see the text in green: operational, registered. If there are issues with the startup or registration, a red message will be displayed. Contact the server administrator to resolve the issue or to submit a request to technical support.
Configuring preferences
By navigating to the section System → Preferences... in the top right corner, you can configure the following settings for your account:
Language displayed in the TrueConf Server control panel.
Time zone. This setting affects the event time specified in all reports.
Settings for exporting logged data to a csv file: encoding and field delimiter.
Server log
To access detailed logs about the operation of TrueConf Server, go to the section System → Server log. It stores events and errors related to the server services startup, connection to the registration server, license activation, and more.
You can save the log in a txt file using the  button. This will be useful for subsequent data analysis or for sending it to technical support.
Access settings
To view information about access settings for the server control panel, go to section Web → Security:
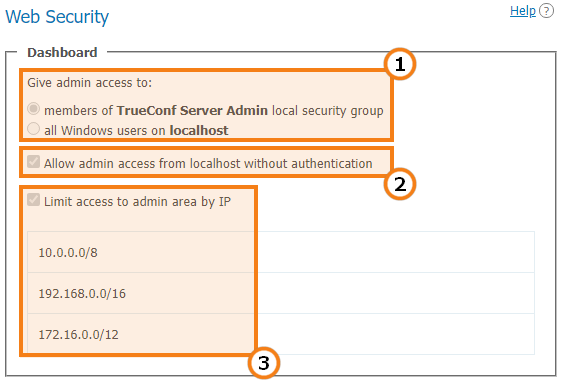
Operating system users that have full access to the control panel.
If this option is enabled, the user does not need to be authorized to perform administration when accessing the server from the following IP addresses.
This option means that administrative access to TrueConf Server control panel is limited only to the IP addresses specified in the list.
Security Admins are not allowed to change the settings described above; only TrueConf Server admins with full access rights can manage these settings.
Transcripts
The Manage add-ons → TrueConf AI Server section displays a list of conference transcripts (requires integration with the separate TrueConf AI Server solution):
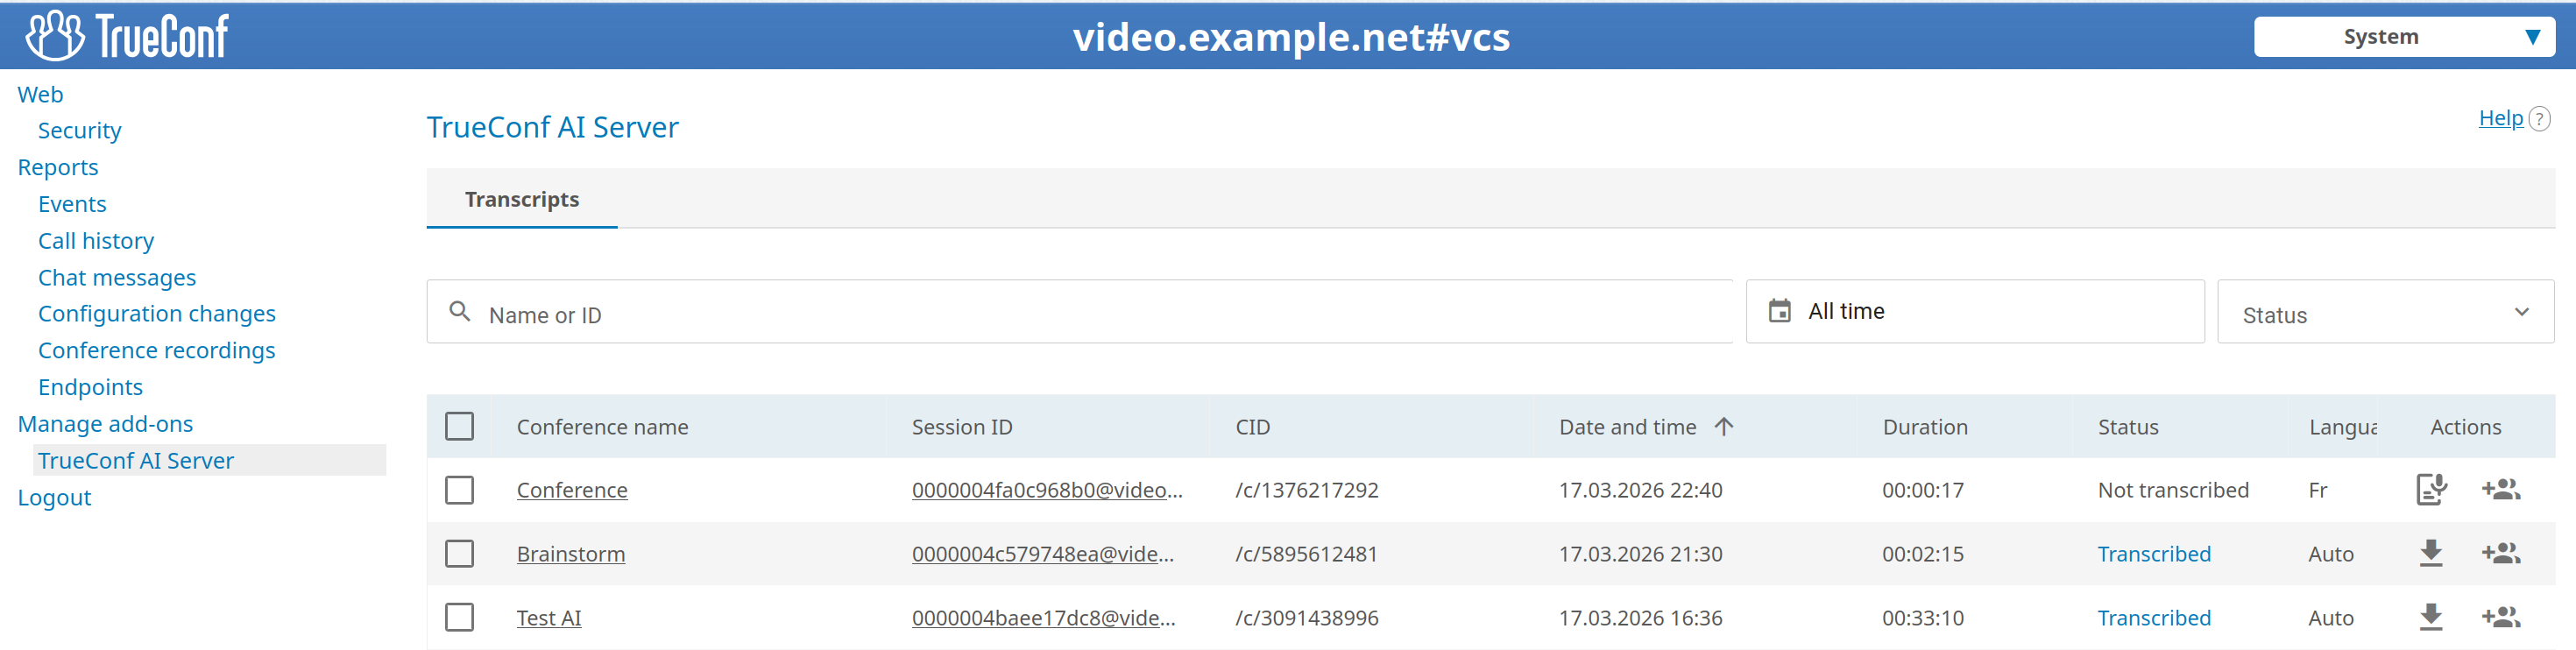
In each entry, there is a link that leads to the respective conference and even to the page of a specific session (call session). Please note that a single conference may have multiple sessions if it was launched more than once.
Column Status shows the current status of each transcript and can have the following values:
- Added to queue — The audio recording has been sent to TrueConf AI Server and is awaiting decryption.
- Not transcribed — the recording was not sent to the AI server and, accordingly, was not decrypted;
- Transcribed - The audio recording was successfully sent to the AI server and transcribed;
- Transcribing - Audio recording in progress (an approximate completion percentage will be displayed).
To quickly find required transcripts, filter the list by name or conference ID, as well as by event time and the status of the transcript.
To start recording recognition, press the  button (available if it has not yet been started).
To configure access to a transcript, click the  button. In the pop-up window, you can add or remove users and specify the access level for each of them:
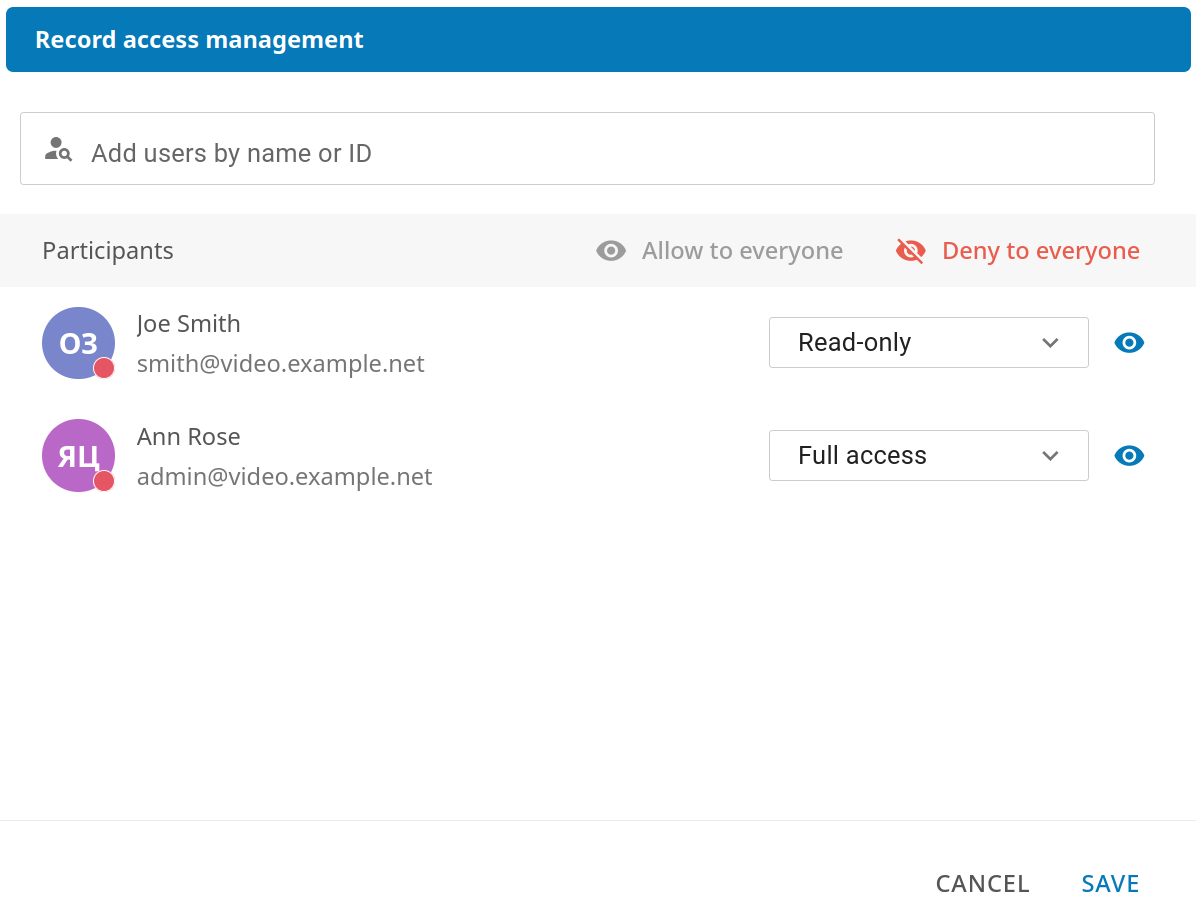
A user with full access will be able to download a transcript, configure access to it for other users, and delete it. In read mode, a user will only be able to download the recording and transcript. You can specify the TrueConf ID (login) of a user from another video conferencing server if your TrueConf AI Server is integrated with this server.
You can select multiple items with checkboxes and either download them or start recognition for all of them at once.
Reports
The Reports section contains all event logs related to server configuration changes, connections and video calls or conferences held on the server.
All reports are tabular data where the time of each event is displayed according to the time zone selected in preferences.
Fields for data filtering are displayed above all tables except for information about connections to the server. You can also save any report in csv format except for the conference recording and endpoint lists by pressing the  button.
Clicking on any column in the table will sort the rows by that column in descending or ascending order. The current sorting direction will be marked with an arrow next to the column name.
Below you will find a brief description of the reports. You can learn more about logs in the administrator guide.
Events
In the section Events, you can view the history of user status changes TrueConf Server and the status of the VCS server. When you select a specific event in the table, detailed information about it will be displayed on the right side of the page.
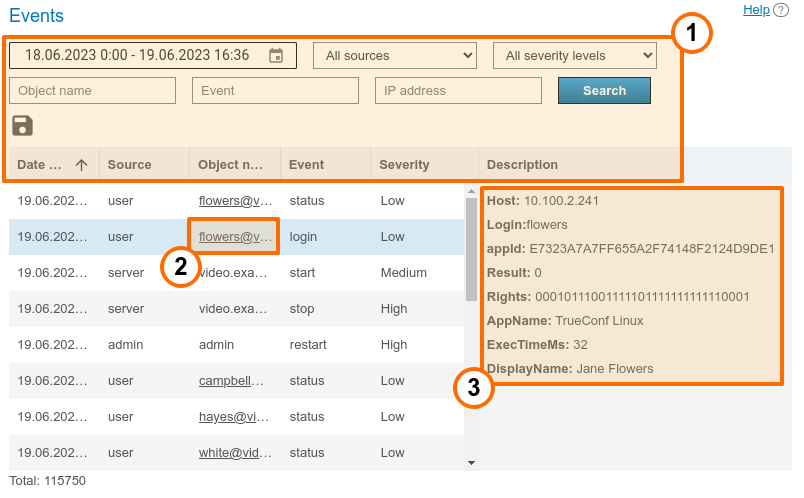
General interface for interacting with the table: sorting, filtering, searching, and exporting. In the Event drop-down list, you can select one or multiple event types for more flexible information search or analysis.
- TrueConf ID The username of the user who performed the action.
Event details. They include detailed information necessary for troubleshooting potential issues; the administrator may have to provide this information when contacting technical support.
Call History
To view the list of past and active sessions, go to section Call History.
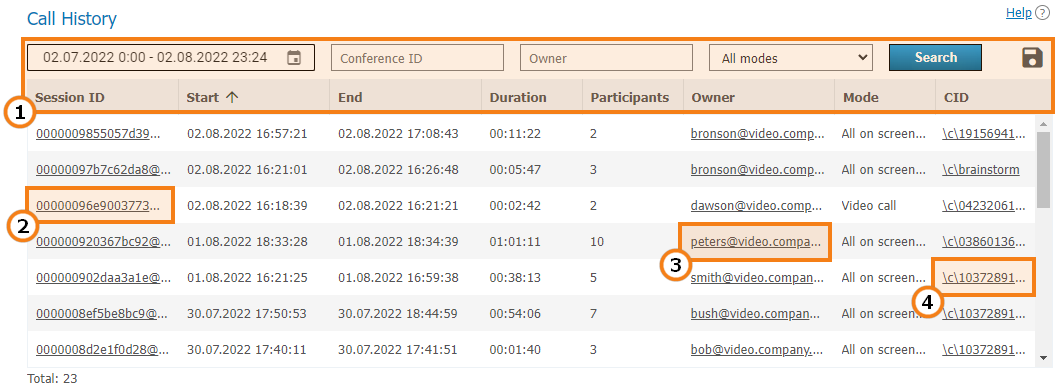
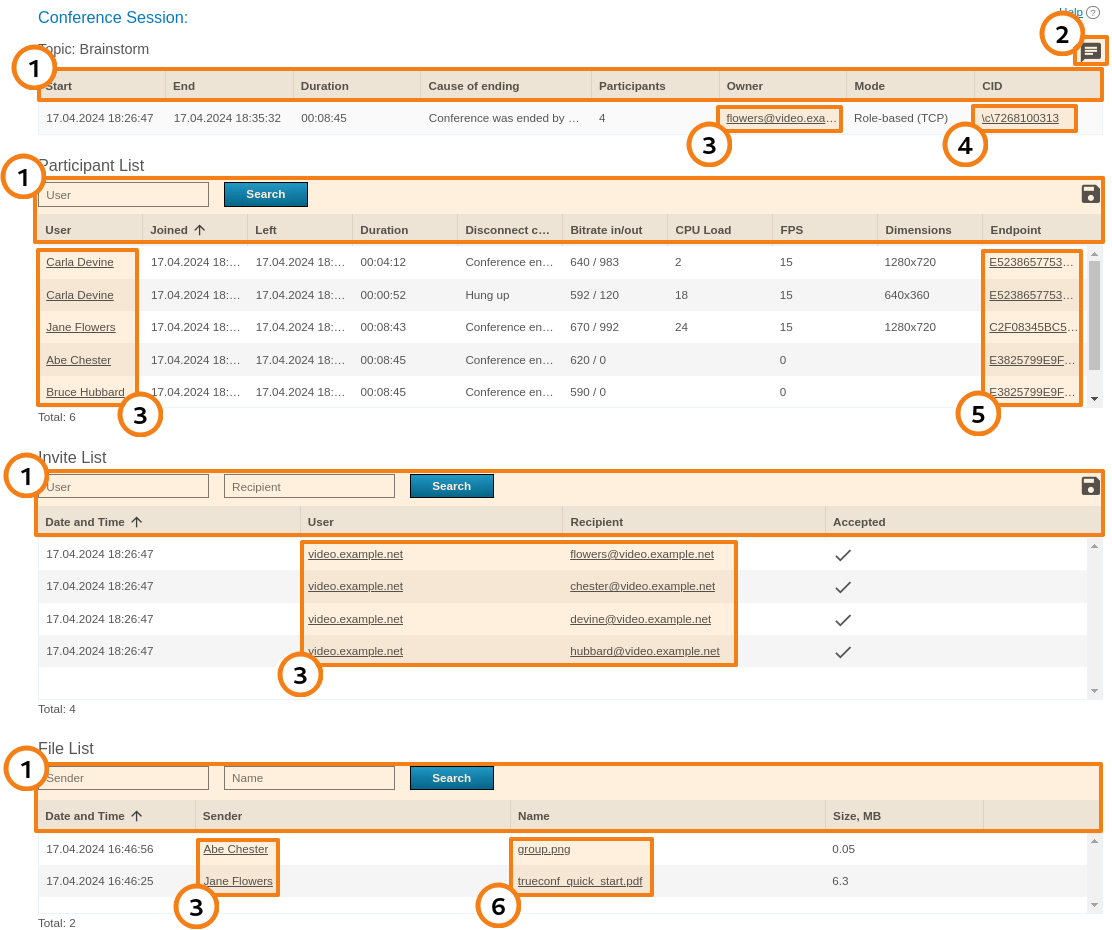
Here you can view data for each videoconferencing session: session ID, start and end time, duration, number of participants, TrueConf ID of the owner, mode, and conference ID.
Clicking on the session ID will open a new tab with the detailed list of invited users and participants, as well as a  button to access the chat history.
Session information
Click on the session ID in the general table to view information about the selected conferencing session, including:
information about time and owner of the conference
list of what time the participant was attending the conference
general media streams quality technical data
history of conference invitations and accepted/rejected video calls
buttons for exporting the lists of participants and invitees to a file
button for opening the conference chat
Sending files.
Chat Messages
In the section Chat Messages, you can view the history of all conversations between users of your TrueConf Server, including in group conference chats.
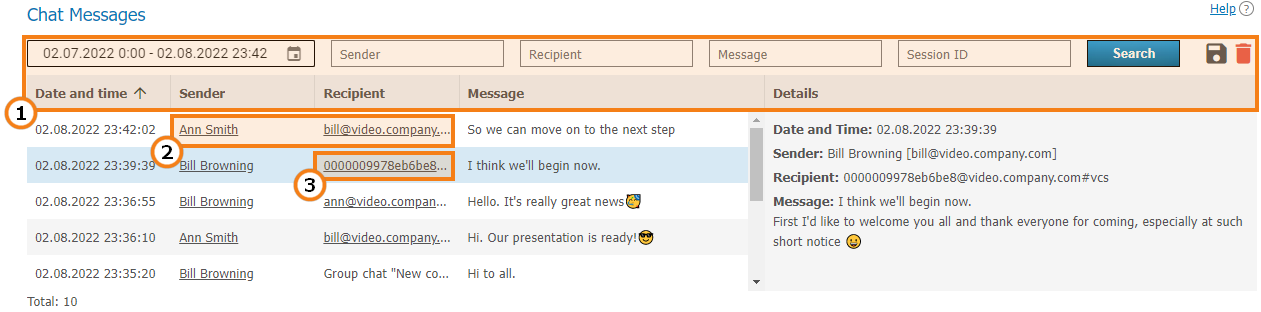
General interface for interacting with the table: filter entries, export them to a CSV file, delete the entries selected in filter settings, sort by columns.
- TrueConf ID (sender's and recipient's) usernames for personal messages.
Link to a page with detailed information about the session to the common chat of which a message was sent.
Configuration Changes
To view the edit history of TrueConf Server settings, go to the section Configuration Changes. This section also shows the creation/deletion of group conferences and their parameter changes by the server administrator.
Every entry in the table corresponds to a certain change. If you click on an entry, the panel on the right will display the server settings before and after this change.
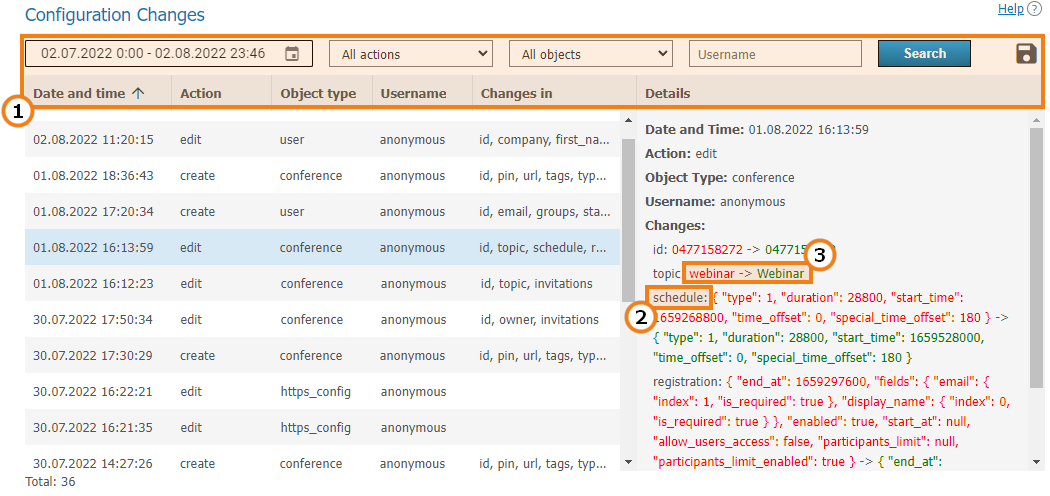
General interface for interacting with the table: filter by events and objects, date, user. Additionally, it is possible to export filtered values to a CSV file.
Name of the modified parameter.
Parameter values: previous (before change) -> new (after change).
Conference Recordings
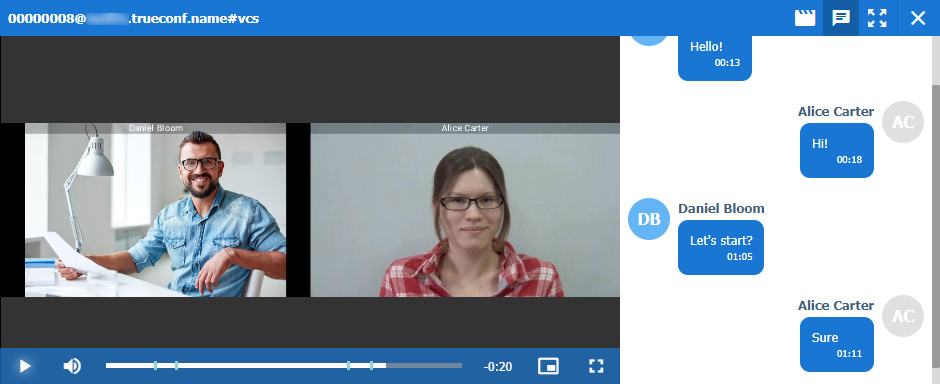
In the section Conference Recordings, you can view a list of all video call and conference recordings saved on the server, including detailed information about each.
To download or view the recording file, use the  and
and  buttons respectively.
If there was a chat during the conference recording, you will be able to view the chat with the ability to jump to specific replies on the timeline:
Endpoints
To view connection statistics for your TrueConf Server, go to the section Endpoints. It displays information about all connections to the server made using client applications or through a browser via WebRTC technology.
Authentication from a browser is logged only in two specific cases:
The user, who connects from a browser, participates in a conference
The user opens the Chats section in the personal area, if a person only signs in to the personal area, a new entry will not be created in the logs.
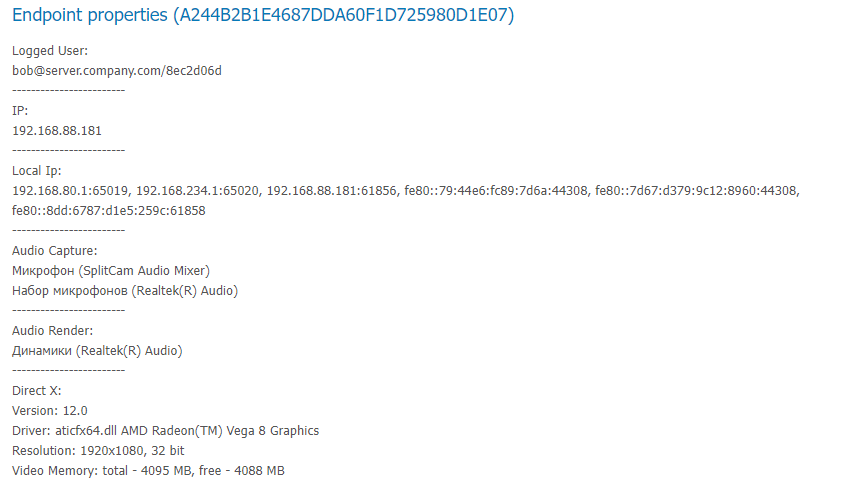
Click on a row to display detailed information about the selected connection: