
Integration with calendars and email
Integration with calendars and email
TrueConf offers a special module for seamless integration with corporate calendars and email plugins for popular mail and calendar applications: Microsoft Outlook, Mozilla Thunderbird.Integration with a corporate calendar
If your company uses a corporate calendar (such as Microsoft Exchange), we recommend using the software module TrueConf Calendar Connector as a link between the server and the corporate calendar server software. It is installed on a separate server and can serve as a gateway for multiple instances of TrueConf Server.
Advantages of this approach compared to standard email plugins include deeper integration with the corporate calendar:
The ability to create, edit, and delete calendar events from the scheduler in TrueConf applications or in the personal area.
Displaying all calendar events: both with and without conferences.
Delegation involves creating events on behalf of the calendar owner through a trusted individual.
Synchronization of data regarding changes to calendar events in real time, as well as participant status (accepted/declined invitation).
A user cannot create a scheduled conference without a calendar event, which means that the organization of events is more streamlined: once a call is scheduled, it will definitely appear in the calendar and be visible to all participants. The option to create a virtual room without an event remains available.
For more information, refer to page TrueConf Calendar Connector and its documentation.
When editing conferences linked to a corporate calendar event in case of integration with TrueConf Calendar Connector, the server administrator will be able to change only a limited group of settings. For more details, refer to the section describing how to work with conferences.
Before integration, ensure that the TrueConf Calendar Connector software is installed on a server that can access your TrueConf Server (see below). Additionally, TrueConf Calendar Connector requires a separate license for its operation, but no additional licenses will be needed for the video conferencing servers connected to it.
A separate settings block in section Manage add-ons → TrueConf Calendar Connector is used for configuring the integration.
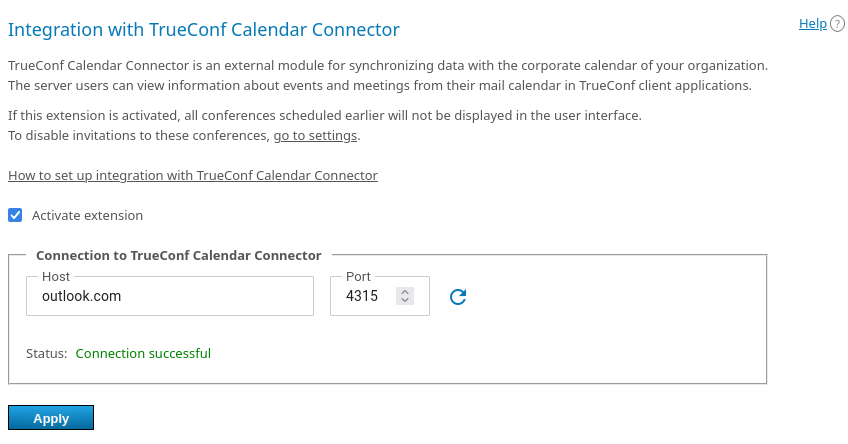
First, you need to check the box Activate integration to enable information exchange with TrueConf Calendar Connector.
Specify the domain name (FQDN) or IP address of the machine where TrueConf Calendar Connector is installed. To set up correct integration, you need to make sure that both servers can communicate with each other. The domain name (FQDN) or IP address of your video conferencing server instance must also be configured on the side of TrueConf Calendar Connector.
Specify the TCP port used for communication with TrueConf Calendar Connector (default is 4315).
Press the Apply button to activate the integration and view the connection status.
To ensure proper functioning, you need to activate TrueConf Calendar Connector and configure integration on its side as outlined in its documentation.
Configuring early connection to a conference before the event
When adding a conference to an event in the MS Exchange corporate calendar (via the Outlook extension), a virtual room is created. However, the event itself has a start time and possibly recurrence parameters. In this case, participants (except for the owner) will not be able to join the conference before the event's start time. Thus, by default, TrueConf Calendar Connector aligns the event time with the conference time.
However, this behavior can be overridden: if you need to allow connections to all virtual rooms from calendar events at any time, you can use a special setting through tc_regkey. This utility is provided with TrueConf Server to manage certain settings, transfer data when creating/restoring backups, and more.
Prohibiting connection to a conference regardless of the event schedule is controlled by the Calendar Scheduled Room Emulation Enabled setting:
If the value
0is set, it will be possible to join conference events at any time (just like a regular virtual room);If a value other than
0is set (the default is1), then virtual rooms from calendar events are displayed as scheduled conferences (meaning they cannot be joined at any other time).
To disable the parameter (i.e., the "scheduling" of conferences from events), execute the command:
On Windows:
"C:\Program Files\TrueConf Server\tc_regkey.exe" set "WebManager\Configuration\Conferences" "Calendar Scheduled Room Emulation Enabled" i32 0On Linux:
sudo /opt/trueconf/server/bin/vcs/tc_regkey set "WebManager\Configuration\Conferences" "Calendar Scheduled Room Emulation Enabled" i32 0Mail plugins
The Email plugins extension allows you to:
Control the web version of Microsoft Outlook plugin that will be downloaded from your server
obtain direct links to install the Windows version of the add-in for Outlook and plugin for Thunderbird;
Customize a template invitation to a conference.
This extension is provided free of charge, including with version TrueConf Server Free.
Go to the Manage add-ons → Email plugins section. In the Plugins tab, you will be able to:
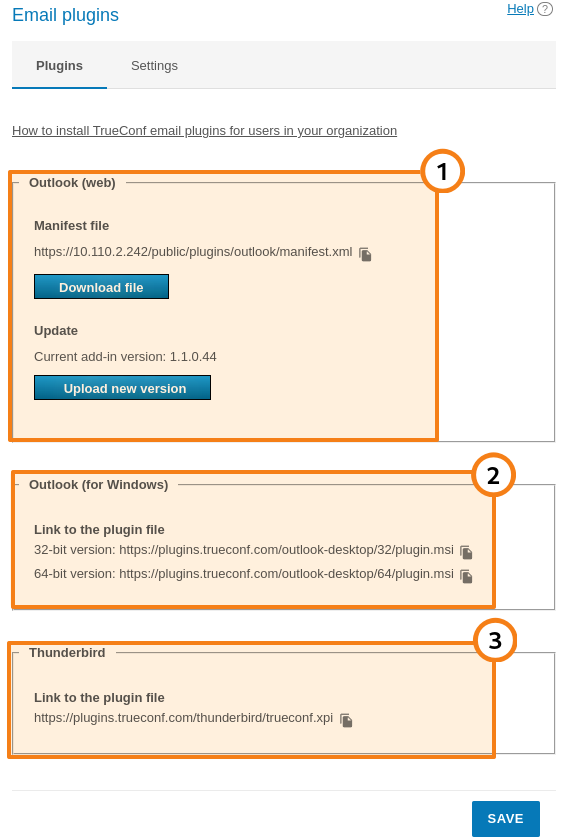
In section Outlook (web), you can download the XML file to install the web version of the add-on (plugin) and update the current version on the server. You can copy the installation link using the
 button and distribute it among users of the corporate network (including those on a closed network without Internet access) so they can install it directly from your TrueConf Server.
Copy the download link for the desktop version of the Outlook add-on with the button
in the Outlook (for Windows) section and share it among users. They will be able to download the plugin from our website via the Internet. You can also distribute the application with the help of group policies since it is provided as an msi package.For more details on installation and features of the desktop and web versions of the MS Outlook add-in, refer to our knowledge base.
In section Thunderbird, use the
button to copy the link for installing the plugin for the Thunderbird application and distribute it among users.
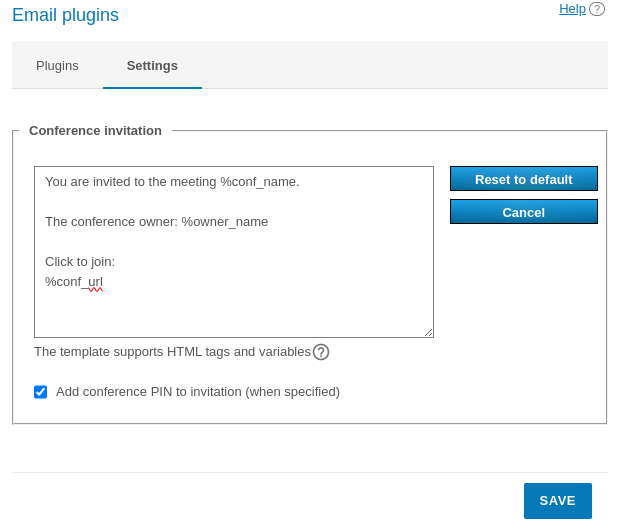
On the Settings tab, you can change the default text of the description which is added when a new event is created with the help of any TrueConf mail plugins. Here, you can enable PIN code to be added in the description (providing that PIN was set previously):
By configuring a special config.json file, you can set certain fields available in the email plugin and their default values. In the knowledge base article TrueConf, we explain how to do this for different plugins:
Invitation template settings
In the invitation template, one can use a group of constants similarly to the email templates available when configuring SMTP:
%owner_name— display name of the conference owner;%conf_id— ID of the conference, e.g.\c\df0a2adebe%conf_url— link to the conference page, for example:https://example.com/c/CID%conf_name— name of the conference%conf_type— conference access type (private or public);%max_speakers— the maximum number of speakers (for a moderated role-based conference and a smart meeting, this is the left value in the pair of numbers M x N)%max_participants— the maximum total number of participants (for moderated role-based conferences and smart meetings, this is the right-hand value in the pair of numbers M x N)%conf_mode— conference mode;%conf_pin— the PIN code for joining the conference%conf_url_app_join— a link for quick one-click connection in a client application without having to open the conference web pageServer administrator contacts parameters:
%admin_name— display name%admin_email— email address%admin_phone— phone number.
Plugin configuration when using a self-signed certificate
If a self-signed certificate is configured on , additional settings will be required:
If the Outlook plugin is used: no action is needed for the COM plugin, while for the web plugin, a user only needs to go to the server guest page in the browser and trust the self-signed certificate.
If the mail plugin is used for the Thunderbird application, the certificate should be imported to each user's PC in the following way:
Export the TrueConf Server certificate from the control panel. To do this, go to the Web → HTTPS section, click on the Download ca.crt link, and choose where to save the ca.crt file. Distribute it to user PCs through any convenient method.
On the user's PC, open the settings in the Thunderbird application.
Go to the Privacy & Security section and click the View Certificates button.
In the window that opens, go to the View Certificates tab and click the Import button.
Select the ca.crt certificate file that you moved to this PC during Step 1.
Check all the boxes in the certificate trust settings window and click OK.