
Web and HTTPS settings
Web and HTTPS settings
Here are the minimum steps needed to set up a working corporate communication system:
Select a machine (PC, physical or virtual server) with suitable hardware.
Configure HTTPS (it is used for many key features, such as integration with the AI server, conference scheduling, etc.) and specify the external server address (guest page). ◀️ You are here!
Configure access to the server for users within the corporate network and, if necessary, from an external network (outside the corporate network).
Create user accounts or integrate the server with a directory service via the LDAP/LDAPS protocol.
Install client applications for users and show them how to connect to your server (check the documentation for the desktop application).
Section Web contains the settings for the guest page and access parameters for the control panel. It is recommended to configure HTTPS first, followed by the other parameters.
HTTPS
In section Web → HTTPS of the control panel, you can configure the data transmission security settings between the browser and TrueConf Server.
A secure connection with your TrueConf Server instance is necessary for capturing media devices using WebRTC technology in all modern browsers. Thus, users won’t be able to join your meeting from their browsers if you haven’t enabled HTTPS connection.
Additionally, HTTPS is required for users connected to your server from TrueConf client applications to use the conference scheduler, presentation sharing, real-time meeting management, and to work with polls and transcripts.
TrueConf strongly recommends that you should configure HTTPS even if you are not intending to use TrueConf Server for holding public conferences and connecting participants via a browser (via WebRTC). Using HTTPS is one of the best practices for web services and helps to enhance the security of video communication.
After configuring HTTPS, update the external server address in the Web → Settings section. Make sure that it starts with https, for example, https://video.company.com. Alternatively, if an external service is used to proxy the traffic, specify its address in this section.
HTTPS configuration
In this section you can select your certificate and set other HTTPS parameters. The web server applies HTTPS settings at startup. If invalid certificate port and parameters are entered, the web server will not start and administrator will lose access to the control panel. Therefore it is required to carefully check the parameters beforehand.
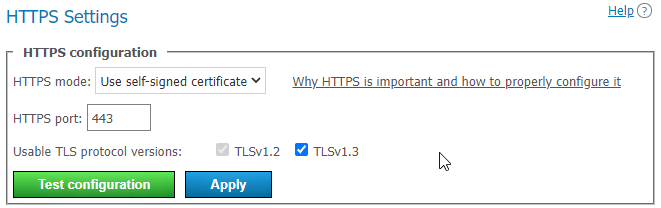
In the HTTPS mode dropdown list, select one of the three operating modes:
- Disable HTTPS — the HTTPS protocol will not be used;
- Use self-signed certificate — using a certificate automatically generated by the server (this certificate is not suitable for connecting external users via WebRTC);
- Use custom certificate — using the certificate uploaded by the administrator TrueConf Server.
In the HTTPS port: field, specify the TCP port that will be used by the web server for HTTPS protocol (use numbers). Port
443is set by default.Specify which versions of the TLS protocol your TrueConf Server will use for HTTPS operation.
Click Test configuration to check the HTTPS configuration settings without restarting the web server. This action does not modify the web server's configuration file.
Click Apply to save the web server configuration file with the specified parameters. You will see a dialog box notifying you that this action will automatically lead to your server instance restart.
Self-signed and custom certificates
There are two certificate types available in TrueConf Server. If you are using a trusted certificate, no additional actions are required, as browsers trust certificate authorities who signed it. To configure an uploaded certificate, the server administrator requires an X.509 certificate and the correct private key.
As an alternative you can also use a self-signed certificate:
a self-signed certificate is valid for 365 days and can be generated from control panel
this certificate can be renewed for unlimited period of time
with a self-signed certificate, you can test WebRTC without purchasing a trusted certificate
In our knowledge base, you can find information on how to create a free Let's Encrypt certificate on Windows or on Linux, depending on which OS your TrueConf Server is deployed.
Self-signed certificate
If you have previously created a self-signed certificate, this section will display the main parameters of the root certificate and the certificate that will be used by the web server and TrueConf Server, in addition to the generation button:
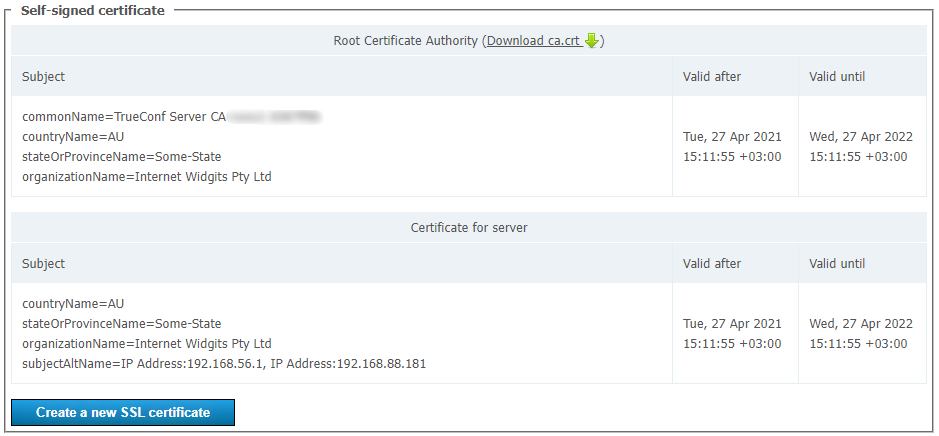
The Create a new SSL certificate button allows you to generate a new self-signed server certificate. This feature is required to extend the certificate's validity by another 365 days or to update the company information in the certificate when it changes. Through the Download ca.crt link, the administrator can download the root certificate file for distribution among client devices.
Custom certificate
If the certificate is uploaded, this section will contain the basic certificate’s parameters. If it's not, you will find the buttons for uploading the certificate:
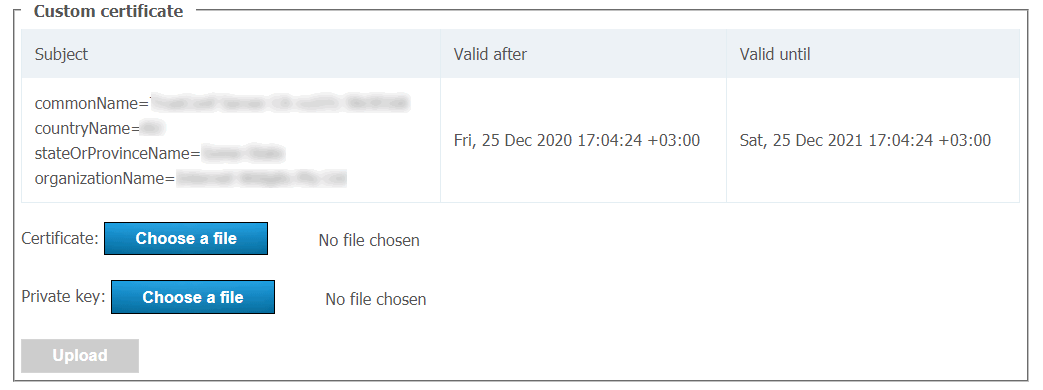
Use the Choose a file buttons to select the certificate and key files. Then click Upload.
The certificate format, key format and key correspondence to certificate are checked during download. Should just one check fail, the certificate and key files will not be not saved.
In our knowledge base, you can find information on how to convert an existing commercial certificate into a format supported by the server.
Web Settings
Guest page settings
To change the guest page URL and its appearance, you can use the following options:
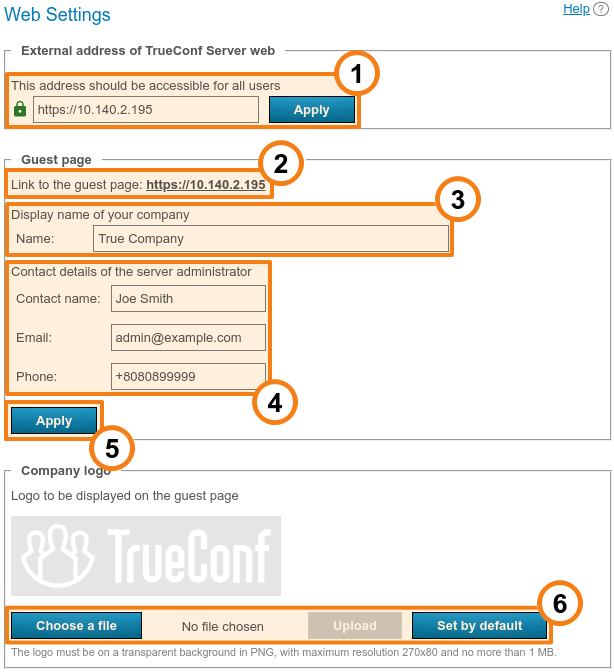
The TrueConf Server address which is used to generate links to the guest page and conference pages. Make sure that it is accessible to all users of your TrueConf Server. If a non-standard port (other than HTTP
80or HTTPS443) is used, it has to be specified in the address field after a colon, for example,https://video.server.com:4433. When an external service is used to proxy traffic, the external address of TrueConf Server will be its address. Such a service could be, for example, NAT or TrueConf Border Controller. The specifiedaddress:portwill be used by client applications to receive the widget for real-time conference management, conference scheduler, content shared in the second stream and presentation (slideshow).Link to the guest page, which contains instructions for connecting new users to TrueConf Server. It matches the external server address.
Your company's name which will be displayed on the guest page.
Server administrator contact details which are published on the guest page and web conference pages.
Don't forget to save guest page settings because settings in each block are saved independently of each other.
Upload a logo to be displayed on the guest page and conference webpages.
If some users in your organization install MS Outlook web plugin from your TrueConf Server (check the “Mail plugins” section) and the external address of the server is changed, they will need to delete the plugin and reinstall it. This issue can be explained by the fact that the external address is specified in the xml file of the plugin downloaded from the server.
Additional documents
In section Personal data processing, you can add texts for the following rules:
Cookie Policy
Privacy Policy
Terms of Use
The size of each document can be up to 100,000 characters.
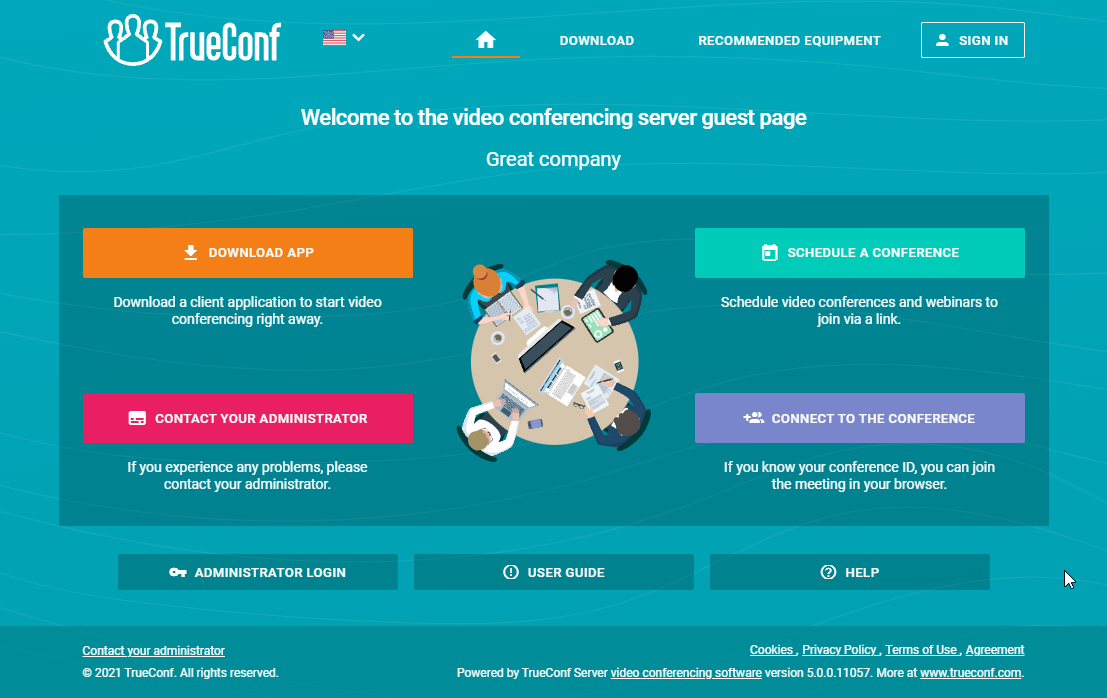
Document links will be displayed at the bottom of your TrueConf Server guest page and conference webpages.
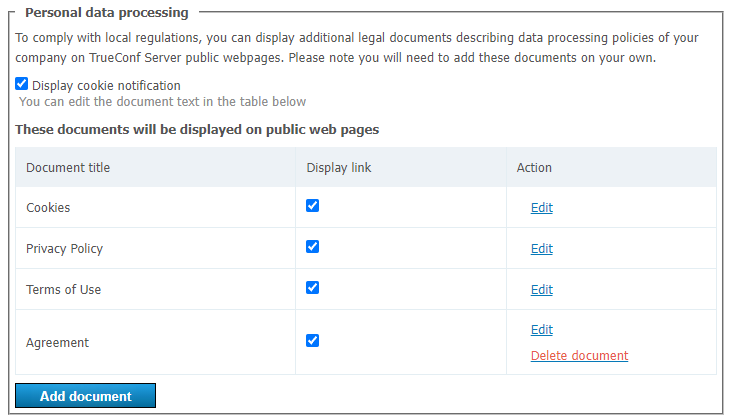
To add or edit rules:
Choose a document you would like to edit and click Edit to change the title and content of your document. The Cookie Policy already contains default text; however, you can also change it.
Check the box in field Display link.
Check the box Display cookie notification if you need to display a pop-up alert with a link to the cookie usage policy for each new visitor on the guest page and public conference pages.
Click the Add document button if you need to display a link to an additional agreement (up to two additional agreements, allowing for a total of five documents). To ensure the document appears on the page, remember to check the Display link checkbox for it as well.
Click Delete document to remove special rules from the list. Please note that standard agreements cannot be deleted, but you can hide them from the guest page and public conference pages by unchecking the Display link box.
You can also add extra information or a manual for your guest page visitors, which will be displayed once you click on the Help button at the bottom of the page. Please note that Help is optional and it does not replace the default manual that opens by clicking on the User guide button.
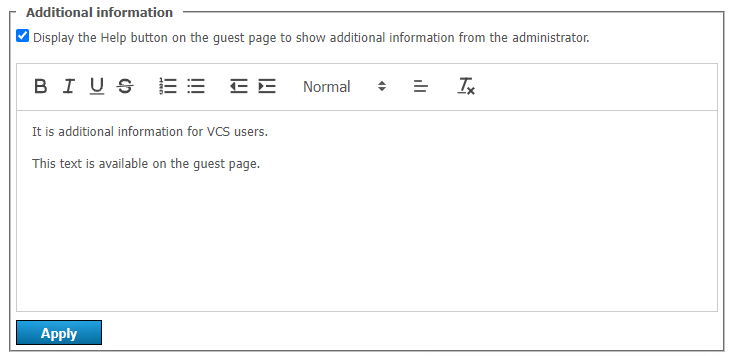
To display additional information:
Check the box Display the Help button.
Enter your information in the field below.
Click Apply.
Below you can see an example of a guest page with three default documents, one additional document and a custom Help button:
Administration access security
Use this section to configure access to the Web → Security control panel and API.
Details about who has access to administrate the VCS server on different operating systems and the reasons for it are explained in the server setup section.
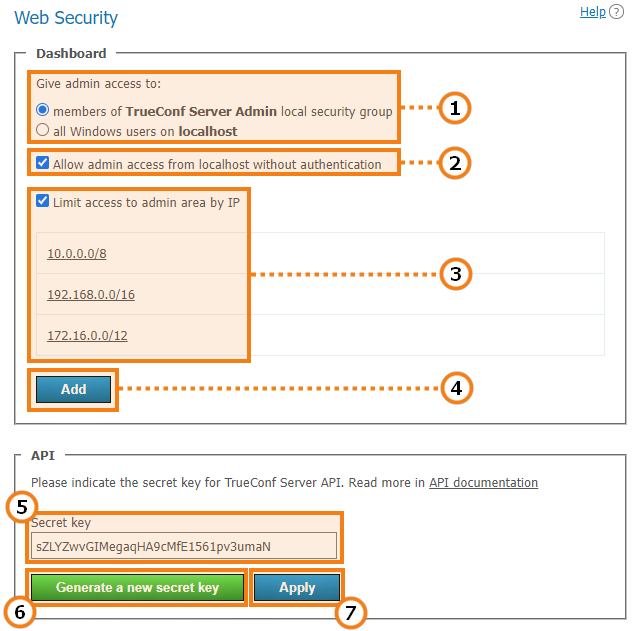
Check this box to make sure that your server is available for control only to the IP addresses specified in the list. In such a case the Limit access to admin area by IP button will be displayed only if the guest page is opened from the IP address added to this list. If the guest page is opened from the IP address which is not included in the specified ranges, the button for administrator login will be hidden.
Click this button to add a subnetwork with access to the control panel. Enter the address in the Add field (allowed characters are numbers and dots, admissible format is 4 octets in decimal representation without leading zeros from 0 to 255, separated by dots, e.g.
192.168.11.10). To open a drop-down list in Dashboard field click the arrow on the right side and choose the appropriate option. The mask32 — 255.255.255.255is used by default.The field Secret key contains the key for accessing your TrueConf Server API.
With a secret key, you can access APIs with no time limits or verifications until the key is changed. This is why we recommend that you use the secret key only for testing purposes or for TrueConf Server admin with privileges that cannot be specified when creating an OAuth application (e.g., viewing logs). For regular operation, please use OAuth2 technology.
Click to generate a new secret key. It is impossible to revert to the previous key or set a custom key.
Don't forget to press the Apply button to save changes.