Video capturing, customization and streaming using OBS Studio
During a video conference, you often have to capture and mix your video layout with third-party content, e.g., crawls, other app windows and brand logos if you want to brand your streaming session or recording. Check out the information below and learn how to do all of that using the OBS Studio software mixer.
OBS Studio is a suite of video recording and streaming software that enables you to capture video and audio from various sources in real time, form scenes, decode, record and stream. You can download the mixer at the official website.
How to add a capture source to OBS Studio
- Create a scene in OBS. Go to the Scenes section and add a new one by clicking on the button
 or use one of the default scenes. If you intend to arrange content in multiple ways for your stream, create a scene for each one.
 - Go to the Sources section in the lower part of the window.
- Click
 to select the capture source.
The use cases below capture individual windows, the entire screen and an RTSP stream.
Capturing video
Capturing video in multi-window mode
Drag the user’s video window outside your TrueConf app:
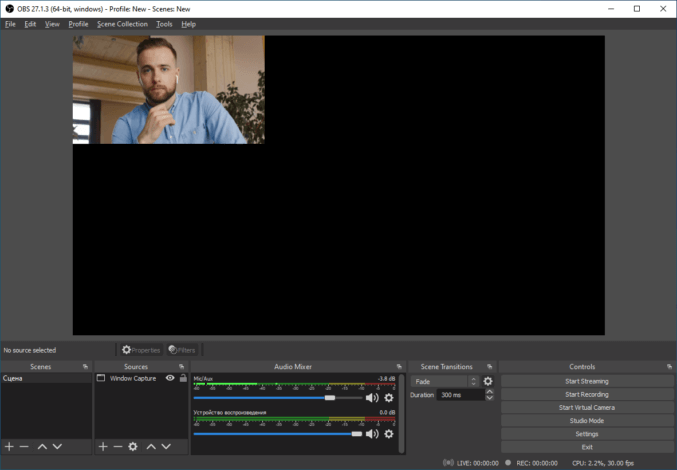
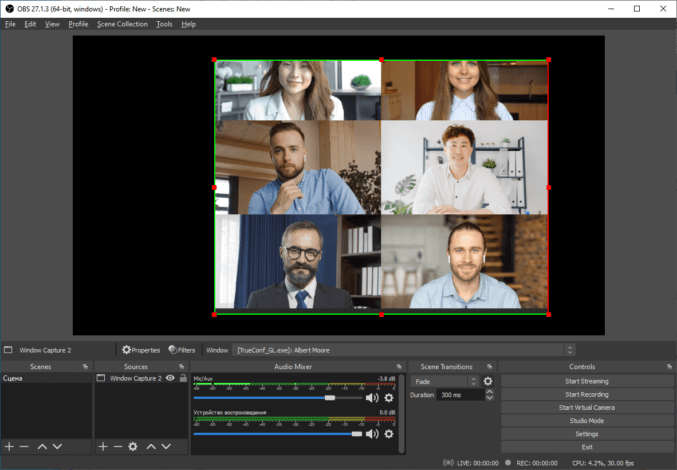
Select Window Capture in OBS Studio. Change the source name (“Window Capture” by default) in the pop-up window to make sure you can easily find the components when you further work with the scene. Click the OK button to confirm. In the Window drop-down list, select the one you want to capture. In our case, it’s [TrueConf_GL.exe]: Albert Moore and click the OK button.
In the OBS Studio workspace, you’ll see your scene preview along with the captured video window.
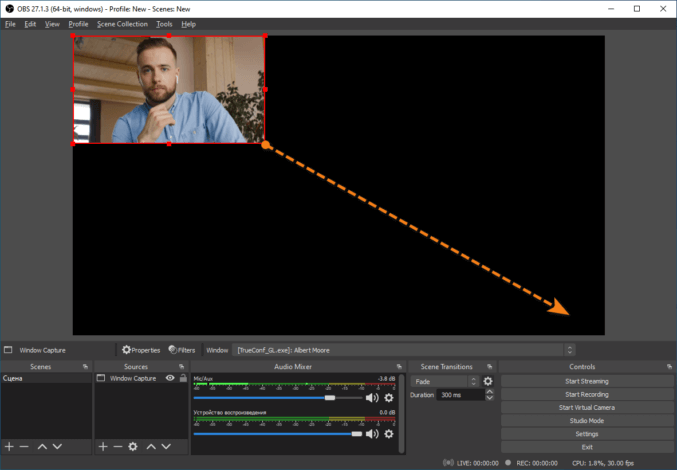
Please note that the Albert Moore window is captured in original resolution. To resize the captured window, you can do the following:
- Increase the size of the
Albert Moorewindow that we moved outside the TrueConf app.
Go full screen to maximize the quality of your captured video. The point is that our server adapts to video layouts. This means that it won’t provide high quality as long as the window remains minimized.
Please keep in mind that 720p is the highest video quality for each conference participant.
- Click a window and pull its corner in the OBS workspace.
Once you’ve adjusted the window size, click Start Recording or Start Streaming in the lower right corner.
You can drag and capture not only the video of a separate participant but also the entire conference layout and move it to OBS. To switch to multi-window mode, click on the button and select the option Enable multi-window mode.
Capturing a screen with a second monitor
Display the user’s video window on a second monitor and go full screen.
In OBS Studio, select Display Capture. In the pop-up window, rename the source (“Screen Capture” by default) and click the OK button. In the Screen drop-down list, select the one you want to capture. In our case, it’s Screen 2: 1920х1080 @ 1920,0, and click the OK button.
You’ll see the resulting scene in the OBS Studio workspace. To start recording or streaming, you need to use the buttons in the Controls section in the lower right corner.
Display of additional content when streaming
With TrueConf client application for desktops, you can share content in multiple ways.
- Sharing the desktop or a separate application window (e.g., a browser window) in one’s own video window. This method is quite easy; however, it has a certain disadvantage: other conference participants will not see you when you will be sharing content.
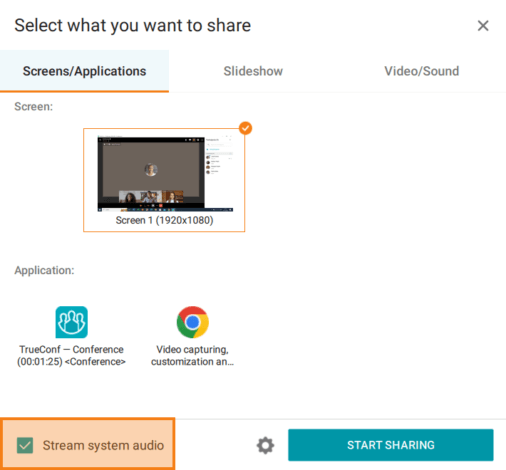
To do it, click the Screen sharing button which is next to the button for muting/unmuting speakers.
 - Display of content in a separate video window. This method is similar to the previous one. The difference is that when content sharing is started, you need to click the gear icon
 in the widget and select the option Show my video and content in separate windows. When content is shared in a separate window, frame rate is reduced (1 frame per 2 seconds) which is needed for better video quality because this method is more suitable for displaying static content.
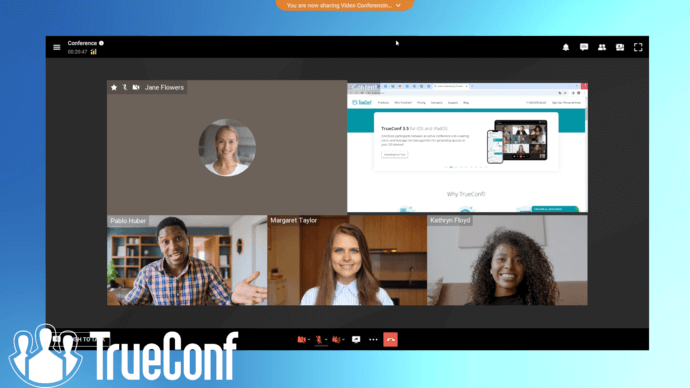
If you intend to show content in a separate window, it may be helpful to configure the layout in advance and add the Content window to this layout.
To do it, go to the Conferences → Scheduled conferences section in your TrueConf client application. Set the layout as it is described in the documentation when creating a meeting. - If it is not necessary to display dynamic content, but rather a set of static slides, you may use the Slideshow option. In this case, the slides will be displayed in a separate window, Besides, you will be able to use the widget for managing the slideshow.
- Besides, you can start a separate stream of a video or audio file without capturing the entire desktop or an application window. Please note that if video is being streamed, it will be displayed only in your video window, instead of the feed from your camera.
Display of selected speakers
When holding a conference, it is not always necessary to display the video of all speakers; sometimes, one can display only a group of speakers selected in advance. For example, there may be the main moderators who will talk to other speakers.
It is also possible that certain speakers cannot share their video due to some reason. You can select the group of participants who will be allowed to share their video. In this case, audio will be received without any restrictions from all participants on the podium. For this purpose go to the real-time meeting management section, and add only selected participants to the layout. Only the selected participants will be seen, but audio will be received from all speakers (e.g., from every participant in “all-on-screen” mode or from the speakers on the podium in a moderated role-based conference). Check the documentation for more details on how the layout for other participants can be changed.
Virtual backgrounds and background blurring
The background captured by the camera is also an important part of the presentation. You may sometimes be in a room that is not suitable for a video meeting or you may want to brand your video background. TrueConf application provides two options for configuring the background:
- Background blurring.
To activate this feature, go to the Settings → Audio and video → Video section.
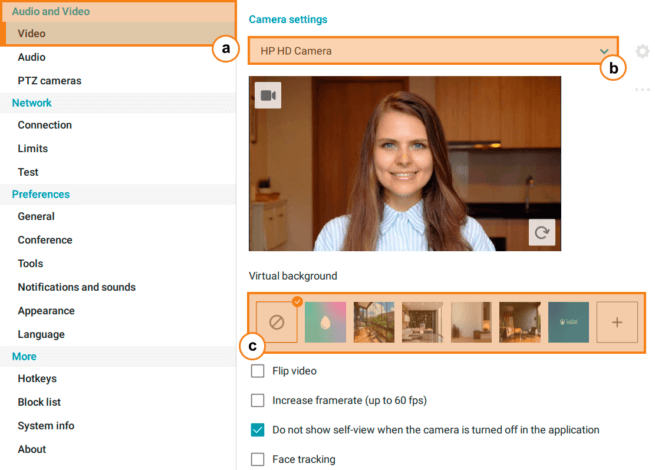 Make sure that the correct camera is selected, and go to the Virtual background subsection. The No effects option
  is selected by default. Right next to this option, you can find the Background blurring
  icon which you need to click.
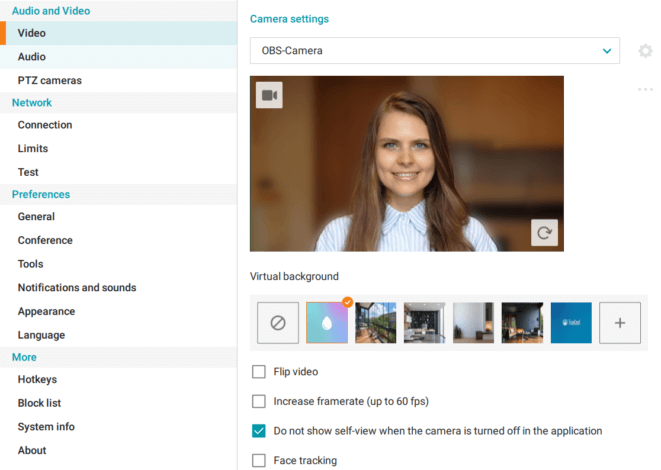
- Background replacement.
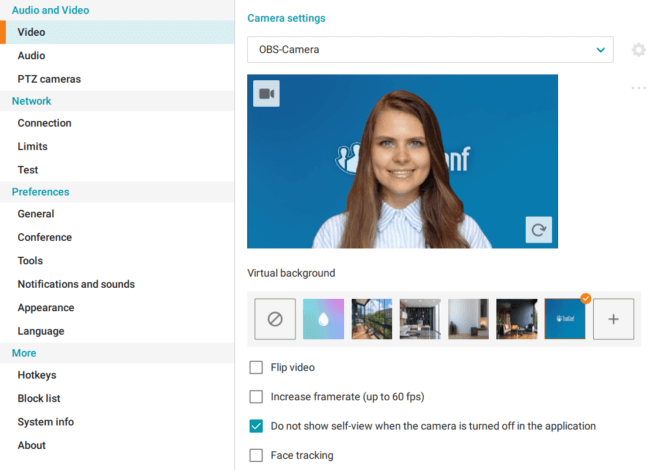
To use this feature select any of the default images in the Virtual background subsection which is in the Settings → Audio and Video → Video section. You can also upload a custom image by clicking on the Add background option and selecting a file on your computer.
Adding branding elements to the stream
In many cases, the style and appearance of the stream is equally important to its content. This is why it is critical to consider visual design of a stream. e.g., choose a video background or a static image.
You can also add your company’s logo design as a watermark to protect the copyright. The PNG format is the best option for a logo (the transparent background should be used). When all the visual components are ready, you can start adding them to the stream.
To do it, you will need to take these steps:
- Go to the Sources section in OBS and click on the button
 .
. - Depending on the type of background you want to use (static or dynamic), select either Image or Media Source respectively.
- Select the path to the file on your computer.
- When the selected background is added to the scene, adjust its size.
The logo can be uploaded in the same way; once it is done, drag it to the selected part of the screen.
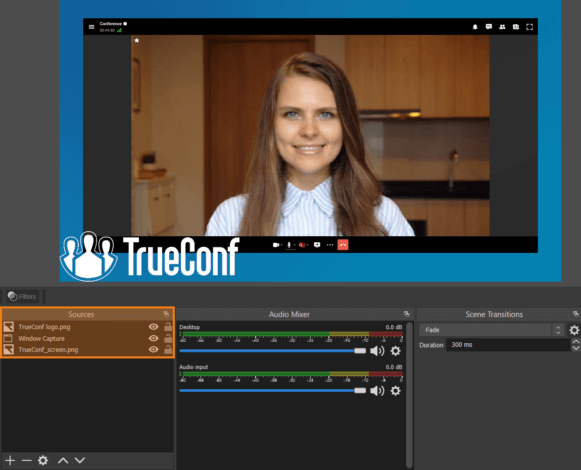
To avoid potential problems, one should consider the order in which the sources are located. For example, if you put the logo in the Sources column. below the background, the logo will be “behind” the background, in other words, it will not be seen.
The most convenient order of sources is as follows; Logo → Main Shared Content → Background. Similarly, by using multiple layers, you can create any scene for streaming, for example, a speaker can be displayed on the left while on the right side, there can be the chat with questions or a slideshow.
If you want to replace the background in the video window layout (gray is selected by default), go to the Settings menu of TrueConf application and select the Appearance option. Here, you can find multiple default backgrounds or upload a custom background. This may be helpful if video windows do not take up the entire screen. In such a case, you can change the default background or choose something more engaging depending on the effect you want to achieve.
Noise suppression
Audio quality is an important part of any conference. since it determines how well speakers can get their points across. To improve audio quality, one should use such a feature as noise suppression that is needed for removing all external noises that may be heard during a stream. Certainly, it is possible to make use of third-party mixers or configure noise suppression in OBS. However, there is a more convenient way: you can enable this feature directly in TrueConf. Noise suppression in TrueConf is based on AI (machine learning) algorithms which make it possible to remove all types of noises: construction noises, dog barking, sound of key presses, and so forth.
To do it, go to the Settings → Audio and video → Audio section. Here, you can select, test, and configure the devices for audio input and output so that they could meet your requirements. Below, you can find multiple options, including Noise suppression. Besides, noise suppression can be activated at any time during a conference by clicking on the button ![]() which is next to the microphone icon. Check the documentation for more details on how noise suppression can be activated.
which is next to the microphone icon. Check the documentation for more details on how noise suppression can be activated.
However, noise suppression works only inside TrueConf client applications; for example, it will not affect the stream via OBS. In case it is necessary to use noise suppression during a stream, you need to enable this feature within OBS.
To do it, take these steps:
- Add a name for this filter and select one of the recommended modes depending on the power of your device.

Add a filter in the way described above. Then, configure it in the Filters menu.
Capturing an RTSP stream from the server while the streaming session is running
You can add an RTSP stream to the scene as a source, for example, it is possible to add the stream of another TrueConf conference to your event. For this purpose, you will need access to the TrueConf Server control panel (check the documentation for more details about this solution). Otherwise, the administrator of your server will first need to configure streaming for this conference.
To add an RTSP stream to OBS Studio, take the following steps:
- Set up RTSP Pull in Group Conferences → Streaming. Read our documentation to learn more.
- In the conference settings (Advanced → Streaming), check the Enable Streaming box and select a preset with your configuration name:

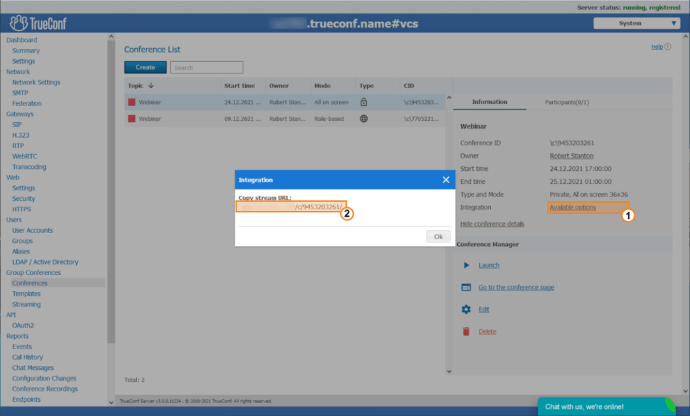
- Go back to the conference list and select your event. On the Information tab (the Integration item), click Available options (1) and copy the stream link (2).
Go to OBS Studio and add Media Source. In the pop-up window, rename the source (“Media Source” by default) and click the OK button. Uncheck the Local File box, paste the copied RTSP stream link into the Input field and click the OK button.
Once the event has kicked off, a video layout will be displayed in the OBS Studio workspace. If you want to crop some parts of the video window, move the borders of the captured video in the workspace while holding down the Alt key. The video area border will change its color to green:
After adjusting the window size and border, click the Start Recording or Start Streaming button.
Capturing video from TrueConf Room
- Create or join a conference as a moderator using TrueConf Room, conference room application.
- In the conference control panel (the Change Layout section), move the required window to the second screen. Read more in our documentation.
- Capture the screen as described here.
Adding additional audio stream
You may need to add an extra audio stream to the resulting scene, for example, quiet background music during a pause between talks or when it is needed to capture video in multi-window mode.
Select the required Scene and go to the Audio mixer section. You will see that by default the application captures the audio from the desktop (the Desktop option) and the audio from the available microphone (the Audio input option). Each of these audio sources can be disabled by clicking on the button ![]() .
.
After you disable all unnecessary capture sources, go to the Sources column. Create a new source by clicking on the Add button. You will need to select one of the recommended audio capture options in the context menu: Audio Input capture, Audio Output Capture, Media Source, or Application Audio Capture.
Capturing audio is no different from capturing video. You need to add the source Media Source. Rename the added source if necessary and click the OK button. In the next window (the Local File field), select the required audio file and press OK.
Setting up streaming sessions
We’ll be showing you a stream setup case for YouTube.
In the OBS Studio window, go to File → Settings → Stream. In the Service drop-down list, select YouTube – RTMPS, while in the Server item, select Primary YouTube ingest server. Next, you have two options to set up your stream.
Option 1: Using an account
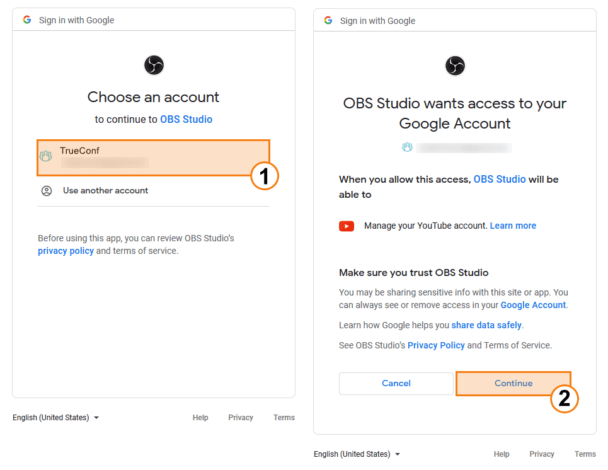
In the stream settings window, click the Connect Account button. In your default browser, the Google account login page will open. Select your account from the list or log in with your credentials (1). On that page, allow the OBS app to access your account by clicking the Continue button (2).
After that, return to OBS Studio and make sure the name of your YouTube channel is displayed in the Connected Account line.
Click the Apply and OK buttons in sequence. You’ll see the YouTube Chat window; if you aren’t planning to use the chat, you can close it.
In the OBS Studio window, click the Manage Broadcast button and adjust the required parameters:
- Name
- Stream access settings
- Mark your stream as “not made for kids”
Customize other options if you want to, such as description, category and splash screen. Click the Create broadcast button and proceed to capture video. Next, click the Start Streaming button when everything is ready.
Option 2: Using a stream key
In the stream settings window, click the Use Stream Key button. After that, click the Get Stream Key button.
If a preset window pops up, specify the start time of your stream: right now or later. Next, select to stream Using DVR.
In YouTube Studio, take the following steps:
- Change the stream name, description, access parameters (public, limited, access by link), category, icon, etc.
- Copy the stream key and paste it into the OBS Studio streaming settings window.
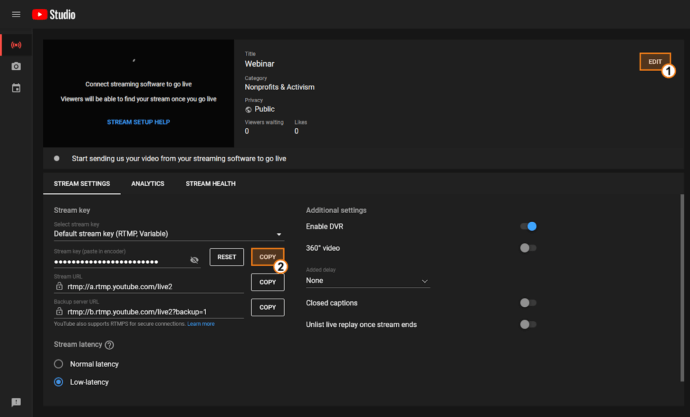
- Click the Apply and OK button.
You can now start capturing video. Next, click the Start Streaming button when everything is ready.
NDI media capture and output with the help of OBS
In some cases, it may be necessary to output the media signal via NDI, for example, if you are sending an NDI stream from TrueConf Room and TrueConf Group meeting-room solutions to the network or if it is necessary to send an NDI stream to the meeting room with the help of OBS.
Please note that to work with this protocol, you will to install the following software:
- NDI Tools
- NDI OBS plugin
Let us consider the case when an NDI stream from TrueConf Room is captured with the help of OBS.
- Create a conference in TrueConf Room as it is described in our documentation. If an NDI stream is already available in the network, go to step 3.
- In TruConf Room, select if it is necessary to stream the entire layout or videos from separate participants and activate streaming for the selected NDI stream.
- To add an NDI video stream to the scene in OBS Studio, go to the Sources section and click NDI source.
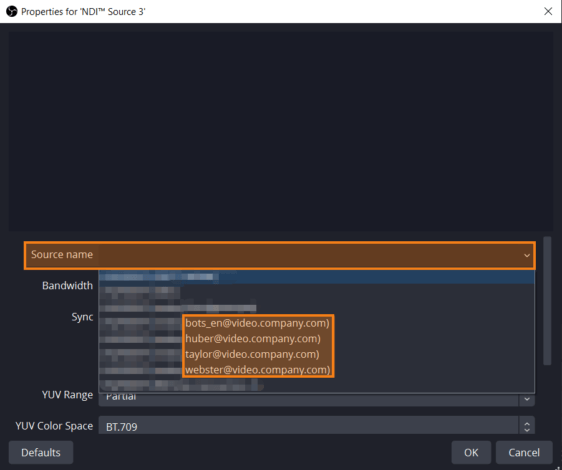
- Select the required stream from the list and click OK.
After the conference starts, enable NDI streaming. You can select if it is necessary to stream the entire layout or the video from a separate participant. To add an NDI video stream to the Scene in OBS Studio, go to the Sources section and click NDI Source. Select the required stream from the list and click OK.
After you choose the location of all windows with a video stream on the preview screen in OBS Studio, you can start streaming to third-party platforms.


