Information about the server and global settings
Server Information and General Settings
TrueConf Server Control Panel is a web interface that allows you to manage TrueConf Server.
Thanks to the web interface, administrators can:
View information about the status, registration, and server license,as well as track its performance
Add and delete users
Schedule video conferences
Setup client applications and integration with Active Directory and LDAP
Set connection rules for calls over SIP and H.323 gateways.
By default, the TCP port for accessing the TrueConf Server control panel is equal to 80; however, when deploying the server on Windows, you can change the port number in the installation dialogue window.
However, you can select any different port after installation both on Windows and Linux. In this case, the port has to be specified in the browser address book right after the colon in the hostname, e.g., http://localhost:8080.
Server Information
When you navigate to the TrueConf Server control panel, it opens in the Summary section.
On the Dashboard tab, you will see the following data:
Real-time performance graphs:
CPU usage
Network usage (according to the traffic type)
Numbers of active conferences and connections of all types
Available disk space
space occupied by the working folder, files transferred in chats, and recordings of conferences and calls;
Number of online users, reserved PRO licenses, guest connections and SIP/H.323/RTSP connections
The number of active (ongoing) conferences and the total number of its participants
The status of HTTPS, SMTP, LDAP, and SIP/H.323 gateways.
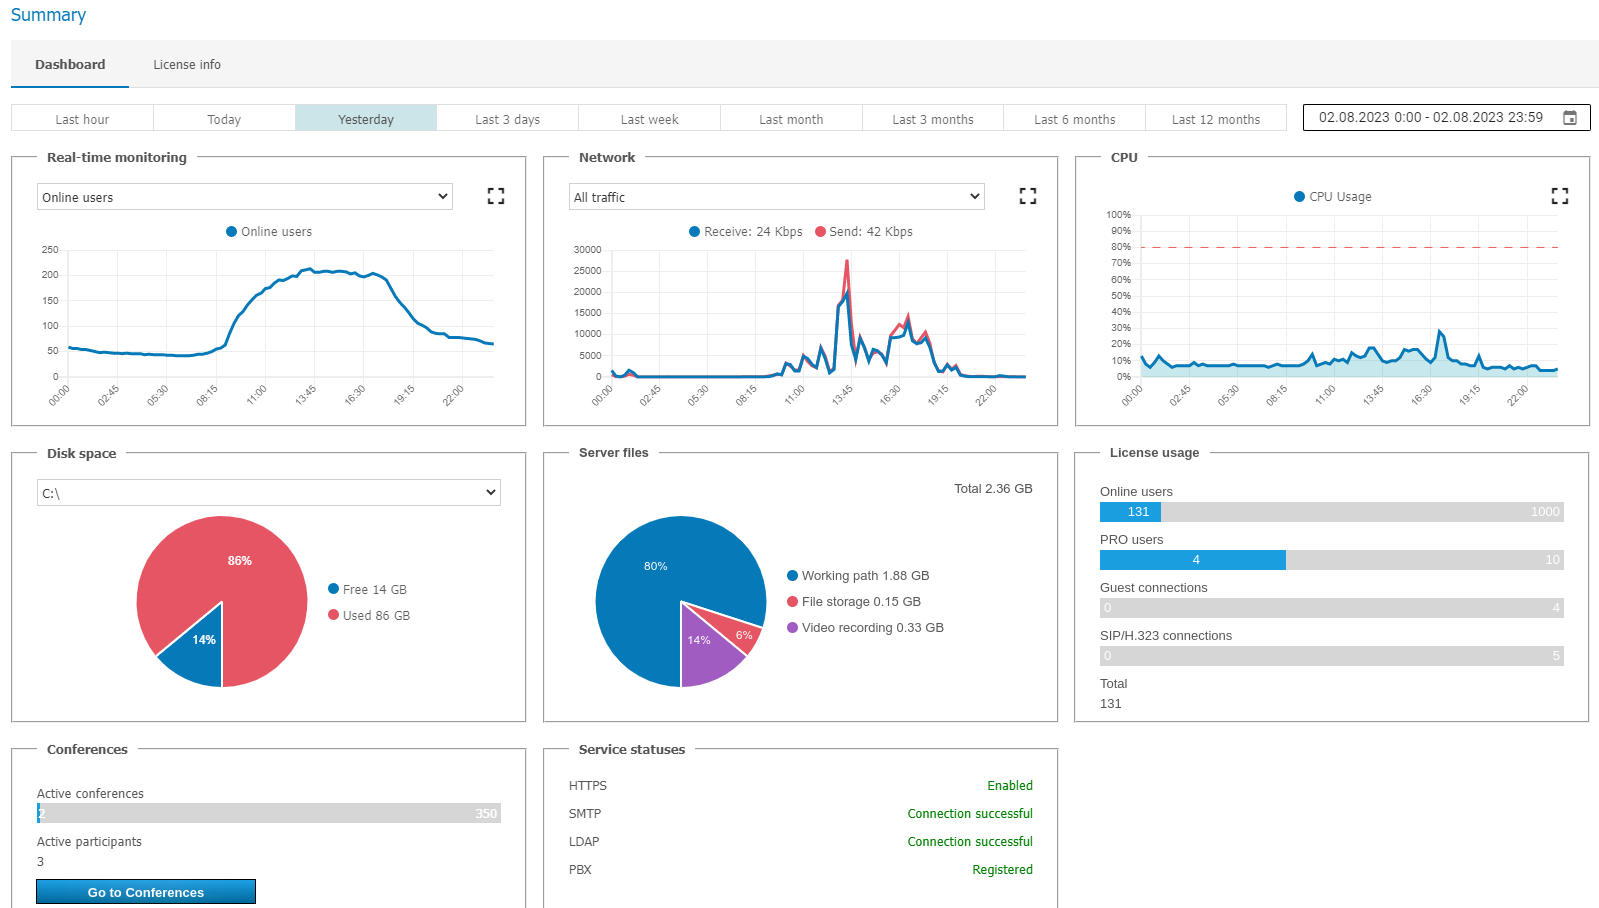
You can enlarge each chart using the  button, and by navigating to the calendar with the
  button, you can select any date range to display the data.
The License info tab shows information about the license, registered contact person, and the extensions used on the server. Here, you can:
by using the Register button to renew or modify the server license;
proceed to purchasing additional features from block Extensions.
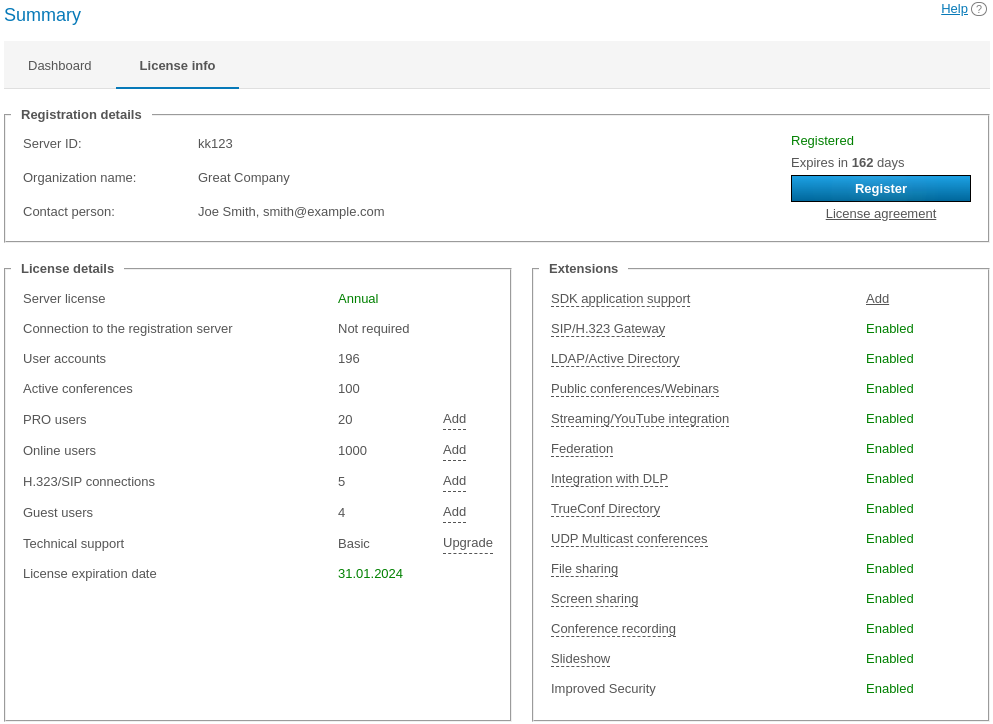
By clicking the All licenses button, a window will appear with the full list of licenses associated with this instance of TrueConf Server, verified by server ID. To obtain this information, a connection to the registration server reg.trueconf.com is required.
In case of any problems with server registration, the administrator may reach out to TrueConf technical support team via the contacts that will be displayed in case of an error.
In the event of a connection loss with the registration server (reg.trueconf.com on TCP port 4310), your TrueConf Server Free will be disconnected after 12 hours. The scheduled disconnection time will be displayed on the Summary tab. The full version of TrueConf Server does not have these limitations, regardless of whether the registration is online or offline.
If the server is connected to the Internet, administrator will be able to receive notifications updates in TrueConf Server control panel. In the left menu of the control panel you will see a notification, while at the top of the page a message with the latest version download link will be displayed. After you have updates, the notification will disappear.
PRO licenses
In the Dashboard → PRO licenses section, the administrator TrueConf Server can configure the distribution of PRO licenses for conference participation and view data on their usage.
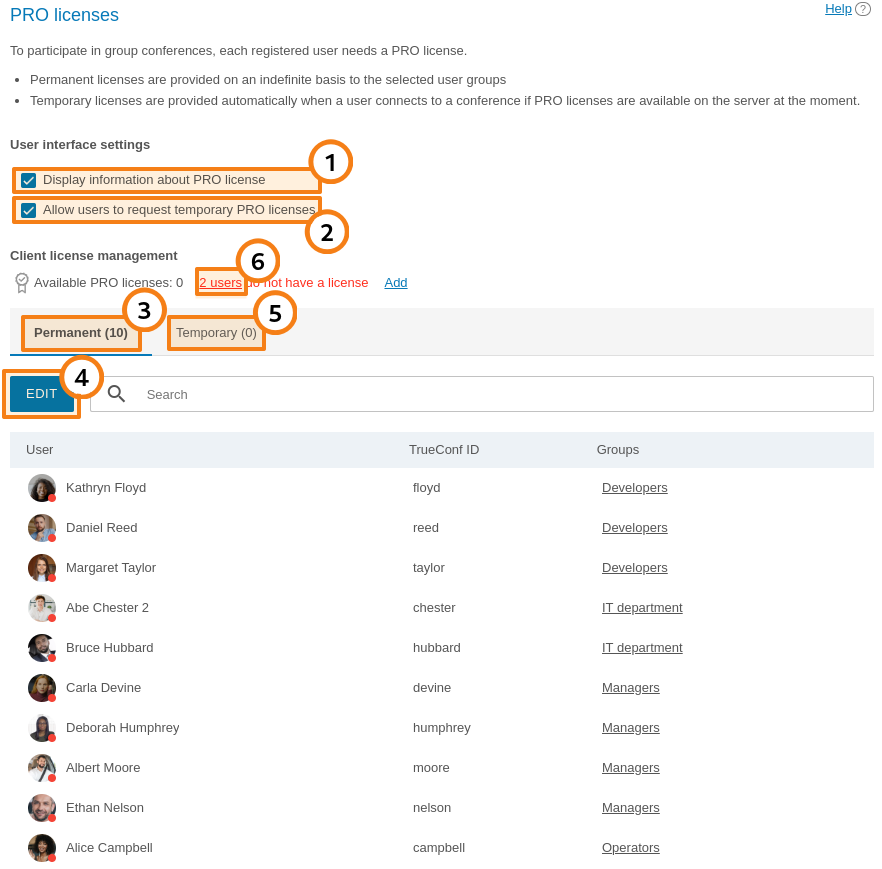
Activate the display of information about a PRO license in the user personal area and in TrueConf client applications (enabled by default).
Enable users to request a PRO license in advance (before participating in a conference) either in the personal area and in the client application (enabled by default).
The list of users who are given permanent PRO licenses. Such users can be picked only by selecting groups. It is impossible to select users individually.
Click on the Edit button to select groups of users. To apply changes, you will need to restart TrueConf Server. If the number of selected users is larger than the number of licenses available on your TrueConf Server, the licenses will be distributed depending on the priority of groups. Within groups, the licenses will be first given to the users who are on top of the list (users are sorted by their display names).
The list of users who were given temporary PRO licenses, along with the validity period of each license. You can revoke a user's temporary license by clicking
 next to the user’s name. This will immediately return the license to the pool of available temporary PRO licenses. If a user is participating in a conference at the time when the license is revoked, he/she will be automatically removed from this meeting.
If there are users, who did not receive licenses, the corresponding notification will be displayed and the number of users without a license will be specified.
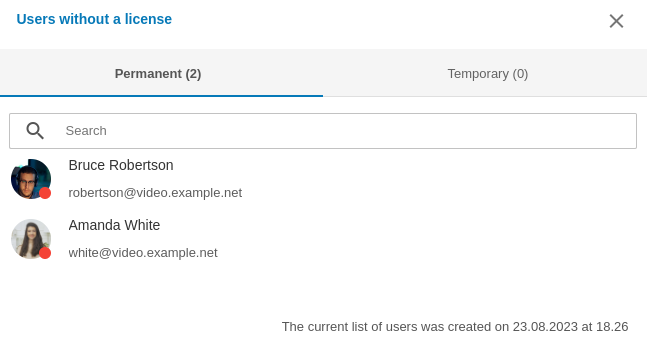
Two separate lists will be generated there:
- Permanent — users who couldn't obtain licenses during the distribution of permanent PRO licenses will be added there (the time of the last restart TrueConf Server will be displayed at the bottom of the list);
- Temporary — users who attempted to obtain a temporary PRO license but found none available on TrueConf Server. This list is not cleared when the TrueConf Server service or the computer itself is restarted. Each user is removed from the list 24 hours after being added.
Please note that the changes in the distribution of PRO licenses are applied either after the server restart or automatically once every 24 hours (check part 5 in the description of license distribution). For example, if a new user is added to the group with permanent PRO licenses, he/she will not receive a PRO license until you restart TrueConf Server.
Basic settings
In the Dashboard → Settings section, you can modify several operational parameters of TrueConf Server and adjust some client application settings.
Server settings
In section Settings, you can modify the following parameters:
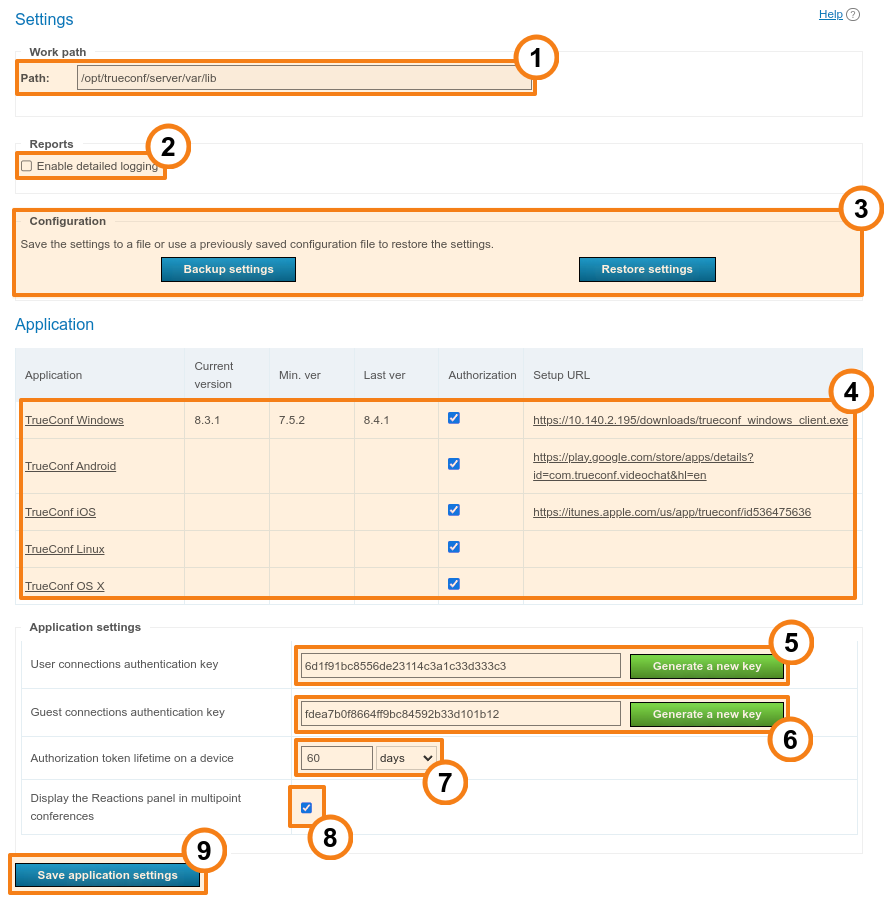
- Work path — the directory on the machine where the server is installed. Here, the server stores certain data needed for its work (e.g., logs, user avatars, etc.). We do not recommended using network drives for this directory as a way of saving space; it is better to use network storage separately for recordings and files sent in chats.
In the TrueConf Server for Linux control panel, the working directory path is set to
/opt/trueconf/server/var/liband it cannot be changed. However, you can set up a symbolic link (symlink) as shown in the corresponding section. Check Enable detailed logging to collect more detailed information in the server operation logs. These logs may be needed when contacting technical support. This setting is responsible for the
stdout.logfile.In our knowledge base, you can find detailed information about the purpose of the saved log files, and which logs are needed in various situations for analyzing and resolving server-related issues.
- Language settingsThe text contains only colons and does not require translation.
The language from the By default list will be used for email templates) (until you select a different language when configuring SMTP notifications), ICS files for adding events to the calendar, web page previews on social media, and the connection menu for SIP/H.323 endpoints.
In the Public pages and the personal area list, you can specify which languages supported by the server will be displayed on the guest page, event pages, and also in the user's personal area. The language By default will necessarily be included in this list of languages.
How quickly will stdout.log fill up if detailed logging is activated?
Activation of detailed logging requires additional space on the SSD drive where TrueConf Server is installed because the size of the stdout.log file will increase much faster.
Path to stdout.log:
Windows:
working directory\stdout.logLinux:
/opt/trueconf/server/var/log/vcs/stdout.log
By default, the maximum size of stdout.log is 1 GB. When this limit is reached, the file is automatically renamed to stdout.old.log, and a new file is created in its place. So, there can be at most 2 main log files of server operation with a total size of 2 GB. The rate at which the file fills up is not constant: it depends on the activity on TrueConf Server (number of meetings started, online users, etc.).
Remember, besides stdout.log, there are also other log files on the server.
You can increase the maximum size of stdout.log with the help of technical support.
Application Settings
In section Application, you can modify the following parameters:
Settings of the client applications TrueConf from which users will connect to your conferences.
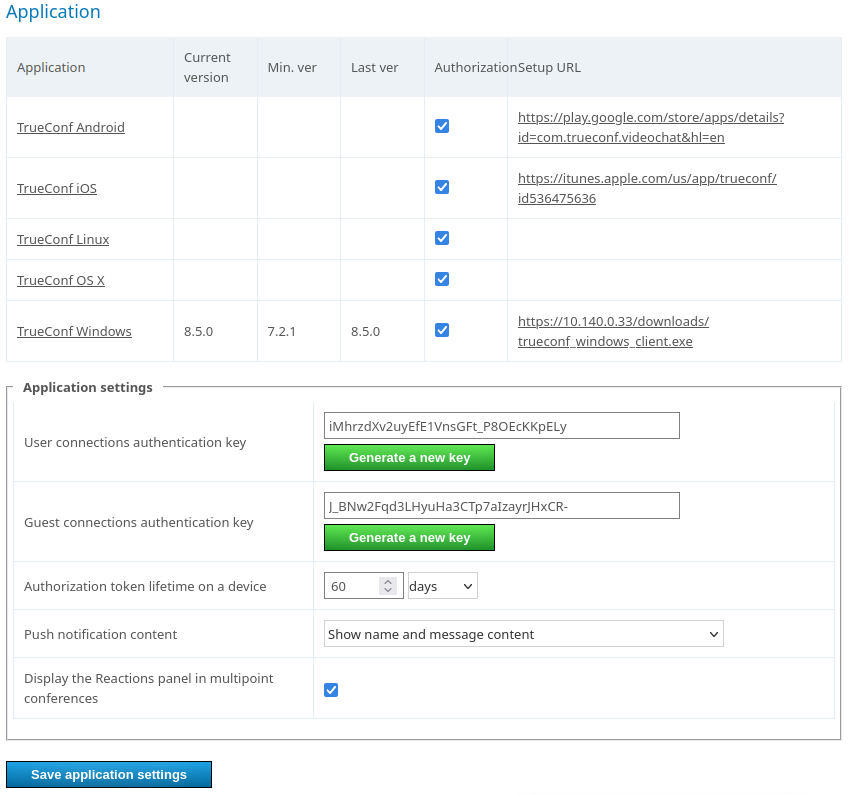
- User connections authentication key — is used when creating session keys to identify users in a conference. To replace the key with a new one, click the Generate a new key button. Changing the key during a conference can enhance its security by making it more difficult for third parties to connect.
- Guest connections authentication key — similar to the previous one, but it controls connections through guest accounts in public conferences.
- Authorization token lifetime on a device indicates the duration for which the session will be maintained after the client application connects to TrueConf Server or the user logs into their personal area. After the specified time expires:
If a user has been signed in to a client application and then goes offline (either logs out or closes the application), he/she will need to authenticate again according to the specified settings when the application is launched.
If a user has been signed in to the personal area, he/she will be logged out after clicking on any button or going to a different section; this person will need to re-authorize according to the current settings.
In the drop-down list Push notification content you can select the content that will be sent to push notification services (Google, Apple, etc.) and displayed on a user’s mobile device. Available options: the message and the sender's name, only the name, or an anonymous notification (both the name and content will be hidden).
If you check the box Display the Reactions panel in multipoint conferences, users will be able to use special statuses (reaction icons) during events.
Don’t forget to save settings after changing them.
Transferring server settings
You may need to save the backup copy of settings if it is necessary to reinstall the operating system or migrate the server to a different physical machine without having to re-configure the server from scratch. To learn more about saving and restoring settings, refer to our knowledge base:
- migrating TrueConf Server from one Windows server to another ;
- migrating TrueConf Server from one Linux server to another;
- migrating TrueConf Server from Windows to Linux;
- migrating TrueConf Server from Linux to Windows.
Configuring client application connections
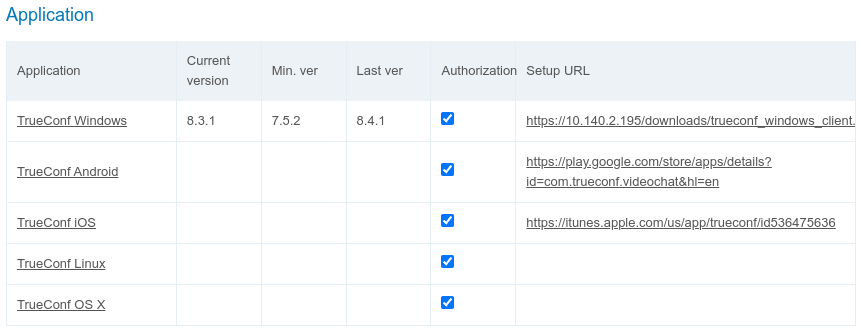
Further down the page, there is a section for configuring restrictions on TrueConf client applications used to participate in calls and conferences held on your TrueConf Server. It is also possible to set separate restrictions for different operating systems: Windows, macOS (previously OS X), Linux, Android/Android TV, iOS/iPadOS.
Here, one can also disable authorization and joining conferences (including guest connections) from the applications for certain operating systems. For example, you may need to prevent employees from using corporate video communication on smartphones, and allow it only at workstations. To do it, uncheck the Authorization box for the selected application in the Application table.
When TrueConf Server is updated, the installation files for TrueConf for Windows client applications, available for download on the guest page and already embedded with links to connect to your server, are automatically updated as well. Other applications need to be installed from other sources, with all links also provided on the guest page.
To choose allowed versions of the application, click on the application name in the first column of the table. Here, you can choose the latest version of the application to which users will be allowed to update. Besides, you can choose which updates should be mandatory and which should be only recommended when users connect to your server:
Here, you can edit the following parameters:
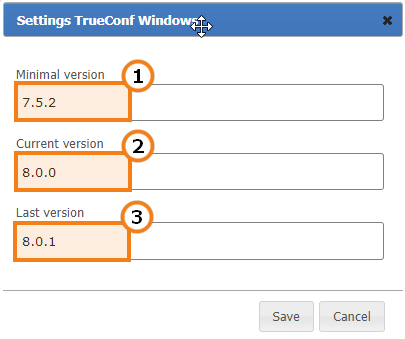
In the Minimal version field, you can specify the oldest version of the client application that can be connected to the video conferencing server. If the client application version is lower than the one specified here, a user will be required to update the application. A user will be unable to continue working with the application without updating it. A warning window will prompt the user to update to the version specified in the Last version field. If the user connects to a different video conferencing server, the application version will be compared with the version from the new server. The warning window will include the button for downloading the update if a link is provided in the Setup URL column for the configured application.
In the Current version field, specify the preferred client application version. If a user's application version is lower than the one specified in this field, but equal to or higher than the version in the Minimal version field, the user will be prompted to follow a link to the appropriate resource and update the application. The user will also be allowed to close the notification window and continue working.
In the Last version field, specify the version of the client application to which the user will be prompted to update.
You can install TrueConf for Windows client application on multiple machines in the corporate network with the help of group policies (GPO). To do it, you can use an msi package that can be downloaded from our website. To learn more about this feature, read the corresponding article in our knowledge base.
Updating applications for Windows without reinstalling the server
The next version of the client application may be released independently of the update for TrueConf Server. In this case, you can also manually configure the transition to it for TrueConf for Windows users of your video conferencing server.
To do it:
Go to the pageTrueConf for Windows and download the latest release versions.
Rename the downloaded file according to its bit version in the following way:
Rename the x64 file (for 64-bit OS) to
trueconf_windows_client_x64.exeRename the x86 file (for 32-bit OS) to
trueconf_windows_client_x86.exe.
Move the renamed files to the following directories depending on the OS used on your server:
- TrueConf Server for Windows – to the
ClientInstFilesdirectory at the server installation path (by defaultC:\Program Files\TrueConf Server\ClientInstFiles) - TrueConf Server for Linux – to the
/opt/trueconf/server/srv/clients/directory.
- TrueConf Server for Windows – to the
Go to the Settings section of the server control panel.
Open the TrueConf for Windows settings window and specify the version of the previously downloaded application in fields Current version and Last version, as shown above.
How to use other folders on Linux with symlink
If you plan on storing many conference recordings or expect a large number of files to be sent in chats, you might find it convenient to change their storage path. For instance, you could move them to a larger SSD to avoid taking up space on the system storage. On Linux , you cannot change the path through the server control panel, but it is possible to use symbolic links (symlink).
To run the commands listed below, use the sudo program, or switch to the administrator mode by executing the su - command in the terminal and entering the root password.
To change the storage location for TrueConf Server on Linux, follow these steps:
Create a new directory for the required files. Below are the examples of console commands for working with new directories at the
/var/server/path:- creating a directory for storing conference recordings:
mkdir -p /var/server/recordings- creating a directory for storing files:
mkdir -p /var/server/filesGive the trueconf user owner permissions for the created directory.
- for recordings
chown -R trueconf:trueconf /var/server/recordings- for files
chown -R trueconf:trueconf /var/server/filesIf you need to keep the existing files, move them to the new directory:
- copying recordings
cp -aRT /opt/trueconf/server/var/lib/recordings /var/server/recordings- file copying
cp -aRT /opt/trueconf/server/var/lib/files /var/server/filesDelete the directory that you want to replace with all its files since we will create a symbolic link instead:
- deleting the directory with recordings
rm -r /opt/trueconf/server/var/lib/recordings- deleting the directory with files
rm -r /opt/trueconf/server/var/lib/filesCreate a symbolic link to the new directory:
- for recordings
ln -s /var/server/recordings /opt/trueconf/server/var/lib/recordings- for files
ln -s /var/server/files /opt/trueconf/server/var/lib/filesRestart the server main service:
systemctl restart trueconfIf you need to remove a symbolic link, use the following command:
unlink [symlink_path]where [symlink_path] is the path to the directory created at step 2, for example, /var/server/recordings. Please note that this command does not delete the directory itself. To do this, run:
rm -r [symlink_path]Mounting a network storage on Linux
You can also create a symbolic link to any mounted directory, such as an external network storage.
To run the commands listed below, use the sudo program, or switch to the administrator mode by executing the su - command in the terminal and entering the root password.
For example, to mount an external network storage available via the SMB protocol, follow these steps:
- Install required tools on your system:
On Debian
apt-get install -y cifs-utils2. Create a directory where you will mount the network storage (see step 1 in the section about creating symbolic links). For example, to mount the directory with chat files:
mkdir -p /var/server/files3. Create the file credentials.ini with the data required to access the remote storage. It should include the following lines:
username=[login]
password=[password]
domain=[domain]
where:
[login]— login[password]— password[domain]— the domain to which the network storage belongs (this line is optional).
For example, with this command in the terminal:
echo -e 'username=[login]\npassword=[password]\ndomain=[domain]' > credentials.iniThe -e parameter of the echo command enables correct interpretation of special characters that are escaped with \. In the example above, this is the newline character \n.
4. Mount the network storage to the created directory using the credentials.ini file:
mount -t cifs -o credentials=[credentials_path] [remote_path] [local_path]where:
[credentials_path]— the full path to thecredentials.inifile created during the previous step[remote_path]— the path to the mounted storage, for example,//10.100.2.120/files[local_path]— the path to the local directory used for mounting (see step 2), for example,/var/server/files.
You can now create a symbolic link to the mounted directory, as shown earlier.
To unmount a directory, run the following command (as administrator or using sudo):
umount [local_path]where [local_path] is the path to the local directory for mounting (see step 2), for example, /var/server/files. After that, you can delete the directory with the command:
rm -r [local_path]Configuring access to network storage in Windows
TrueConf Server for Windows will be able to access network drives, only if its three services are allowed to read and write to network paths. However, by default, these services are launched under the Local System account, which does not have access to network resources. So, you need to configure the services to run under a user account with required permissions (e.g., OS administrator):Open the list of Windows services. To do it, launch the command prompt (terminal) or PowerShell and run the command
services.msc.Locate the TrueConf Server service in the list (the main service of the video conferencing server).
Go to the service properties by double-clicking on the name or from the context menu.
On the Log On tab, activate the This account: toggle.
Enter the username and password for the required account, for example, a Windows administrator, and click OK.
Repeat steps 2-5 for the TrueConf Web Manager and TrueConf Server Manager services.
File storage
When the location for the working directory is selected, one can immediately configure other parameters related to the allocation of space for various video communication needs: paths for chat files and video recordings of events.
When the path to chat files is changed, the files will not be automatically moved to the new location. To make sure that these files are available in chats, you should first move them to the new directory, and only then change the path in the control panel. The same applies to recording files: they will be unavailable in the built-in player of the control panel and in users' applications until they are copied to the new directory.
In the File storage section, you can specify the file storage settings for user exchanges:
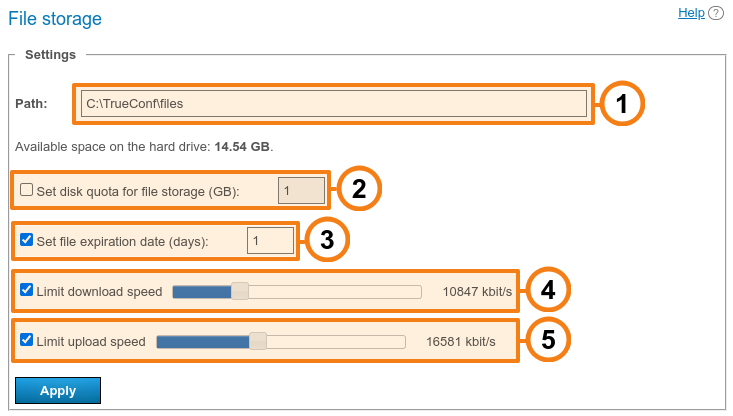
- Select the location of the file directory. By default, recordings are stored in the
filesfolder inside the server working directory. It is possible to use network paths (see above to learn how services can be configured on Windows).
In the control panel of TrueConf Server for Linux, one cannot change the path to the directory where conference recordings are saved. However, you can set up a symbolic link (symlink) as shown in the corresponding section.
2. The maximum storage allocated for chat files. The decimal counting system is used, where 1 KB = 1000 bytes. Keep this in mind, as the OS may display it differently; for example, Windows Explorer shows sizes in multiples of 1024.
3. File lifetime (specified in days): the period after which files will be automatically deleted. The countdown starts from the time when the file was first uploaded. By default, automatic deletion of files is disabled. Available values range from 1 to 99999 days (almost 274 years, which is clearly sufficient for any business task).
4. Use the slider to set maximum download speed limits to download the files from the server.
5. Use the slider to set maximum upload speed limits to upload the files to the server.
Below you can set restrictions on the size and extension of files sent in chats. These restrictions apply to files sent between users of your server and incoming files from users of other (federated) servers:
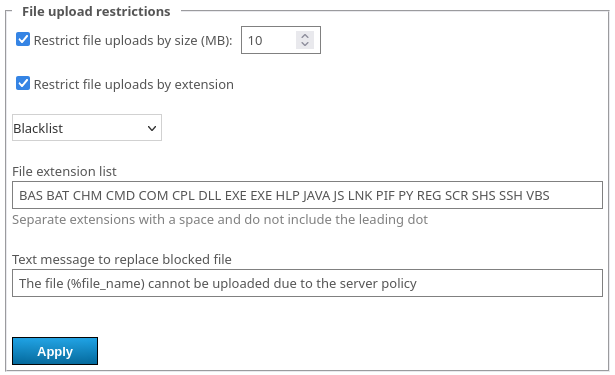
The file size (from 1 to 99999 MB), the decimal system is used where 1 KB = 1000 bytes. Keep this in mind because the operating system may display it differently; for example, in Windows Explorer, sizes are shown in multiples of 1024.
Extension (for example, due to security reasons, you can block the sending of executable files such as
.exe, .bat, .sh, etc.). Separate the values with a space as shown in the screenshot above:When selecting option Blacklist (default value), only explicitly specified extensions will be blocked.
When selecting option Whitelist, all extensions will be disabled except for those specified in the list;
You can also specify the message that will be displayed instead of the blocked file if it violates one of the restrictions on size or extensions.
The notification replacing the blocked file will be displayed exactly as you specify it, in all languages, it will be the same for all users regardless of locales, etc. If you have a multilingual audience working with chats, keep this in mind when writing the text (e.g., you may write the text in English).
Call and Conference Recordings
In section Recordings, you can adjust the server settings for automatic conference recording.
If a conference is simultaneously translated into one or multiple languages, its recording will include all the audio tracks that were translated, and as a separate track with the main audio, where one can listen to both the speakers and attendees who made audio remarks. This will work regardless of the selected video recording format.

- Path to the folder where all recordings will be saved. By default, recordings are stored in the
Recordingsfolder inside the server working directory. The list of recorded conferences displays video recordings from the specified folder. If the path is changed, the list will also be changed accordingly. A network path can also be specified in this field, in this case check above to learn how services can be configured on Windows OS.
When the storage path is changed, the recording files will not be automatically moved. Due to this reason, the owners of conferences will be unable to download video recordings in the personal area. However, if recordings are manually moved to the new location, everything will work as intended.
In the TrueConf Server for Linux control panel, one cannot change the path to the directory with conference recordings. However, you can set up a symbolic link (symlink) as shown in the corresponding section.
2. Enable/disable point-to-point video call recording. This option is similar for all calls: either all are recorded, or none are recorded. Please note that if you enable this option, you will not able to use direct connection between users (to be recorded, all information between subscribers is transferred through the server).
3. There are three options to set up group conference recordings: either all are recorded, or none are recorded, or recording is set separately for each conference ("on demand" mode).
4. Visibility settings for the indicator showing that a conference is being recorded on the TrueConf Server side (enabled by default). With these checkboxes, an administrator can disable the display of this indicator separately for:
participants in client applications TrueConf;
mixed video for recording, WebRTC users (from a browser), or connections via SIP/H.323 protocols (from endpoints).
5. Making it impossible for the conference owner to download meeting recordings stored on TrueConf Server. In this case the conference owner will see the list of recordings in the personal area or in the client application, but will be unable to download them.
6. The video format in which recordings will be saved. Supported formats are MP4, MKV, and WebM.
7. Time (in days) after which conference recordings should be deleted automatically. Click the checkbox next to the field to activate the text field. If you don’t check this box, recordings will be stored indefinitely (recordings are not deleted automatically).
Frequently asked questions about recordings
What will happen if I run out of space in the directory selected for storing recordings?
New recordings will no longer be saved, but the recordings that had been made previously will remain.
What happens to the recording if storage space runs out during a conference?
Recording will end and the file will be saved at the moment when the directory is filled.
How much space does a call or conference recording take?
To estimate the storage space required for storing the recordings of TrueConf calls and conferences, you need to know the approximate bitrate (number of bytes per unit of time). However, due to the use of VBR (variable bitrate), video is optimally compressed, so it's impossible to predict in advance how much space, say, 10 minutes of video will take up. The size may depend on many factors:
recording quality (selected in the section Gateways → Transcoding);
The number of movements in the frame, for example, the video of a speaker, who is sitting without any movements, will be compressed better than the video with some dynamic content
The quality of the camera given that the resolution of the captured video is the same.
Generally, the storage requirements for recording a video conference in FullHD 1080p can range from approximately 50 MB to 500 MB, depending on the factors mentioned above. It's advisable to plan for the higher end of the range to make sure that there is enough space.
Connecting Users
To learn how to configure access for users outside your VCS server's network, refer to our knowledge base.
for automatic search of available servers;
for corporate email authentication instead of entering a username (TrueConf ID).
Additionally, users and guests of your server can go to a convenient guest page with links to client applications.
Where can I find client applications
To enable users of your server to connect to the video conferencing system, share the link to the guest page where they can download client applications for all supported platforms.
The guest page is available at http[s]://<server>[:<port>] where:
<server>— the address of the computer with TrueConf Server;<port>- port used to access the control panel (if you are using default80port, you don't need to specify it)
For example:
https://videoserver.company.comhttp://100.120.12.12:7777
You can configure the link to the guest page in the Web → Settings control panel menu.
Configuring automatic server discovery
You need to specify the server address in the network settings of your client application so that your client application can connect to your TrueConf Server instance and your users can authorize. You can either do it manually or let your client application find the server automatically via DNS.
After connecting to the desired server, the user must authenticate by entering their username and password.
Manual configuration of the client application
Users can configure connection to TrueConf Server manually. In order to do it, you need to specify the TrueConf Server address and connection port manually in the application network settings menu (or upon the first application launch). You can find detailed instructions on how to connect an application to the server on the guest page.
Automatic server discovery with mDNS
The TrueConf client application sends a broadcast message at startup, asking the host (TrueConf Server) to identify itself. This request is sent via the UDP port 5353. In response, the application receives server data, including its IP address. All other host machines in the network record the information about the identified host in their mDNS cache. This allows the user to get the list of the servers available for connection without manually specifying the address. Typically, there is one server in a corporate network.
More details about mDNS operating conditions are covered in the basic administration course for TrueConf Server at the certification center TrueConf.
Additional DNS Configuration for Discovery
If mDNS is blocked in the corporate network, the client application within the domain will still be able to automatically discover TrueConf Server. To enable this feature, specify the server address in the DNS domain, which is the primary DNS suffix for the client computer. Create an SRV record for the _vcs._tcp service in the required domain and specify the server address and port in this record.
If your server version is 5.5.1 or older, use the SRV record in the format vcs2.tcp. Starting from the version 5.5.2, the format with underscores is required.
The following example shows how to do this using DNS utility in Microsoft Windows 2022 Server:
Go to DNS Manager.
Right-click on the desired domain, select Other New Records, and choose Service Location (SRV) from the list:
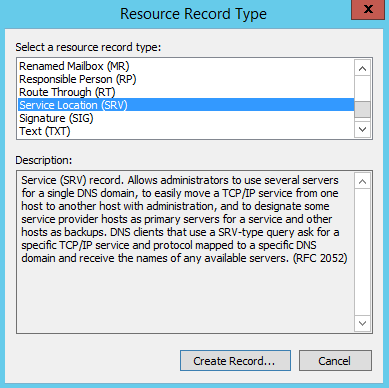
Configure the following settings:
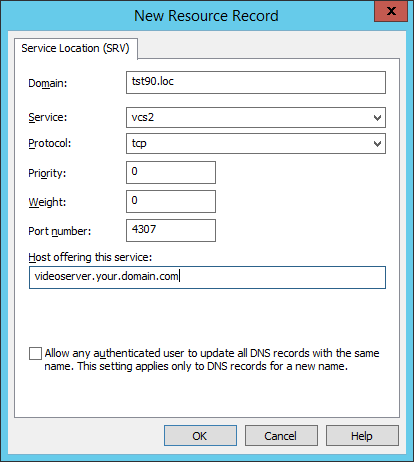
In this example the TrueConf Server instance has videoserver.your.domain.com address and port 4307.
Configuring automatic server connection using corporate email
To authenticate on TrueConf Server, you can use not only your login (TrueConf ID) but also your corporate email. This option can be useful if SSO is not used and the email server address does not match the address of the video conferencing server, for example, mail.example.com and video.example.com. In this case, instead of remembering the login, the user only needs to remember his/her email address and enter it in the login field when signing in to the application. The application will then find the video conferencing server address by the mail server address and try to connect to the video conferencing server.
Please note that this corporate email must also be specified in the user profile.
This feature is not dependent on the server version but requires client applications of a specific version:
- TrueConf for desktops (Windows, Linux, macOS) version 8.5+
- TrueConf Room versions 5.0+
- TrueConf for Android versions 3.1+
- TrueConf for iOS/iPadOS versions 3.9+
However, this feature does not work out of the box; preliminary configuration is required. An SRV record of a specific type has to be added on the DNS server accessible to client applications:
_vcs._tcp.[mail-server]. 3600 IN SRV 10 0 4307 [video-server].where:
[mail-server]— address of the corporate mail server[video-server]— the address is TrueConf Server.
For example:
_vcs._tcp.mail.example.com. 3600 IN SRV 10 0 4307 video.example.com.For more information on configuring this feature and SRV records, refer to the basic administration course in the certification centerTrueConf.