
Conference scheduling
Conference scheduling
The scheduler is used to arrange conferences on a certain date and create virtual rooms.
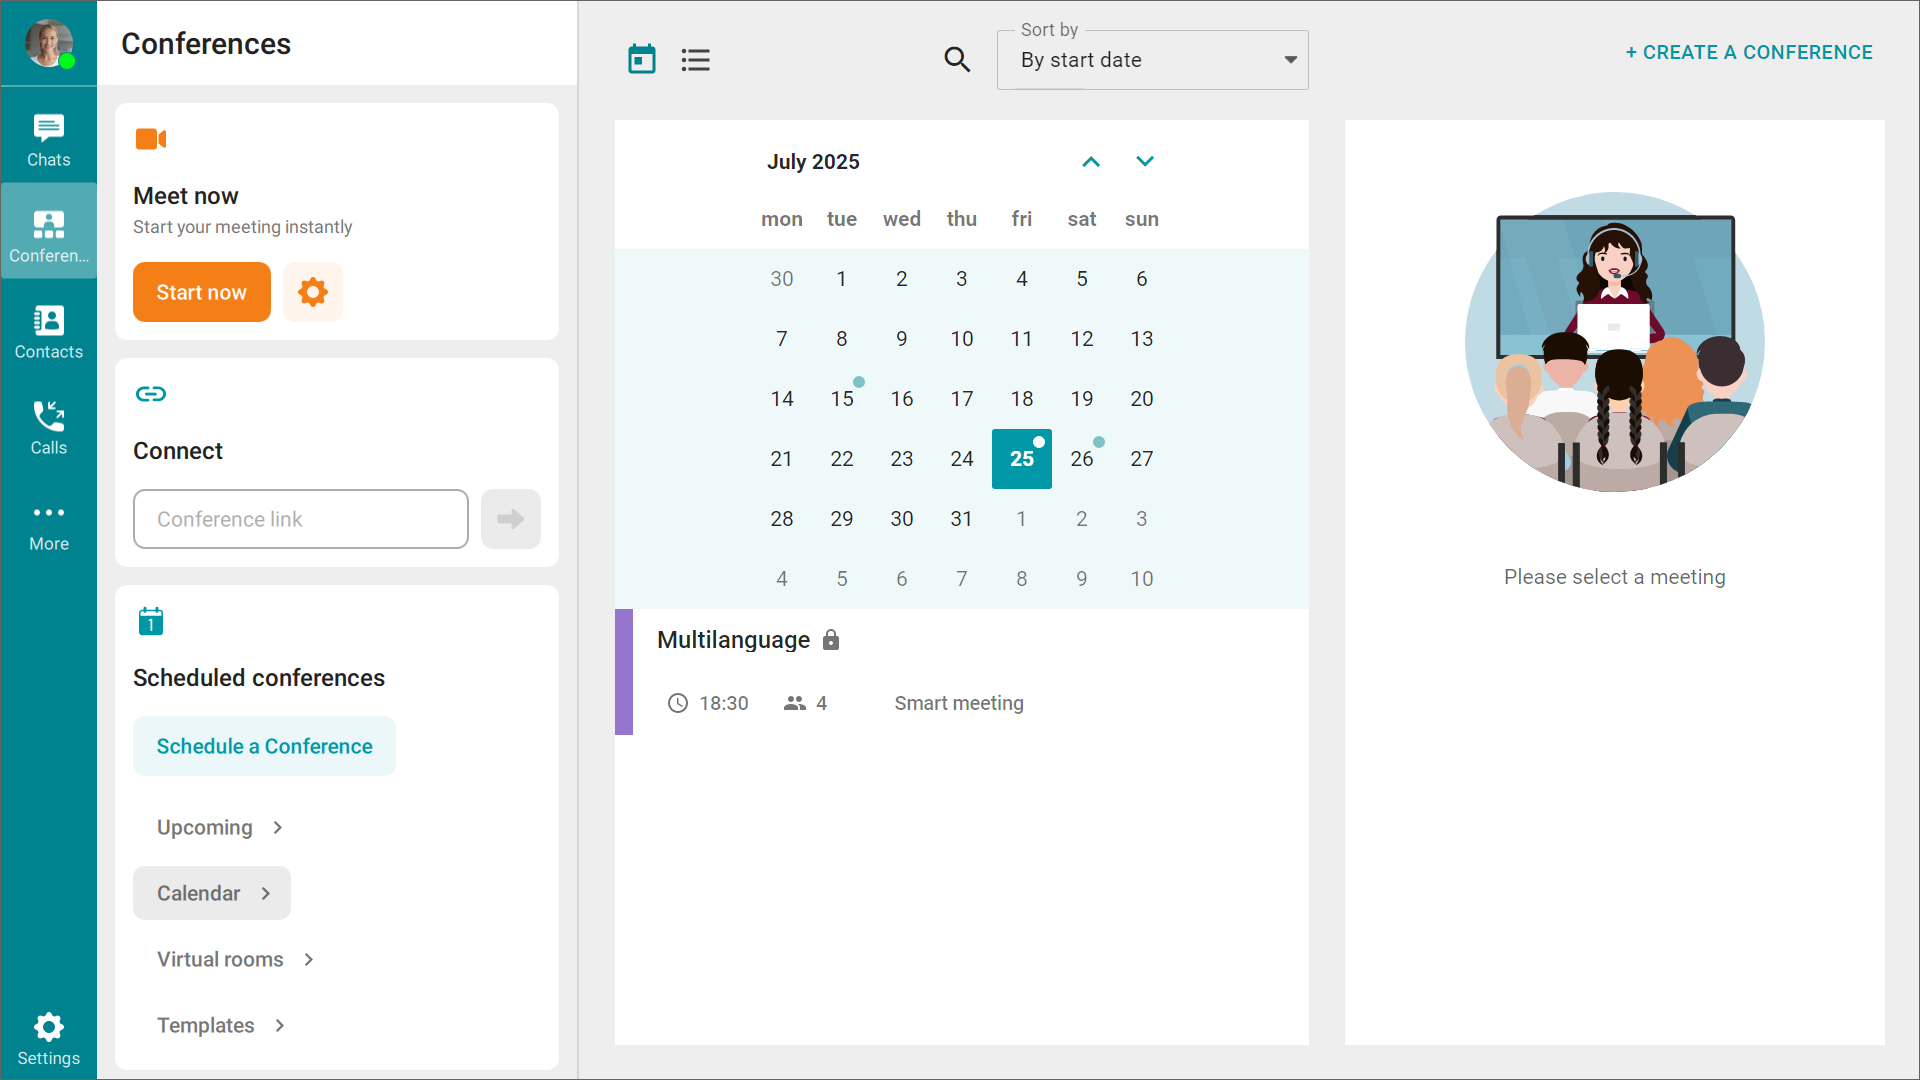
Conference scheduler is a tool that enables a user to schedule and edit video conferences on TrueConf Server. This tool is available in TrueConf client applications for desktops and mobiles. With its help, you can create a conference without the administrator`s assistance. One can add events that will start automatically at the selected time. It is possible to create either one-time or recurring events (the administrator does not have to be involved). It is also possible to create virtual rooms that are constantly available to participants.
In the scheduler, there is also a calendar that allows you to view conferences for a specific date. If your company uses Microsoft Exchange, the application calendar will show all events created in Outlook, not just TrueConf conferences. For more details on working with a corporate calendar in Outlook, read the article in our knowledge base.
Once you navigate to the Conferences tab, you will see the Scheduled conferences section. Click the Schedule a Conference button, and you will be taken to the Creating a conference menu.
There will be several tabs where you will have to set required parameters.
You may not be able to create a conference in the conference scheduler due to the restrictions set by the server administrator on a group level.
"General" tab
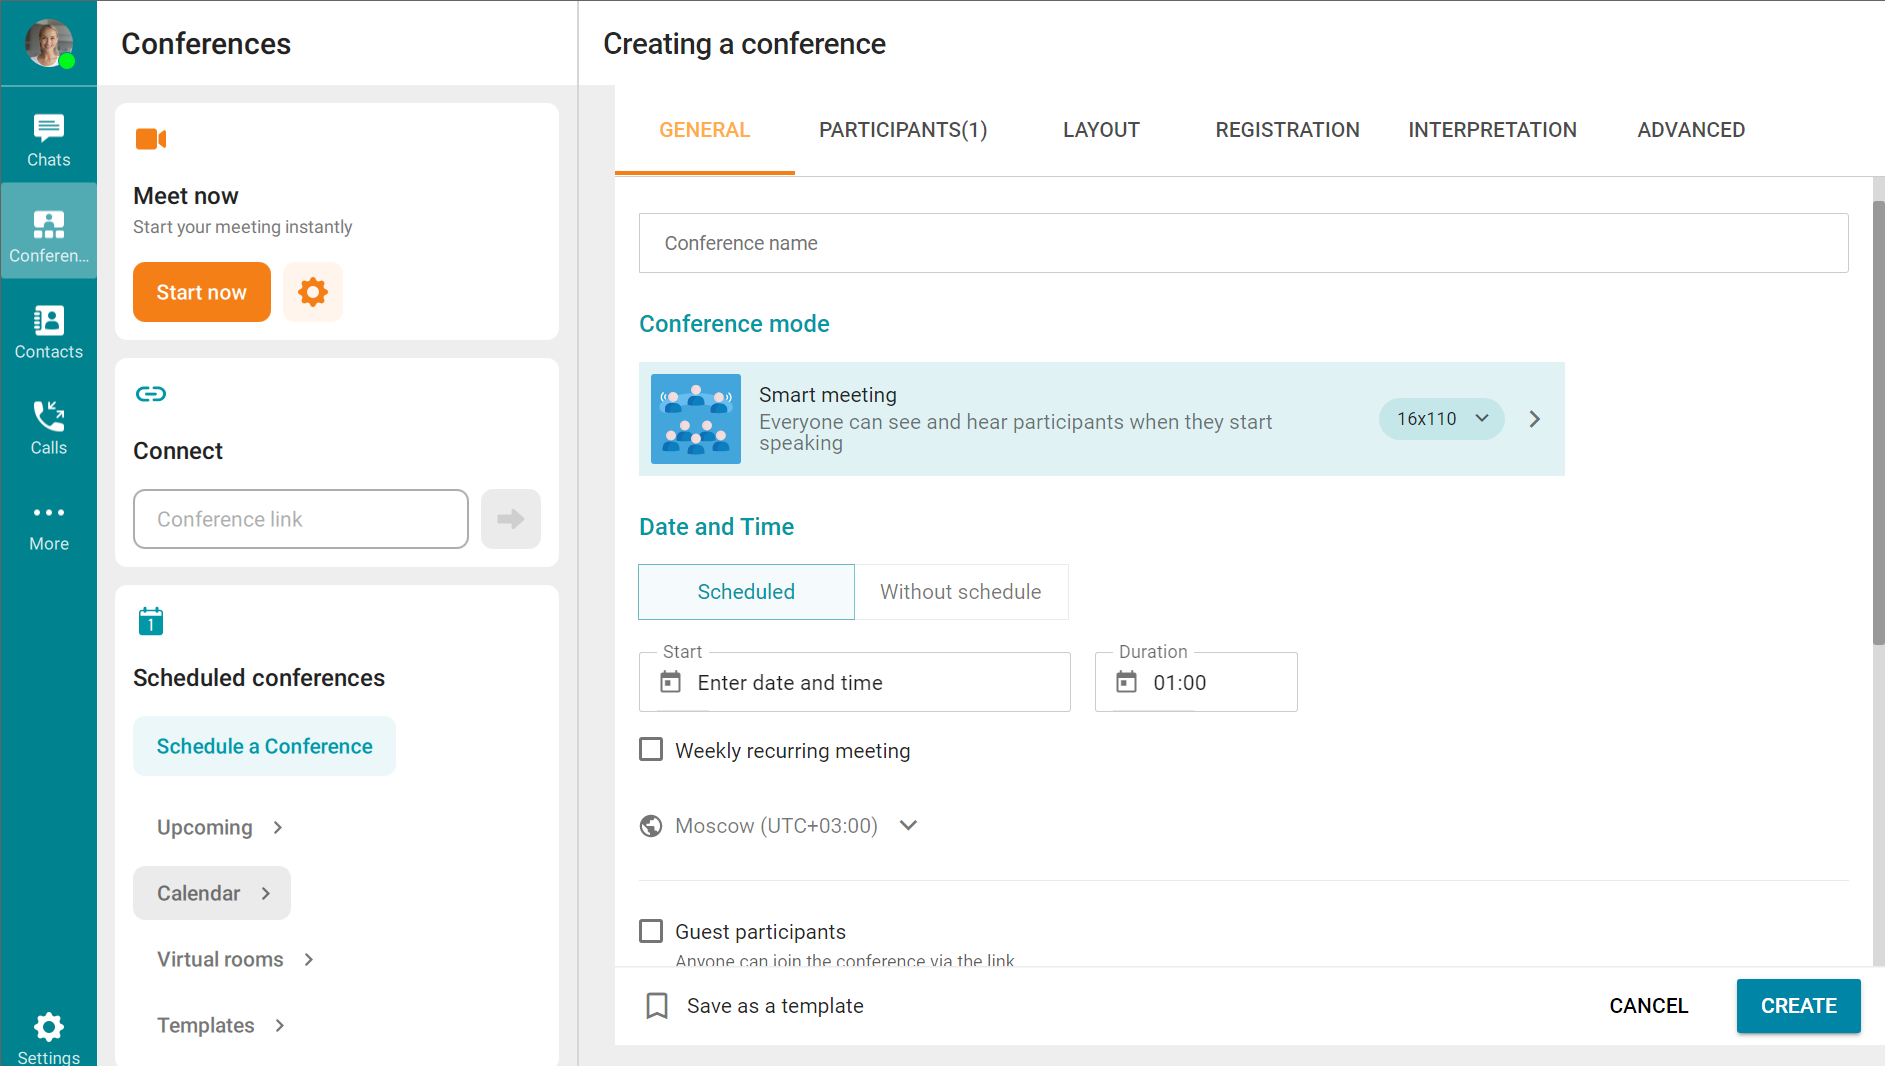
Here you need to:
Enter the name of your conference in the corresponding field.
Select the mode of the current conference, and for the Smart meeting and Moderated role-based modes, also determine the number of people on the podium using the dropdown menu accessed via the
 button.
In section Date and Time, you will need to select a conference launch option: Scheduled or Without schedule. Selecting Without schedule provides a virtual room accessible to any participant at any time until it is deleted. If you select Scheduled, you'll need to set the conference date and time, its duration, and whether the meeting will recur weekly. Additionally, for your convenience, you can choose the time zone that will be used to schedule the date and time.
Next, you can enable the following features in the last section by checking the corresponding boxes:
- Guest participants - if this checkbox is activated, invited external users will be able to join your conference, and you can set up registration for them for the webinar;
- Waiting room – if this box is checked, all users connecting to the conference will first be placed in the waiting room and will be able join the conversation only after approval by the meeting owner.
- PIN when joining – if this checkbox is activated, entering the conference will require a code;
- Enable conference recording;
Create a conference transcript for subsequent audio stream recognition and protocol creation.
To create conferences with the same settings in one click in the future, check the box Save as a template.
"Participants" tab
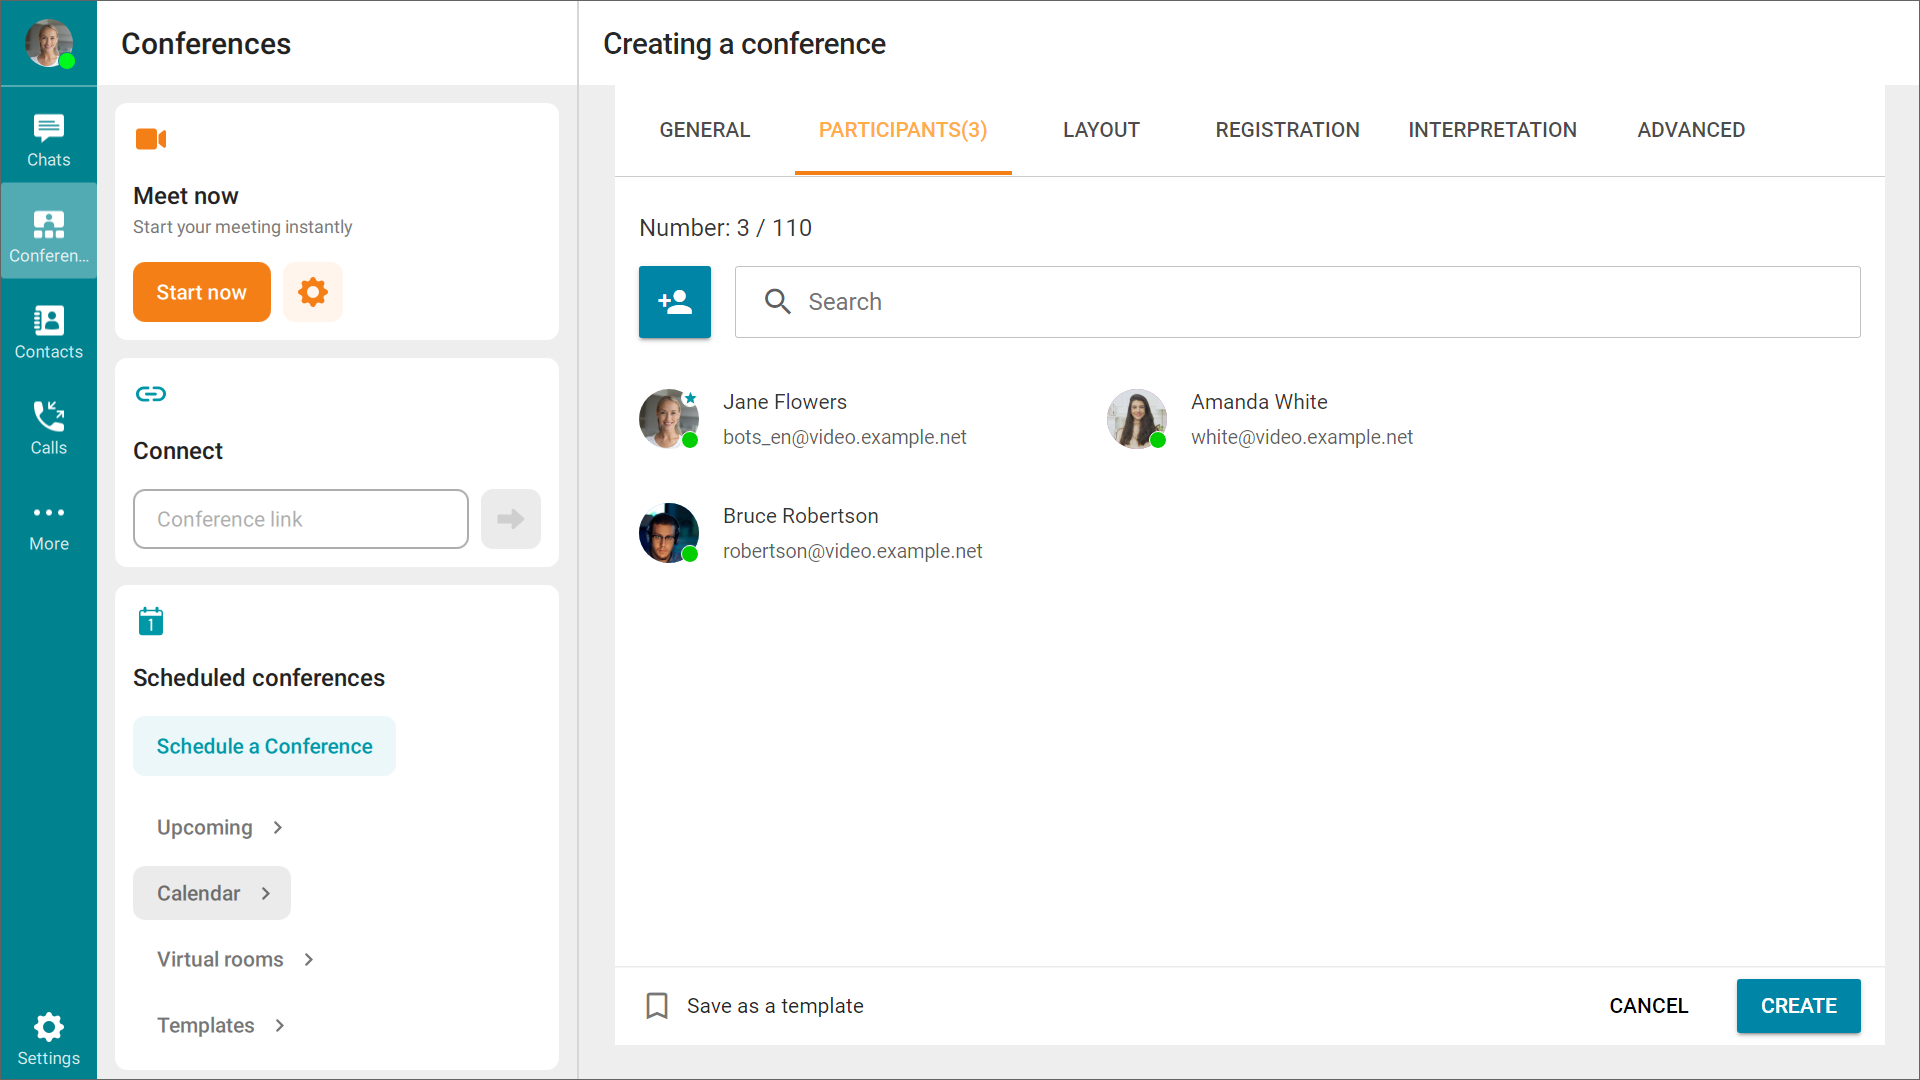
Go to the Participants tab and add users to the conference using one of the following methods:
from the address book;
according to its TrueConf ID;
specifying the dial string for a SIP/H.323 or RTSP device;
Via email (possible only for public conferences).
In addition to adding participants, you can also assign any of them as moderators in the conference. To do this, click the  button next to the participant's name and select the Assign as a moderator option from the context menu that appears.
"Layout" tab
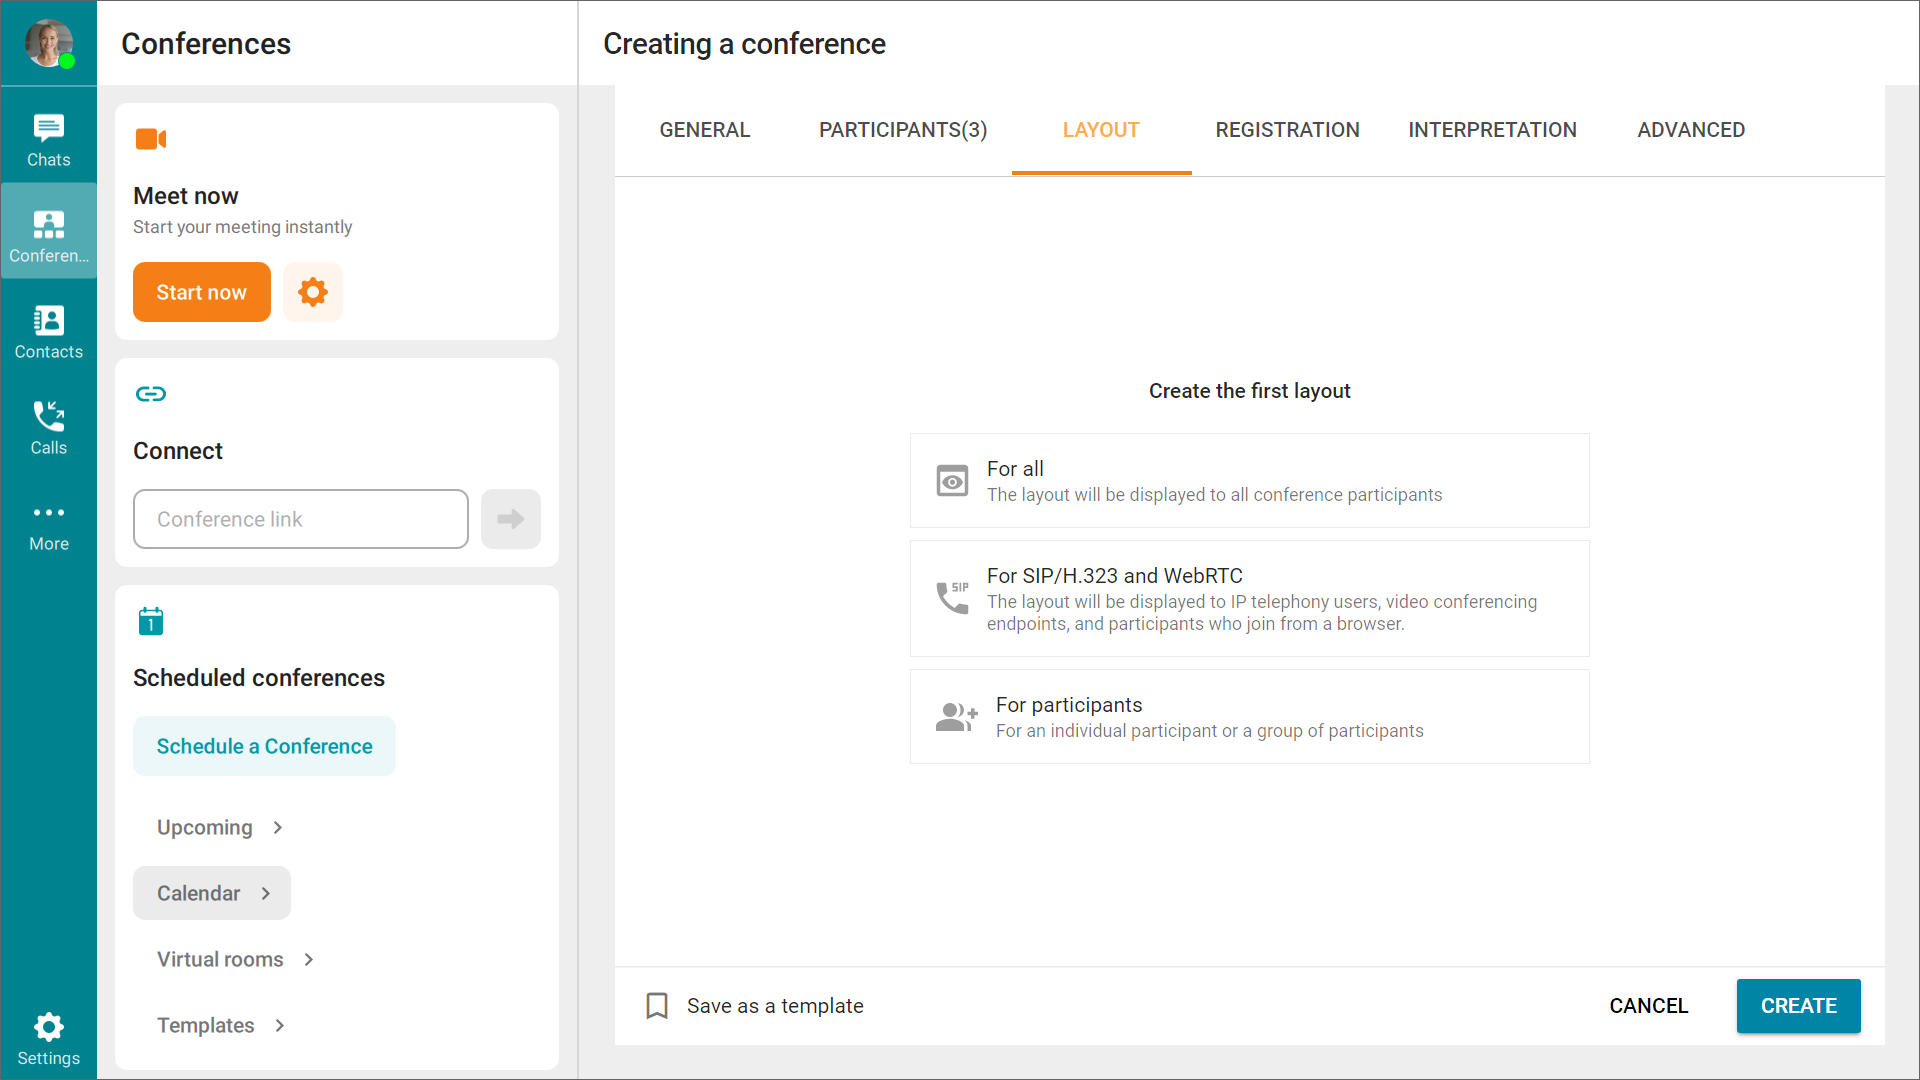
In this tab, you can create the video layout for your conference. It is possible to create the layout for all participants, selected users, or SIP/H.323 devices.
To create a custom layout for an upcoming conference, you need to choose one of the three available options:
- For all: When using this option, the video layout will be set for all conference participants simultaneously.
- For SIP/H.323 and WebRTC: This option will only affect the specified devices.
- For participants: this option allows you to select specific conference participants for whom the layout will be created. The participants have to be selected before creating the layout.
For more information on creating a video layout, please refer to the relevant chapter of this documentation.
"Registration" tab
Please note: the parameters of the Registration tab will only be available if you have checked the Guest participants checkbox on the General tab.
If you want external participants joining the conference (excluding those invited by the conference owner) to undergo a pre-registration process, check the box Enable conference registration on this tab.
You will then be prompted to choose when you can select one of the registration closure options: At conference start, At conference end, or Set the registration start and end time. If you choose the last option, you will also need to specify the start and end date and time for registration.
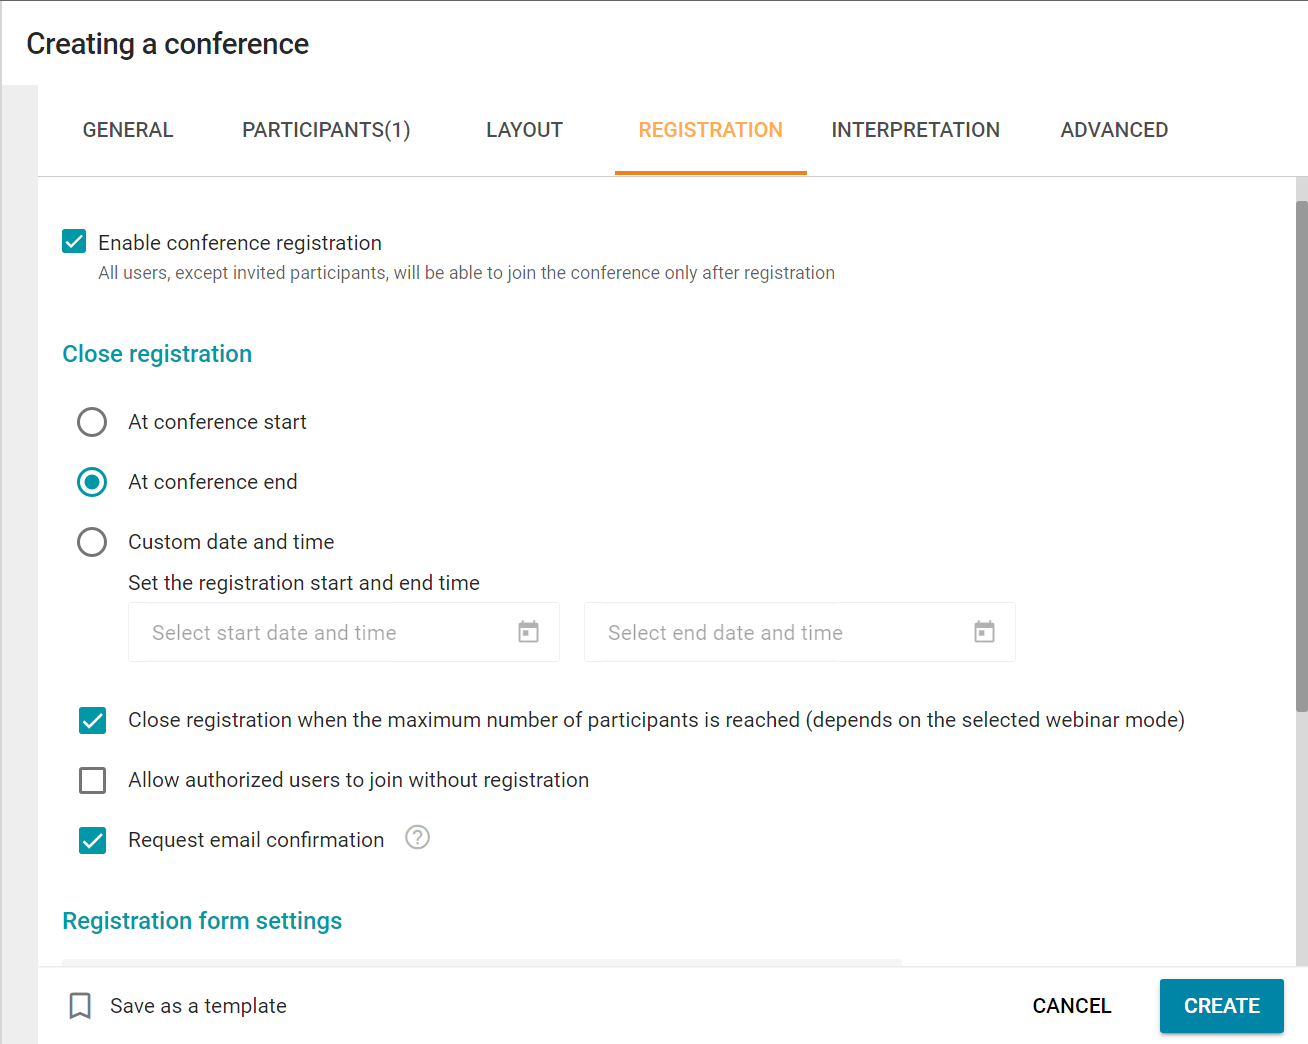
In section Close registration, you will find three checkboxes that allow you to further optimize the participant registration process:
- Close registration when the maximum number of participants is reached (depends on the selected webinar mode);
- Allow authorized users to join without registration;
- Request email confirmation.
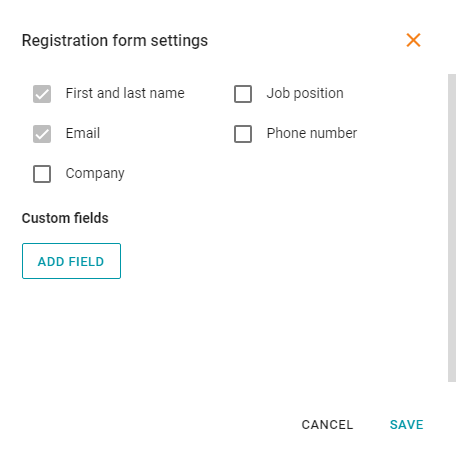
In section Registration form settings, you can select the fields to include in the registration form and specify whether they are mandatory or optional. To choose fields from the existing list or to create your own, click Settings. This will open a window where you can select the required fields:
"Interpretation" tab
Conferences with simultaneous interpretation are special events with multiple independent audio tracks. In such conferences, participants do not see the interpreter, but can hear the translation if they select the corresponding language in the application.
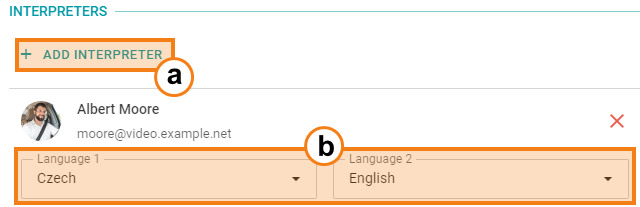
To allow interpreters to participate in the conference, check the box Language interpretation mode. Additionally, on this tab, you can add one or more translators (a) and assign a language pair to each of them (b).
Besides, you should pay attention to the volume level of the original audio track (it is set at 30% by default).
"Advanced" tab
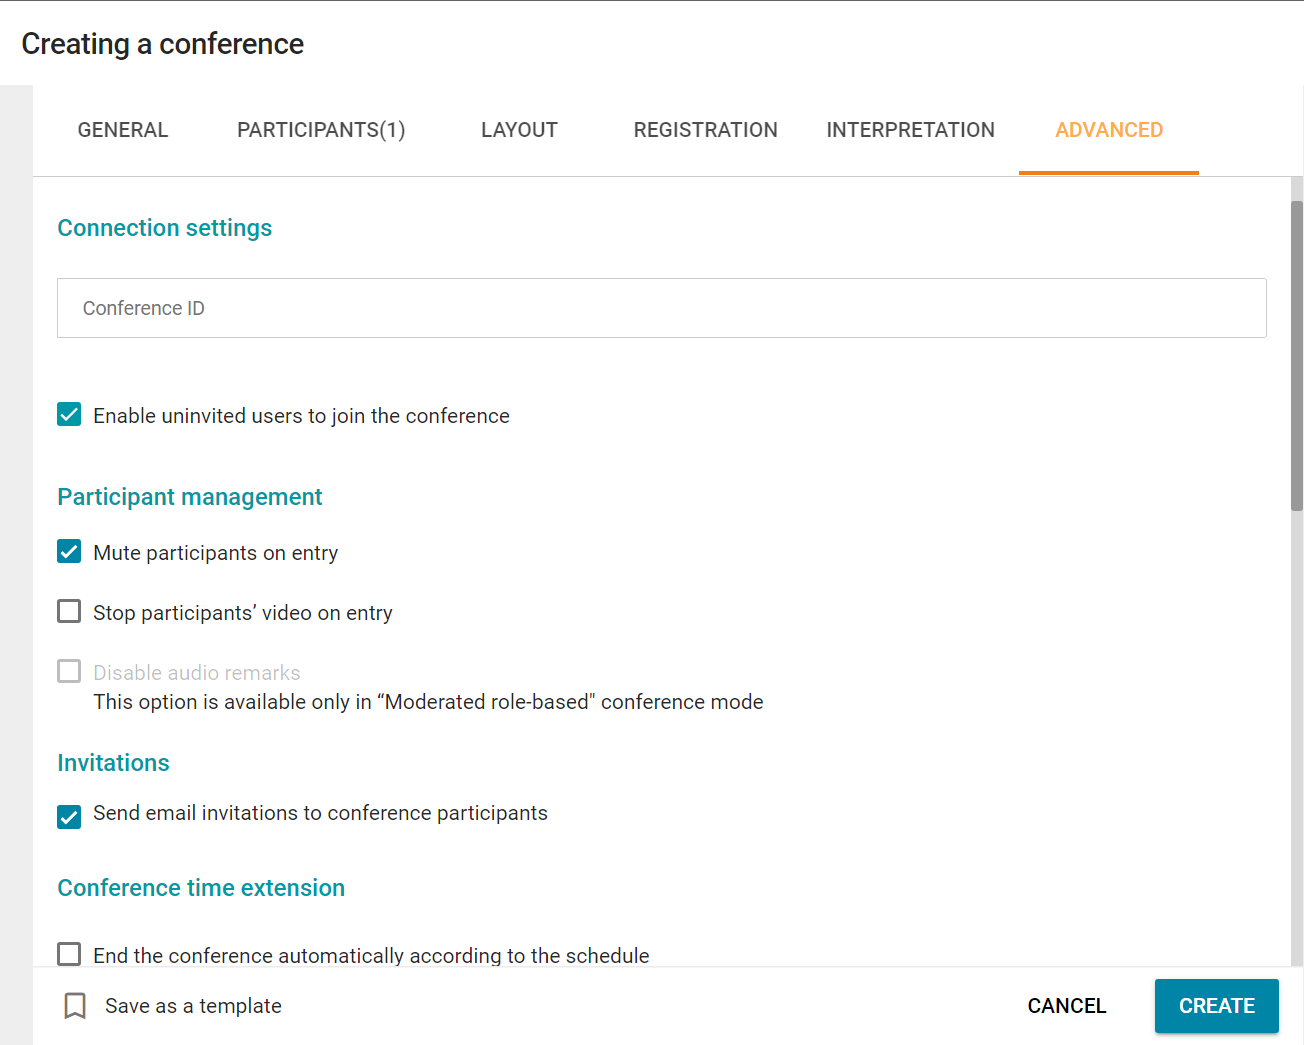
On the Advanced tab, configure the following settings:
The ability to join a conference for users on your server who have not been added as participants (enabled by default).
If a PIN code for connecting was set on the General tab, users of your server who know this code will be able to join the conference regardless of the status of the Enable uninvited users to join the conference checkbox. PIN code protection is considered sufficiently secure when enabled.
Automatically turn off microphones and cameras for all participants as soon as they join the conference and disable audio remarks for participants (the latter option is available only in a moderated role-based conference)
Set the permissions for guest participants: ability to send messages, audio and video and specify the maximum number of guests (only for a public conference)
Enable email invitations
Set time extension parameters for the conference: choose whether the meeting will automatically end when the time expires (this option is disabled by default), enable participants to extend the conference, and choose whether it is necessary to display notifications about the upcoming ending of the conference (it is possible to select the time when these notifications will be displayed)
Configure settings for the reminders about the conference start: activate email reminders, choose the time when these reminders should be sent and select the number of such notifications
Specify the meeting location and give a brief description of this event.
Transcription
This feature enables users to get a full transcript of a past conference in any of the languages available in the general list. To enable transcription, check the corresponding box on the General tab. When this checkbox is enabled, you will be able to:
- Choose whether the audio recording will be transcribed immediately after the online event ends
Keep in mind that the administrator can disable automatic audio recording recognition on the server side. In this case, you will need to activate this feature in the personal area of the AI server or TrueConf Server.
- Select the primary language for speech recognition.
After the conference ends, the bot will send you two messages with the following links (this feature has to be configured by the server administrator):
A link to the audio recording that will be transcribed
A link to the completed transcript (this link will be sent if you checked the Transcribe when recording ends checkbox).
By following the link, you will open the personal area page of the AI server in your browser (a similar page with meeting transcripts is available in the personal area of the video conferencing server):
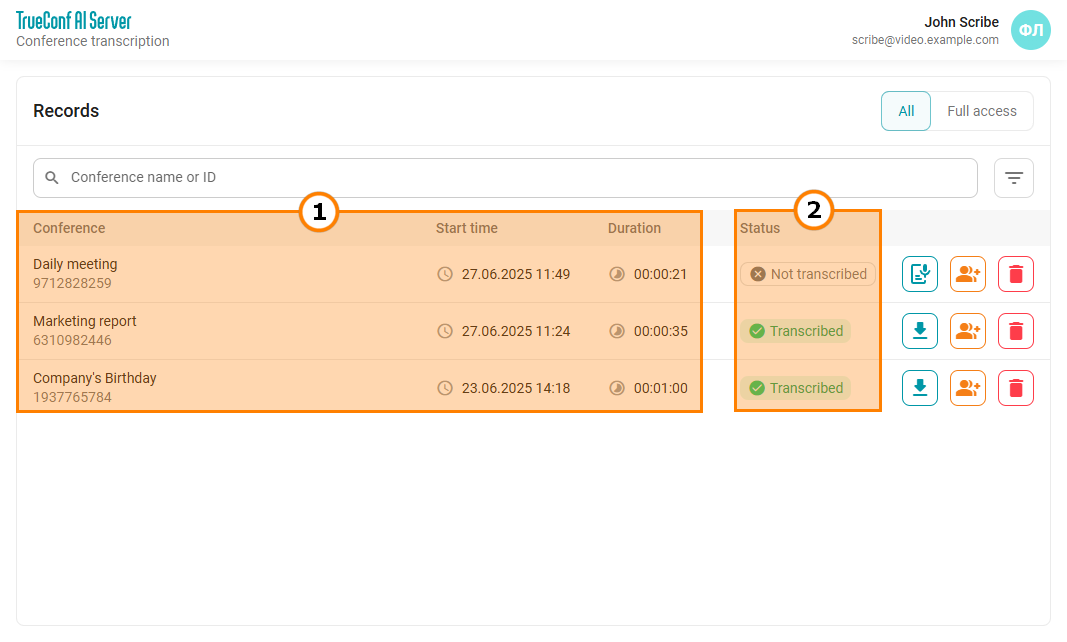
Here, you can find all the general information about the recording of the past conference (1) and check the status of the transcript (2).
You will also be able to:
Download the transcript and/or audio of the past conference by clicking the
 button. The transcript can be downloaded in one of three formats: .csv, .txt, .pdf.
Start transcribing the completed conference manually by clicking the
 button.
Give selected users access to the transcript by clicking the
 button. Access can be given not only to the users of your own server but also to the users of other servers if federation is configured between the servers (please contact your administrator for more details).
Delete the conference transcript by clicking the
 button.
Please note that the server administrator can limit the storage period for untranscribed audio recordings. Over time, old audio tracks that have not been used for creating transcripts will be deleted.
If the video conferencing server is not configured to send recognition status messages, you can find your records in your personal area TrueConf Server or TrueConf AI Server.
Virtual room management
In section Virtual rooms, a list of unscheduled conferences (virtual rooms) where you are the owner or participant will be displayed.
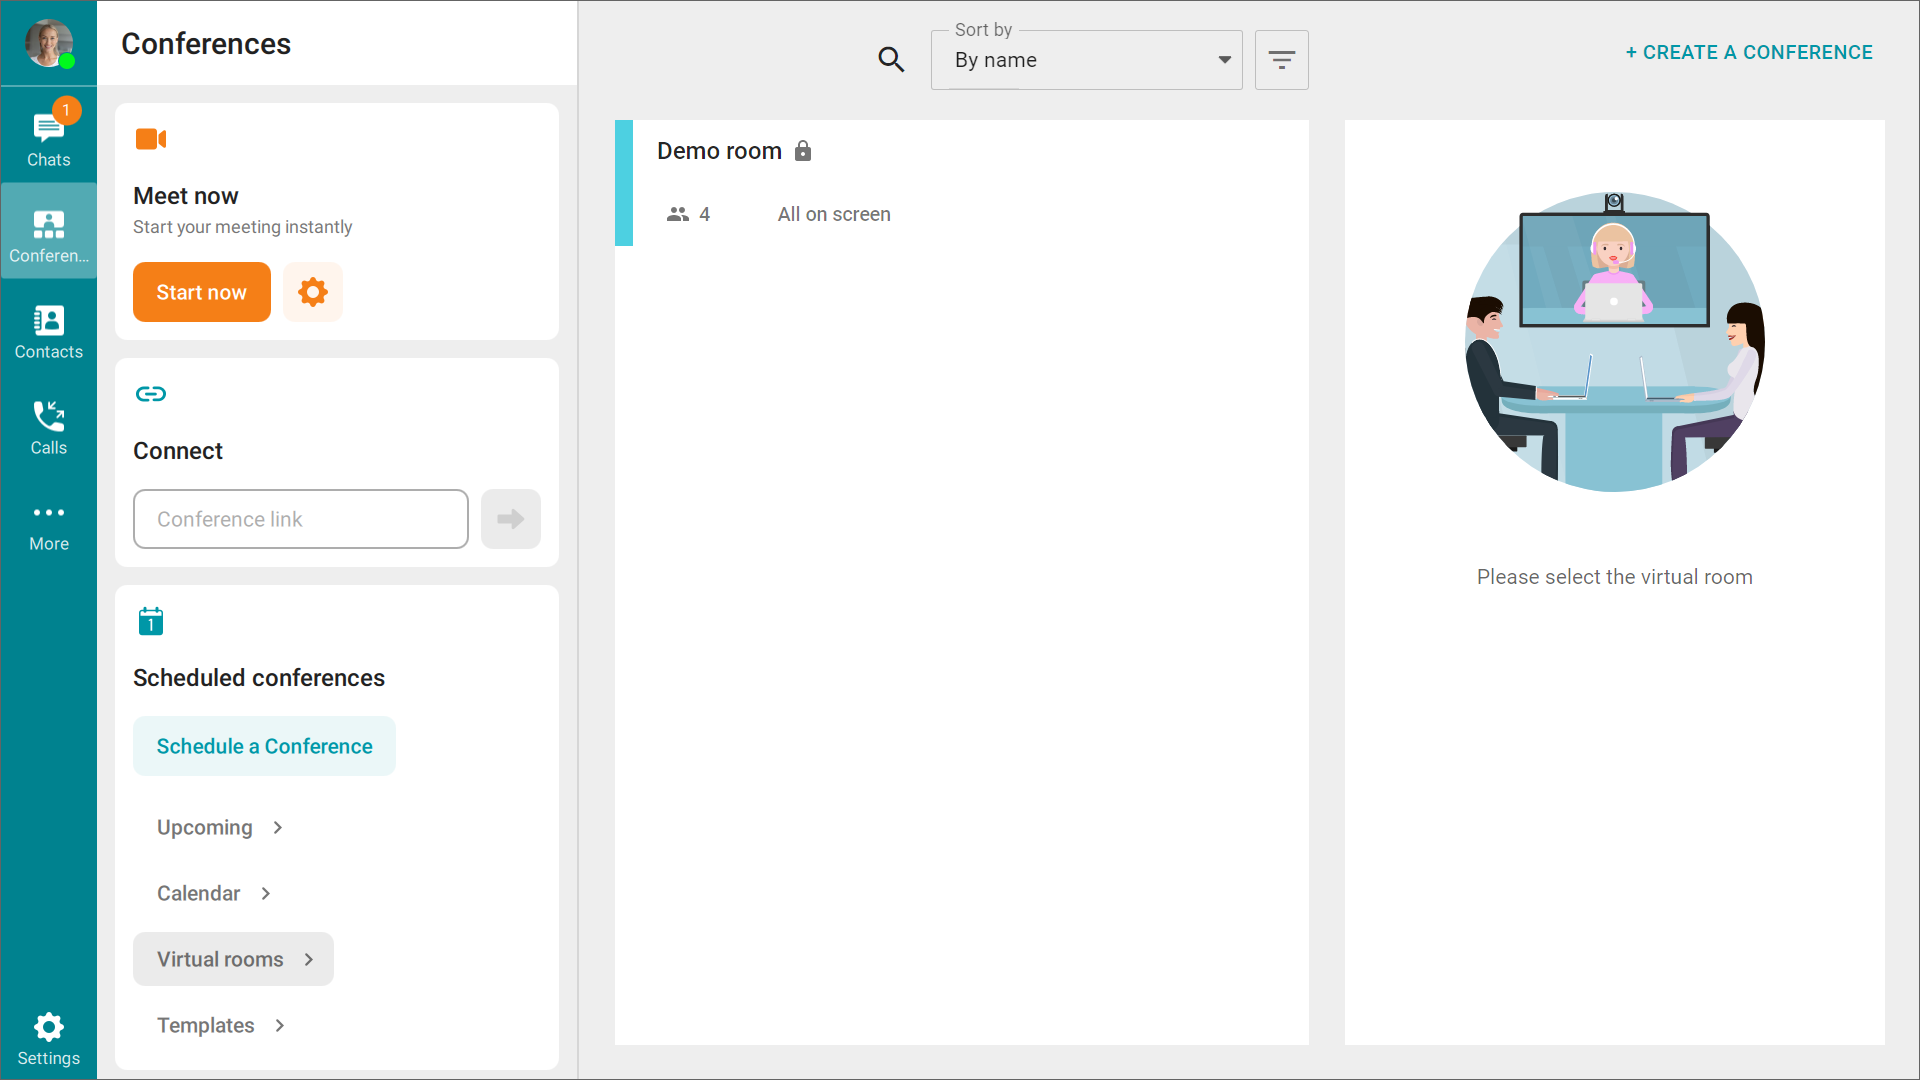
Here, you will be able to manage the events you've created and add new ones. If necessary, you can change the conference launch type during creation and editing: scheduled or virtual room. To add a conference, click the  (Create a conference) button in the top right corner.