# Chat
Instant messaging (or chat) allows users to exchange text messages or files during video calls or group video conferences. You can use chat not only during video calls or conferences, but every time you need to send a message to other users.
When a user is signed in on multiple devices, the chat history will be synchronized across these devices.
If your TrueConf Server instance is below v. 5.0, chats will not be synchronised across your devices.

With this messaging platform, you can:
Send text messages
Edit, forward, and delete text messages
Please note that your server administrator can restrict the time during which users can edit messages which have already been sent. If you are participating in a public conference (webinar) as a guest, the availability of editing is determined by the settings of the server where the event is hosted.
[Search for words and phrases] (#search-of-message) within chat messages
Create a quick conference with all participants of the selected chat or only some of them.
In the message input window, you can enter up to 20,000 characters. If a single message contains more than 4,096 characters, it will be sent as multiple messages, each up to 4,096 characters long.
# Editing and deleting messages
All chat messages can be edited. To do it, right-click on a message and select the Edit option. An edited message will be marked as edited (the date of editing will also be specified).

If you want to delete a message, use this function in the same dropdown menu. You can delete your own message either just for yourself or for the other participant as well. To do this, check the appropriate checkbox in the window that appears when you attempt to delete the message:
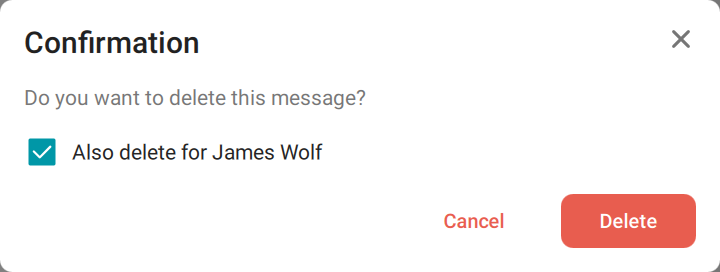
Please note: this checkbox appears only when deleting your own messages. If you select multiple messages for deletion, including both your messages and the other party's messages, you will only be given the option to delete your messages for both parties. The other messages will be deleted only for you.
# Message formatting
To format a message, right-click on the selected text in the input field and in the Formatting option select the correct format: bold, italic, underline, strike-through or use Markdown (opens new window). The following special characters are supported:
**text**— bold
__text__ — italic
~~text~~ — strike-through.
Additionally, you can use the Insert link option which allows a user to attach a link to a specific part of the text. Please note that if you had copied a hyperlink to the clipboard before using this feature, this link will be automatically pasted into the input field.
You can also format the selected text via the context menu which can be opened up by right-clicking on the chat line:
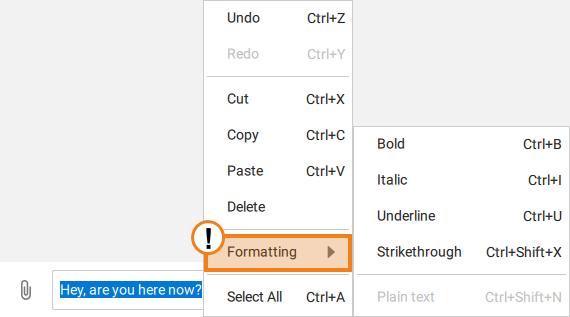
If you need to remove all formatting, use the Plain text option.
It is also possible to use hotkeys to quickly format messages in the chat. You can view them on the right side of the option name in the menu, or in the section Settings → Hotkeys.
# Built-in spell check
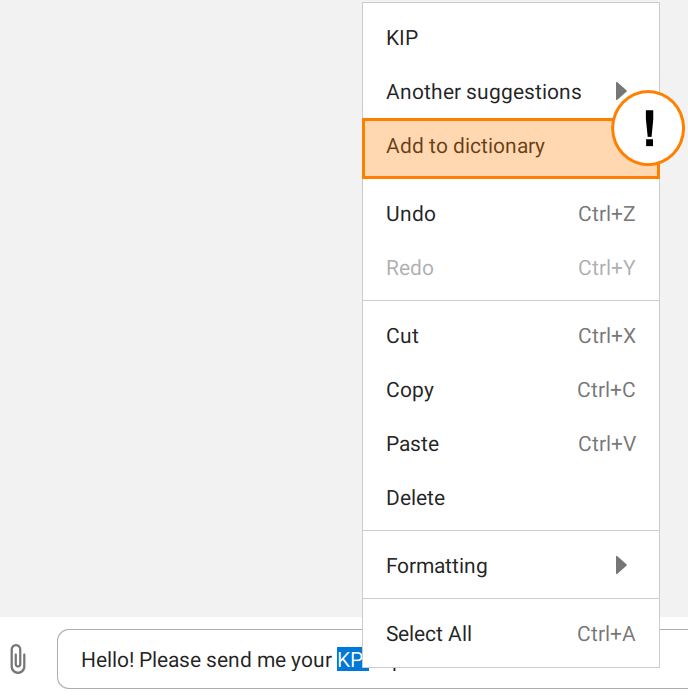
In the TrueConf client application, the spell-check feature is enabled by default. As you type a message, the application's internal dictionary will check your spelling and highlight any misspelled or unrecognized words in red.
You can expand your application's vocabulary by right-clicking the highlighted word and selecting the Add to dictionary option in the context menu:
Keep in mind that the dictionary is linked to a specific application. If you log into your account on another device or a different copy of the application, you will need to add required words to the dictionary once again.
To correct a word, right-click on it. After clicking, you will see a suggestion which you can apply by left-clicking.
# Status "typing"
If your contact is typing a message in a personal or group chat, you will see a notification at the top of the message list.
In a group chat, the typing status will be displayed only if there are no more than 100 participants in the chat. If more than 2 people are typing at the same time, the names of the 2 contacts, who started typing first, will be shown, along with the count of other users who are typing at the moment.
# Searching for messages
To find a chat message click the  button which will open an input field. Enter the text in the input field and, as you type, the messages matching your query will be highlighted.
If multiple messages have been found, you can switch between them with these buttons:  and
and  . Right next to these buttons, there is a counter indicating the number of messages that match your query.
If you double-click on a chat in the list, it will be scrolled down to the very bottom.
# Sending files to a chat
To share files, simply drag and drop them into the chat window, or use the paperclip icon located to the left of the message input field.

You can select multiple files by pressing CTRL or clicking on the Add button in the preview window.
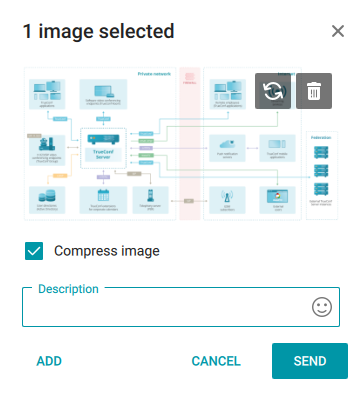
When sending multiple files at once, you can:
remove the unnecessary image from the group (1);
replace the image (2) with any other image from your device;
Send all images as a single group or as separate messages. Note: By default, the checkbox (3) responsible for this setting is enabled.
compress the image (enabled by default in the same way). If you want to send uncompressed files, then deactivate the checkbox (4).
You can also send video files in the chat. When such files are opened, the built-in media viewer is used. Supported formats include .mp4, .avi, .mkv, and .webm.
Important! If a video file of an unsupported format is sent in the chat, it will be opened in the default media viewer installed on the device.
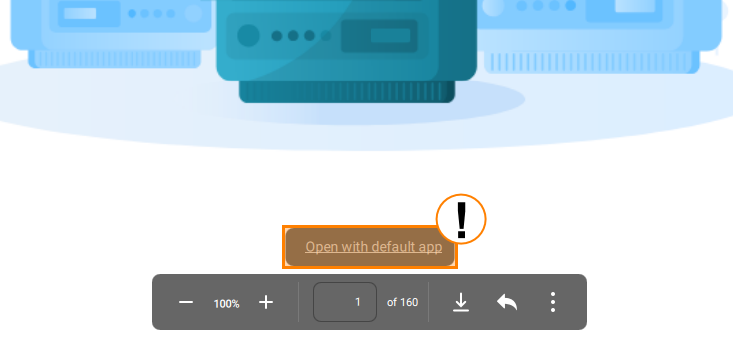
Please note that you can open all files sent in the chat either with the built-in file viewer or with the default viewer installed on your device. Right-click on the desired file in the chat and select the option to open it with the default viewer.
You can also type an additional message in the Description field. This message will be sent together with the files.
Documents in certain formats can be viewed directly in the chat (but not edited). Supported file formats include .pdf, .odp, .odt, .odg, .ods, and .odf. For all these formats, except pdf, you need to have LibreOffice version 7.5.0.1 or later installed on your PC. If you want to check whether the office suite is available, or you need to set the path to the office suite, check the description of how presentations can be imported.
Even if the user is currently offline, you can send them an "offline" message—the recipient will receive it as soon as they log in.
Please note that when viewing .pdf files, you can quickly open them using the default system program by clicking on the relevant link above the content control line.
The default location of downloaded files is:
%USERPROFILE%/Downloadsfor Windows/home/$USER/Downloadsfor Linux~/Downloads/for macOS
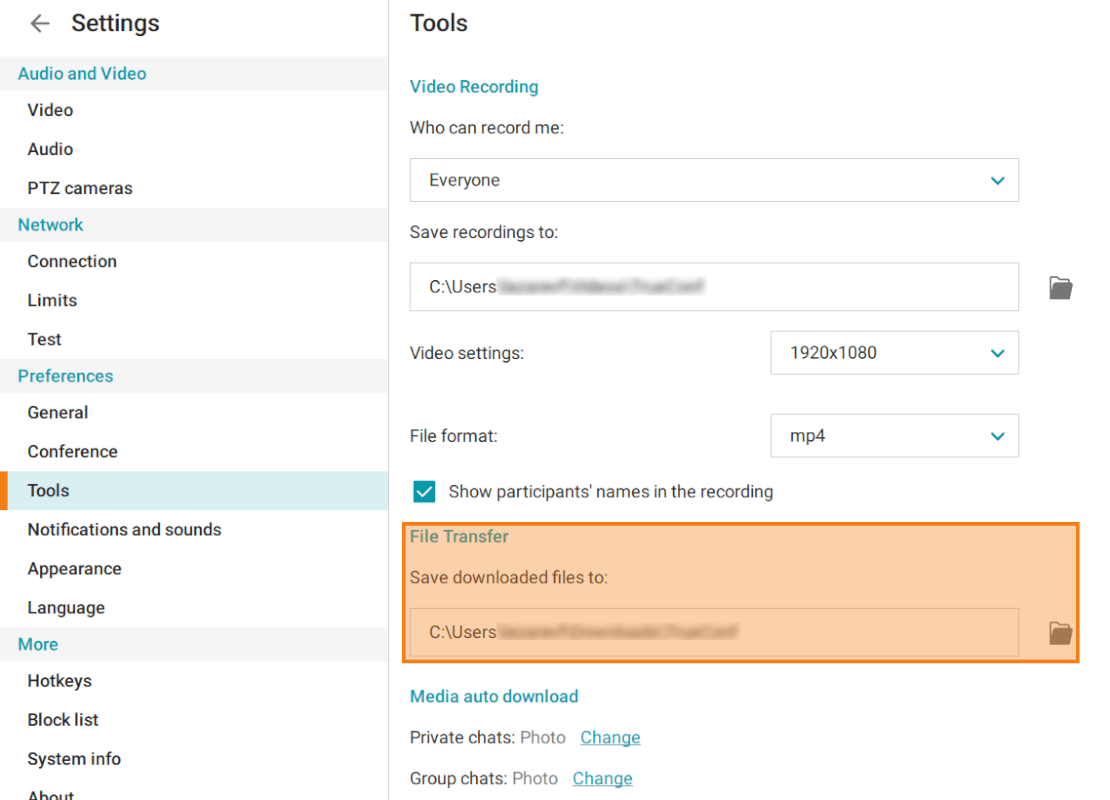
To change the download folder, go to Settings → Preferences → Tools menu in the application window. Then click the  button in the File Transfer section and specify the required folder.
A subfolder named TrueConf, which will store all chat attachments, will be automatically created in the folder selected for downloaded files.
If you want to view the list of files sent to the chat, click on the  button and choose Files.
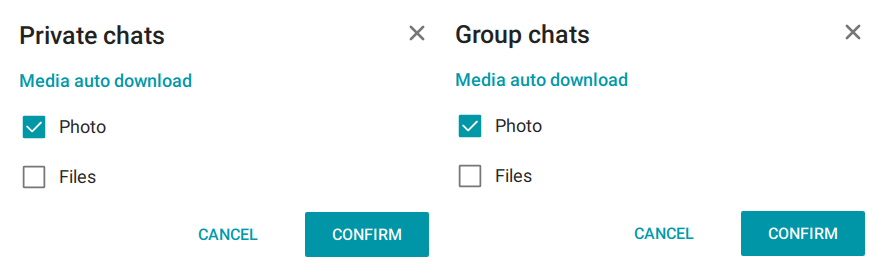
If needed, you can configure automatic downloading of chat files or disable it. To do it, go to the Tools section and navigate to the Media auto download block. Here, you can configure automatic file downloading for private and group chats; to do it, click the Change button and select the necessary options in the context menu.
# "Favorites" Chat and Message Forwarding
If you need to save any messages and files from private or group chats, you can use the Favorites chat.
To forward messages to this chat:
Right-click on the message you want to save.
Select Forward in the context menu.
Select Favorites in the list of recipients (it will always be at the top of the list).
You can also write any messages or upload files to the Favorites chat, so they are saved as your notes.
To jump to the Favorites chat, click the  button above the chat list.
In the Favorites chat, you are not only able to view messages or files. You can also open the original message in the chat where it was sent. To do it, click the  button on the right side of the message.
Please note: When forwarding a message from the Favorites chat to another user, your name and the indication that the message was forwarded will not be displayed.
# How to disable notifications
You can disable notifications about chat messages (for both group and private chats). To do it, right-click on a chat and select the Disable notifications option in the context menu.
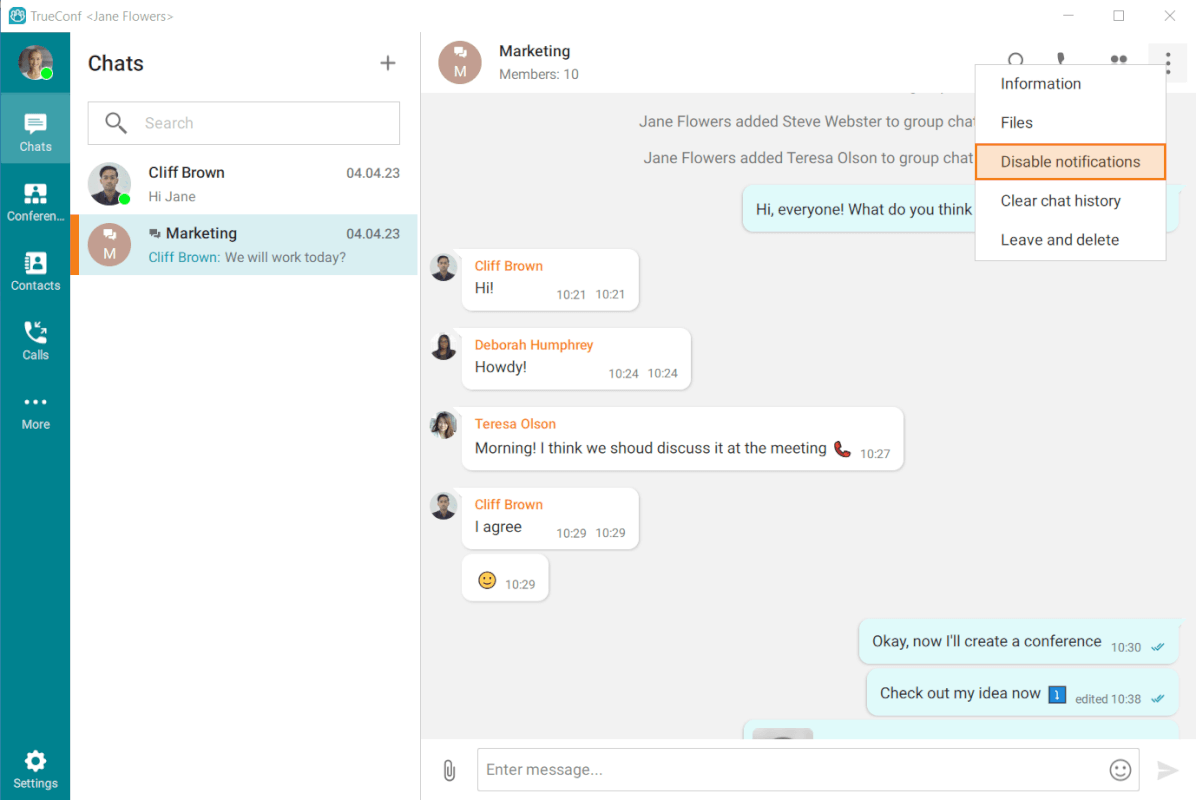
You can also activate this option by clicking the button in the upper right corner of the chat window and selecting the corresponding option in the menu.
The notifications from the selected chat will no longer be displayed. You can enable these notifications in a similar way.
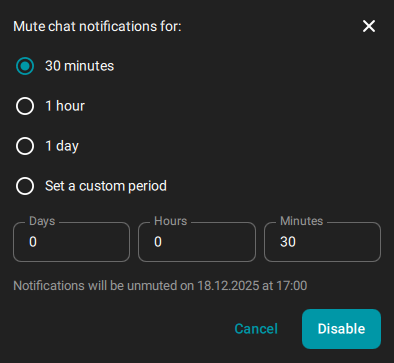
In addition to permanently disabling notifications for individual chats (both personal and group), the client application offers the option to disable all notifications at once. To do this, find the icon of the running TrueConf application in the system tray and right-click to open the menu:
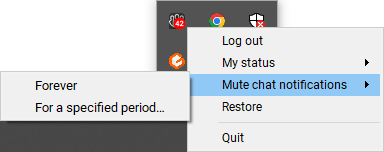
In the Mute chat notifications section, you'll have two options to choose from: Forever or For a specified period. If you select the second option, an additional window will open where you can select one of the default periods for muting notifications or specify your own period:
If you are in a call or conference when opening this menu, an additional option will be available: During the current conference. Thanks to this option, you will not have to specify the time period manually.
# Drafts
Keep in mind that drafts are also automatically saved on the server side and synchronized between devices. For example, you can start writing your message in the TrueConf mobile app and then continue on your laptop.
# Mark as unread
If you accidentally open a chat that you intend to read later or just want to return to the conversation at a more convenient time, you can mark the chat as unread. To do it, right-click on the selected chat in the list to open the context menu and select Mark as unread.
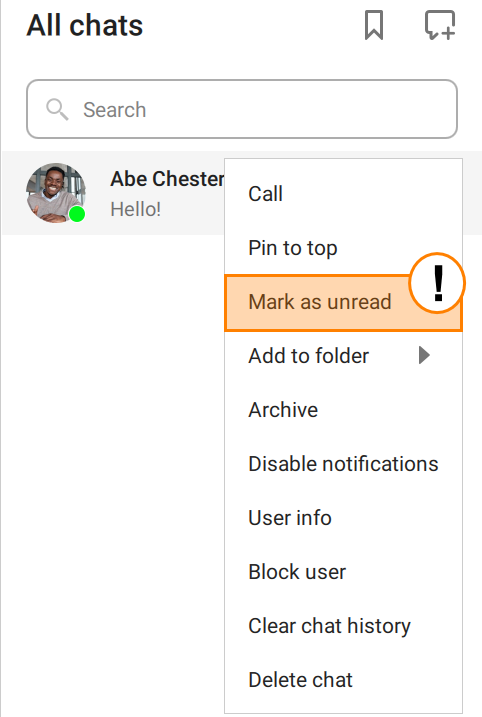
If this feature is used, the chat will be marked similarly to any unread chat, but without the message counter. The mark which is set manually will increase the overall counter of unread messages: the displayed number will be increased by 1.
# Pin the chat
Among other things, you can pin an important chat. To do it, right-click on the chat and select the corresponding option in the context menu. Pinned chats will not move down the chat list even when new messages are sent to other chats.
You can sort pinned chats in any order by dragging them with the mouse.
# Chat archive
If you need to hide any of the chats for a while, for example, an inactive chat from a recurring conference, you can use the Archive button. When this button is clicked, an additional item will be displayed in the list of chat categories — Archive:

This item is hidden if there are no archived chats.
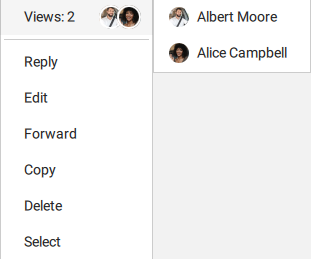
In the chat, right-click on a message to:
Reply
Edit
Forward
Copy
Delete
Select, for example, choose multiple messages to delete, copy, or forward them all at once.
Multiple messages can be selected in the same way the text is selected. To do it, left-click on a message and drag the mouse up or down.
Click on the button in the upper right corner of the application to access additional features:
View additional information about a user or a group chat
Check the list of all sent files
Clear chat history
Delete a chat (you can also delete it for the other user by marking the corresponding checkbox)
Block a contact.
Please be careful when clearing chat history or deleting a chat. This action cannot be reversed. Even if you are added to this chat afterwards, you will not be able to view previous messages because all chat history has been removed.
The same group chat will be used for a virtual room or a recurring conference. It will be synced with the conference.
# Group chats
To create a group chat, select the Chats option in the application menu. Next, click the  button, enter the chat name and select its avatar, if necessary. Click the button Create a group chat. You will see a pop-up window where one can select and add participants from the address book to the created chat.
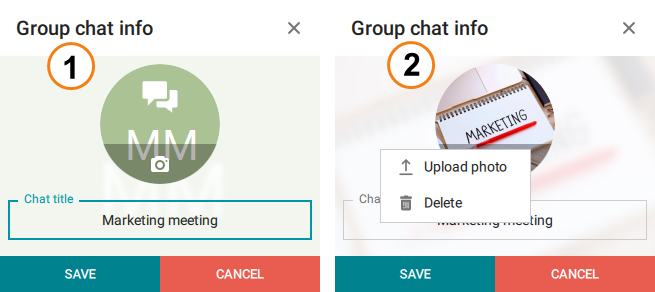
The group chat owner can change its title by clicking the  button to edit group information (1) or click below the avatar area to add an image (2). To do it, click the button and go to the Information menu.
In the Information menu, you can also configure additional chat settings. After clicking , you can enable the option Display chat history for new participants and enable/disable notifications from the group chat by clicking  .
.
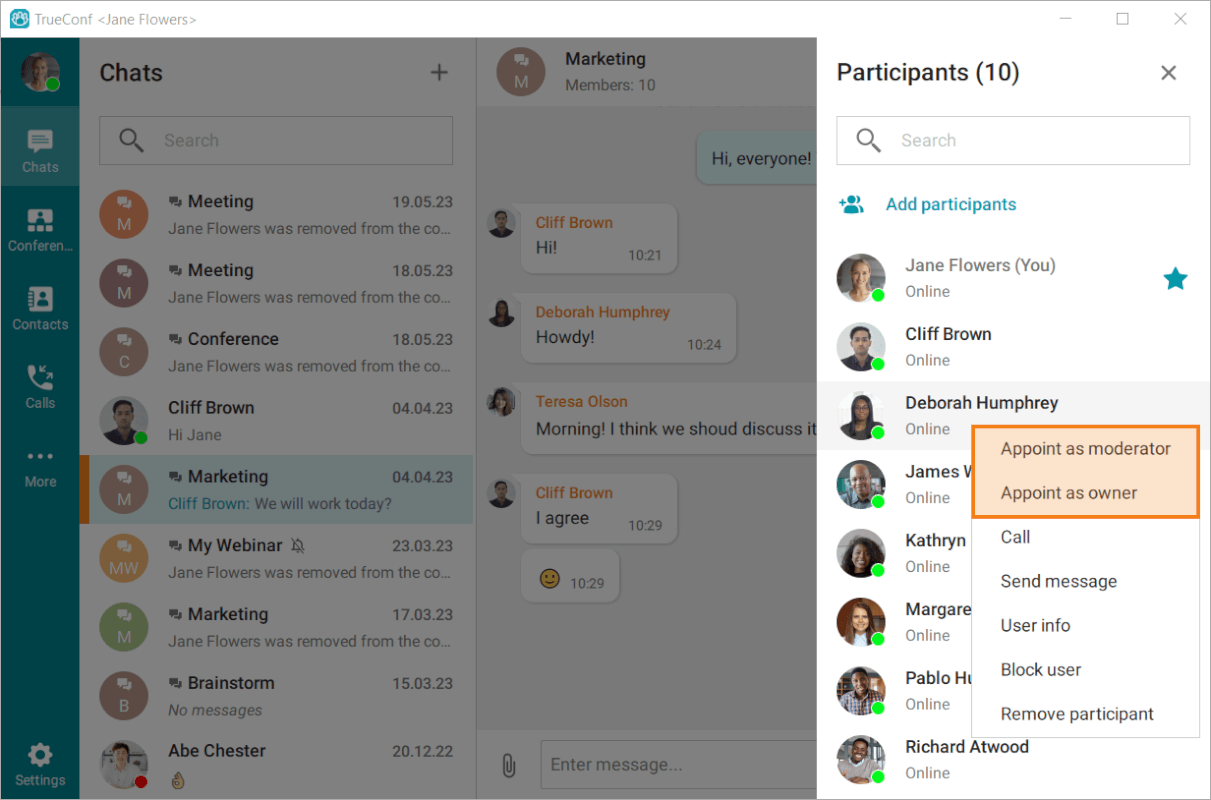
The group chat owner can grant moderator rights to other participants or even fully transfer ownership rights. To do it, click the  button, and right-click on a participant in the opened list. Select Appoint as moderator or Appoint as owner in the context menu depending on your needs. A moderator can add/remove participants, appoint other moderators, delete messages, and change the chat name or avatar. The chat owner is marked with
  in the list of participants while moderators, if there are any, are marked with the
  icon.
icon.
Only the owner can delete a group chat for all its participants.
# Mentioning a contact in a chat and adding links
You can mention a user in a message by specifying their TrueConf ID prefixed with the @ character. As a result, the user's name, which links to their profile, will be displayed in the message.
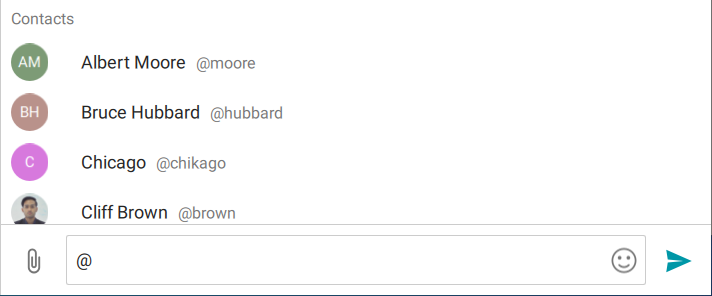
In the same way, you can select all participants with the @all tag.
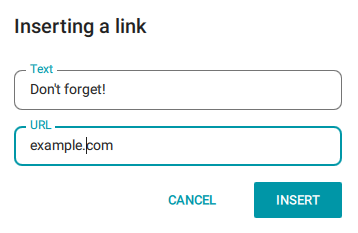
You can also change the contact's mentioned name while keeping the link to the user's page unchanged. This can be done in one of two ways:
Select a part of the text with the left mouse button and press the Ctrl+K shortcut (used by default).
Right-click on the selected text and choose Formatting → Insert link.
By clicking, you will open the pop-up window where one can type the name of the link:
For your convenience, any links inserted into a message are instantly recognized and become active, meaning you can click on them to automatically navigate to the specified address. Any URL is considered a link; however, certain conditions have to be met:
Any text beginning with
http://orhttps://will be considered a link.Without specifying the protocol, URL links are automatically recognized if the top-level domain is included in the standard's list of allowed domains. For example,
example.comis recognized, whereasexample.someis not.A link should not end with the following characters: :
\ ? # [ ] @ ! $ & ' ( ) * + , ; . { } ^, as they won't be included in the link. This rule does not affect the characters- _ ~ % =. If an allowed character is followed by a prohibited one, the link will end at the last allowed character, ignoring everything that follows.If the link ends not with a single closing parenthesis, but with one that matches an opening parenthesis, such a parenthesis will be taken into account.
Examples of correctly formatted links:
http://examplehttp://example.exampleexample.comhttps://example.net/blogvideo.example.com/#anchor
# List of users who have read the message
A user can check which participants of the group chat have already read his/her message.
This feature has a number of specific restrictions:
It is applicable for chats with up to 20 participants.
A message cannot be older than 7 days.
# Chatbots
In addition to chatting with other users, the client application allows you to communicate with chatbots that have been pre-integrated into your server. The list of commands that a bot can "understand" is determined by its developer. Commands are sent as text messages. You can immediately find out the list of available commands for interaction by entering the / symbol in the message line during a conversation with the bot.
Please note that your system administrator is responsible for integrating bots on the server. If you want to learn about all the capabilities of these bots, you can refer to our guide on migrating chats from other platforms or explore the Python library for creating other integration options.
# Chat folders
To organize your current chats, you can use chat folders. The list of these folders can be found in the Chats tab, on the left to the list of chats and groups.
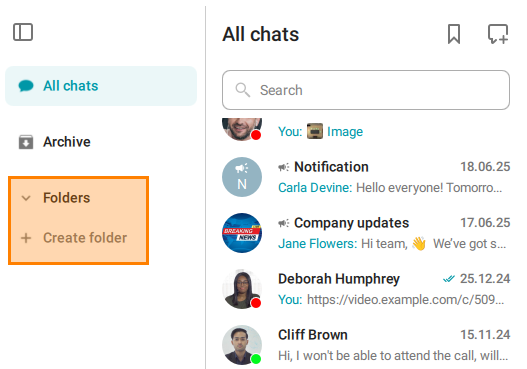
To create a folder, select the corresponding option in the menu. By clicking, you will open the pop-up window where one can enter the folder name and add selected chats (both private and group chats).
Please note that the folder name cannot exceed 20 characters. For convenience and brevity, you can use emojis.
You can add new chats to an existing folder at any time. To do it, right-click on the selected folder and choose Folder settings from the context menu. In this menu, you can also select the Delete button. Deletion of a folder will not delete the chats stored in this folder.
Among other things, you can mark all the chats stored in the same folder as read at once.
A user can sort the list of folders in any order by dragging them.
# Hotkeys
These hotkeys are available only in the Chats window. To view other hotkeys, please check the settings.
Up and down arrows will later be referred to as ↓ and ↑.
If you are using macOS, press ⌘ (Command) instead of Ctrl .
# Formatting selected text
Ctrl + B— boldCtrl + I— italicCtrl + U— underlineCtrl + Shift + X— strike-throughCtrl + Shift + N— clear formatting
# For chats
Alt + ↓,Ctrl + Tab,Ctrl + PageDown— switch to the previous chatAlt + ↑,Ctrl + Shift + Tab,Ctrl + PageUp— switch to the next chatEsc— leave the chat or undo the current action.
# For messages
Ctrl + ↑andCtrl + ↓— select a message for a quick replyCtrl + ↓— cancel the reply↑— edit the last messageDel— delete selected messages.
# In the chat list
These hotkeys work only if no chats are opened.
↑and↓— navigationEnter— open the selected chat.