# Server users. Integration with LDAP/Active Directory
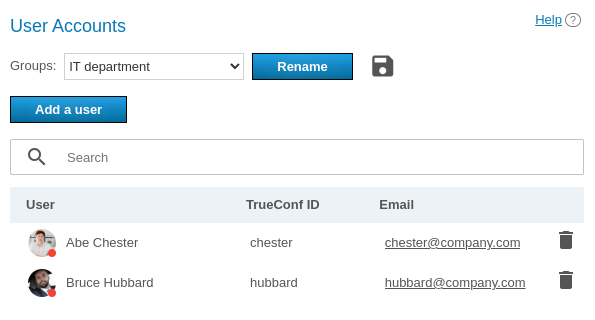
# User Accounts
In the User Accounts section you can add new user accounts, as well as edit and remote existing user accounts.
You cannot edit user details in LDAP mode. User data entry form is available only in Registry mode.
In TrueConf Server Free the number of user accounts is restricted. To learn more, go to the web page of this solution.
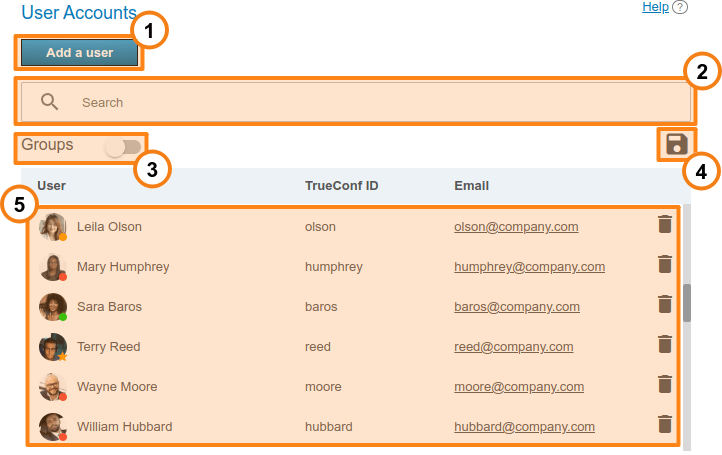
Add a new user.
Search users by TrueConf ID, first name, last name, display name, or email.
View user groups available on your TrueConf Server instance.
Export the list of users to a CSV file for later import to the address book of TrueConf Group (can be done in the Maintenance section of the endpoint control panel ). This button is available only in the Registry mode. The CSV file will saved in the UTF-8 encoding and ";" will be used as a separator which means that the preference settings will be ignored.
The list of the users registered on your TrueConf Server instance. At the bottom of each user's avatar, user status is displayed:
 — the user is online
 — the user is offline
 — the user is in a conference or in a call
 — the user is the owner in the conference
 — the user account is deactivated by the administrator (check the Status section in the profile).
Read how to connect users from outside your network to your TrueConf Server instance in our knowledge base.
In order to change user information, click on the username. To remove a user, click on the  button.
# User profile
Click on any user account in any control panel section to proceed to edit mode:
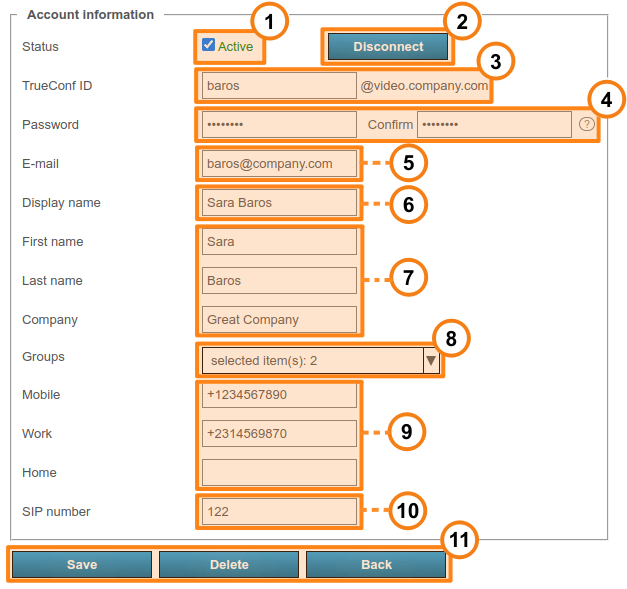
Change a user’s status to "active" or "inactive" (see below). Such users will be displayed semi-transparent with a gray status in the general list.
Forcefully disconnect all user’s client applications from your TrueConf Server instance. You may use this option to allow another user to connect to your server when the maximum number of connections in your license has been reached.
TrueConf ID is a unique user identifier. It can be used for authorizing in client applications and making calls and conferences. Username is a part of your TrueConf ID displayed before the “@” symbol. It may consist of Latin characters, numbers, underscores, hyphens and dots. The server name displayed after the username (
@servernext to the input field) is required for calling a user of another TrueConf Server instance. The username is set when creating a user account and cannot be changed afterwards.Enter the user's password. After creating or editing an account, you cannot see the password you’ve set. However, you can always change the password. To check password requirements, click on the
 button which is next to the password confirmation field.
User’s email address. You can set automatic email notifications to this address via SMTP server connected to your TrueConf Server instance.
The name you have entered will be displayed in the address book of other users. This field, as well as the username indicated at step 3, is prefilled. However, the field value can be changed.
User’s personal details. These fields are not required.
User groups. Click the arrow icon to view existing groups on your TrueConf Server instance. To add a user to one or more groups, check the box on the left of each group name.
If necessary, you can enter the user’s phone numbers. One can call any of these numbers by clicking on it in the user profile section of TrueConf client application.
If SIP telephony is used, you can enter a number for making SIP calls in this field. Then, the corresponding field will be displayed in the user profile in TrueConf client application. When a user clicks on this number, the call will be started in the format
#sip:<number>and the number can specified as<number>,sip:<number>, or#sip:<number>.Save changes, delete account, or return to the list of users.
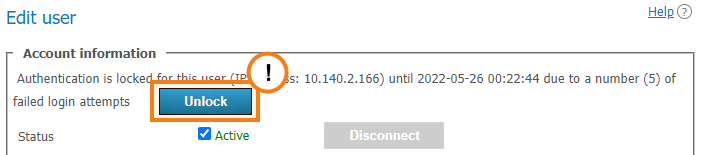
If a user has entered an incorrect password multiple times in a row (the exact number will be specified in the Users → Settings section), the authorizatin via the web application will be locked for 24 hours. You can enable the access to the application manually by clicking the Unlock button on the user profile page:
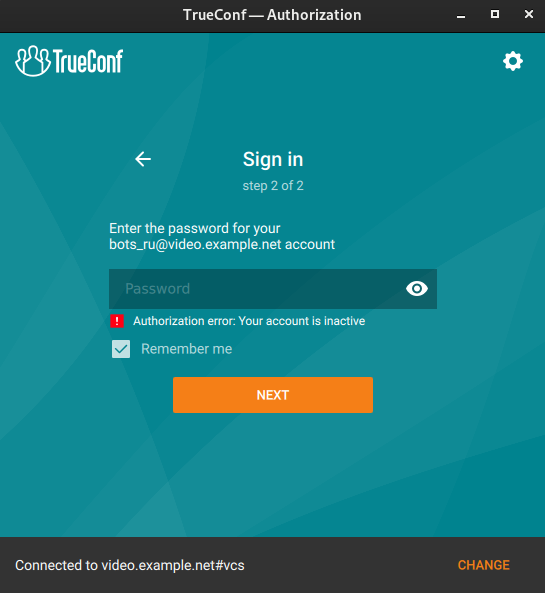
# User deactivation
The Active checkbox in a user’s account can determine if this user should be able to authorize. If the user account is inactive, it will not be deleted, but one will not be able to use it for authorization. The following message will be displayed in all client applications:
# Calls and conferences
If you are editing the user account created previously, you will see the Calls and conferences section where you can find the links for accessing:
Call history of the selected user
The general list of scheduled conferences and virtual rooms created on this server and filtered by this user. It will include only those meetings where this user is one of the participants.

The call history will include all user sessions in one-on-one calls and conferences:
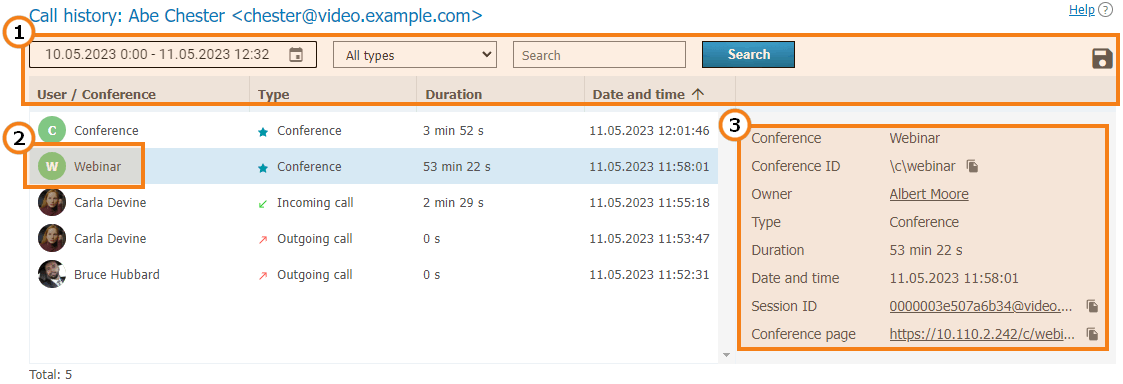
General UI for working with the table (check the description of the reports section). Events can be filtered by the following types:
All types (selected by default)
- Incoming call
- Outgoing call
- Missed call
Conference.
2. To view full information, select session (communication session) in the list on the left, Recurring conferences and virtual rooms may have multiple sessions depending on the number of times these conferences were started.
3. When selecting a session linked to the specific conference, you will see the following information in the card on the right:
Conference name and ID
The owner’s display name
Current session duration
Session start and end time
Link to the detailed information about the session in the Call history section
Link to the web page of a conference linked to the session. It will not be available for the meetings created ad hoc in TrueConf client applications.
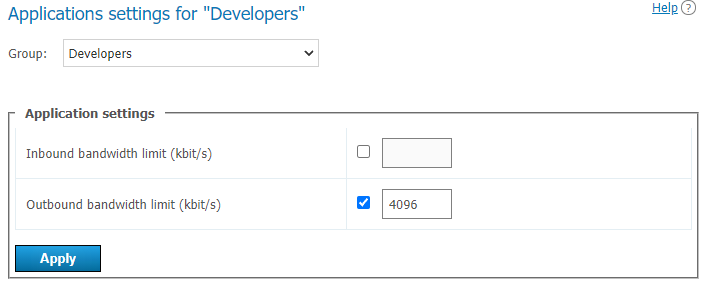
# Application settings
On the page where a user account is either edited or created, the administrator can set special parameters that will be activated in the client application when a user authorizes on the server. These parameters can determine the restrictions for incoming and outgoing bitrate and can be found in the Application settings section.
If such settings have not been configured, group settings (if any) are applied to the user (the member of the group). User group settings are displayed next to the user settings field. They are displayed for preview only and cannot be changed. If a user is a member of multiple groups, the scope of the user rights will be defined by the group with fewer rights.
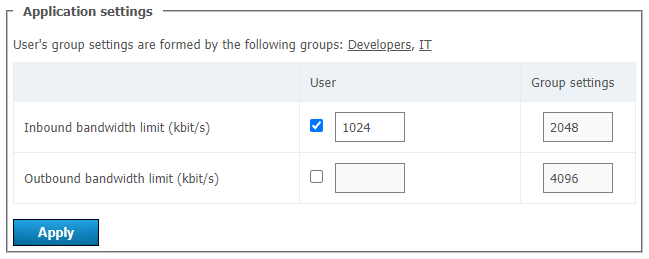
If bitrate limits are set at the user or group level, the user will not be able to change them in the client application TrueConf, but will see what settings have been set.
User application settings have higher priority than group settings: if you put user restrictions lower than group restrictions, user restrictions will be applied.
# User address book
At the bottom of the page you can find the address book and edit buttons. The address book contains all the users who are located in the address books of the user groups where the user belongs.
You can add individual entries to the list, which will be displayed only to the user being edited. Please note that you can add not only TrueConf Server users, but any call string, such as conference ID, SIP/H.323 or RTSP in the address book. Subsequently, you can delete them using the button. The user can delete them in the address book of the client application or in the personal area.
If address book editing is allowed at the group level, a user will be able to add contacts and organize them into groups in the client applications. Such groups are displayed only for the current user and are not included in the list of groups displayed in the control panel. However, the contacts added by the user will be displayed in the address book for his/her account in the control panel and the administrator will be able to edit this list.
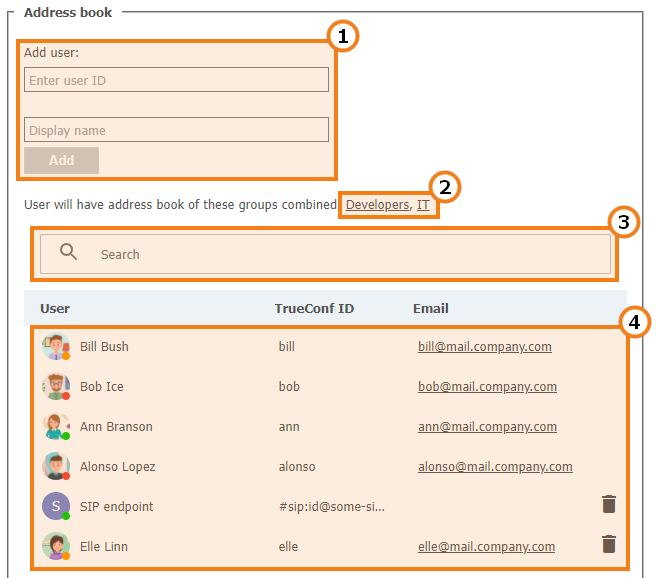
Add a user to the address book. To add a user, start typing the username or display name. From the drop-down list, select the user that matches your search (if the user is registered on your TrueConf Server instance).
The list of groups that the user belongs to, as well as the address books which are included in the user’s contact list and cannot be removed.
Search for users.
The list of users displayed in the address book. Click on the user registered on your TrueConf Server instance to edit their profile.
# Groups
In Groups tab you can create, rename, edit and delete groups. You can also add or remove users from the group, set up their address book and configure individual settings for the users of any group.
Manual editing of the user list and settings is not available in LDAP mode. You can only import groups from the LDAP directory as shown below.
Regardless of the data storage mode (Registry or LDAP), the following groups are included in the list by default:
Users without group — this group automatically includes the users who were not explicitly added to any group when their account was set or in this section as it will be described below.
Federated users — the users who make calls to the users or conferences on your TrueConf Server instance from a federated server.
Guest users — the guests who joined your public conferences (webinars).
It is impossible to rename or delete the default groups.
# Editing groups in Registry mode

To add a new group, enter its name and press Create.
At the group level you can allow or forbid the following features:
Editing address book. By checking this field, administrator allows users to change users display names of the users, delete/add users and perform any other changes in the group’s address book. If the box is not checked, group users will not be able to perform the actions mentioned above. In this case, all changes are performed by administrator in TrueConf Server control panel and extend to all address books of the users from this group.
Making point-to-point video calls. However, users can still receive incoming calls.
Creating group conferences.
Sharing the screen and application windows
Ability to permit the remote control of one’s desktop
Slideshows
Sending files in both private and group chats
Downloading files in chats. If a user does not have this right, instead of a file, he/she will see the notification indicating that this feature is unavailable.
Conference recording in the client application. This feature does not affect the ability to activate video recording when creating a conference in the application scheduler or personal area.
Operator rights. Operator right enables a group participant to become a moderator and have access to the real-time meeting management tool of any conference he or she joins.
These settings allow you to distinguish between different server users.
3. Edit the name of the group and its members.
4. Set up address book for group members.
5. Adjust bandwidth settings for group members.
6. To delete one or more groups, check corresponding boxes and click Delete selected. Accounts of the group members will not be deleted from your TrueConf Server instance.
# Editing Groups in LDAP Mode
If you would like to centrally manage user information and enable LDAP synchronization on your TrueConf Server instance, the list of users and groups is imported from the LDAP catalog (e.g., Active Directory). Note that your designated user search catalog object must contain all necessary user groups. For instance, if when configurating LDAP you indicated in the Group field the string cn=UsersGroup,ou=People,dc=example,dc=com, on the LDAP side the UsersGroup object must contain the necessary account groups:
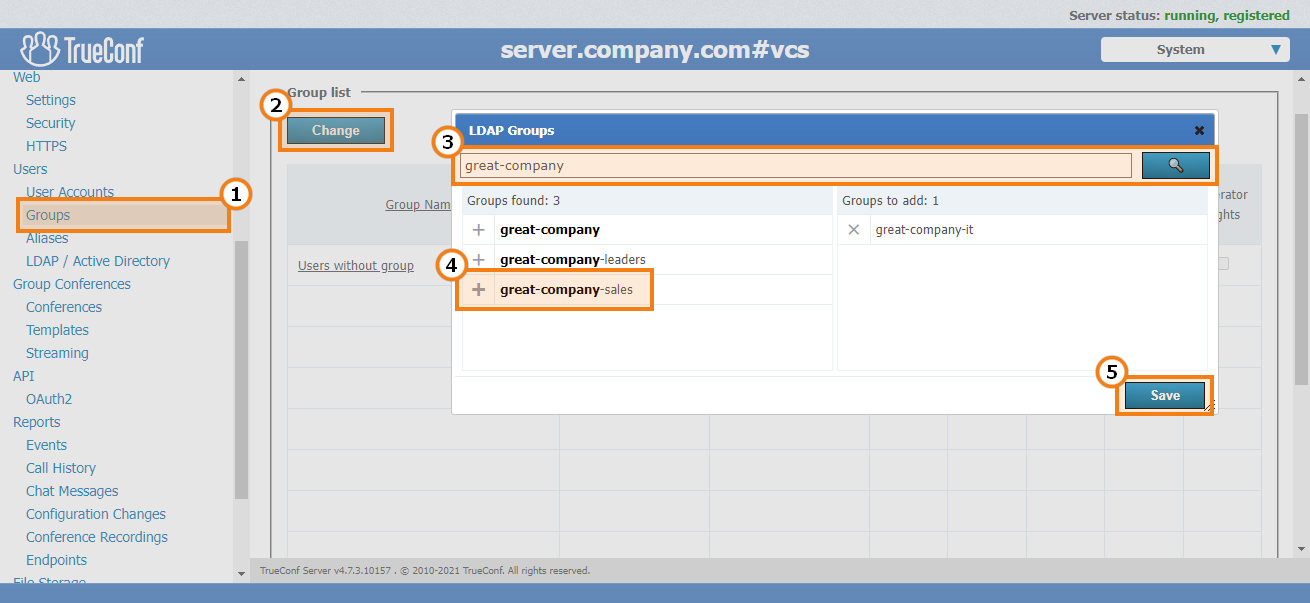
In this case, system administrators will not be able to create user groups and add group members in the TrueConf Server control panel. Instead, they can be imported from the LDAP catalog. To do it, follow the next steps:
Open the TrueConf Server control panel and go to Users → Groups.
Click Change above the group list.
Enter your search and press
 . You can type both full group name or a keyword.
Click
 to add required groups to the list.
Press Save to apply changes.
For groups imported from LDAP, settings for user permissions and the address book are available, just like in Registry mode.
# How the restrictions of rights work
If a user is a member of two groups: the permissive settings will override restrictive ones. For example, the user account is included in such groups as IT and DevOps. If the members of the IT group are allowed to show slides, the user will be allowed to show slides even if this feature is not permitted for the members of the DevOps group.
The persons who make a call to the users of your TrueConf Server via federation, will have the rights specified on your side (for the group Federated users) and on the side of their own server. For example, if you have disabled file sharing for federated users, they will not be able to send files when participating in the conferences hosted on your server, even if this right was given to them on their own TrueConf Server. Similarly, the federated user will be unable to send files if you have allowed this feature for federated users; but this right is denied to the group of this user on the side of his/her video conferencing server.
# Editing group's name and its members
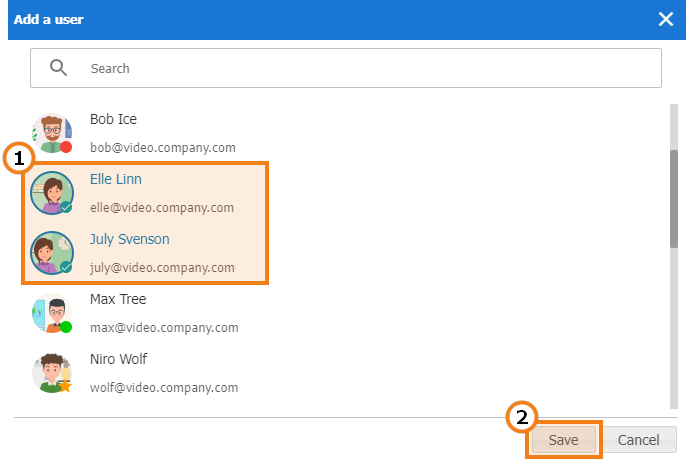
Click on the group name from the list to access the User Accounts page. Here you can rename the group and edit the list of members using the corresponding buttons:
Click the Add a user button to complete the list. Select the users you want to add to the chosen group in the window. After that they will be marked with a checkmark. After all users have been selected, click Save:
Click Rename to change the group name. Enter the new name and press Save (or press Cancel if you want to close the window without changing the settings):

You can also click the  button to export the user list of a specific group to a CSV file for subsequent import into the TrueConf Group address book.
# Setting up address book for users of the group
In the Address Book column of each group, click Customize. Click on it to edit the address book of this group. Group members can also add new contacts to the address book if they have a corresponding right (to enable it, please check Address Book Editing box).
You can add all users belonging to another group at once to the group’s address book (i. e. to the address book of each of its members). To that end, use Define, which users will be shown in the address book of the users in the group. Please note that automatic addition of users to the address book and manual addition are applied independently of each other.

You can also manually add users of different types (this process is similar to adding users to the address book in the user's profile). However, group members cannot delete users themselves, because these contacts are added to the entire group and not to their personal address book.
Group members can search for other TrueConf Server users and add them to their list of contacts on their own (if you have enabled address book editing).
# Setting application settings for group users
Click Customize in Application column to set bandwidth limits for the group users.
# Aliases
# Description
Thanks to aliases, you can call TrueConf Server user or any other user who can be called via the server (e.g. SIP, H.323, RTSP or other server users) using a short alias without entering full call string. By adding an alias, you create an extra name for existing user. When calling an alias, your call is redirected to the existing user corresponding to this alias.
This option is very useful for those users who are making calls to TrueConf Server users from mobile devices using a dialer. You can create digital aliases for server users so that they can be called from mobile devices.
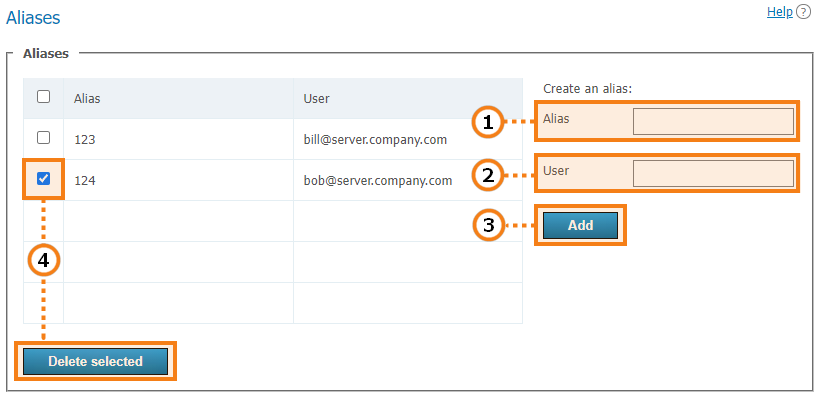
An alias may contain numbers and letters. The maximum number of characters is 32. You can update aliases only after restart you have restarted the server.
Call string (including username of the server user). The calls to the alias will be forwarded to this user.
Press the button to add a new alias to the list.
To delete one or more aliases, mark them and click Delete selected.
After adding or removing aliases, please restart your server to update the list of aliases.
# Use for federation
In federation mode aliases can be used to make calls just like TrueConf ID. An alias will be resolved on the server which is specified after @ in the full alias@server alias , e.g., 122@video.server.name.
We will now discuss two examples of using aliases on federated TrueConf Server instances, one.name and two.name.
Case 1
Each of TrueConf Server instances has its own aliases. We have created an alias 111 for the user userA from the one.name server.
To make a call to userA from the two.name server, the following string should be entered in the address line:
111@server where server is the DNS name or IP address of the one.name server.
Case 2
Create an alias 111 on the two.name server for the user userA from the one.name server. It will correspond to the following call format:
userA@server where server is the DNS name or IP address of the one.name server.
In this case the users from the two.name server will be able to call users from the one.name server without its IP or DNS name. They will just have to enter aliases in the address line of their client application. For example, they can use 111 which we have discussed before.
The second option is more transparent for users, but in this case, it will be more difficult to configure a convenient system of aliases.
# Authentication
In this section you can configure authentication options for the users of your TrueConf Server.
Authentication may occur in two different security zones: trusted (or Trusted network as it is called by default) and external (untrusted) (called Internet by default). They are included from the very beginning and cannot be deleted. However, one can configure them as it will be described below.
Everyone, who does not get into the trusted zone, will automatically be moved to the external zone. A user’s IP address will determine the zone to which this person will belong.

Security zones. To open the settings of the security zone, click on it.
Authentication methods specified for each zone.
Zone activation or deactivation. When a zone is deactivated, the users, who belong to this zone, will receive a notification that authorization is currently unavailable when they try to connect to your TrueConf Server. The users, who were connected previously, will be able to interact with the system up until the moment when the authorization token expires.
Configurable verification methods. If you click on Kerberos SSO and AD FS, a configuration pop-up will be displayed. There are no settings for Login and password and NTLM (Single Sign-On) options; they can be simply activated with switchers on the right.
The configuration and work status of each method.
Activation of authentication options.
To enable Kerberos SSO, NTLM SSO, and AD FS methods, you have to select and configure LDAP account storage mode.
# Access zones settings
Click on the name of a trusted zone to open its settings:
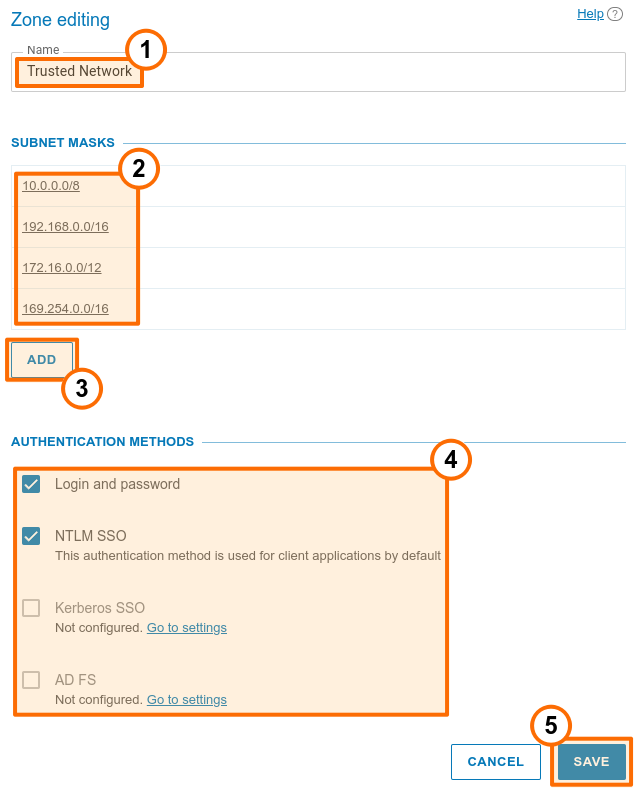
Changing the zone name, e.g., to “Corporate network”.
The subnets of this zone. If you click on any entry, you will see a window when one can edit the address or masks of the subnet. Here, you can also delete the subnet.
Adding a new subnet.
Selection of authentication methods.
Don’t forget to save changes.
You can specify the name of the external zone and configure authentication methods for it.
# SSO and AD FS settings
When integrated with an LDAP server, SSO (Single sign-on) technology will enable the users of your TrueConf Server to authorize automatically after logging into the operating system and starting TrueConf client application. For this purpose, one can use one of the two protocols: Kerberos (opens new window) or NTLM (opens new window).
To make sure that SSO authentication works correctly via NTLM, add the machine, where TrueConf Server is installed, and users’ PCs to the domain. In the case of Kerberos, only users’ PCs have to be registered in the domain, but this is not mandatory for the machine with TrueConf Server.
To activate NTLM you only need to enable this option in the State section; there are no additional settings.
To configure connection via Kerberos, click on the Kerberos SSO link in the Authentication methods section (on the Authentication page with the list of security zones):
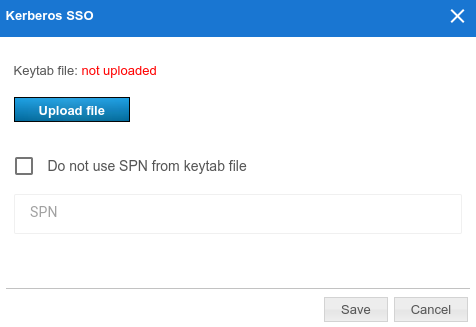
In the pop-up window, select:
The keytab file that will be used for authentication
If necessary, click on More and specify your own value for ServicePrincipalName (SPN) instead of the value saved in the file.
Active Directory Federation Services (AD FS) is the software component of Windows Server which acts as the authentication provider needed for accessing the resources outside the Active Directory corporate system, for example, it may be used for accessing web applications.
In addition to AD FS, one can use other solutions to implement two-factor authentication, for example, Keycloak.
To configure integration with federation services, click on the AD FS link in the Authentication methods section and specify the required parameters:
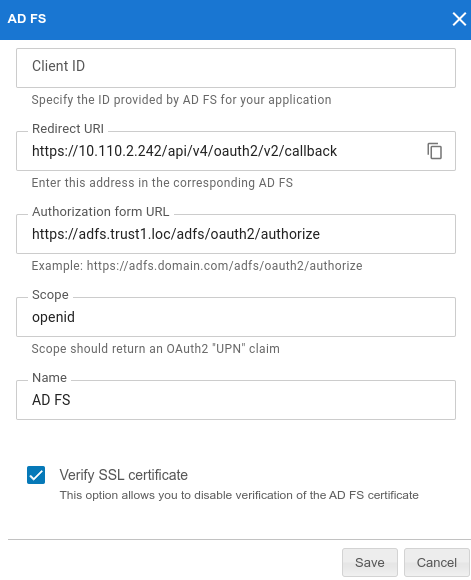
The identifier (Client ID) of the OAuth application which is configured on the side of AD FS for receiving the access token
URI on the side of used for receiving the response from AD FS; it also needs to be specified on the federation service.
If you click on More, you will be able to change the following parameters (if necessary):
Authorization form URL which has to be specified on the side of AD FS and used for receiving the access token for a TrueConf Server user during connection
Scope
The authorization provider name displayed in the list of authorization options on the page where access zones are configured and in TrueConf client applications when two-factor authorization is used
On the side of TrueConf Server, you can also disable the verification of the SSL certificate received from AD FS.
# LDAP / Active Directory
Switching between user data storage modes. TrueConf Server supports two types of data storage: Registry and LDAP. You can switch to any type by pressing Switch button:
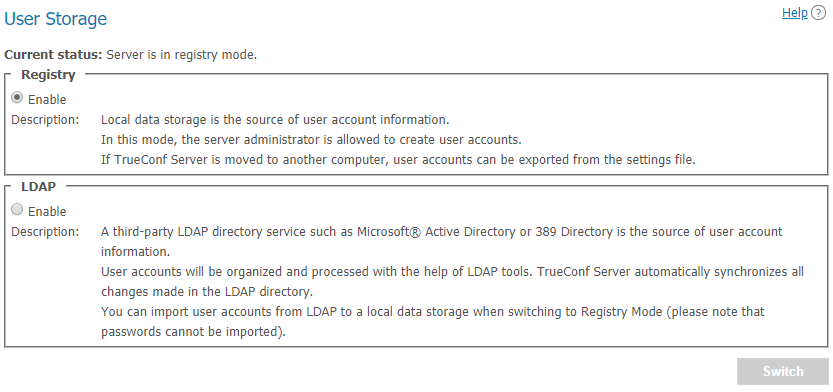
# Registry mode
Registry mode is used by default. In this mode, the server contains information about the users on the local server. You can add or remove users via control panel. If the server has been switched from Registry to LDAP data storage mode, existing user records will not be used anymore.
When switching to LDAP data storage mode, user records stored on the local computer will not be removed, so switching to another data storage mode will not damage saved information.
# LDAP mode
In this storage mode, the server takes user information from a remote or local LDAP directory. This approach offers a number of advantages when the server is used in the corporate environment:
Automatic syncing of user information
No need for authorization within the network at the workplace
Transparency, speed, and ease of administration
Administration security
Support for various directory services: Microsoft Active Directory, FreeIPA, OpenLDAP, 389 Directory Server, etc.
In LDAP mode you cannot edit user list and user group settings via control panel. By default, configuration settings for LDAP match Microsoft Active Directory. User information is edited using Active Directory management tools.
To learn more about the LDAP protocol and the Microsoft Active Directory service, read our website.
In LDAP mode, user rights correspond to the Active Directory group where users belong. To activate this mode, check LDAP → Enable and press LDAP settings button at the bottom. LDAP settings window will open:
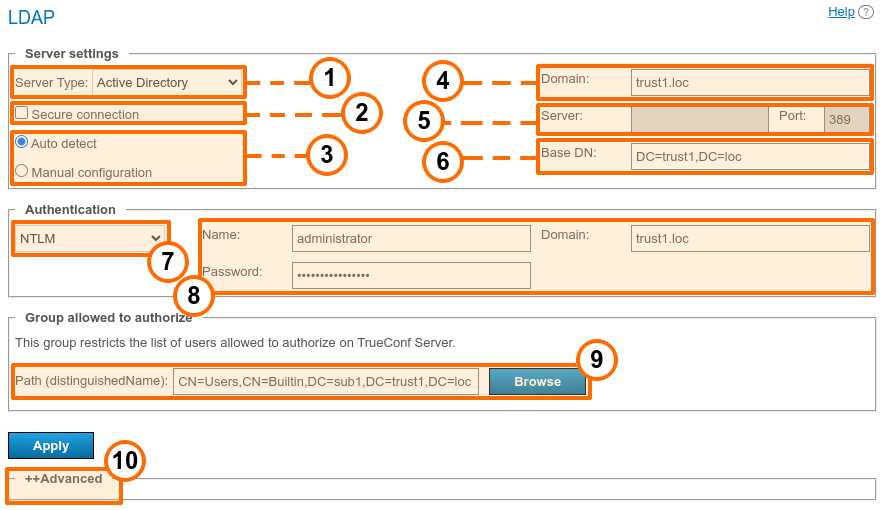
Server type, the following types are supported: Active Directory, OpenLDAP, 389 Directory Server. This will determine the default names of attributes that will be parsed by the server from the LDAP directory. It is also possible to select the Custom option if you want to specify the attribute name manually. When the server type is selected, open the Advanced section and click the Default button to switch to the attribute name that corresponds to this type of server. You will see that the attribute name in the Value column has changed. If necessary, you can specify the required values and then click the Apply button which is also in the Advanced section.
Connecting to the LDAP server in protected mode (via LDAPS protocol) to ensure secure transfer of user data over the network.
LDAP server settings configuration (automatic and manual).
In the automatic mode the LDAP server can be chosen among the servers by default of the DNS domain, specified in this field. Default servers are being chosen according to the relevant DNS-notes of SRV type. For Active Directory DNS domain name AD can be indicated here.
The address and port of the LDAP server when manual configuration is used. It is possible to use the global directory for connecting to the directory service. To do it, specify 3268 or *3269 as the connection port when working via LDAP and LDAPS respectively.
Base Distinguished Name is a directory object designed for searching users, e.g.
ou=People,dc=example,dc=com.TrueConf Server authorization modes on the LDAP server.
Authorization parameters on the LDAP server.
In this section, you can specify an LDAP group of users who will be allowed to authorize on TrueConf Server, for example,
cn=TC_Users,ou=People,dc=example,dc=com. It is possible to select a group by clicking on the Browse button. To enable this button, you need to fill out the fields required for connection to the LDAP server (in the Server settings and Authentication blocks) which will enable the Base DN field.Additional LDAP parameters. Allow to adjust the parameters to other types of LDAP servers.
Please note that if the server type is changed (for example, from Active Directory to OpenLDAP), the additional LDAP parameters are not automatically reset. To switch to the default parameter values for the new server, open the Advanced section and click the Default button.
When changing from LDAP mode to Registry mode it is possible to import user data. To do this, choose the Registry mode in the User storage tab, tick on Import User Information and click on Switch.
User passwords are not imported. After being imported the user accounts are inactive (see User accounts section).
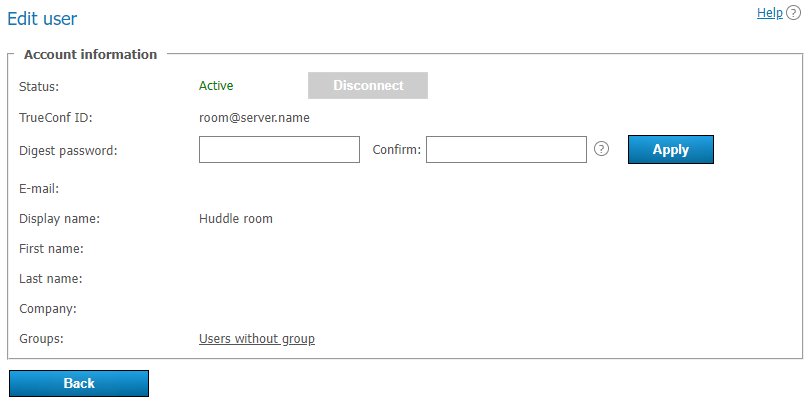
In LDAP mode, only the digest password will be available for editing in the user profile. This digest password must be specified when registering an SIP/H.323 endpoint on TrueConf Server. The same password should be specified in the authorization settings for the endpoint:
Directory of groups and users registered on TrueConf Server. This tab allows to create and manage the user’s groups. User Accounts tabs allows creating groups and managing rights. In the Registry mode a user can belong to one (or more) created groups. This parameter can be edited in the edit user information window. In the LDAP mode this window allows you to define rights for several LDAP groups. User attribute can be defined in the LDAP folder.
To import user groups from LDAP, open Users → Groups. Click the Change button and select corresponding groups in the drop-down list. Read more in our article on how to set up user groups.
When groups of users are imported from LDAP, the list will include only the groups that are included in it by default.
If you have several TrueConf Server instances connected to a common LDAP directory, users can log in to the personal area from a guest page of any of the connected servers. In addition, users can participate in private meetings hosted on a different TrueConf Server instance connected to a common LDAP directory using an auto-generated login.
# How to upload user accounts from different domains
Create a group with the area of application (range) Domain Local on the main domain to which TrueConf Server will be connected.
Move to this group the accounts of users (or user groups with the universal range; nested groups are supported only within a single forest) that you want to upload on the server.
Complete the steps 1 and 2 for all domains that will be used for uploading accounts.
Specify this group in the field Path (distinguishedName) in LDAP settings.
Make sure that the parameter Trust Enabled in LDAP settings is equal to 1 (default value) in the Advanced section.
# Certificate installation for LDAPS connection
To ensure connection via LDAPS, one may have to upload the root SSL certificate on the physical or virtual machine where TrueConf Server is deployed. This certificate should correspond to the domain where the domain controller server operates. To do it, copy the root SSL certificate of the domain to any directory on the machine with TrueConf Server.
Please note that the certificate has to be in the .crt format. So, if a different format is used, you will need to convert the certificate as it is described in this article.
Next, install the .crt certificate depending on your OS:
For Windows OS
Double-click on the certificate.
Click on the Install Certificate button in the certificate installation window.
Select Local Machine in the pop-up where the storage location has to be specified.
Select Place all certificates in the following storage and click Browse in the storage settings window that will be displayed next.
In the list of storages, select Trusted Root Certification Authorities and click OK.
To complete configuration, click the Next and Finish buttons.
На Debian:
- Run the following command in the terminal as the administrator:
cp /home/$USER/cert.crt /usr/local/share/ca-certificates && update-ca-certificates
where /home/$USER/cert.crt is the absolute path to the .crt certificate copied to the machine with TrueConf Server.
2. Please reboot the computer on which TrueConf Server is installed.
На CentOS:
- Run the following command in the terminal as the administrator:
cp /home/$USER/cert.crt /etc/pki/ca-trust/source/anchors/ && update-ca-trust
where /home/$USER/cert.crt is the absolute path to the .crt certificate copied to the machine with TrueConf Server.
2. Please reboot the computer on which TrueConf Server is installed.
# How to address typical issues when using LDAP
When LDAP is configured, some errors may occur while connecting to the directory service. In such cases, after you click on the Apply button which is in the connection parameters block, the corresponding notification will be displayed in the upper part of the screen. Below you can find some typical issues:
LDAP error 81 (Server Down)
No connection with the directory service. Most likely, TrueConf Server cannot access this service via the specified address and TCP port (389 for the standard connection and 636 for the secure connection via LDAPS). To test the connection, you can use the console application telnet (available on Windows and Linux):
telnet [ldap-server] [port]
where [ldap-server] is the address while [port] is the port of the server that acts as the domain controller. For example, if you need to test access via LDAPS, you need to run:
telnet ldap.example.com 636
If there is no connection, it is necessary to check the network equipment settings or network-to-network software. One should also make sure that the server acting as the domain controller has been started.
LDAP error 49 (Invalid Credentials)
Unable to authorize on the LDAP server. Make sure to provide the correct service account data used for connection to the directory service (go to LDAP settings, the Authentication section).
LDAP error -1
This error may occur when connecting to the directory service via the secure LDAPS connection. This problem may occur due to various reasons.
- It is necessary to make sure that the root SSL certificate of the domain, which includes the domain controller server, is uploaded on the physical or virtual machine where TrueConf Server is deployed. When the certificate is uploaded, you can test the connection with the openssl program: run the following command in a Windows or Linux terminal:
openssl s_client -connect [ldap-server]:[port]
where [ldap-server] is the address while [port] is the port of the server acting as the domain controller.
2. If TrueConf Server is deployed on Linux, and connection to Microsoft Active Directory has to be configured, make sure to specify the fully qualified domain name (FQDN) of the machine, where the domain controller server is deployed, in the Domain field. It should include the name of this machine, for example, server-name.ldap.example.com. In this case, FQDN should be used in the command testing SSL connection (check the previous step).
Connection has been established, but the list of accounts is empty
Make sure that the set of filters in the Advanced tab corresponds to the selected server type (Active Directory, OpenLDAP, 389 Directory Server). To switch to the corresponding attribute name after the server type is changed, click the Default button and configure required filters.
The users from the main domain are displayed, but the users from trusted domains are missing
Make sure that:
The Trust Enabled parameter equals 1 in the Advanced section, LDAP settings.
The account used for connecting to the domain controller server has the right to read the attribute member of from the container ForeignSecurityPrincipals.
# Password and account lockout settings
# Password requirements
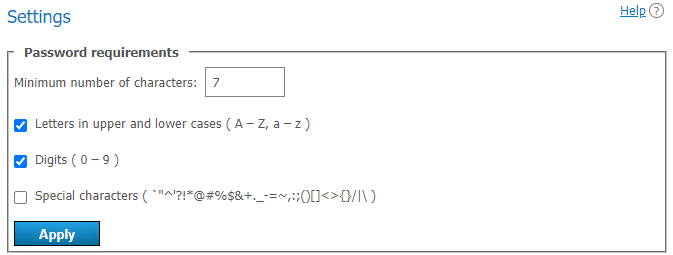
When using the Registry mode, you can specify the minimum password length (from 2 to 64 characters) and specify other requirements (upper and lowercase characters, digits, special characters) for a TrueConf Server user. These parameters will be checked when adding a new user account or changing the password. These requirements will also be applied when a user will be editing the password in the personal area.
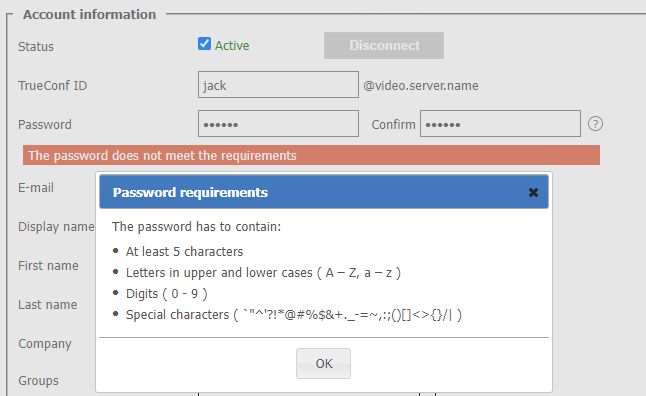
If the password does not meet the requirements, an error message will be displayed. Click on the ![]() button (which is next to the input field) to view the password requirements:
button (which is next to the input field) to view the password requirements:
# Automatic lockout
In this section, you can enable the account lockout policy for those cases when a user enters an incorrect password during authorization.
Lockout settings are available both in Registry and LDAP modes. The lockout should be configured on the side of the video conferencing server; it is not related to AD/LDAP settings.
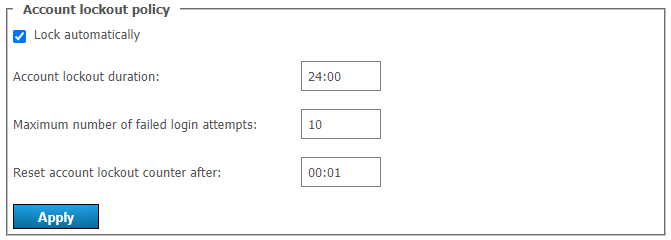
Here, you can specify:
account lockout period (a user can be manually unlocked at any time in his/her profile)
maximum number of failed login attempts
time interval between unsuccessful login attempts (if the interval is larger than the specified value, the counter for unsuccessful login attempts will be reset to zero).
Let us consider the following example. Here, we will use these settings:
Account lockout duration = 6:00 (6 hours);
Maximum number of failed login attempts = 5;
Reset account lockout counter after = 00:10 (10 minutes).
Then, if a user makes 5 unsuccessful authorization attempts with the login (TrueConf ID) existing on the server and the time difference between these attempts will be less than 10 minutes, the account will be locked for 6 hours. And if after any of the attempts (for example, the 4th) there will be 10 minutes, then the counter will count again starting from one.