Configuration via web interface
Configuration via web interface
To access the terminal settings, go to the Settings tab. Almost all sections correspond in content to the sections of the interface available directly from the control panel.
Calls
In the Settings → Calls → Call settings section, you can select the protocol that TrueConf Group will use.
You can activate SIP and H.323 simultaneously, but you must then set the priority in the Protocol priority dropdown list. This ensures that when making an outgoing call without specifying a protocol, the first attempt is made using the priority protocol. If it fails, the system will automatically make a second attempt using the additional protocol.
You can deny or allow Far=end camera control so that your interlocutors can control the position of your PTZ camera, and you can control their PTZ camera.
Below is the presentation preview setting. If option When connected is selected, content will be immediately shared with remote participants when the source is connected during a conference. If option By button click is selected, the content source will initially display only on your screen, and further transmission to the conference will begin only when the Start sharing button is pressed.
Accepting calls
In the Settings → Calls → Call reception tab, you can configure the terminal's behavior for incoming calls.
In the dropdown list Answer Point-to-Point Call and Merge incoming Call to Current Call, the following options are available:
- Accept automatically - the terminal automatically answers an incoming call/invitation;
- Ask for user's confirmation – When you receive an incoming call or invitation, an information window will appear, giving you the option to Accept or Decline it (accompanied by an audio indication, i.e., ringtone).
- Do not disturb – all incoming calls/invitations to the terminal will be rejected, and you will be able to make only outgoing calls.
Item Merge incoming Call to Current Call is available if the MCU module is included in your configuration.
Below, you can configure call reception settings:
- Mute microphone;
- Mute the camera;
- Receive calls only from address book contacts;
- Spam protection (Spam calls via SIP and H.323 protocols are automatically rejected);
When operating on an open network with a public white IP address, standard SIP and H.323 ports may frequently receive "calls" from various scanning programs searching for vulnerabilities in IP telephony. Spam protection makes the terminal invisible to them.
- Block incoming SIP calls;
- Block incoming calls while recording/streaming.
MCU
The settings for MCU conferences are described in the relevant section.
Administration
In the Maintenance section, you can:
change the name of TrueConf Group (Maintenance → System);
use export/import for settings, address book, and call log, or restore factory settings;
activate or update the license;
configure access permissions.
The license activation feature is intended for OEM partners.
- change the password for accessing the web interface, advanced settings, SSH and API management;
Restricting access to the control panel
By default, any user on the local network can access the control panel using the IP address TrueConf Group.
Authorization is performed using the standard login admin and password admin.
To change the default username and password, go to Settings → Maintenance → Permissions → Administrator interface.
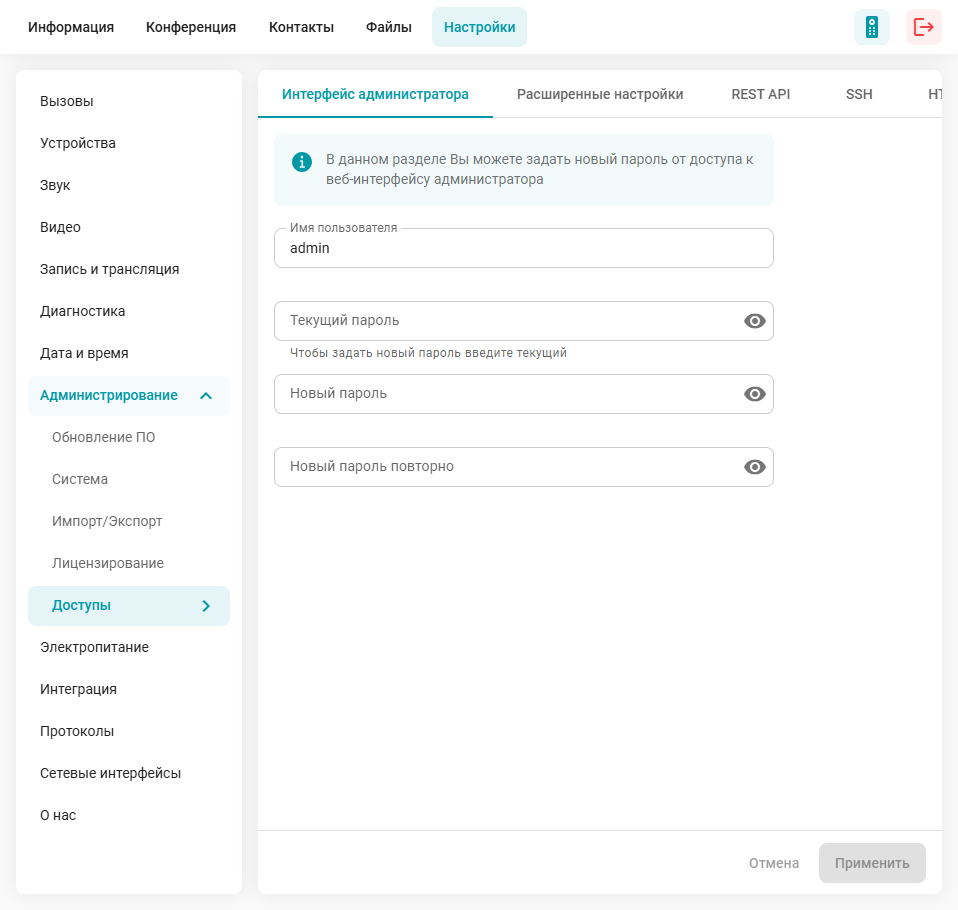
In the Username field, enter the username that will be used for authentication.
To change the password:
Click Change;
Enter the new password in the Password field;
Click Apply.
Configuring HTTPS Connection
The HTTPS protocol is always used for the web interface, with certificates issued to the terminal by the registration server reg.trueconf.com, which appear as self-signed to browsers.
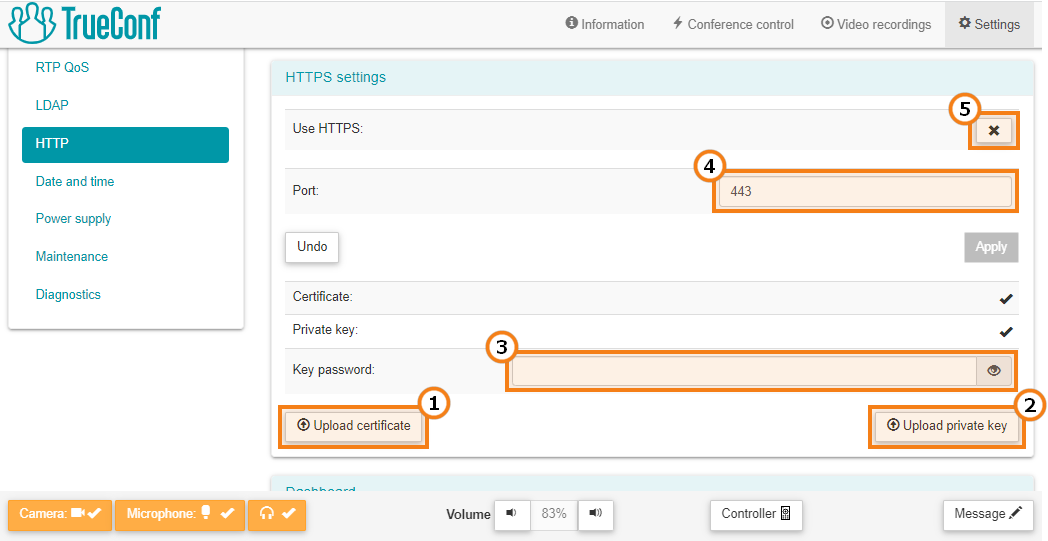
To enable access to the control panel via HTTPS, go to the Settings → Maintenance → Permissions → Web access section:
Upload the certificate file with the .crt extension. If your certificate format is different, you can convert it.
Download a private key file in .key format.
Specify the password if it was set when generating the key.
Press the Apply button at the bottom of the screen to save the settings.
If necessary, you can set an HTTPS port in the web interface different from the default 443 by specifying it on tab Settings → Maintenance → Permissions → HTTPS port and then clicking the button Apply below.
There are three ways to generate a certificate file:
Create a self-signed certificate.
Generate a free Let's Encrypt certificate on a PC with Windows or Linux.
Buy a commercial certificate.
Restricting access to terminal settings
To restrict access to the advanced terminal settings for TrueConf Group users in the meeting room, you can set a PIN code in the Settings → Maintenance → Permissions → Advanced settings field.
After entering the PIN code, press Apply. The new access password will become active immediately. Now, to access advanced settings, you will need to enter this PIN code using the numeric keypad on the remote control or the on-screen keyboard.
If you have forgotten the PIN code for accessing the terminal settings, you can change or reset it via the web interface: Settings → Maintenance → Permissions → Advanced settings.
To access the management of TrueConf Group using the command line interface, go to the SSH tab, activate the Use SSH toggle, and download the access key.
Firmware Update
To update the installed software, you need to obtain the update file by contacting the manufacturerTrueConf Group. After that, go to the Settings → Maintenance → Software upgrade section, click the Select file button, and select the provided file. Once preparation is complete, a warning will appear indicating that the update process for the video conferencing system will start in 5 minutes. You can Stop or Start the update process before the countdown ends by clicking the appropriate buttons in the window at the bottom right corner. After the update, you can continue working with the new version of the software.
Before updating the software, ensure that TrueConf Group is connected to a reliable power source to prevent unexpected shutdowns during the process. Also, verify that you have a stable network connection to the terminal to maintain access to its control panel. You can start the update process from a USB drive using the on-screen interface or a tablet.
Online Update
In TrueConf Group version 2.0 and later, you can now update the firmware online. This is a simple and convenient way to update the terminal software; just click the Upgrade button in the Online upgrade section.
For TrueConf Group to access the latest version of the software, the terminal needs access to the update servers mirror.trueconf.com and packages.trueconf.com via port 443.
Import and Export
Configurations
In the Settings → Maintenance → Import/Export → Configuration section, you can import system settings for TrueConf Group. This can be useful if you have acquired an additional terminal and want to simplify the setup process by importing settings from another TrueConf Group. Click Select file and select the desired configuration file.
Similarly, you can export the current terminal settings by clicking Download in the relevant section.
If you need to clear all settings and parameters from the terminal, use the factory reset option. Press Reset, and the terminal's settings will return to their original state.
NTP settings are not exported to the configuration file.
Address Book
Here you can import, export, and completely clear the local address book. When importing and exporting the address book, the terminal generates a file in .csv format.
Import, export, and clearing affect only the local address book. Contacts from TrueConf Server and TrueConf MCU will not be affected.
Call Log
On this tab, you can either download or clear the call log. The log is exported in .csv format. After clearing the call history, the contacts tab Recent will be empty.
Licensing
The Licensing menu section is intended for OEM partners. The terminal is delivered to the customer as a fully activated product.
Online Activation
For online activation, access to reg.trueconf.com on port 4310 is required.
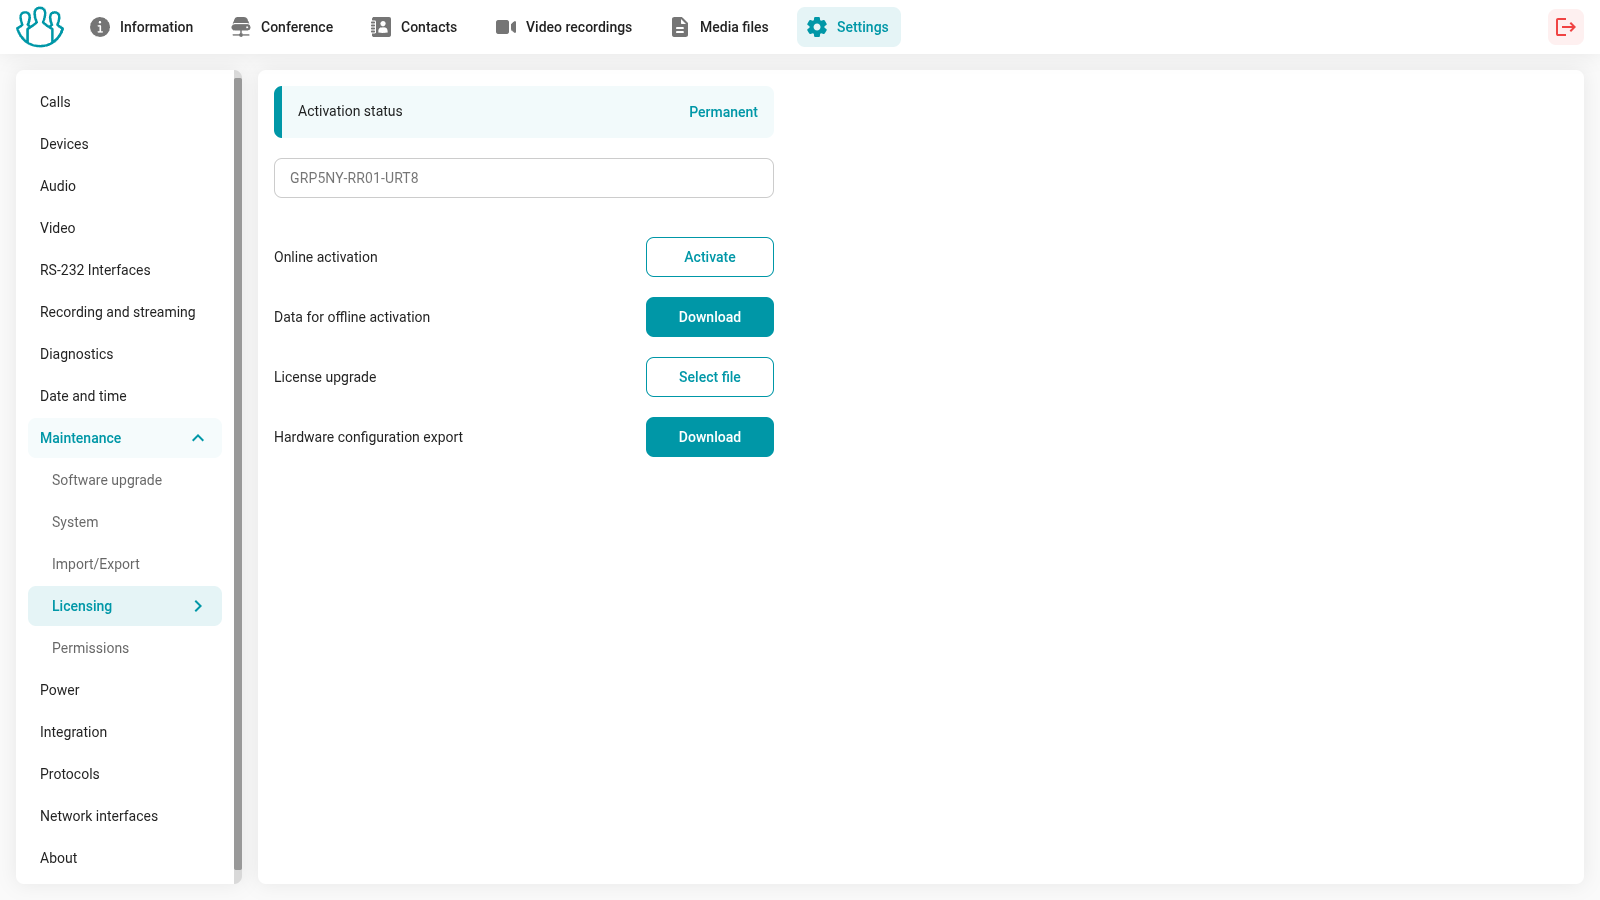
If your TrueConf Group has internet access, you can use online activation. To do this, go to the Settings → Maintenance → Licensing section, then:
- Please fill in the Serial number field.
The serial number of the terminal is located on the bottom of the case.
2. Click Activate;
3. After successful activation, the status at the top will be updated.
If you encounter issues with online activation, please use one of the offline methods described below.
Offline Activation
1 method
Go to the Settings → Maintenance → Licensing section, then:
Please fill in the Serial number field.
Click Download in the Data for online activation section;
Contact the terminal manufacturer and provide them with the saved activation data file. In return, you will receive a license file generated for you.
Select it in item License upgrade.
2 method
In the same section:
Click Download in the item Hardware configuration export
Contact the terminal manufacturer and provide them with the saved configuration file. In return, you will receive a generated license file.
Select it in item License upgrade.
Date and Time
In this section, you can use the convenient calendar widget, which appears when you click in the Date and time field, or you can use the interactive map to select a city with the desired time zone.
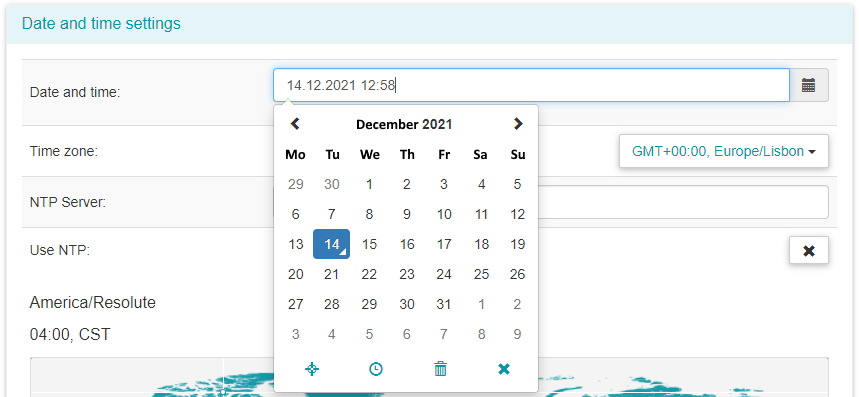
The widget also offers an interactive time zone map where, by hovering the mouse over each of the city circles, you can see its current time. To choose the desired time zone, simply left-click on the city:
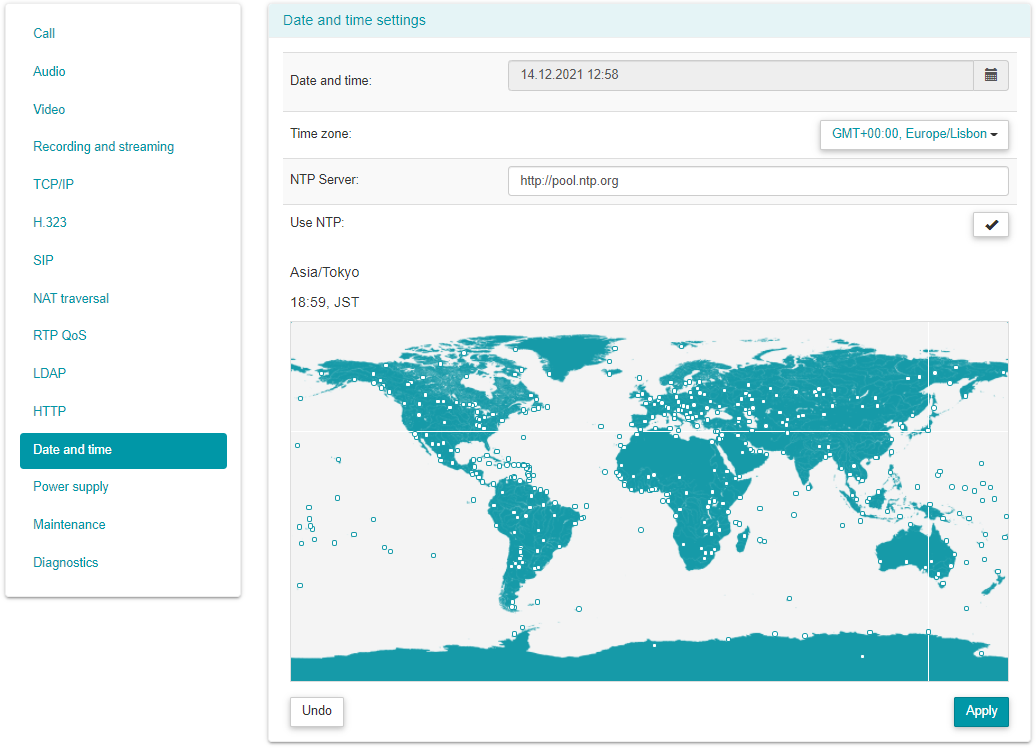
Below the interactive map, there are some system time settings. You can enable the display of time on the conference screen by activating the corresponding setting.
You can also use your own NTP server by specifying the synchronization frequency and the server address.
To save the settings, use the Apply button.
Sleep mode and power management
You can configure the sleep mode settings. In this mode, the terminal operates with reduced power consumption while remaining capable of receiving incoming calls. When entering standby mode or shutting down, connected PTZ cameras automatically turn to the far left-down position, regardless of the control type, including RS-232, NDI, VISCA-IP, and USB. Upon exiting sleep mode, the cameras return to their original position.
When viewing video from a connected camera in the web interface, the system will exit sleep mode and activate peripheral equipment.
For TrueConf Group to automatically enter sleep mode, it should not be in presentation preview mode, and the main menu, address book, settings, or calendar must be selected on the screen.
TrueConf Group will not enter sleep mode in the following cases:An active call or conference.
An active conference recording or broadcast.
Presentation view.
Viewing/managing your camera on the main screen.
Viewing/managing the terminal camera in the web interface.
To configure sleep mode, navigate to the Settings → Power → Sleep mode section in the on-screen interface:
Set the time interval after which the terminal will start displaying a screensaver showing the current time.
Specify the terminal's idle time before entering sleep mode.
Specify the action for double-pressing the power button on the terminal. When pressed once, a window appears allowing you to choose the action: Go to sleep mode or Turn power off.

4. Choose whether TrueConf Group should put connected displays into sleep mode as well, if they support this feature, when entering sleep mode.
Power Management
In the Power management tab, additional features are available:
force the terminal into sleep mode;
complete shutdown of the terminal;
Restart the endpoint
quick restart of the video conferencing software without rebooting the operating system itself.
Diagnostics
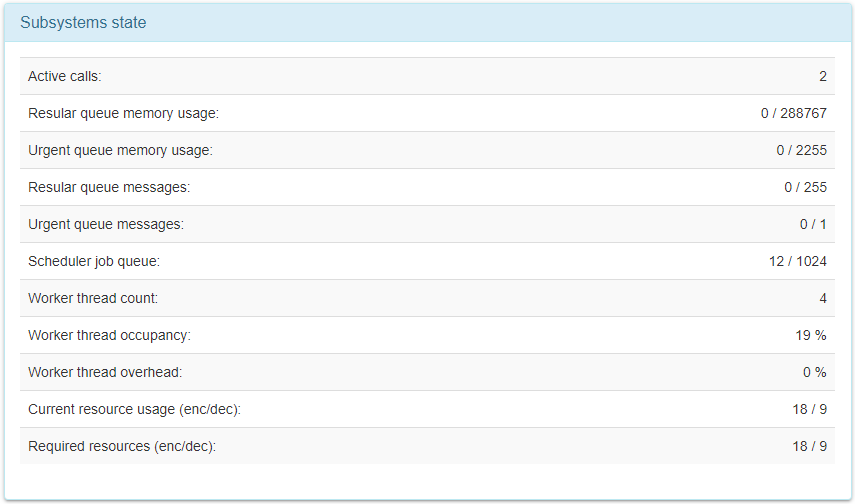
To monitor terminal subsystems in detail and view its log files, go to section Diagnostics.
In the Dashboard tab, detailed statistics of current resource usage are displayed in the CPU, RAM, Network, and Disk widgets of the TrueConf Group terminal:
The System log tab contains terminal log files that should be provided when contacting technical support.
In section Ping, you can check the availability of a specific VCS server via IP and SIP/H.323 protocols. To do this, enter its IP address or DNS name (without protocol specification, for example,
video.company.com) in the Enter an address field and click the Test button: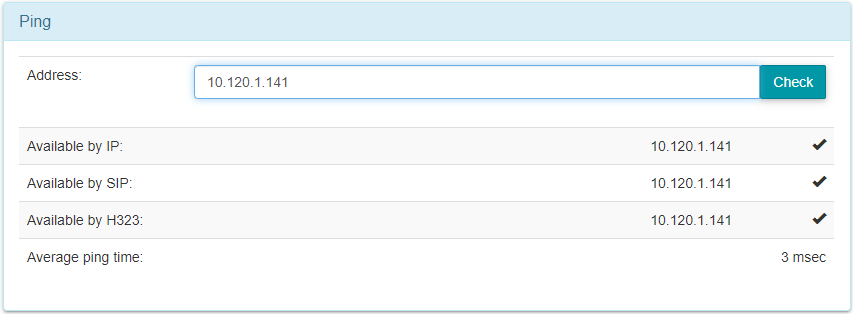
To check the packet route to a specific server or terminal, enter its IP address or DNS name in block Traceroute and click the Test button.
In section Network packet log, you can record and analyze the network traffic passing through the terminal, for example, using Wireshark. You can download the network log by clicking the
 button. Additionally, traffic log files should be provided when contacting technical support.