Configuring Hardware
Configuring Hardware
Select device models from the sections listed below. Their names will appear in the list with a label in square brackets, for example, [USB] TrueConf.
Monitors
The standard version of TrueConf Group supports simultaneous output to two monitors via HDMI and DisplayPort connections. To configure them, go to the Settings → Devices → Monitor section.
If both monitors are connected, select the display from the dropdown list Monitor 1 (Primary) where the terminal's main menu should appear.
If necessary, you can change the resolution of the primary and secondary monitors (in section Monitor 2) using the appropriate options. To select the monitor's operating mode (graphics resolution and frame rate), use option HDMI resolution. This setting will help resolve potential compatibility issues when connecting two monitors with different resolutions. In modes up to UltraHD, the main menu supports background animation on the main screen and background blur when displaying modal windows.
In the Content dropdown list, select what should be displayed on the additional monitor:
- Auto – display a presentation in an active conference, or your own video if the presentation is not available;
- Presentation - shared content;
- Local video - an image from the main terminal camera or a screensaver if the camera is turned off;
- Copy primary - Duplicating the primary monitor's display.
Additionally, using the Detect video outputs function, you can display the names of the video outputs to which monitors are connected on the displays connected to the terminal, such as HDMI-1 and HDMI-2, indicating the primary and secondary monitors respectively.
Section Monitor test allows you to calibrate the colors of connected screens using a special image. The calibration image is displayed only on the primary monitor.
Image Capture
Go to the Settings → Devices → Camera section and configure the PTZ camera settings or other video capture sources:
Select the desired device from the Primary camera list, which may include:
USB-connected camera;
camera connected via HDMI;
NDI stream – all streams found on the local network are displayed (the same ones as in section Contacts → NDI);
RTSP stream - displays the names of contacts from the terminal's local address book that have an RTSP call string specified. If multiple RTSP addresses are specified for a contact, the image is captured from the first one on the list. Thus, to display an image from an RTSP stream instead of a camera, you need to:
create a contact with an RTSP call string;
create a camera from this contact, Settings → Devices → Device management → Add device from address book (RTSP,VNC);
select the device created from the contact as the main camera or for sharing content.
VNC stream – the names of contacts from the address book are displayed if they have a VNC call string. The rendering rules are similar to the rules for RTSP.
If a USB-connected camera is selected, you can:
adjust the brightness, contrast, saturation, and other settings of the captured video. For a detailed description of all parameters, refer to the user documentation TrueConf Group.
specify the Definition used by the camera.
If a PTZ camera is being used, go to Device management and click
 . A window will open where you can:
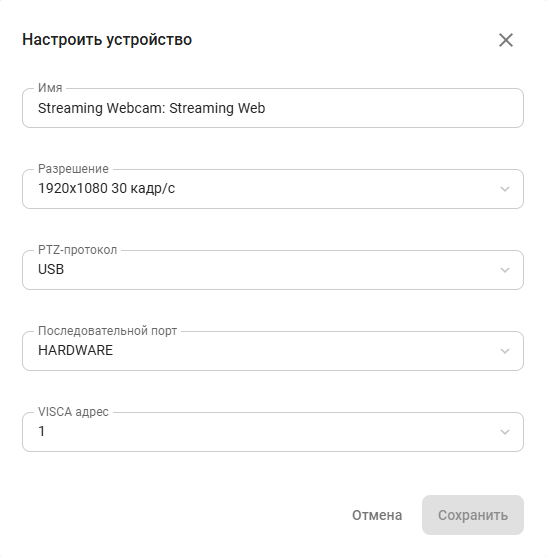
change the camera's display name;
set the image resolution;
select the PTZ protocol to control the camera position based on the connection:
control via RS-232 (Visca, Pelco-P, Pelco-D);
control over LAN (Visca-IP, NDI);
control via USB (UVC).
select the serial port (the HARDWARE port is built into the terminal);
select the VISCA address (the camera's logical address for control via the RS232 port).
In case of camera control via the VISCA, PELCO-P, or PELCO-D protocol, specify IP address.
The terminal supports control of a camera connected to the local network via the VISCA over IP protocol. To send commands to such a camera, enter its IP address in the VISCA IP field. By default, port 52381 is used.
You can connect additional USB to RS-232 adapters to terminal TrueConf Group to control multiple cameras simultaneously using VISCA, PELCO-D, and PELCO-P protocols. They will appear in the ports dropdown list.
Microphone
Go to section Settings → Devices → Audio → Audio settings.
In the Microphone dropdown list, select the interface to which the microphone is connected. Say a few words, and if the equipment is functioning properly and recognized by the terminal, the indicator at the top of the menu will fluctuate depending on the volume of your voice.
To test the microphone's operation, click Start test. Check the volume and quality of the incoming audio signal through the terminal speakers. If the volume settings are not satisfactory (for example, the sound is too low), adjust the microphone volume using the slider at the top of the web panel screen.
Integrated speakerphones come with built-in echo cancellation, so you need to set the software echo cancellation mode to Disabled in the settings when using them. Enabling software echo cancellation on the terminal will be effective when outputting sound to a TV or other external audio devices.
To eliminate echo, select the appropriate Echo cancellation mode:
- 50 Hz filter only - removes low-frequency sounds, such as stomping and banging on the table;
- Half-duplex – effective when the microphone is positioned very close to the speaker;
- Full-Duplex - main operating mode;
- Custom – includes parameters optimized for a specific device.
Enable Microphone gain control for automatic microphone sensitivity adjustment. This setting is available if one of the echo cancellation modes is selected.
When using microphone input gain (AGC), various noise or sound distortions may occur along with the volume. We recommend using this setting only when absolutely necessary.
Additionally, if there is background noise in the room where TrueConf Group is being used, activate Noise suppression to eliminate unwanted noise and improve speech clarity. When using a USB speakerphone, the echo canceller and noise suppression should be turned off, while with an analog microphone, they should be enabled. If a speakerphone is used for capturing sound and an HDMI-connected device (such as TV panel or monitor speakers) is used for output, the hardware echo canceller will not function; instead, a software solution should be used.
Audio settings (noise cancellation, echo cancellation, and volume) are saved for each device individually.
When the Yamaha YVC-1000 speakerphone is used, it needs to be connected to the endpoint only via the USB 3.1 port for proper configuration.
Speakers
In section Settings → Devices → Audio, select the speaker under item Speakers.
You can select the output device HDMI Out, which will allow you to play sound through the built-in speakers of the connected video output device (monitor or TV).
To test the audio playback, click Start test. If the equipment is connected successfully, you should hear a short musical clip.
Tablet
In some configurations, TrueConf Group includes a desktop tablet. The device comes with pre-installed software, and typically, the tablet is already set up and connects automatically. However, if the tablet is replaced, additional steps may be required to link the tablet to the terminal.
To connect a tablet:
Connect the tablet to a power source using the included PoE injector, then use the USB–RJ-45 adapter to connect it to the terminal. A detailed connection diagram is provided here.
On the tablet screen, select your terminal. The address TrueConf Group will appear as: "terminal_address":1337/tablet.
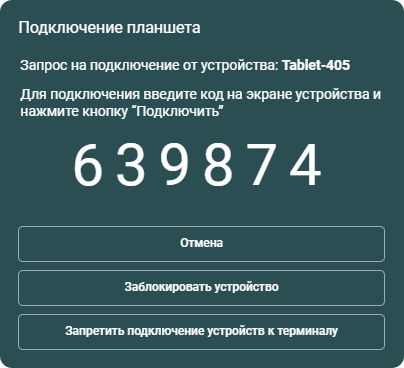
When connecting the tablet for the first time, you need to enter the code displayed on the terminal screen.
After logging in, the tablet displays an interface adapted for touch control.
On the terminal, go to the Settings → Devices → Touchscreen controller section and activate the Prevent connection of devices to the endpoint setting. This setting will help prevent unwanted connections.
Managing Connected Tablets
To manage the tablets connected to the terminal, go to section Settings → Devices → Touchscreen controller.
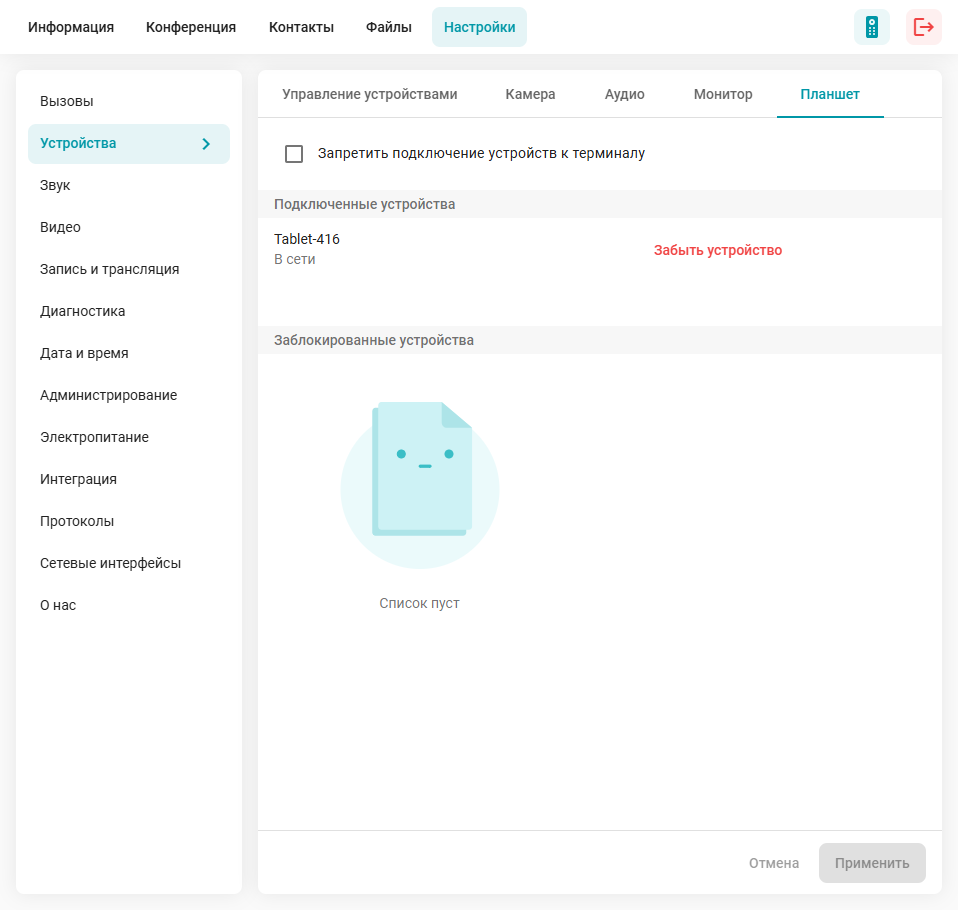
Here you can:
- Prevent connection of devices to the endpoint - The setting applies only to new devices. You can enable this option after connecting all the necessary tablets to prevent unauthorized connections.
View the list of Connected devices – displays a list of all connected tablets. The displayed information includes the device name and the last connection time to the terminal. To disconnect a tablet and reset the binding, click .
View the list of Blocked devices. To block , you can do so during the connection on the screen with the one-time code.