
Terminal management
Terminal management
There are several ways to control the endpoint:
In meeting room:
remote control (the IR receiver is located at the front of the device);
Remotely:
- web interface available to the administrator via the local network.
The remote control is powered by two AAA batteries (included in the package).
Home Screen
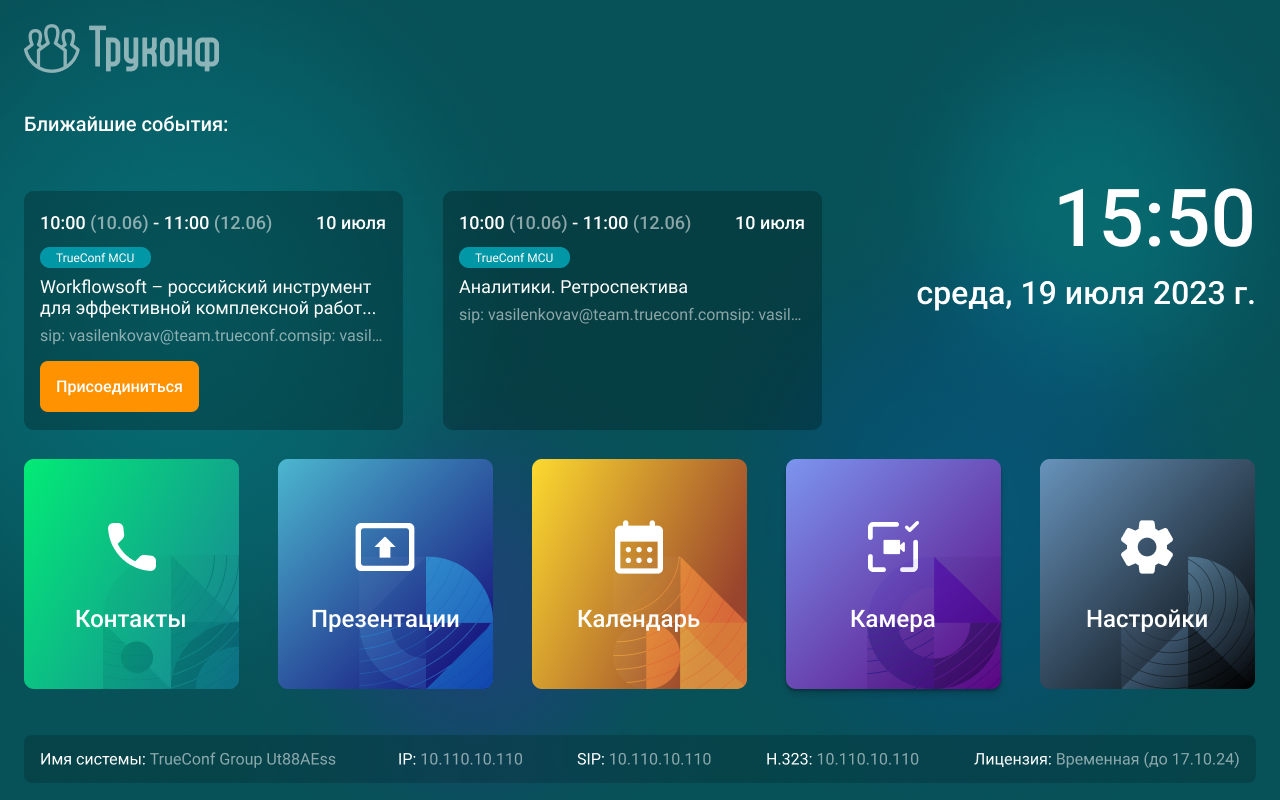
Immediately after turning on, the main screen should appear on the TrueConf Group, containing:
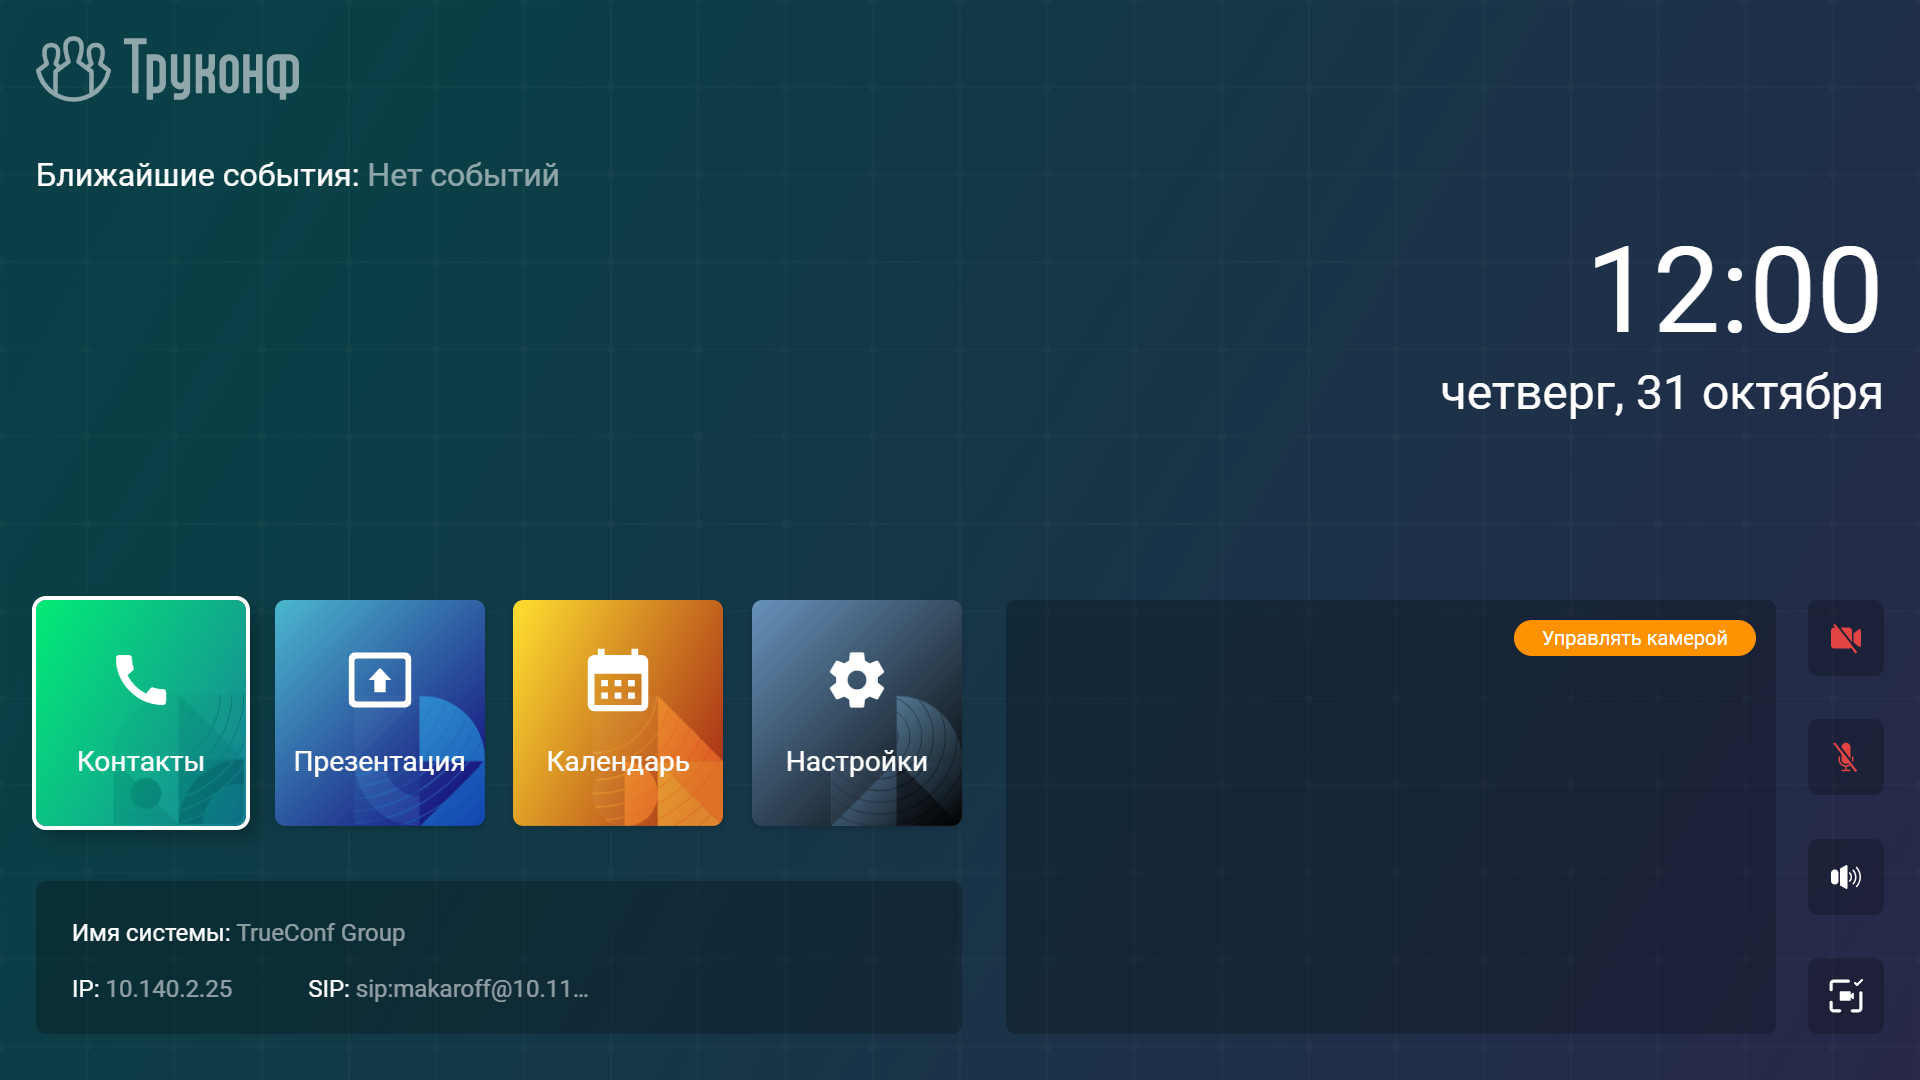
Upcoming scheduled events (4 items). Each event displays: the time, platform (TrueConf Server or TrueConf MCU), title, number of participants, owner's name, protocol, and connection address. To connect, simply click the Connect button. To display event cards, the administrator must configure the integration.
Current time and date.
Main sections of the terminal menu:
- Contacts - address book;
- Presentation - presentation menu where you can view them and add network sources (NDI, RTSP, VNC);
- Calendar - calendar with scheduled events;
- Settings – terminal user settings.
The status of the local network connection (the terminal's IP address if the connection is successful, or the text Network unavailable otherwise), as well as the notification panel with information:
about the system name;
on SIP server registration (configured by the administrator in protocol settings) – if successful, the terminal name on the SIP server will be displayed, for example,
SIP: meeting-room; otherwise, an error code, such asSIP: 401 Unauthorized, will be shown;about registration on the H.323 gatekeeper (configured by the administrator in protocol settings) – if successful, the terminal name will be displayed on the H.323 gatekeeper, for example,
H323: meeting-room, otherwise an error code will be shown, such asH323: TransportError.
Image from your camera. After selecting this window using the arrow keys on the remote control (the window will be highlighted with a white border), press OK to open a screen where you can:
control your camera's position;
select angle;
create a view;
control devices: select resolution, PTZ protocol, and other parameters;
Go to recordings and broadcasts.
Equipment status control buttons:
 - disabling the camera selected as the main one;
 - muting the microphone;
 - muting the terminal;
 – selecting the PTZ camera angle.
To navigate to a specific component (button or section) of the main menu, use the arrow keys on the remote control to select it (the window will be highlighted with a white frame) and press OK.
To select an item from the dropdown list or start typing text, you also need to move the focus to the corresponding element and press OK.
To enter text, you can also use the on-screen keyboard. To bring up the on-screen keyboard, focus on the field and press the button OK on the remote.
Tablet screen
The tablet interface provides the most convenient and fast way to interact with the terminal. It allows you to manage the course of the conference and the settings of TrueConf Group. Instructions on how to connect a tablet are provided in the relevant section of the administrator's documentation.
To control peripherals, tap  at the bottom of the tablet screen. This will bring up a panel where you can manage:
Camera – click to enable/disable.
Microphone – click to enable/disable.
Speakers – click to adjust the volume.
With a tablet, you can control camera angles. To do this:
On the main screen, press the Camera button.
Click the Position management button.
Click on Create new position.
In the opened form, fill in the fields:
- Name – name the angle as you prefer, or leave it blank.
- Quick number - assign to one of the dial numbers, from 0 to 9.
- Preview - a toggle responsible for enabling the preview.
Verify the entered values and press Save.
The created view will appear in the list, and by clicking on it, you can:
Rename the view in field Name.
Change the speed dial number in the dropdown list Quick number.
Modify preview availability.
Save the changes made.
Delete the view with no possibility of recovery.
During a call, the following controls are available to you:
- Presentation - selecting a device or file for content streaming.
- Layout - changing the current video layout.
- DTMF - enter DTMF commands.
- More – includes additional call management options:
- Select – select a camera angle from the existing ones.
- Selfview - enable/disable the display of your video.
- Videostream management – Control of the selected video stream: your own camera, your presentation, or a remote participant's camera.
- Priority participant - Assigning the selected conference participant as a priority.
- Participants – display of the participant list in a conference and the ability to add new ones.
- Device control - management of connected devices.
- Record and translation – conference recording or streaming via one of the available protocols: RTMP, SAP, NDI.
- Connection information – display of information about signaling, video, and audio streams for transmission and reception.
- Settings - displaying the codec settings interface.
Remote Control Keys
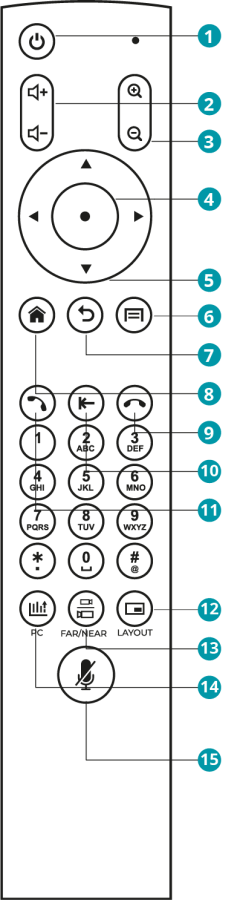
The remote control has the following keys:
| Keys | Description |
|---|---|
 | Terminal shutdown |
 | Adjusting the speaker volume level on the terminal |
 | Zoom buttons while controlling a PTZ camera or presenting slides |
 | The center key of the navigation block (hereinafter referred to as the button): presses the on-screen button that is in focus and expands the on-screen list that is in focus. |
 | Arrow keys: in the menu – navigate between interface elements; during a call or conference – control the PTZ camera. |
 | Navigate to the main menu |
 | Return key: when navigating the menu, it takes you to the previous section and hides the menu when at the topmost section; during a group conference or call, it ends the communication session. |
 | Depending on the context of use: in the main menu, it navigates to the settings section; during a video call session, it opens the contextual management menu. |
 | Call button: when navigating to the address book or call history, it dials the selected contact; in the main menu, it opens the address book. |
 | When entering characters or using the on-screen keyboard, deletes the last entered character. |
 | Reset key: during a call with a single participant, it ends the call; during a group conference, it allows you to select and terminate one of the connections; when navigating the menu, it returns to the previous section and hides the menu when in the top section. |
 | Source selection. Depending on the type of connected source (external device or flash drive), the corresponding window will open. |
 | During a call, it switches the function of control buttons (arrows and zoom buttons) between different content sources: your PTZ camera, the participant's PTZ camera, and the shared presentation. |
 | Switching the video layout during a conference |
 | Muting the microphone (an icon will appear at the bottom of the screen) |
The web interface also features an on-screen control panel that fully replicates the functionality described above.