# Settings
This section will cover the terminal settings that are accessible to the user without entering a PIN code.
The administrator of can restrict access to advanced settings using a PIN code.
# Information
To view detailed information about the terminal, navigate to the section:
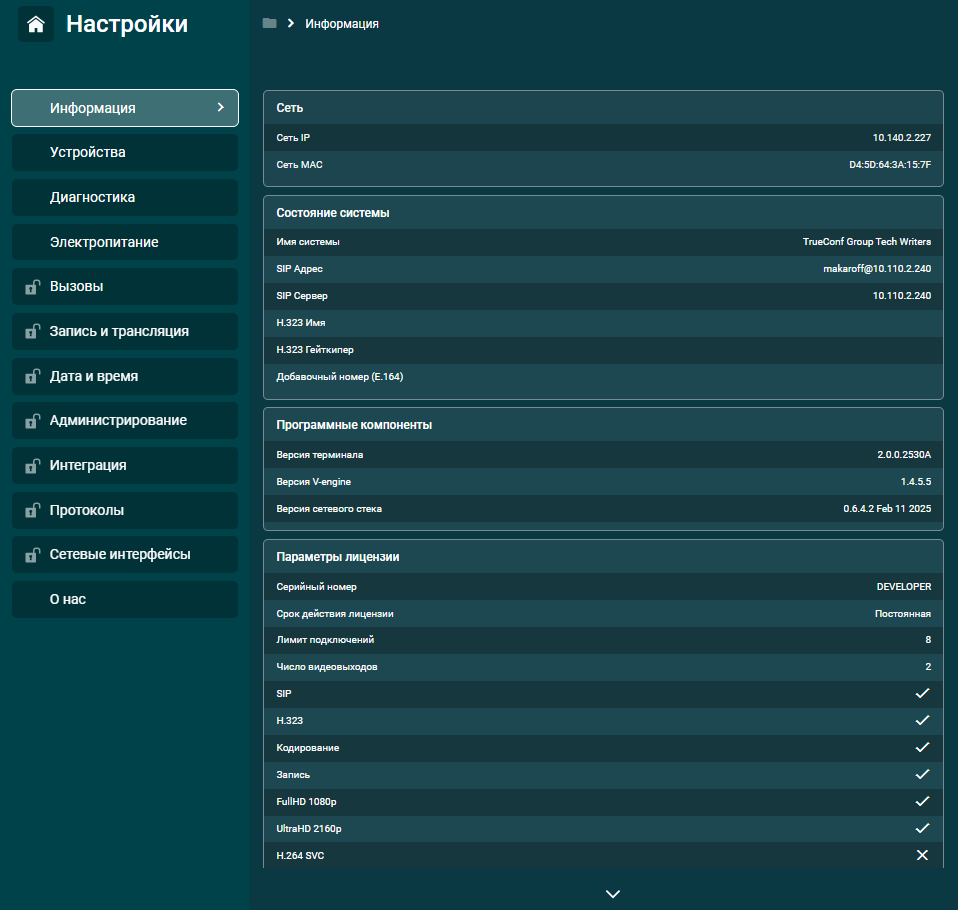
network address;
system status;
version of software components;
license parameters;
integration status with TrueConf MCU, TrueConf Server, AD/LDAP, and Email.
# Devices
# Audio settings
Go to the Devices → Sound → Sound settings section to change the microphone and speaker settings.
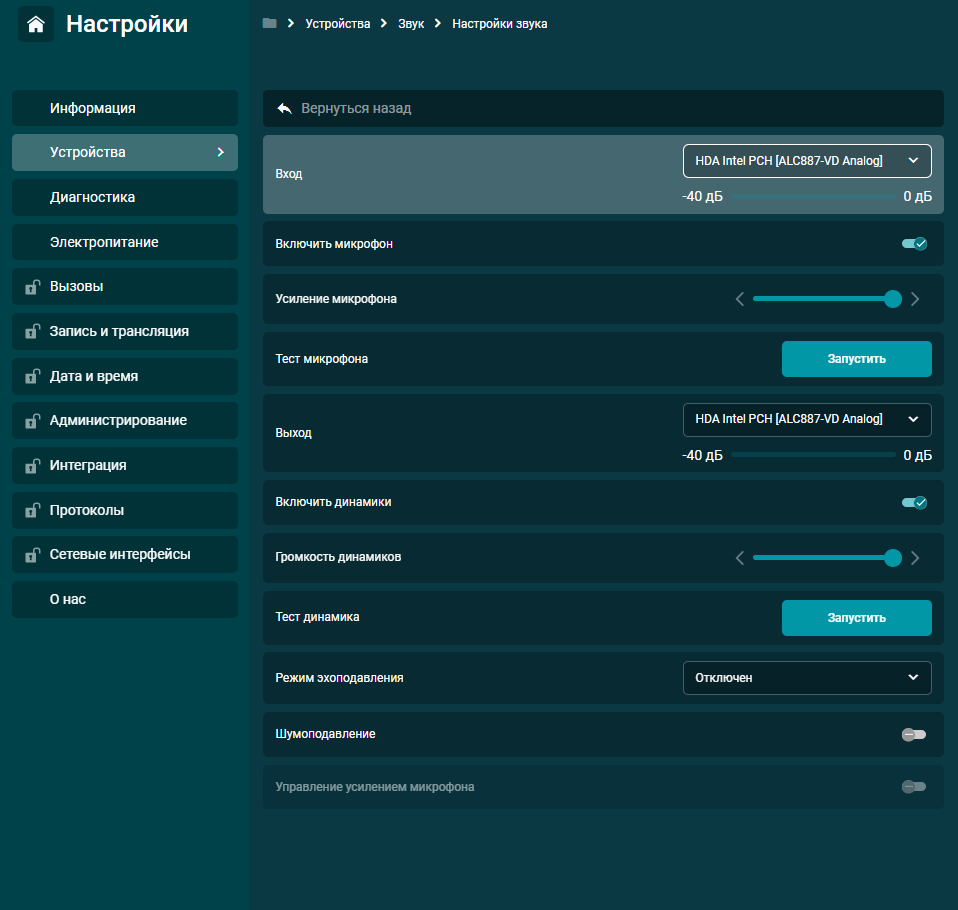
For the microphone, you can:
select Login;
enable or disable it;
adjust microphone gain;
conduct a microphone test.
And for speakers, you can:
select Exit;
enable or disable audio sources;
adjust the volume;
conduct audio testing;
set the echo cancellation mode – Only 50 Hz filter, Half-duplex, Duplex, and Custom;
Complete speakerphones come with built-in echo cancellation, so when using them, you should set the software echo cancellation mode to in the settings.
activate the Noise Suppression mode;
Enable Microphone Gain Control (the system automatically adjusts the microphone gain). This setting is available if one of the echo cancellation modes is selected.
When enabling echo cancellation, select the appropriate mode:
Only 50Hz filter – eliminates low-frequency noises, such as stomping and table thumps;
Half-duplex – effective when the microphone is positioned very close to the speaker;
Duplex – the primary operating mode;
Custom – includes settings optimized for a specific device.
Enabling software echo cancellation is effective when outputting audio to a TV or external speakers.
# Video Settings
Go to the section, which allows you to set image capture parameters and display it on one or more screens.
# Main camera
In the section, you can select the camera you want to use. A list of all available cameras connected via USB, HDMI, VNC, RTSP, and NDI is displayed here.
By enabling the Auto-framing option, the image from your camera will be automatically cropped to keep you always in focus.
Face detection marks all people in the frame with a colored box.
In the Device Management section, you can add RTSP and VNC sources from the address book. These sources can then be used as your camera.
# Monitor Management
In this section, you can configure the connected screens.

If your setup uses two screens, you can choose which one will be used as the main or additional screen.
In the HDMI Mode section, you can set the resolution and frame rate for the terminal's display interface.
The Rendering resolution option is responsible for the resolution of the layout in calls (Auto, FullHD 1080p, and UltraHD 2160p).
The UltraHD 2160p resolution for video layout in calls is not available in all configurations. When displaying the layout on 2 monitors, the rendering resolution of each layout is limited to FullHD 1080p.
Below, you can Specify video outputs and perform a Monitor test (useful for screen calibration).
# Video Layout
Here you can configure the video layout in calls.
By default, the Hide self-view option is enabled. Disable it to see your self-view in the video layout.
To display microphone sensitivity in the participant windows, activate Show volume indicators.

Scaling mode – the video window cropping mode for participants. Available options:
Auto – depending on the participants' video, the terminal automatically selects the framing mode;
By video size – participant video windows are fully displayed in the video layout;

Fit to window – participant video windows are adjusted to fit the width of your screen.

If you activate the option Use overlay mode, participant videos will be displayed over the priority video window.

Below is the Overlap Ratio setting, which adjusts the distance between video windows. Here is how the layout looks with a 25% overlap:

# Camera image
This section allows you to configure the image from your camera. You can edit:
Brightness – camera image brightness;
Contrast – camera image contrast;
Auto exposure – this parameter affects the automatic exposure settings of the camera image:
- Aperture Priority Mode – a mode for automatic exposure control;
- Manual mode – independent configuration of camera exposure settings.
Saturation – the level of saturation in the camera images;
Exposure Time, Absolute – this parameter affects the settings for the maximum exposure time in the camera image;
Hue – this parameter affects the camera image hue settings. It will be adjustable if Manual mode is selected in the Auto exposure settings;
White Balance, Automatic – automatic white balance;
Focus, Automatic – automatic focusing;
Gamma – overall image gamma;
Gain – this parameter affects the gain (sensitivity) settings in the camera image;
Power Line Frequency – allows the camera to synchronize its image capture frequency with the power supply frequency. Available options are: 50 Hz, 60 Hz, and off;
White Balance Temperature – this parameter affects the white balance temperature settings in the image. The setting is available if the Off mode is selected in the White Balance, Automatic section.
Sharpness – adjusts the clarity in the camera image;
Backlight Compensation – adjusts the backlighting in the image;
Focus, Absolute – camera image focus settings. This parameter can be configured if the Off mode is selected in the Focus, Automatic section.
Additionally, for PTZ cameras, the following settings are available:
Pan, Absolute – PTZ camera rotation setting. This parameter can be configured if the Off mode is selected in the Focus, Automatic section.
Tilt, Absolute – PTZ camera tilt setting. This parameter can be adjusted if the Off mode is selected in the Focus, Automatic section;
Zoom, Absolute – this parameter affects the zoom settings of the camera image. It can be adjusted if the Off mode is selected in the Focus, Automatic section;
Zoom, Continuous – this parameter affects the speed of continuous zoom. You can adjust this parameter if the Off mode is selected in the Focus, Automatic section;
Iris, Absolute – this parameter affects the settings for the maximum amount of light reaching the camera sensor. It can be adjusted if the Off mode is selected under Focus, Automatic.
Pan, Speed – this parameter affects the pan speed settings of the camera image. It can be adjusted if the Off mode is selected in the Focus, Automatic section. The more the slider is moved to the right and the higher the number, the faster the speed.
Tilt, Speed – this parameter affects the tilt speed settings in the camera image. You can adjust it if the Off mode is selected in the Focus, Automatic section. The further to the right the slider and the higher the number, the faster the speed.
# Presentation
In this section, you can add RTSP and VNC sources for presentations. The process for adding presentation sources is described in the relevant section of the documentation.
# Diagnosis
This settings section is designed for monitoring the operation of TrueConf Group and its network connection.
# System Monitoring
This section allows you to monitor the key parameters of system performance in real-time: RAM and storage usage, as well as network and CPU loads.

# System log
Here you can export detailed logs of events, processes, and errors occurring in the system to a USB drive. Refer to this section if you encounter issues while operating the terminal. We recommend leaving this procedure to your administrator.
# Ping
This section is designed to test and determine the connection latency to servers, routers, and other devices. Enter the required IP address and click the Check button. Detailed information will then be displayed.

# Tracing
If you need to trace the route of packets from your device to the target node, use the built-in Trace Route tool. Enter the required IP address and click the button.
# Network Packet Log
The network packet log allows you to record network traffic passing through TrueConf Group. Only an administrator can download and view the records using the control panel, and downloading to an external USB drive is also available.
Traffic log files must be provided if you contact technical support.
# Power Supply
In the section, you can:

Enter Sleep Mode. Your administrator can configure the sleep mode, for example, to activate it by pressing the power button;
Turn off the terminal;
Reboot OS. After pressing, the operating system and the terminal's visual interface (VCS) will reboot.
Restart VCS Pressing this will quickly restart the terminal's application software.