Managing the Address Book
Managing the Address Book
The terminal TrueConf Group supports working with the address book for convenient calling. It also supports group division within the list and a shared address space TrueConf Server, TrueConf MCU, and H.350 LDAP.
Address Book Sections
To configure the contact list on the main screen, select Contacts or press the button  on the remote control.

The address book can have multiple lists of users:
- Favorites – contacts added to local and marked with the corresponding
 button in the contact editing window;
 - Recent - terminal call history, where contacts of any of the types described below are listed;
- Local - a local list stored on the terminal;
- NDI – NDI streams available on the local network are automatically searched in the background;
- TrueConf MCU – contacts imported from TrueConf MCU during integration with it;
- LDAP – when integrating with the LDAP service;
- TrueConf Server – contacts from TrueConf Server when integrated with it;
- TrueConf Group – other terminals TrueConf Group available on the local network. When this option is selected, they are automatically detected. The terminal name is set by the administrator in the field.
Switching view and calling a contact
Any list can be shared (default view), and additionally, the Local tab supports grouping. To switch to the grouped view, click Groups below the search field. To switch back to the shared list, press the same button. You can navigate to contacts in any group by clicking the button OK.
To call a subscriber, select them from the appropriate list (and group if necessary) and press  or the call button on the remote control. If the list contains many users, start typing the desired name at the top, and the list will automatically filter. When making a call, the port for each protocol is automatically added if it is not explicitly specified in the call string.
Editing the list
In the local address list, one can add a new contact or edit the contact that had been saved previously.

To edit, click the appropriate button after selecting a contact. The contact card will open:
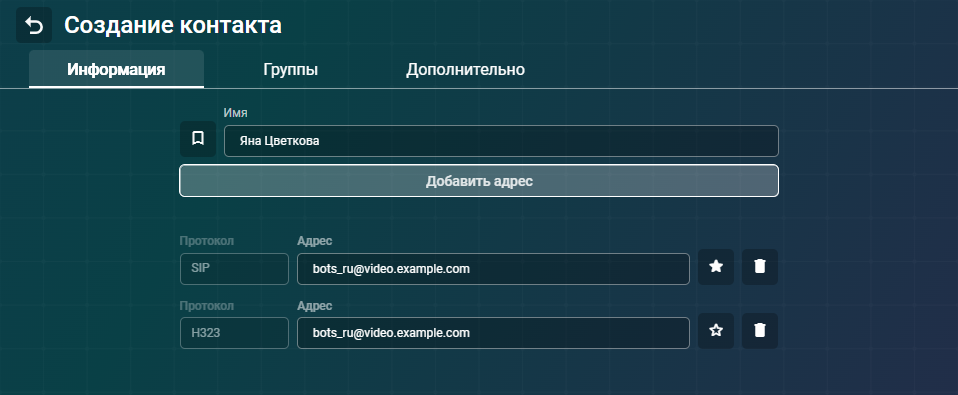
You can change its name; specify a SIP, H.323, RTSP, VNC, or NDI address; and set a bitrate limit for communication with it. You can assign up to 5 addresses for each user, and the protocols may be repeated. You can mark any address by clicking the  button, making it the priority address for calls to the user.
To add a new contact to the list, click the Create contact button below the search field.
Call History
In section Recent, a list of completed calls is displayed, which includes:
Username
call details: incoming
 , outgoing
  , missed
  , and call status:
- Canceled – you declined the outgoing call before the interlocutor accepted it;
- Decline – the subscriber you called declined the call;
- Disconnect — The call was successfully completed, and the participant disconnected from the call.
- Missed - you did not answer the incoming call within the allotted time;
- Busy - during an outgoing call, the subscriber is already on another call;
- No reply - during an outgoing call, the recipient did not answer within the allotted time;
- Unknown - An error occurred during the outgoing call, and the subscriber could not be reached.
Time (for today's calls) and date (for earlier calls).
To call a subscriber, select them from the list and press or the call button on the remote control.
You can attach the address of a subscriber from the history to a contact in the local address book by clicking the Add to contact button and selecting the desired item from the list. If the subscriber is not among the local contacts, you can add them by clicking Create.