Conference scheduling
Scheduling Conferences
To enable you to create conferences, the administrator must grant you the appropriate permissions.
If your company uses synchronization with Microsoft Exchange corporate email (you create events through Outlook), you can create a calendar event instead of creating a conference. If needed, a conference can be added to it TrueConf.
Creating a conference without Outlook calendar integration
To create a conference on the main page of your personal area, click New conference or New room.
The event creation window will open on tab General.
Click Continue or select the template to access the main settings.
Tab "Main"
The General tab at the top includes the parameters required to create a conference, as well as a range of other settings:
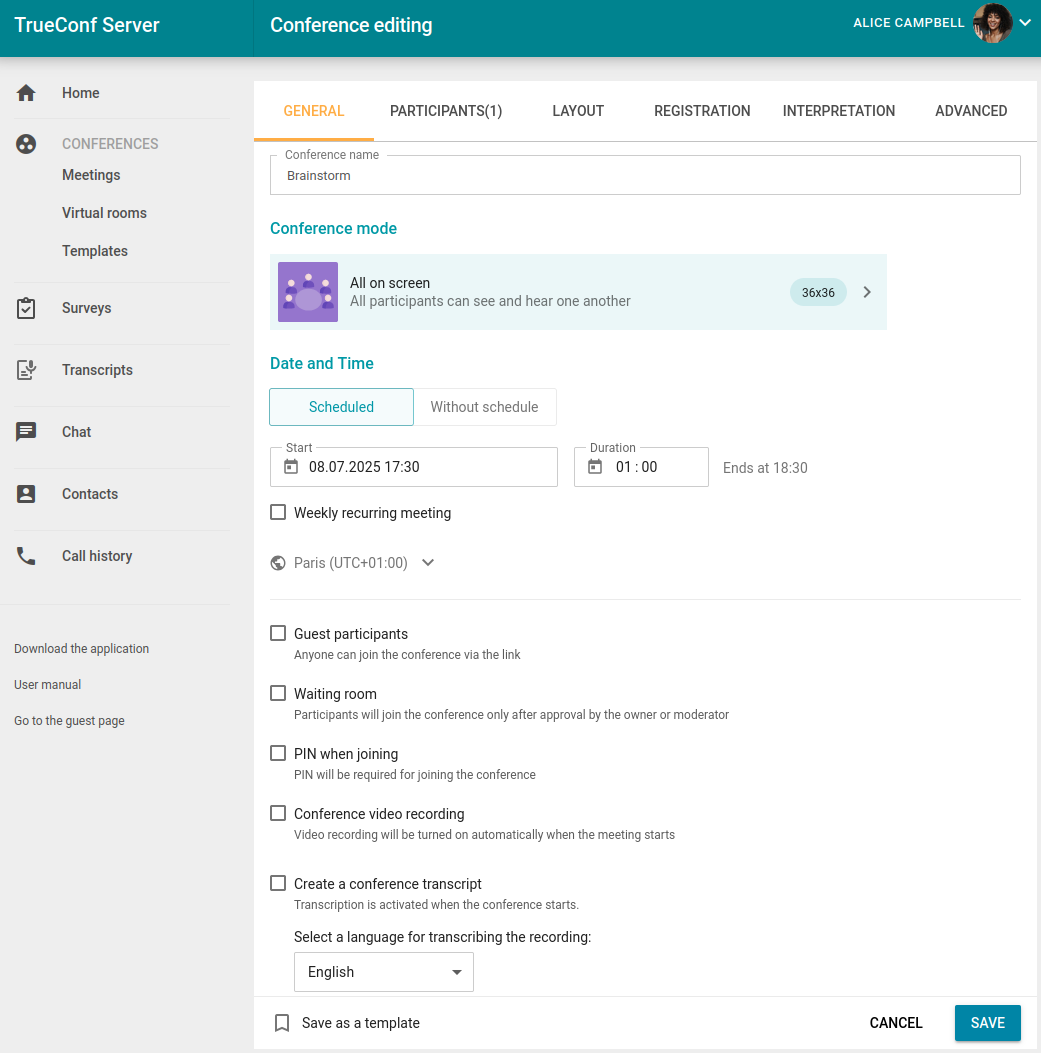
conference name;
mode (by default, Smart meeting is selected);
For moderated role-based conference and smart meeting, you can specify the number of speakers;
- conference launch type: scheduled (planned) or unscheduled (virtual room);
Start date, time, and recurrence (if necessary) for a scheduled conference
The checkbox Guest participants makes the conference public, allowing not only server (or federation) users to join, but also guests without authentication.
You can enable a waiting room for the event. You will then be able to select the participant category that will be placed there (see below);
Using a PIN code enhances conference security: even if someone has the link, unauthorized participants cannot join. When this option is enabled, a password is generated automatically, but it can be manually changed. PIN protection is not available if registration for a public conference (webinar) is enabled.
conference recording (available only if your TrueConf Server administrator has granted access to this feature);
If your TrueConf Server is integrated with the TrueConf AI Server solution, you will be able to override certain settings for a specific conference:
Using the checkbox Create a conference transcript, you can save the audio track of this event for AI processing (if allowed by the general settings of your video conferencing server);
select the main language spoken by conference participants which will help the AI server in difficult speech recognition situations. Although the language is determined automatically, there are languages which are similar in terms of pronunciation, and under such circumstances, it may be helpful to choose the main conference language.
To create conferences with the same settings in one click in the future, check the Save as template box.
Selecting participants to send to the waiting room
The selection of categories for placement in the waiting room is not available when registration is activated for a public conference (webinar). In this case, when the waiting room is activated, all participants except the owner and moderators will be placed there.
In all cases, SIP/H.323/RTSP connections are considered participants from other servers. For instance, if a terminal calls into a conference or is invited, it enters the waiting room unless the settings are configured to Guests only for a webinar.
Categories that can be selected for public conferences
- All participants (except the owner and moderators) – all participants except for the moderators and the owner will be placed in the waiting room, including registered participants;
- Uninvited participants and guests (selected by default) – the following will enter the waiting room:
all users from your server, who were not invited in advance before the start of the conference and are now calling the conference/owner or are invited after the start of the event
all users from a federated server who were not invited in advance before the start of the conference
all guests.
The following participants will not be moved to the waiting room:
users from your server who were invited in advance before the start of the conference
users from a federated server who were invited in advance before the start of the conference
users who signed up for the event (since they have already been added to the list of invited participants)
users from your server and federated server who were invited in advance, but did not join when the conference started and are now trying to join during a conference or receive another invitation call.
- Uninvited participants from other servers and guests Only guests (except those who have registered) and not pre-invited users of the federated server are placed in the waiting room.
- Guests only Only guests (excluding those who have registered) are placed in the waiting room.
Categories that can be selected for private conferences (the rules are similar to the ones set for webinars except guests and unregistered participants):
- All participants (except the owner and moderators);
- Uninvited participants (selected by default);
- Uninvited participants from other servers.
Participants Tab
Go to the Participants tab and add users to the conference using one of the following methods:
from the address book
according to his TrueConf ID
specifying the call string for a SIP/H.323 or RTSP device
By email (only for public conferences).
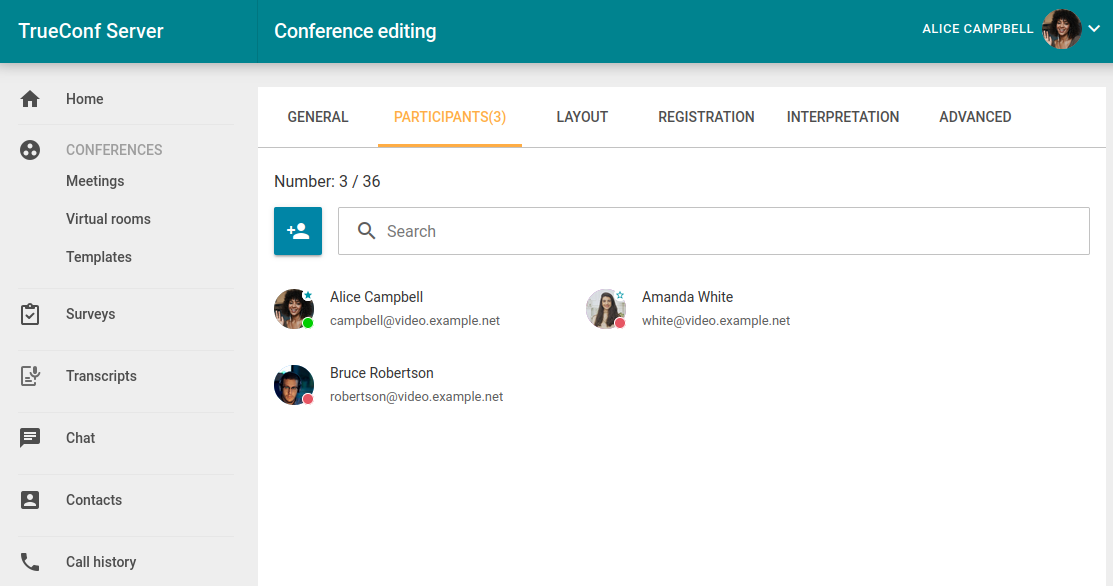
You can immediately grant moderator rights to some of the invited participants. To do this, click the button with three dots next to the desired participant and select Assign as a moderator.
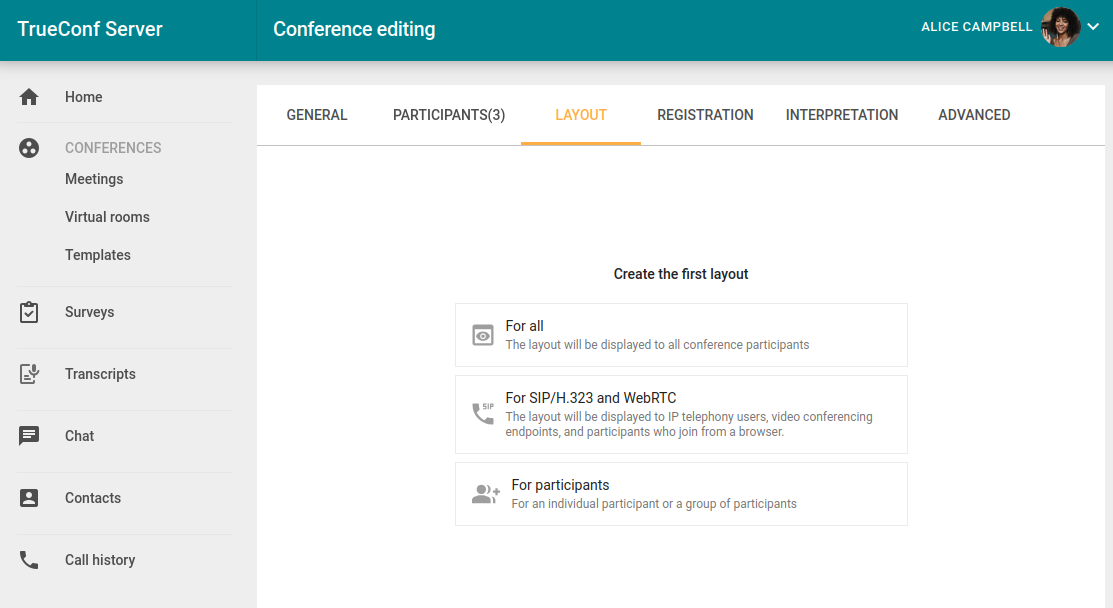
Tab "Video Layout"
We recommend familiarizing yourself with how video layouts work in TrueConf in the relevant section beforehand.
On the Layout tab, you can select the default video layout for all conference participants (including by groups based on connection type) or individually for each participant.
You can create multiple video layouts for each type (e.g., for SIP/H.323/browsers) and switch between them on the fly during a conference. To create the first layout, select its type from the list below:
To set a layout:
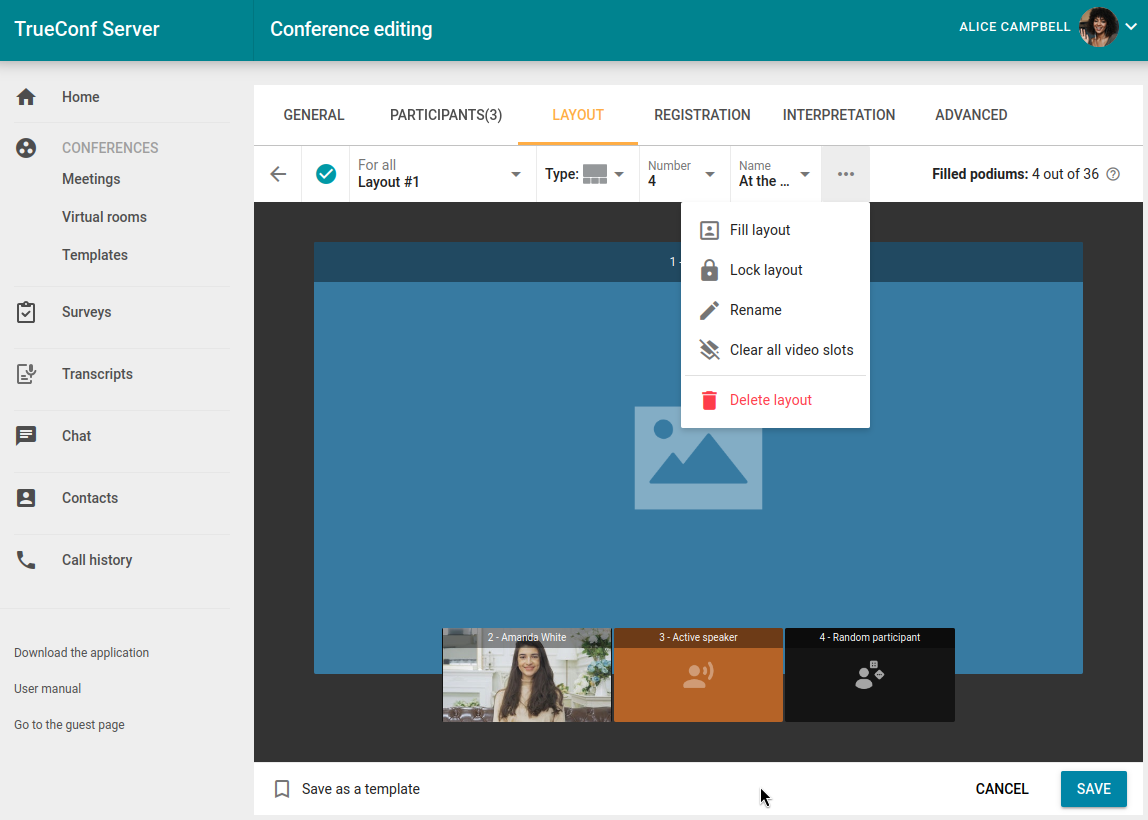
Edit the conference video layout. You can move a participant's video window and also set it as the priority by double-clicking on it. When you click on any video window, you can select its type: Fixed, Random, Time-based shuffling, Active speaker, Content.
If the checkbox
 at the top of the editor (or checkbox
  in the general list) is selected, this video layout will be used as the default at the start of the conference (this is automatically set for the first layout in each category). Click this checkbox to disable the activation of the layout at the beginning of the event.
You can add a new video layout directly from the editor by clicking on the dropdown menu with the layout name and selecting Add layout.
In the Type dropdown list, select the arrangement of video windows in the video layout.
In the dropdown list Number, select the number of video windows in the video layout.
In the dropdown list Name, specify the position of the username in the video window.
Click the
 button to proceed to the following items:
- Fill layout — allows for the automatic filling of slots in the video layout with invited participants; you need to clear the layout before use.
- Lock layout — in this case, participants will be forced to use this video layout when it is activated during the conference and will not be able to customize it locally on their own. This is especially useful for connections using third-party SIP/H.323 protocols, as terminals often have fewer options for managing slots;
- Rename — specify a name for the video layout (up to 70 characters) to quickly find it in the general list;
- Clear all video slots — completely clear the video layout to start filling it again;
- Delete layout — deleting this video layout, if it was set as the main layout for its category (for example, for all), another layout will not automatically become the main one upon deletion, and you will need to assign a new main layout manually.
If you have previously created video layouts for a conference, you will see their list:
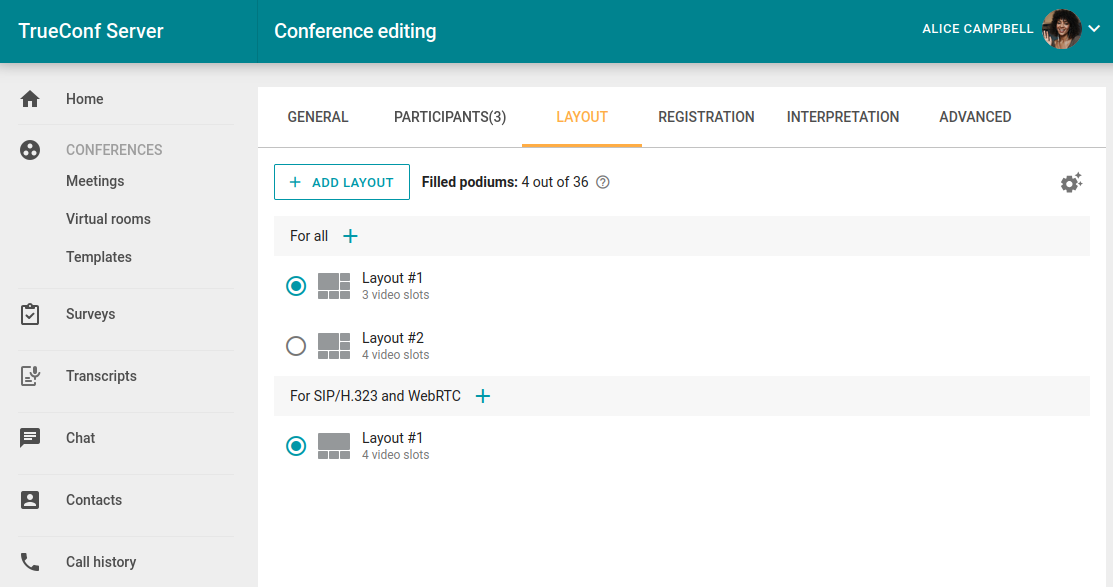
The toggle on the left side of the layout name is needed to select the layout which will be used by default for each type of participants when the conference starts.
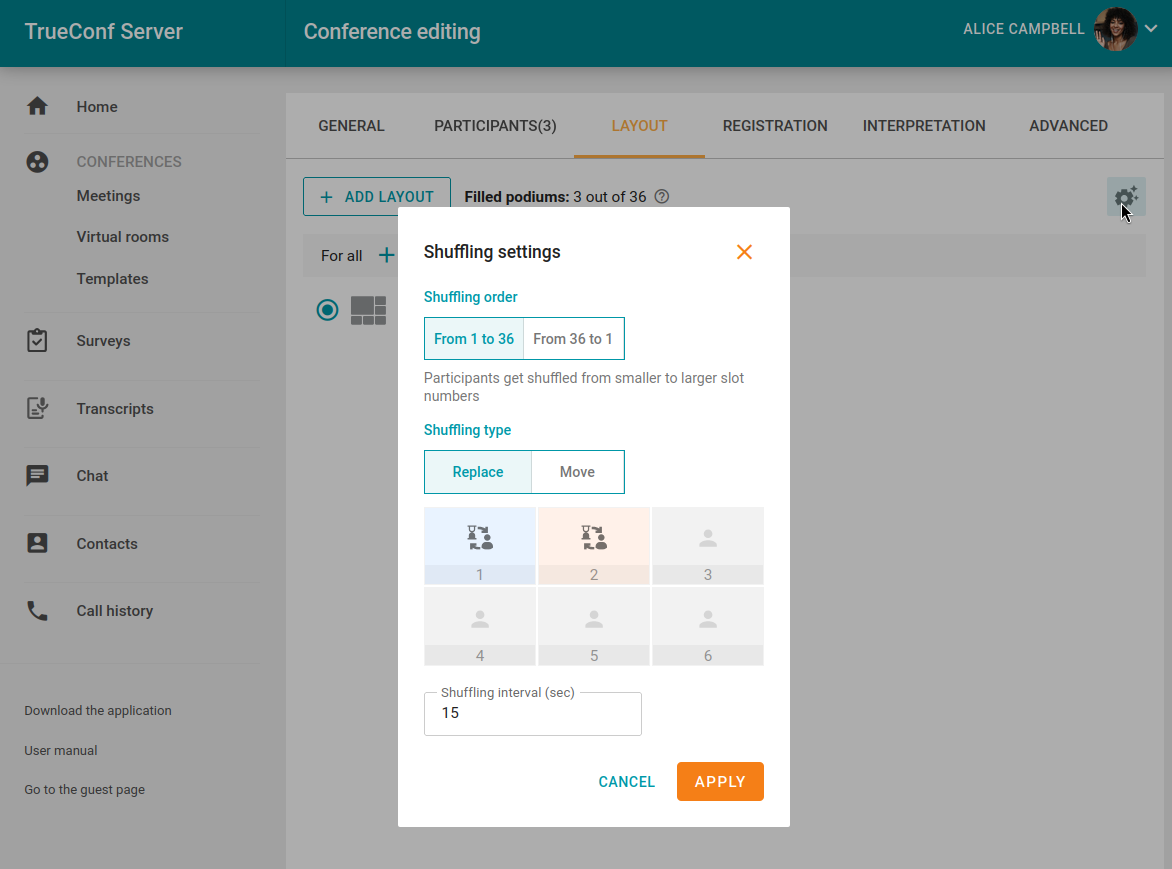
In the general list of video layouts for the conference, you can configure the display settings for video windows of type Time-based shuffling. To do this, click the  button in the upper right corner of the list. These settings apply to all windows of this type across all layouts within a specific conference. You can select the order of participants from the list of those not included in the layout, the type of alternation, and the speed of participant switching:
Interpretation Tab
If the event involves participants from different language groups and designated interpreters for translating speeches into other languages, check the box on the Interpretation tab Language interpretation mode. When recording a conference with simultaneous interpretation, multiple audio tracks will be created: a main track and separate tracks for each language that was set up for translation.
Each participant can select in the client application or in the browser (depending on how they are connected) the language in which to listen to the speaker's presentation. The number of interpreters is limited only by the number of participants.
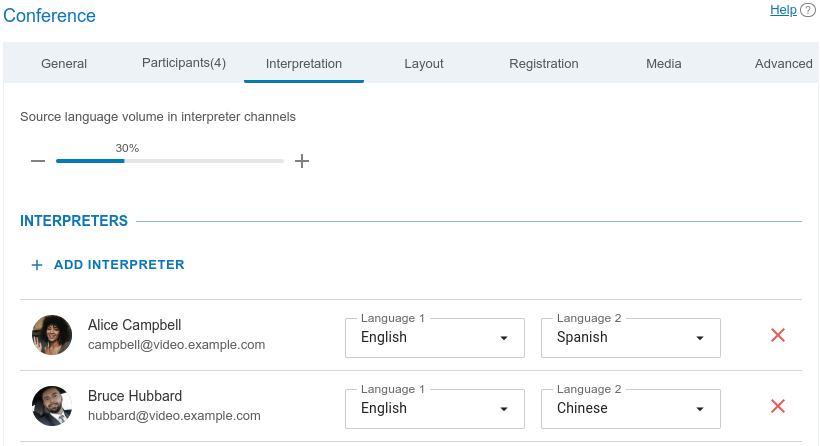
Interpreters are selected from the previously specified event participants (including from another server with which federation is configured) or from the list of already registered guests in case of a scheduled webinar with registration. Simply click the Add interpreter button and select the language pair for translation. In the example below, several pairs are chosen: English - Russian, Russian - English, Korean - Russian. During the event, the interpreter will be able to change the translation direction in the TrueConf application.
In this way, you can select several interpreters. This includes the cases when interpreters work on the same language pair (for example, one of the interpreters may rest, while the second one continues working).
At any given time, only one person can translate from one language to another. For instance, only one user will be able to translate from English to Hindi; however, the second interpreter will be able to translate from Hindi to English.
In interpreter channels participants will be able to hear the original presentation: its volume level will be set at 30 % by default. However, you will be able to reduce the volume level to 0 % (i.e. mute it).
The option for "daisy-chain" translation is also available and is explained in more detail in the client application documentation.
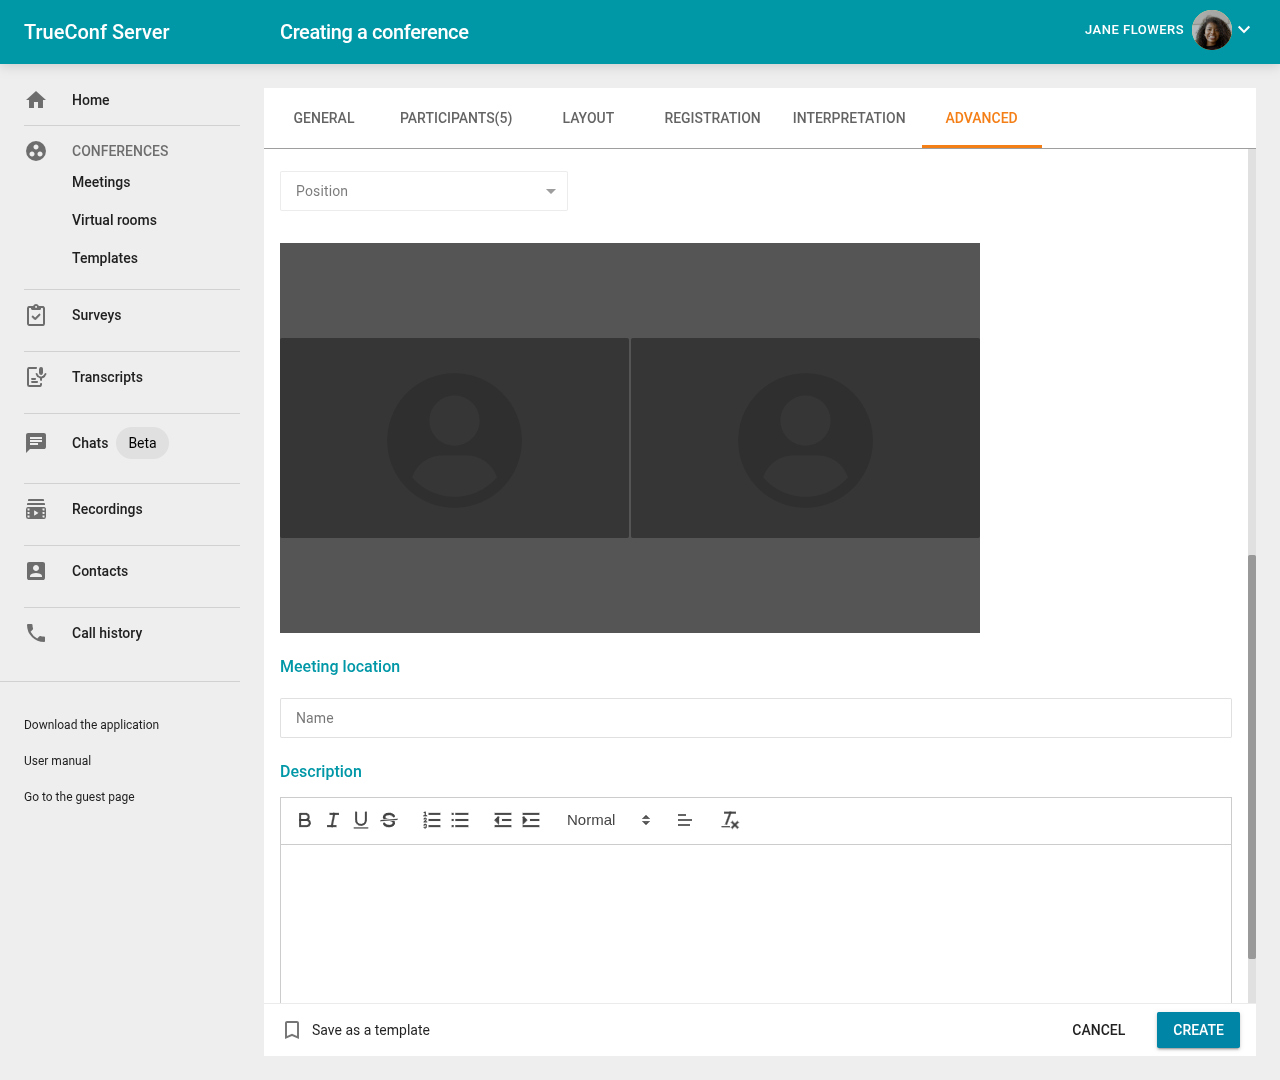
The "Advanced" tab
In the Additional tab, configure the following settings:
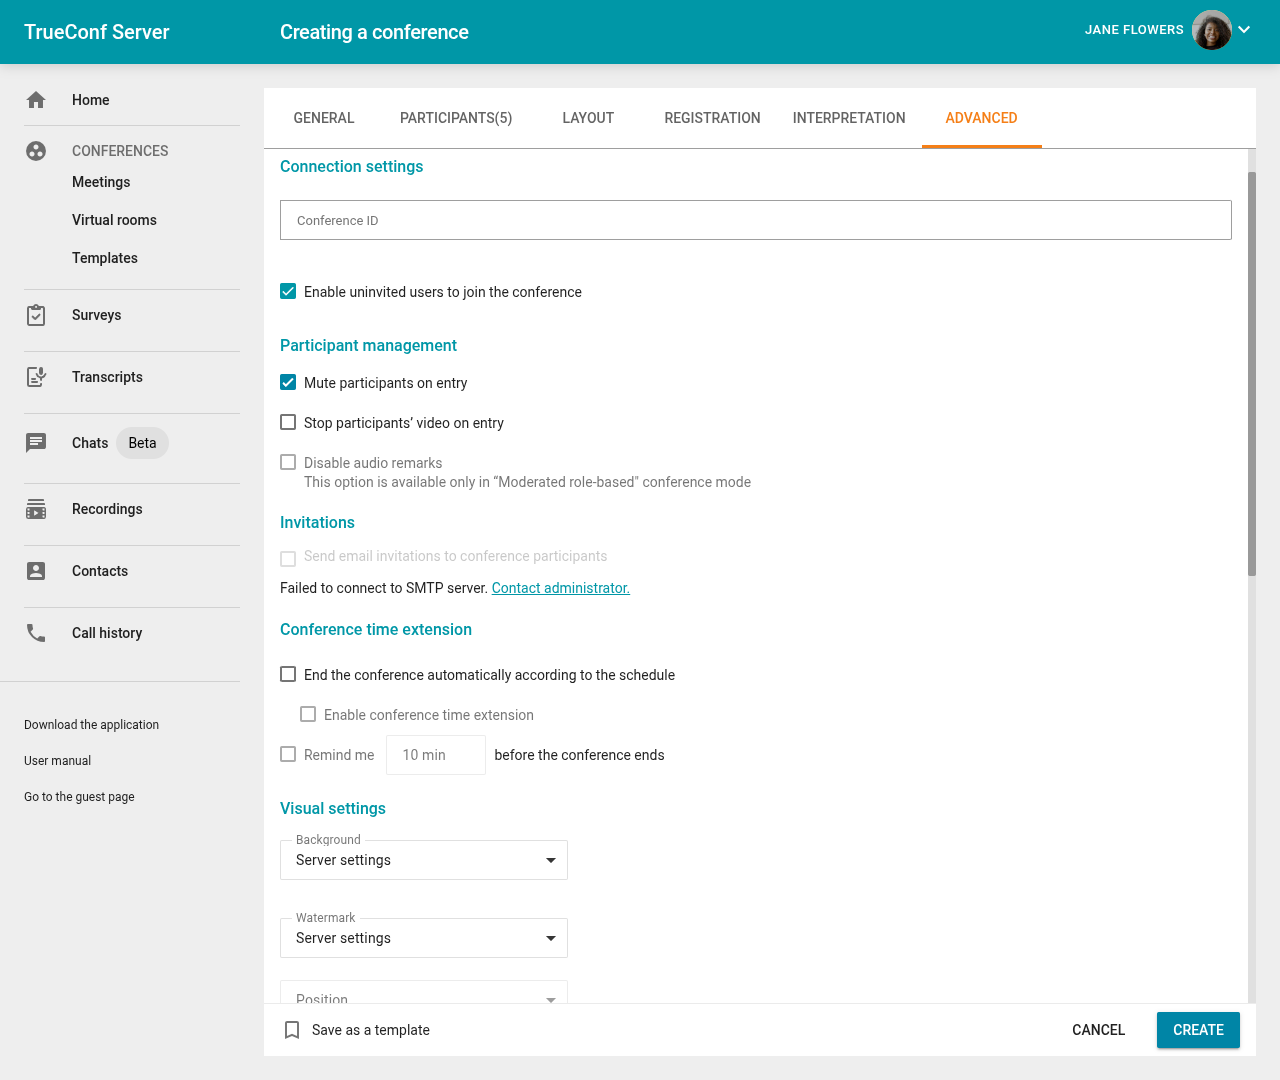
- Conference ID;
ability to join a conference without an invitation (for internal conferences only);
Settings for automatically turning off participants’ cameras and microphones when they join the conference
Disable audio remarks in a moderated role-based conference
permissions for guest participants (only for a public conference);
Restriction on the number of guest participants (available only for public conferences); by default, unauthorized users can join the event up until the moment when the licence limit for guest connections is reached
Sending email invitations to participants
By default, a scheduled conference will not automatically end if the allocated time runs out. However, you can enable event termination by selecting the checkbox End the conference automatically according to the schedule. In this case, checkbox Enable conference time extension will become available to allow moderators to extend the event. This option will be accessible in the personal area, in real-time meeting management within the applications, as well as through the button in the notification about the upcoming end of the event (if it is enabled, see below).
You can configure notifications for the upcoming end of the event (see above) using checkbox Remind me 10 min before the conference ends. The notification time can be adjusted in the dropdown menu. Available only for scheduled conferences. All moderators will see the notifications, not just the owner.
Visual settings for a conference: you can set a custom background and watermark for any event. It is also possible to add multiple watermarks to different parts of the video layout.
You can add email reminders for event participants. To do this, the corresponding option must first be enabled by the administrator in the settings of TrueConf Server. Up to 4 reminders can be added for a single conference using the Settings button. To align the notification settings with those specified for the video conferencing server, press the Use administrator specified settings button.
If you are editing a previously created conference and notice reminders here that you did not add, it might be due to the activation of global notification settings by the administrator TrueConf Server after the event was created.
enable alerts about impending conference ending and, if necessary, allow moderators to extend the meeting for the selected period of time. Such notifications will be displayed in the real-time meeting management section both in the application and the personal area.
Conference location and description.
Registration Tab
In the case of creating a public conference (webinar), the Registration tab will be available (only for scheduled conferences). This tab allows you to configure the following settings for self-registration of guest participants for your online event:
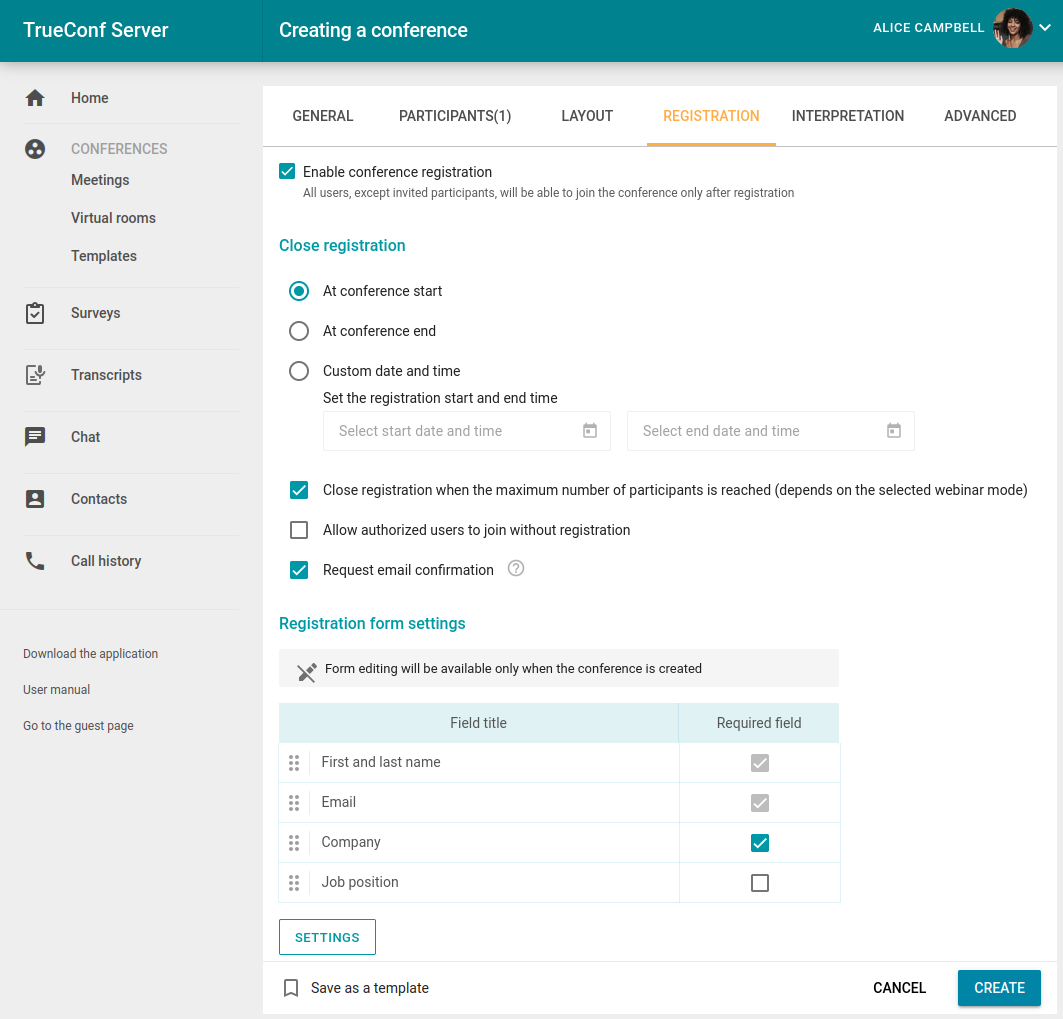
Enable registration (disabled by default)
Select the time when registration will close:
- Without limitation — available only for recurring conferences, keeps registration for them permanently open;
- At conference start — Registration will close once the webinar starts;
- At conference end — Registration will be available until the end of the event;
- Custom date and time — manual specification of the registration availability period.
3. Automatically close the webinar registration when the maximum number of participants is reached (depends on the selected conference mode).
4. Allow any authorized server user to join the conference after it has started. In this case, any user on your server can log in to the conference page and add themselves to the list of invited participants by clicking the Attend button.
5. The checkbox Request email confirmation enables the mandatory requirement to follow the authorization link in the registration notification email, thereby confirming the authenticity of the provided email address. Without email verification, participants will not be able to join the webinar.
6. In section Registration form settings , you can configure the fields for participant self-registration in the webinar TrueConf. You can rearrange fields by dragging the desired parameter and mark the ones that are required with checkboxes. These fields can be set up only when creating a conference and are not available for editing afterward.
7. Using the Settings button, you can add registration fields, but this is available only when creating a conference. You can add standard fields to the form or create up to 10 custom fields by selecting Settings → Add field.
When the changes are saved, users will be able to sign up for a public conference on its web page.
Creating a Calendar Event
To create a calendar event through the TrueConf personal area, a slightly different interface is used:
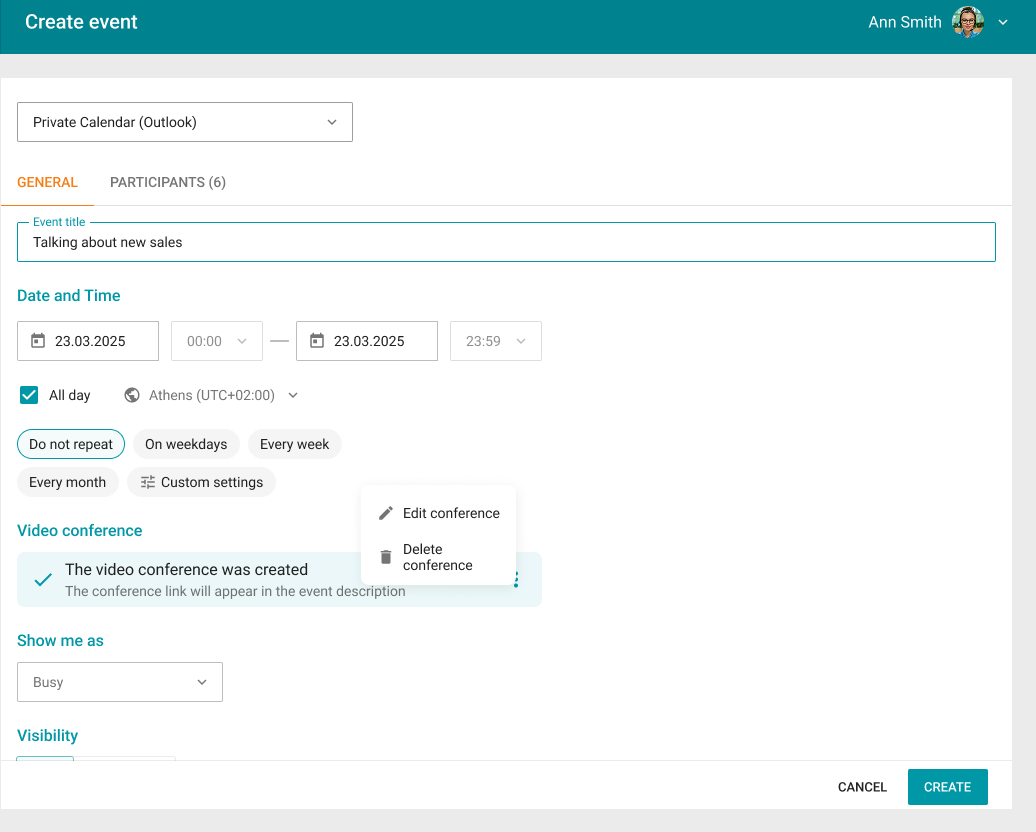
You have to specify the event name, its duration, repetition rules (if necessary) and invite participants.
By default, a conference TrueConf is automatically added to the event in block Video conference. To edit the existing conference, click on it. To access the full conference editor, click the All settings button. The editor will be the same as when creating a regular conference (not linked to an event), but without the participants and translations tabs.
Templates
To create meetings with multiple identical parameters, you can use templates. When a conference is created based on a template, all schedule settings are discarded (it becomes a virtual room by default). However, the following parameters remain unchanged:
Conference name, mode, and owner
List of participants
parameters from the Additional tab (excluding the conference ID);
All registration settings saved in the template, except the time when participant registration will be closed: these parameters will be available for a scheduled public conference (webinar).
To regularly hold the same video conference, set up a schedule on the General tab.
To add a template, use the Create a template button in the upper right corner of the Templates section. You can also save a conference as a template when creating it.
To use a template, select it in the Templates section and create a conference using the buttons on the right panel. You have the option to edit or delete the selected template.