Conference management
Conference Management
Managing an event from its card
Before the conference starts, a number of options will be available to you in its card (if you are the owner):
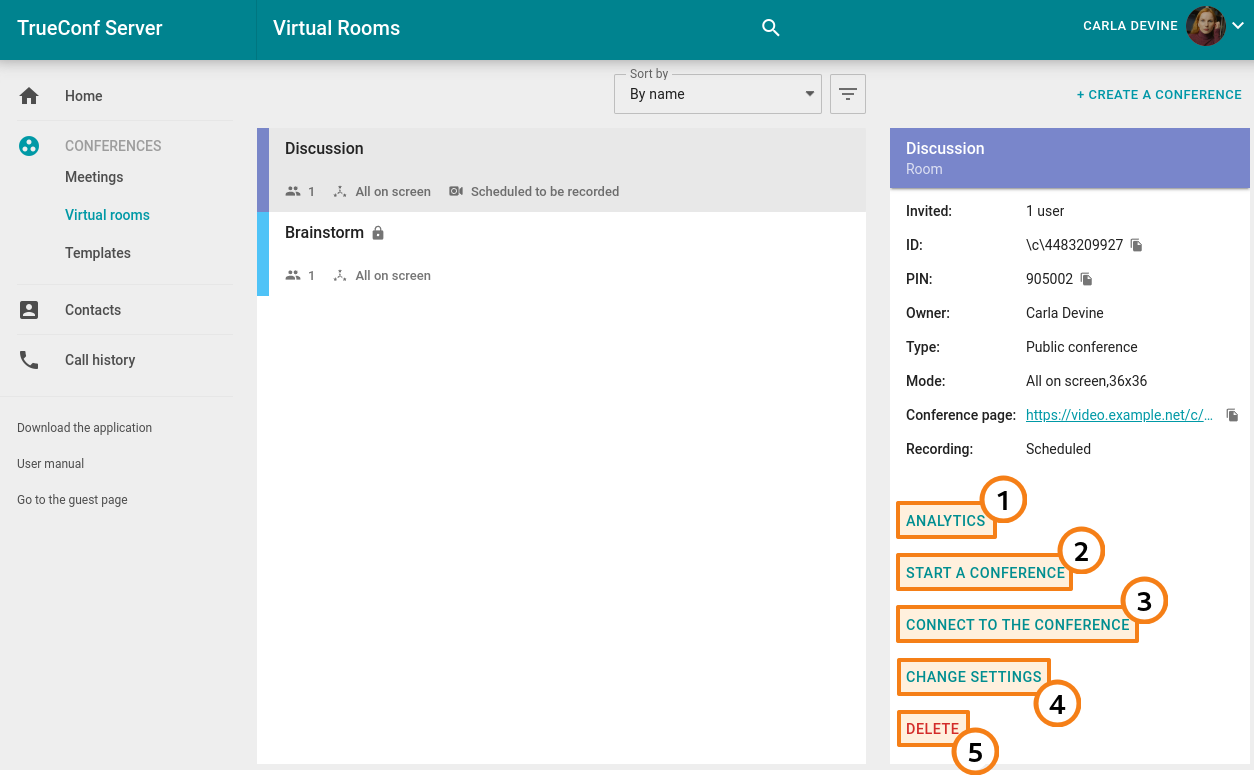
Go to conference analytics.
Start the event
Connecting to a conference via its page (for a virtual room) or adding it to the calendar (for a scheduled conference).
Delete the event.
All other participants (including moderators) will only be able to join the event (for a virtual room) or add it to their calendar (for a scheduled conference).
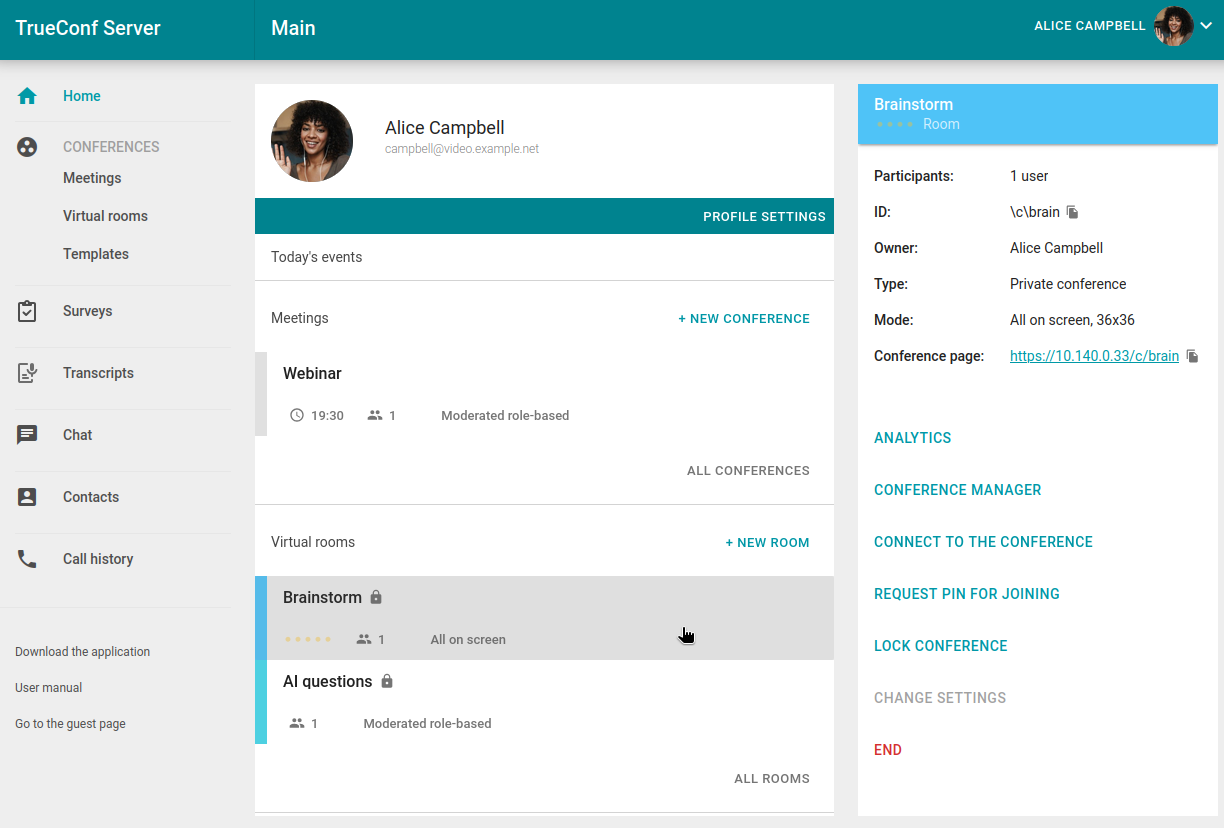
Once the conference begins, the list of available features will change, allowing the host to view analytics, access real-time meeting management, and set or change the PIN.
Real-time meeting management
You can change the video layout and control participants’ devices during an ongoing conference right in your personal area. To do it, use the real-time meeting management tool.
This feature is available in one of the following cases:
you are the conference owner;
You are a conference moderator.
You have the operator rights which means that you automatically become a conference moderator.
In the last two cases you have to be connected to the conference from a browser (via WebRTC) or in your client application and added to the list of invited participants before the start of the meeting; otherwise, this event will not be displayed in your personal area.
To access real-time meeting management, select the conference on the main page of your personal area, in the Meetings or Virtual rooms section, and click Conference manager on the panel that appears on the right.
A new tab will open with the real-time meeting management on the main page. In the top left corner of the page, you'll see the event's name, while on the right, you'll find its duration and the end call button (which will be replaced by the settings menu button on other pages  ). The
  button provides access to the menu for transitioning to video layout settings and the participant list:
For the sake of convenience, the major conference parameters are available on the main page of the real-time meeting management tool:
activate transcript (if integration with TrueConf AI Server is configured on your server);
change the conference PIN and modify its ID;
From the main page, you can also navigate to the video layout settings page and the conference participants list.
Configuring video layout
The order of participants’ video windows in the layout (all participants in “all on screen” mode and presenters in a moderated role-based conference or a smart meeting) is determined in the following way by default: the windows are displayed in the order in which participants joined the conference. The layout is filled from left to right and from top to bottom starting from the upper left corner.
In the case of a video lecture, managing video layouts is not possible, but you will still be able to manage participants' devices.
If the conference already has video layouts, you will see a list of them after selecting Layouts at the bottom of the main real-time meeting management window or from the main menu :
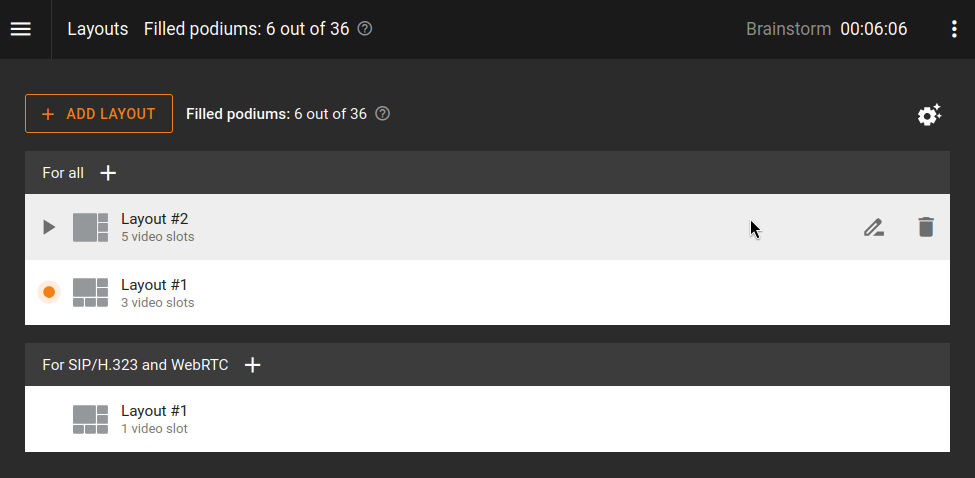
The active video layout will be highlighted with an orange indicator  to the left of the name. To activate a different layout, hover over it and click the
  button to the left of the name. To stop the layout broadcast, hover over it and click
  . To edit the slot switching rules with alternation, click
  .
.
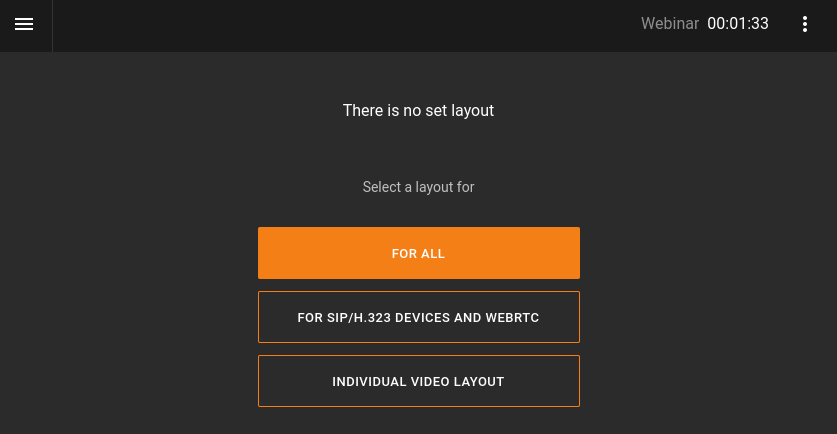
If no layouts have been created so far, after opening the real-time meeting management section, you will see the menu for choosing the type of the layout that you want to create. Select the layout mode you want to apply:
for all participants
for SIP/H.323 and WebRTC users
individual video layout for a specific meeting participant.
Video layout management is not available in video lecture mode.
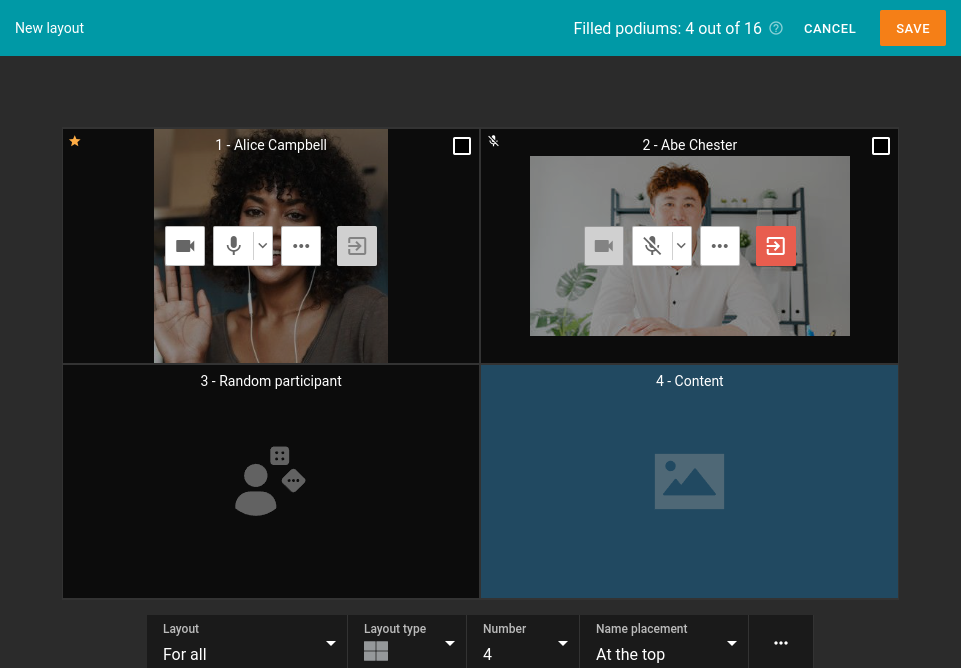
After that you will proceed to the layout control panel.
Please note that in the real-time meeting management section, video layouts are not saved automatically; you need to save them manually before returning to the general list.
To launch the current video layout, click the
button to the left of its name. You can only launch a saved layout.Click on each video window and select its type in the menu that appears on the right. For fixed windows, specify a particular participant to display. You can move any video window using the mouse, and also select it as a priority by double-clicking on it.
You can add a new video layout directly from the editor by clicking on the dropdown menu with the layout name and selecting Add layout.
In the Type dropdown list, select the arrangement of video windows in the video layout.
In the dropdown list Number, select the number of video windows in the video layout.
In the dropdown list Name, specify the position of the username in the video window.
Click the
 button to proceed to the following items:
- Fill layout — automatic filling of video slots with participants (if there are more slots, the remaining ones will be set as "random participant");
- Lock layout — in this case, participants will be forced to use this video layout when it is activated during the conference and will not be able to customize it locally on their own. This is especially useful for connections using third-party SIP/H.323 protocols, as terminals often have fewer options for managing slots;
- Rename - Assign a convenient name to the video layout (up to 70 characters) to quickly find it in the general list;
- Clear all video slots — completely clear the video layout to start filling it again;
- Delete layout — If this video layout is deleted and it was set as the main layout for its category (e.g., for everyone), another layout will not automatically become the main one. It will need to be assigned manually.
- Show control buttons in video windows — buttons for managing the settings of a conference participant will appear if a fixed participant is selected in the slot. Control buttons for participants in fixed slots are shown only for the active (running) video layout;
- Show participants not added to video layout — On the right side of the screen, a menu will open displaying all participants who are not selected as fixed in the video layout.
After arranging and adjusting the participants' video layout, click Save to add it to the list.
To launch a saved video layout, click button in the general list of layouts or in its editor. In the case of a moderated role-based conference, the listeners added to the layout will automatically be called to the podium.
The top panel will display the number of remaining free podiums in all video layouts. For more details, refer to the rules for reusing unique slots.
Conference participants will be able to override the video layout you've set and customize it themselves if you select Enable users to change layout in the additional layout settings.
How to Rename a Participant
You can change the name (caption) of any conference participant displayed in the video window. This caption will be used only in this layout and will not affect the user’s name in the address book:
Control buttons are displayed in video windows:
In the participant's video window, click the
 button to access the additional menu.
Select item Change display name.
Enter the new name in the window that appears and click Save.
Control buttons are not displayed in video windows:
Right-click on the window of the participant whose name has to be changed.
In the context menu, select the option Change display name
Enter the new name in the window that appears and click Save.
Renaming is also possible when a participant is replaced in the video window.
How to add a content window
To add an extra video window to the video layout, where content shared in a separate stream or a presentation will be displayed, simply select the desired slot and assign it a Content type.
Managing participants' audio and video devices
You can manage participants' devices immediately after adding them to the video layout. If the control elements are not visible, enable their display using the option Show control buttons in video windows.
Please note that the buttons for managing participants are displayed only in an active layout!
The following participant management buttons are available:
 — включить/отключить камеру
 — включить/отключить микрофон
 — увеличить/уменьшить чувствительность микрофона (отображается по нажатию стрелки справа от него)
— вызвать дополнительное меню, где можно:
remove a participant from the podium or invite him/her to the podium (available only in a moderated role-based conference)
rename a participant in the video layout;
replace a participant in the video window with a different one
set up audio and video devices (choose and set up camera, audio capture and playback devices, adjust microphone sensitivity)
select the audio output channel for this participant (only in conferences with the simultaneous interpretation mode enabled);
appoint the participant as moderator
set an individual layout for a participant
spotlight a video window or make it smaller (in the layout with a spotlighted window)
clear the video window.
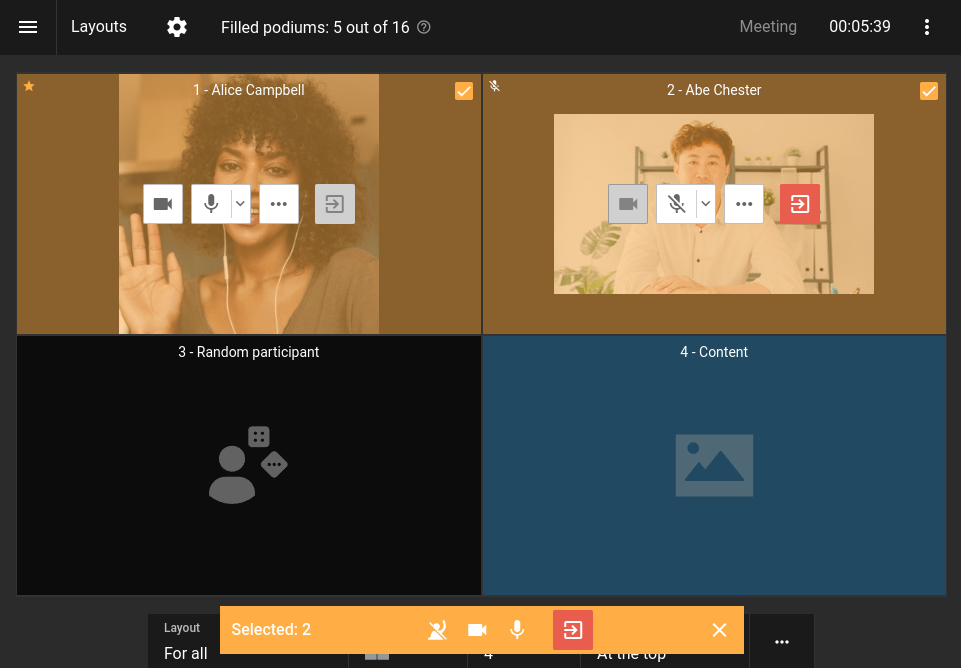
To select multiple participants, check the box in the upper right corner of the video window for each participant. In the toolbar at the bottom of the screen, you can turn off cameras and microphones of multiple meeting participants and remove them from the conference. In a moderated role-based conference there will be an additional button for removing the participant from the podium.
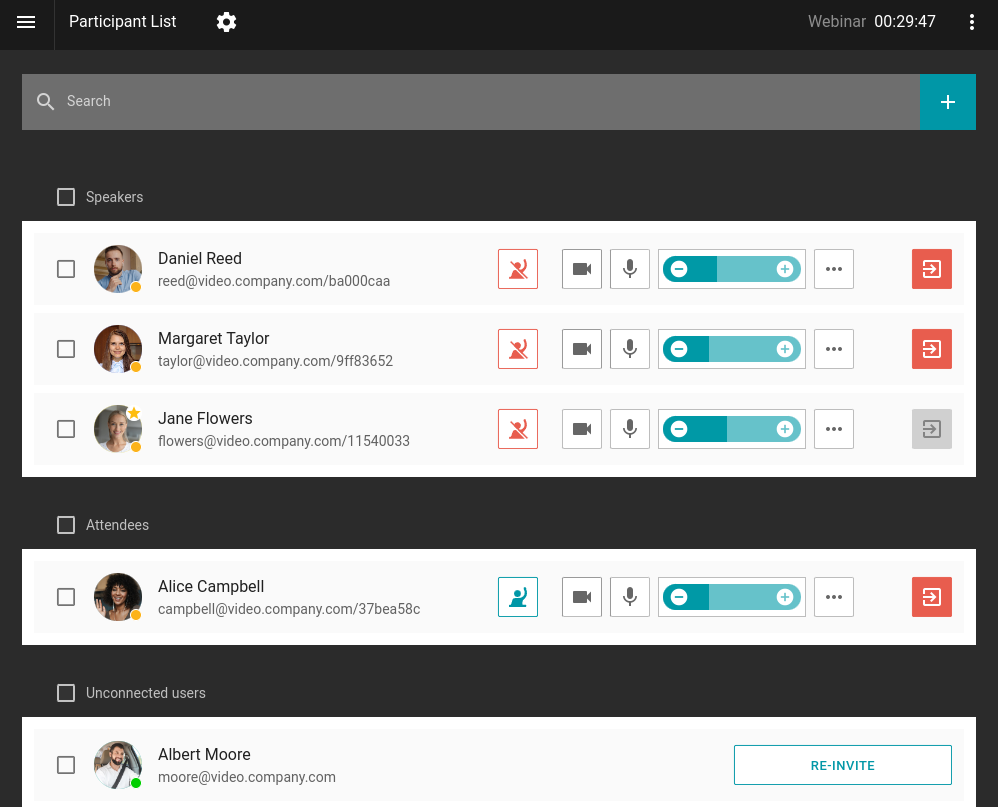
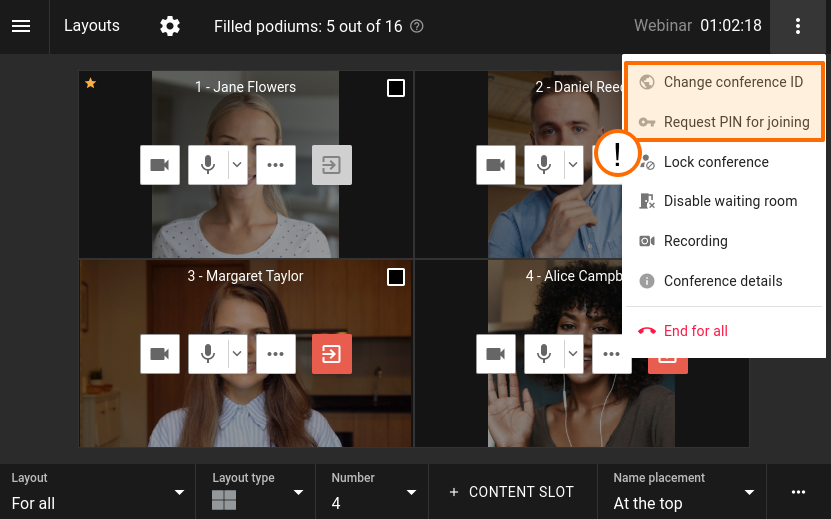
List of conference participants
You can also access the full list of participants by clicking the button in the top left corner and selecting Participant List. Here, you can remove someone from the conference, invite new participants, and manage their devices. The button will be hidden if you have changed the video layout but have not saved it.
To return to video layout management, press the button and select Layouts. In the moderated role-based conference mode, additional buttons will be available for inviting to the podium  and removing from it
  .
.
Adding participants on the fly
You can invite users to an ongoing conference. To do this, go to the participant list and click the  button to the right of the search bar.
A user addition window will open, where you can select users just as you would when creating a conference.
One can also invite users to the conference in the layout management window, if participants, who are not added to the layout, are displayed.
Extending a conference
If the option to extend a scheduled conference was enabled on the tab Additional, all moderators will be able to extend the duration of the event. This can be done in real-time meeting management using several methods:
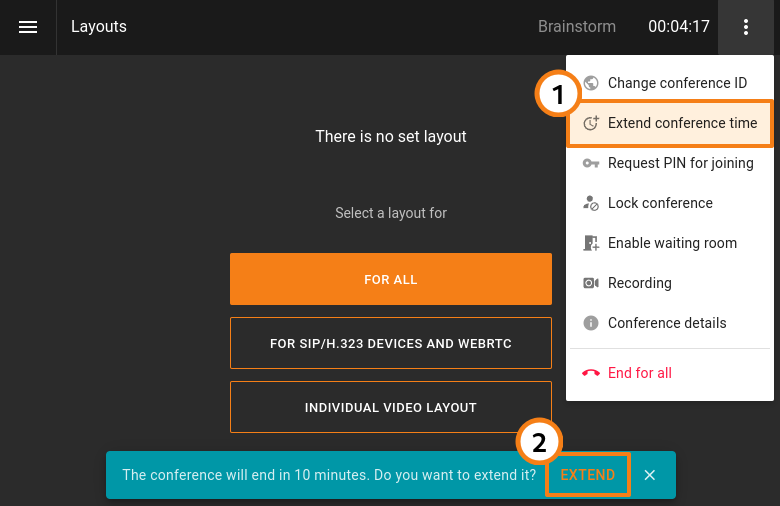
In the upper right corner, click the
button and select Extend conference time.If the checkbox for notification about the upcoming end of the event was also activated, a notification with the Extend button will be displayed at the bottom of the management window.
Additionally, the event owner can extend the session using the Extend conference time button from the active conference card without switching to real-time meeting management.

In the dialog box, select the time you want to extend the conference for, then click Apply.
Changing conference PIN and ID on the fly
During a conference, you can change its entry PIN and ID (unique identifier) in real-time. This can be done to further secure the event from unauthorized access after the invited participants have joined. This feature is available in the same scenarios as switching to real-time meeting management.
To change PIN or ID:
Go to real-time meeting management.
From any window, click the
button in the top right corner or use the toggle directly on the main page.Select one of the options and specify the new value of PIN or ID. One can also generate a PIN automatically or set a new one if it was not specified before.
The owner can also set a PIN code from the conference card in the list of scheduled events or virtual rooms.
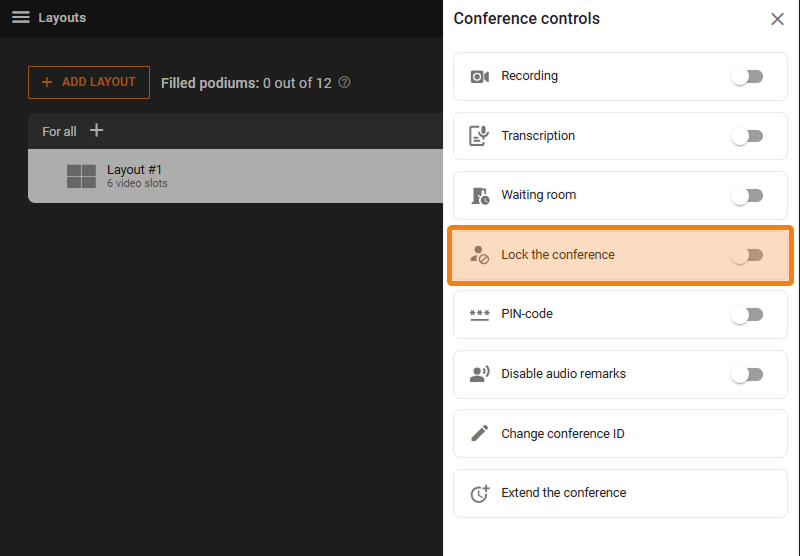
Locking a conference
A moderator can lock a conference for new participants either temporarily or up until its ending. The conference can be locked in one of these ways:
select the ongoing conference from the list in your personal area and click Lock conference in its card;
Go to real-time meeting management, click the
button, and select Lock conference.
When a conference is locked
it can be joined by:
Moderators (including the owner)
Users who will be explicitly added by the moderator (including those who were previously invited, but did not join).
it cannot be joined by:
Authorized server users who were not explicitly invited by the moderator after the conference was locked
Users who were added to the list of invited participants before the conference started, but did not join before the conference was locked
Guests (in case of a public conference).
Each time when a conference ends, it automatically becomes unlocked which is the default status.
Restoring the connection capability is done in the same way as restricting it: using the Unlock conference option in the conference card or through real-time meeting management.
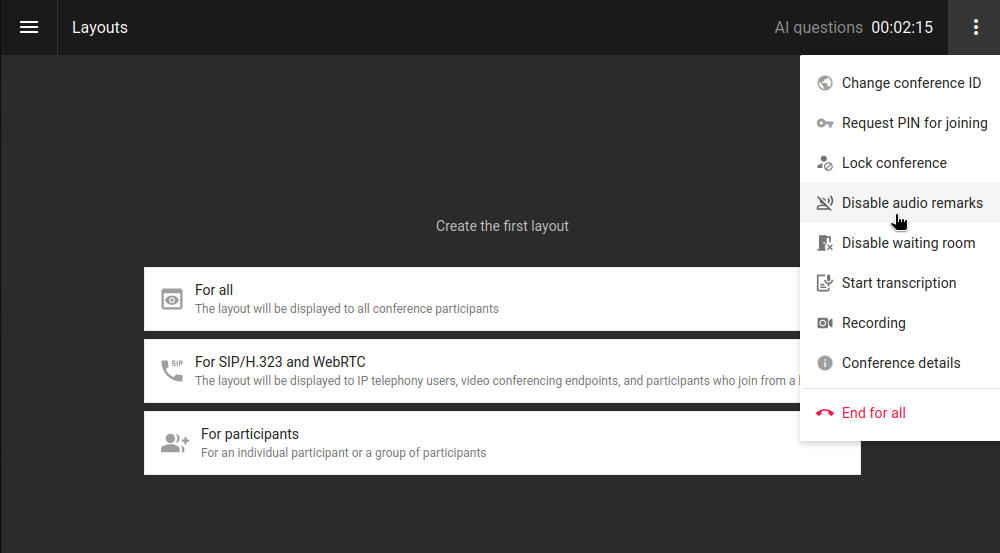
Prohibition of audio remarks for moderated role-based conference
In a moderated role-based conference, moderators have the option to mute audio remarks for all participants in real-time meeting management. To do this, click the button and select the Disable audio remarks option. If needed, you can restore them using the same menu:
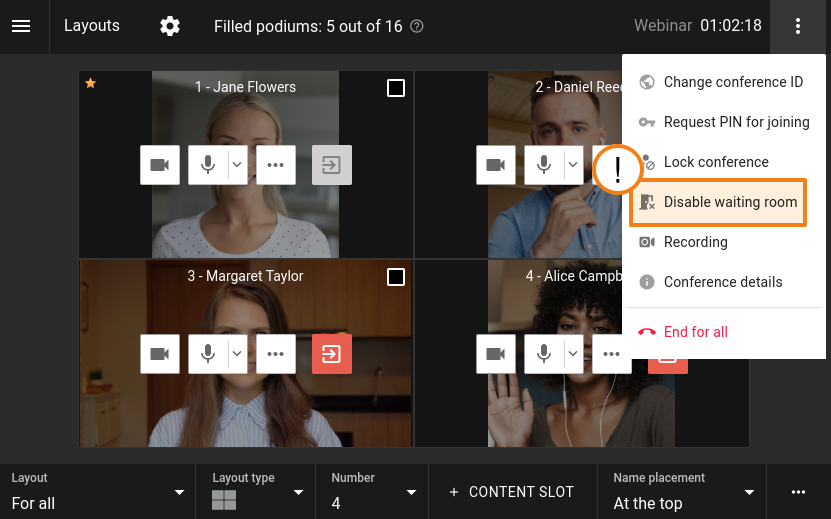
Managing the Waiting Room
During the conference, the moderator can manage the waiting room: enabling and disabling it as needed. To do this:
Go to real-time meeting management.
From any window, click the
button in the top right corner or use the toggle directly on the main page.Depending on the current status, select either Enable waiting room or Disable waiting room.
When the waiting room is disabled, you will see a pop-up window where one can choose the actions for the participants in the waiting room: they can be invited to a conference or removed from it.
After each conference ends, the waiting room status resets to the value specified on the Advanced tab before the conference started.
Recording a conference
As the owner, you can start video recording not only when creating or editing a conference, but also when this meeting has already started. To do it, take these steps:
Go to real-time meeting management.
From any window, click the
button in the top right corner or use the toggle directly on the main page.Select item Recording.
In the opened window start or stop recording (if it was started previously).
If the recording is already in progress, use the
 button next to the conference duration timer.
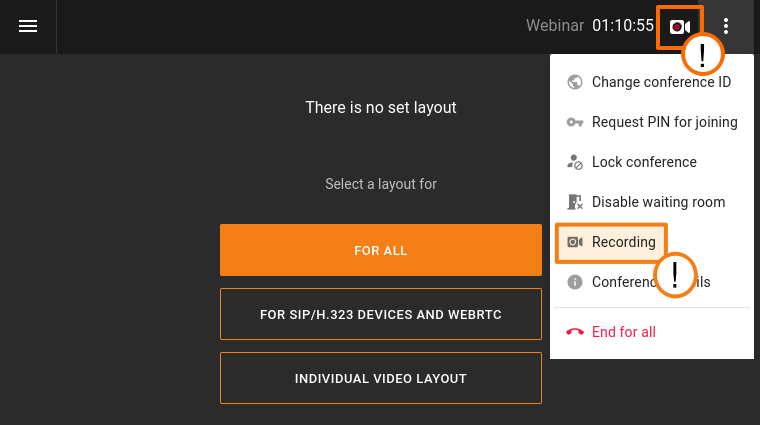
The option to record a conference will only be available if the administrator of your TrueConf Server has configured the appropriate setting.
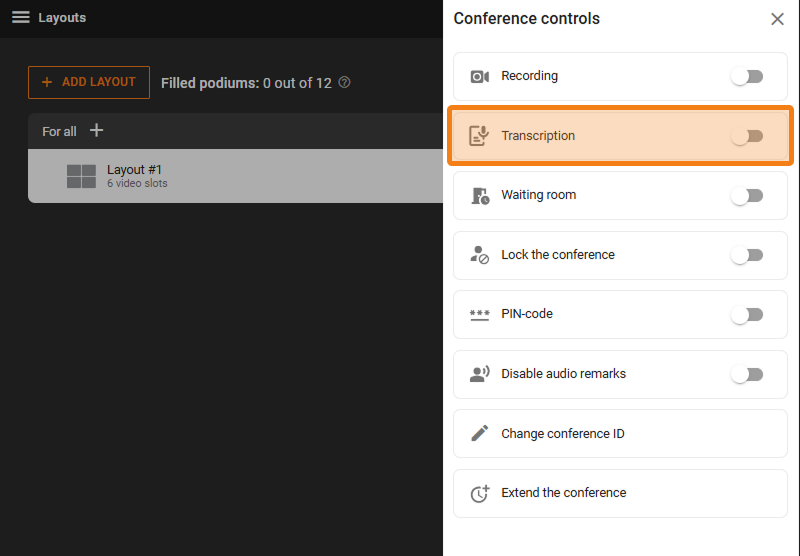
Transcription Recording
With the TrueConf AI Server integration enabled, you will also have the option to enable transcript recording.
To enable transcription during a conference:
Go to real-time meeting management.
From any window, click the
button in the top right corner or use the toggle directly on the main page.Select item Transcription.
In the opened window start or stop recording (if it was started previously).