How to work with transcript records
How to work with transcript records
For users of TrueConf Server, working with the TrueConf AI Server solution involves recognizing conference audio tracks and using the obtained transcripts (scripts). In this case, the video communication server administrator can configure automatic audio recognition at the end of the event, so manual initiation will not be required.
The following instruction is intended for TrueConf Server users who will create conferences, manage their recognition, or simply access transcripts.
You can manage the list of transcripts in your personal area TrueConf Server and in the personal area TrueConf AI Server. The interface is similar and provides the same features. For information on how to manage conferences in the video conferencing server's personal area please refer to its documentation.
Below is how to work with the list of transcripts in the TrueConf AI Server web interface.
Activation of recognition in conference settings
For TrueConf AI Server to be able to convert audio to text, you need to activate the necessary parameters in the conference settings (it looks the same in the server's personal account and in the TrueConf client application scheduler):
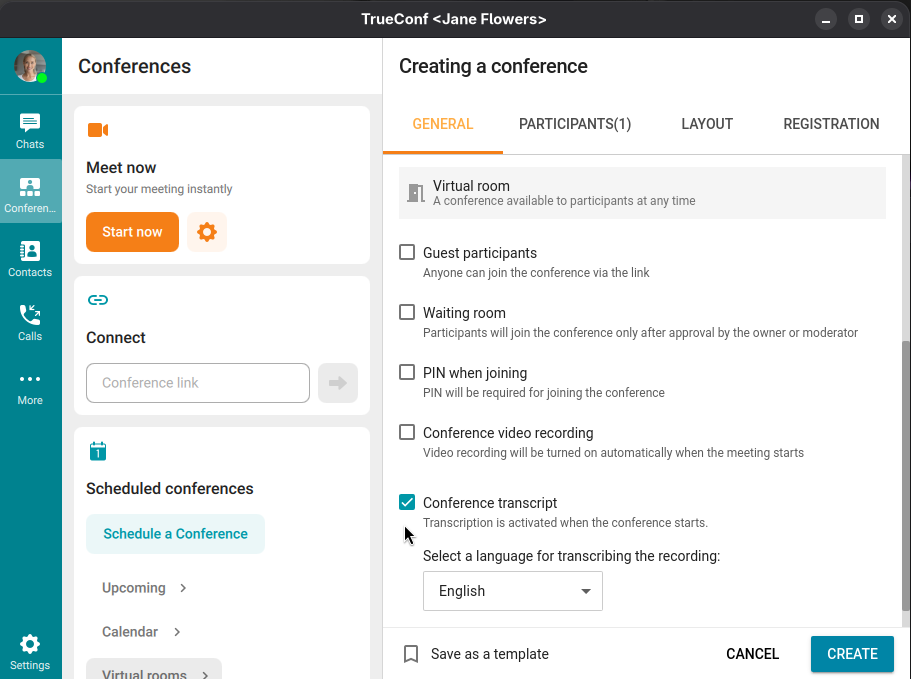
When creating a conference, navigate to the General tab.
Check the box Create a conference transcript (it may be enabled by default if your administrator has activated automatic recognition for all conferences).
Select the primary language that the AI will attempt to recognize audio in first. If there are phrases in another language, they will also be correctly recognized, but the default language will assist the AI in cases where similar languages are used.
Transcript list
The administrator of TrueConf Server could configure chat notifications about the conference being ready for recognition and the transcript being ready. In this case, you will receive a link to the transcript in such a message.
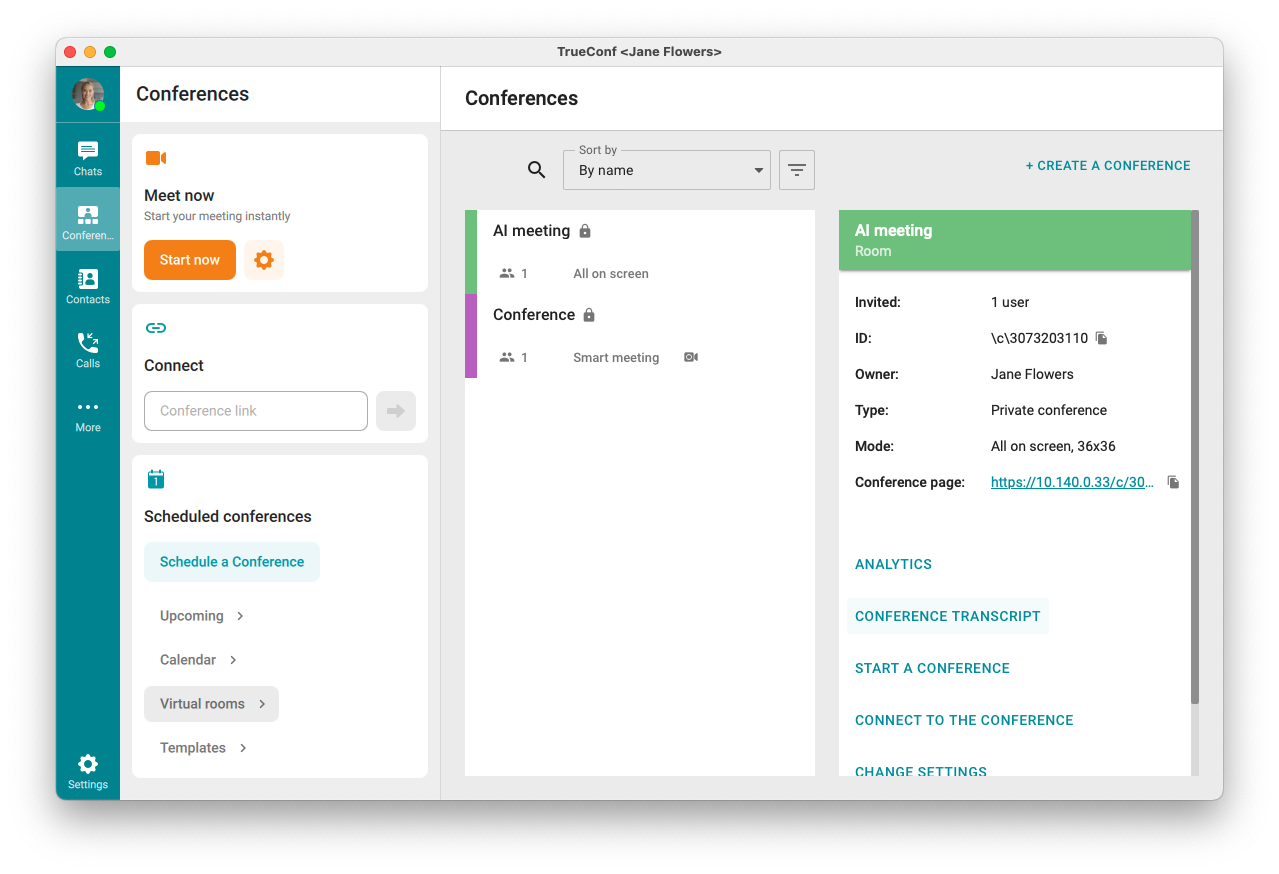
Otherwise, you can find the conference transcript directly in its card in your personal account or the client application's scheduler:
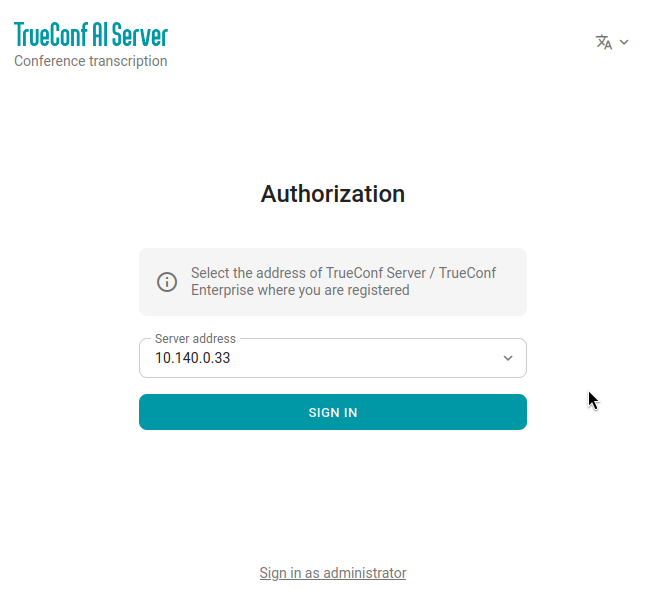
You can also simply go to your TrueConf AI Server and complete the authorization process:
Go to the main page of your MCU server (check the link with your administrator).
On the page that opens, select your video conferencing server from the dropdown list and click Sign in:
Enter your login (TrueConf ID) and password for your video conferencing server account, and then click Sign in:
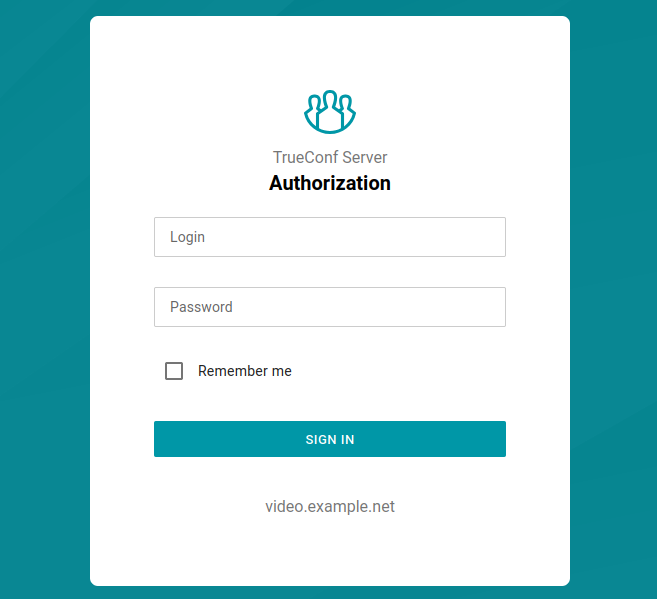
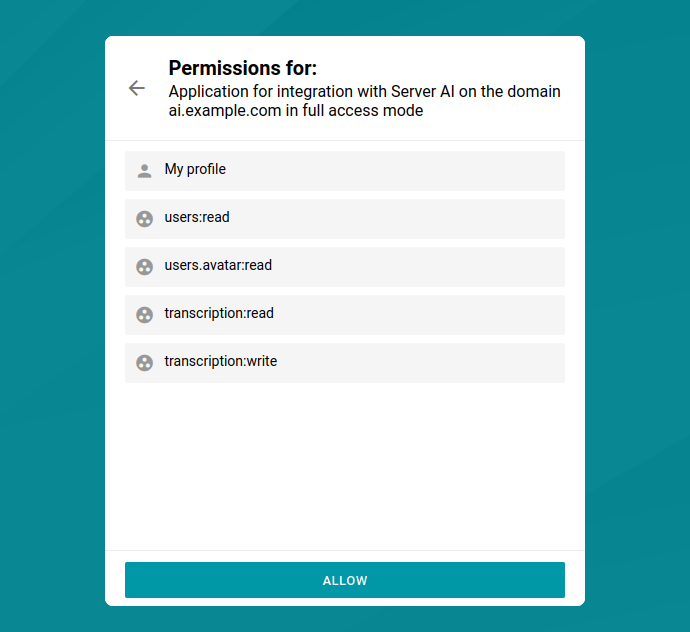
If you are logging in for the first time, you will need to confirm the permissions for your account to the AI server, just click Allow:
After this, a list of transcripts available to you and conferences ready for recognition will open. For more information about access, read further:
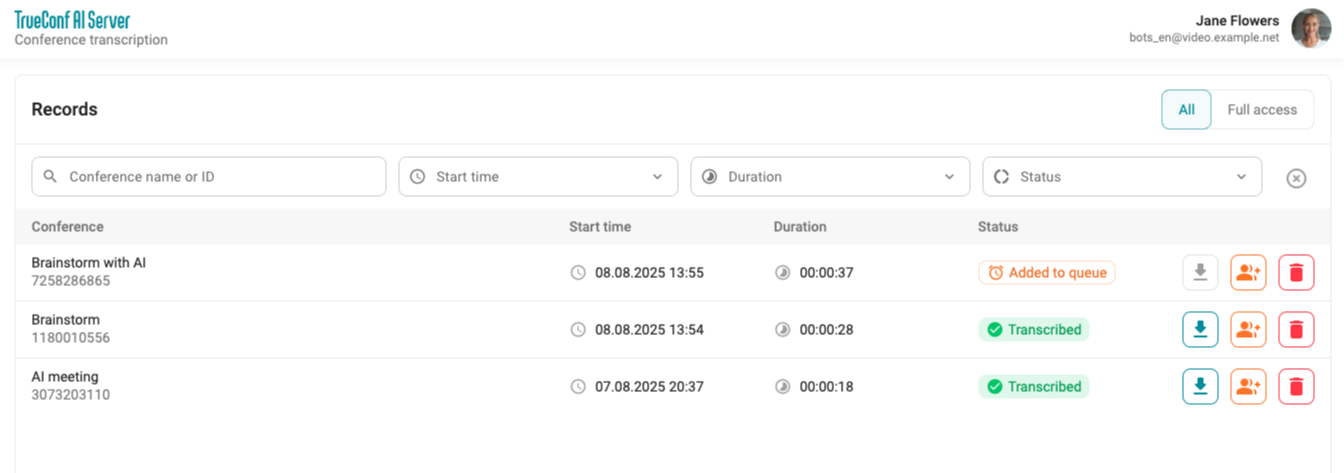
Each conference entry in the list is marked with one of the statuses: recognized, in the process of recognition, or not yet recognized. By clicking on the row of a recognized conference, you will be taken to the transcript page.
Full access will be set by default
To start transcribing an unrecognized conference, press the  button.
To download the text of an already completed transcript, click the  button. You will be able to choose the transcript export format: as a csv table, a txt text file, or a pdf document. You can also download the transcript as an archive with the addition of the original conference audio recording.
You can delete the transcript using the  button. This will remove both the transcript and the original corresponding audio track of the conference.
To quickly find the necessary transcripts, you can use filtering by conference name or ID, duration, event time, and the status of the transcript itself.
A comprehensive search through transcripts for specific text entries is available above the general list. Initially, a list of suitable transcripts will be displayed, and upon entering a specific one, the search will continue within it, highlighting the relevant lines.
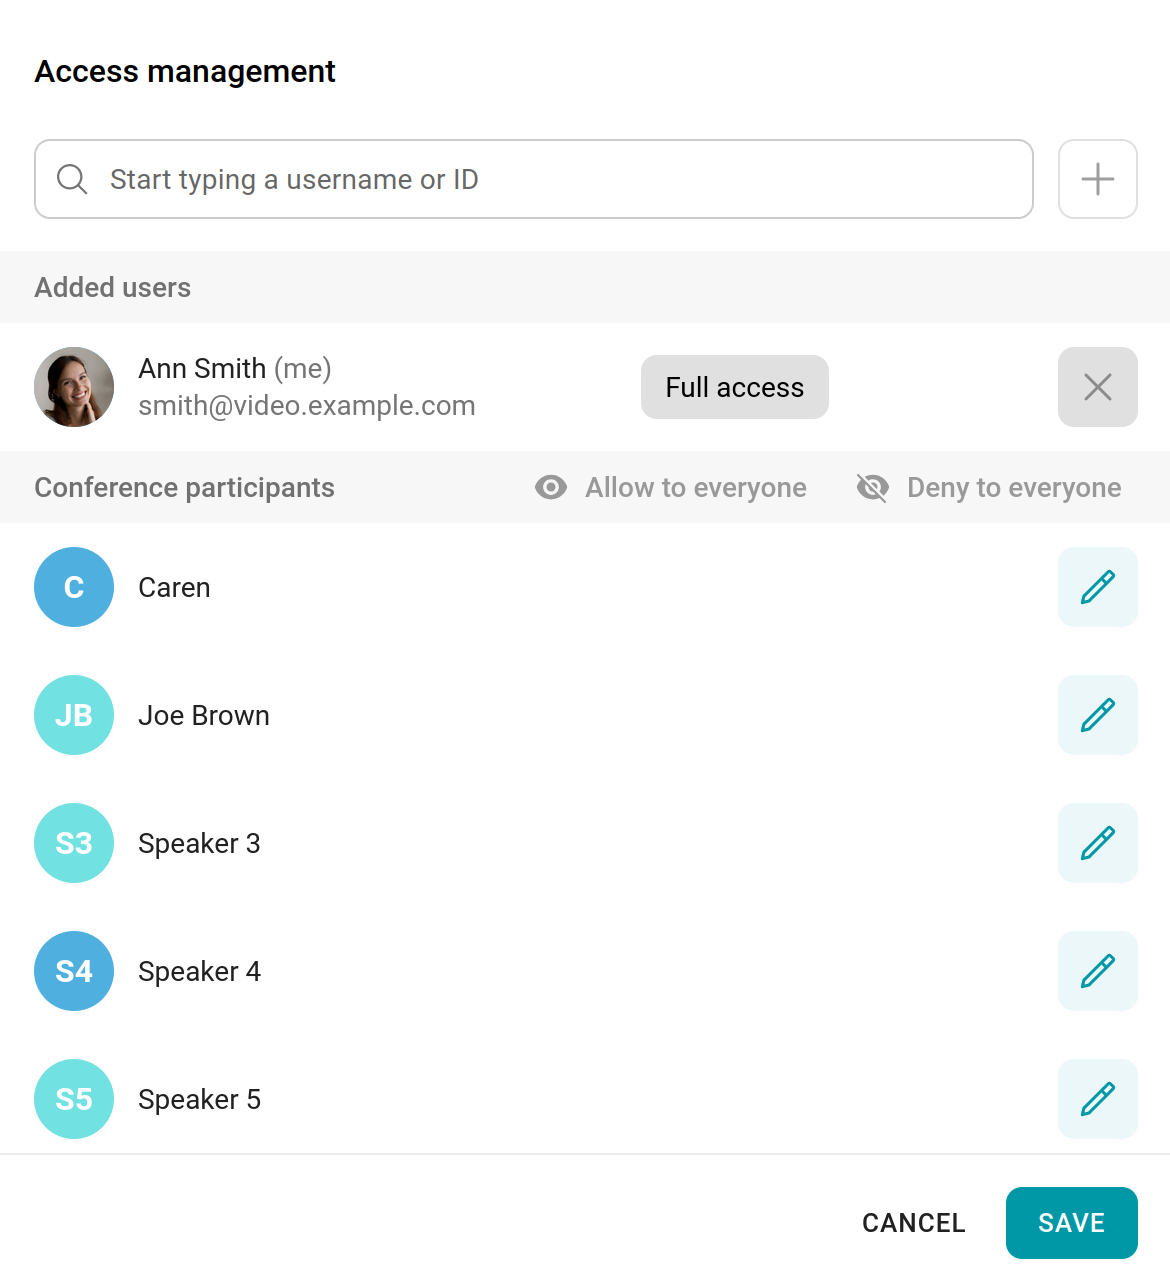
Transcript access settings
A user can be assigned one of two access levels to the transcript, and this will determine the list of features:
If you have full access, you will be able to take notes (if such a module is activated on the AI server), download, configure access for other users, and delete.
if you have read access, you will only be able to download the transcript.
Who initially has access to the transcript depends on the settings on the TrueConf Server side, where the event took place. The administrator could configure the access rights as follows:
disable access for all users (including owners) – in this case, you will not see transcripts from this server, even for your own events;
enable access for moderators only;
enable full access for the moderators and read-only access for the other participants;
grant all participants full access.
Additionally, the administrator TrueConf Server could configure access for specific users. For instance, a group of users with full access to all transcripts and their summaries can be created. In this case, these users will have access regardless of the settings for a specific transcript. If you are managing a video conferencing server, you can learn more about the settings in its documentation.
Access to a specific transcript is granted by a user with full access rights.
If you have full access to the transcript, you can configure access for other users, including those from another video communication server if your AI server is integrated with it. To do this, click the  button and configure access:

Access level for each user is selected from the dropdown list (read or full). To revoke a participant's access, click the  button. To add a user from your own or an external server, search for them or enter the full TrueConf ID and click the
  button.
Transcript page
On the page of a specific entry, you can:
review the text of the recognized conference;
start summarizing or view it if it has already been received;
listen to the original audio in the built-in player.
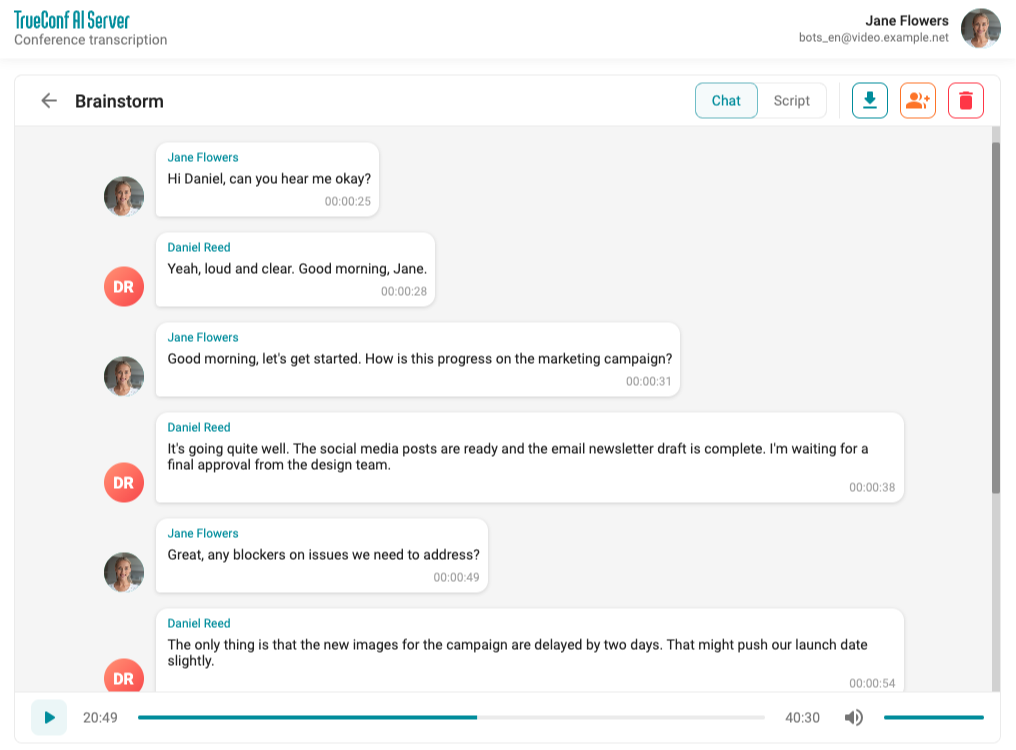
Clicking on any line will take you to the desired spot in the player, allowing you to immediately listen to the original.
To view the transcript as a plain text with timings (similar to the structure of a subtitle file in movies), go to the Script tab.
Uploading Files for Transcription
In addition to native integration with TrueConf Server / TrueConf Enterprise, users of your AI-server will have access to upload any file with an audio track for transcription. For instance, you can upload a video recording of a past conference where you forgot to enable transcription but remembered to record. The number of speakers will be automatically identified based on voice differences, and the remarks will be attributed to the respective participants of the event.
Supported for upload:
audio files: wav, mp3, flac, ogg, aac
video files: mp4, avi, mov, mkv, webm.
Maximum file upload size: 5 GB.
The process of automatically identifying multiple different speakers within a single audio stream and separating speech according to these participants is called diarization.
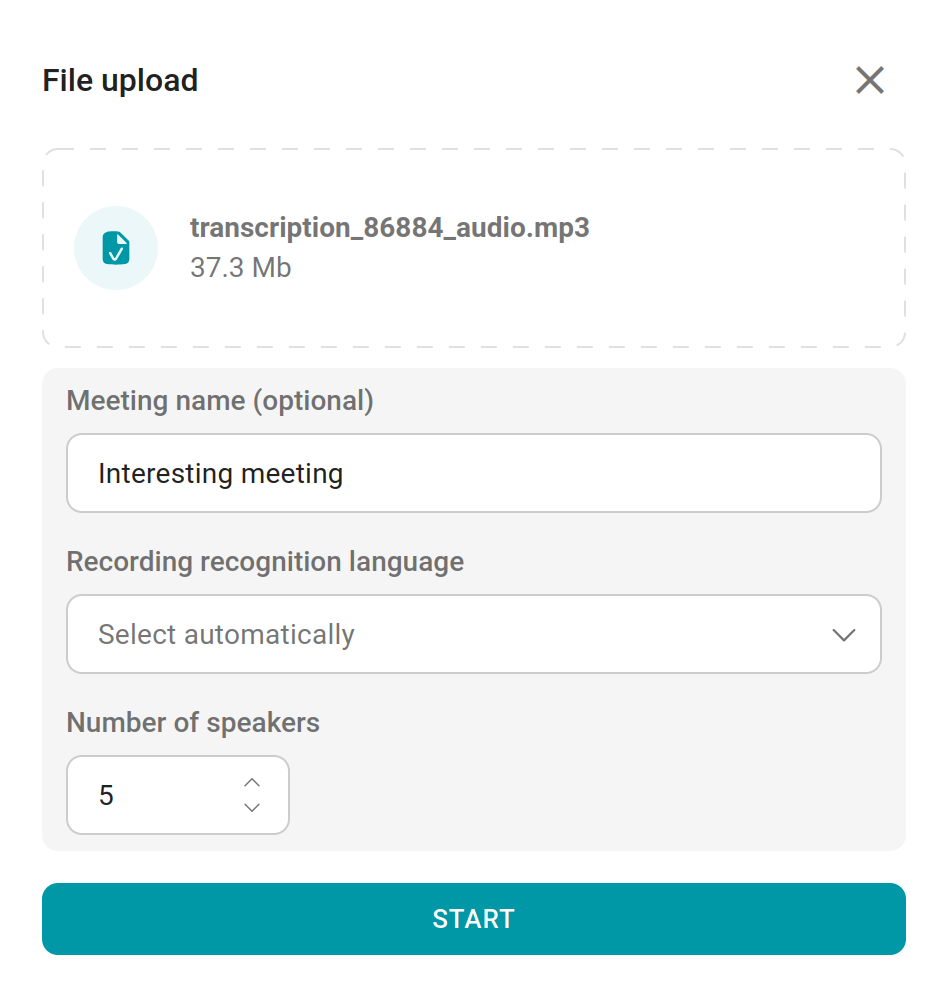
To upload a file, click the Upload file button in the transcripts list:
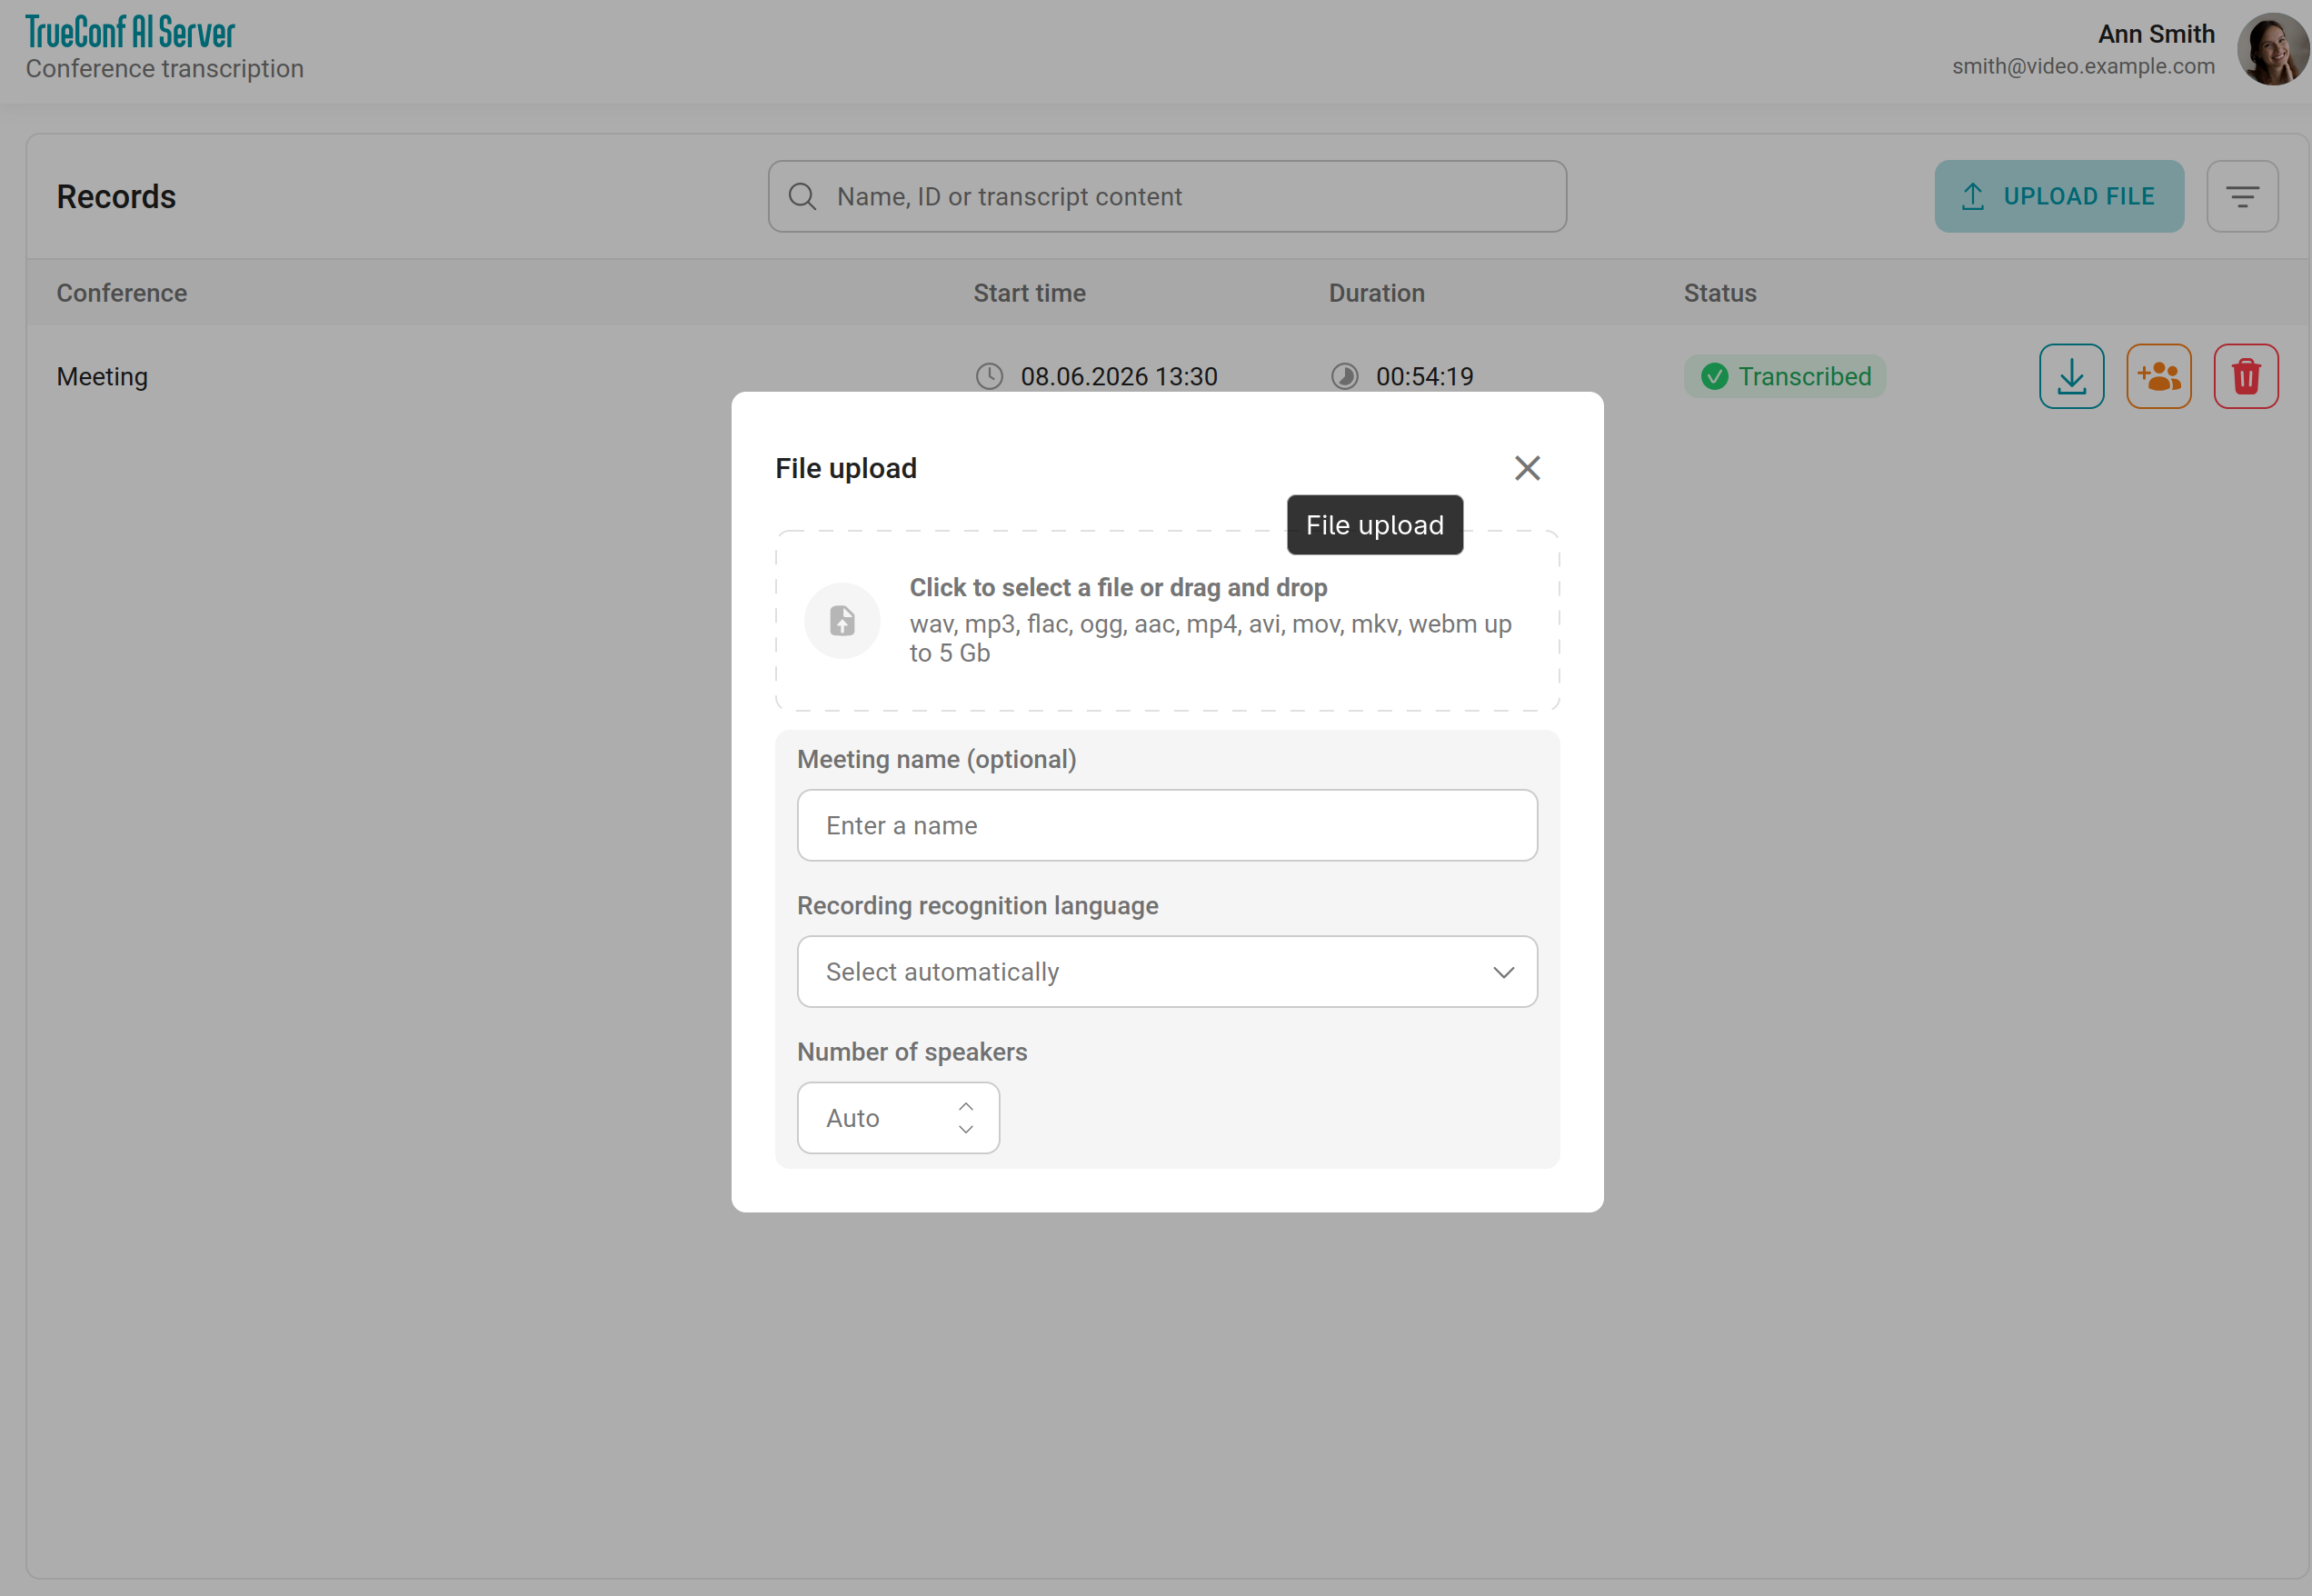
A download window will open, where you can:
Upload a file by clicking on the area with the list of formats or simply drag and drop the desired file from the file explorer.
Specify the event name; otherwise, the file name will be used.
The language for speech-to-text recognition is generally determined automatically with high accuracy, but you can manually specify the preferred primary language.
If you know the number of speakers in advance, you can specify them to help distribute the turns more accurately.
After specifying all the parameters, click the Start button:
Once the file is fully uploaded to the AI server, speech recognition and speaker assignment will begin immediately.
Once the file is recognized, the transcript will appear in the general list. Click on it to configure the speaker names, which are signed by default as Speaker 1, Speaker 2, and so on.
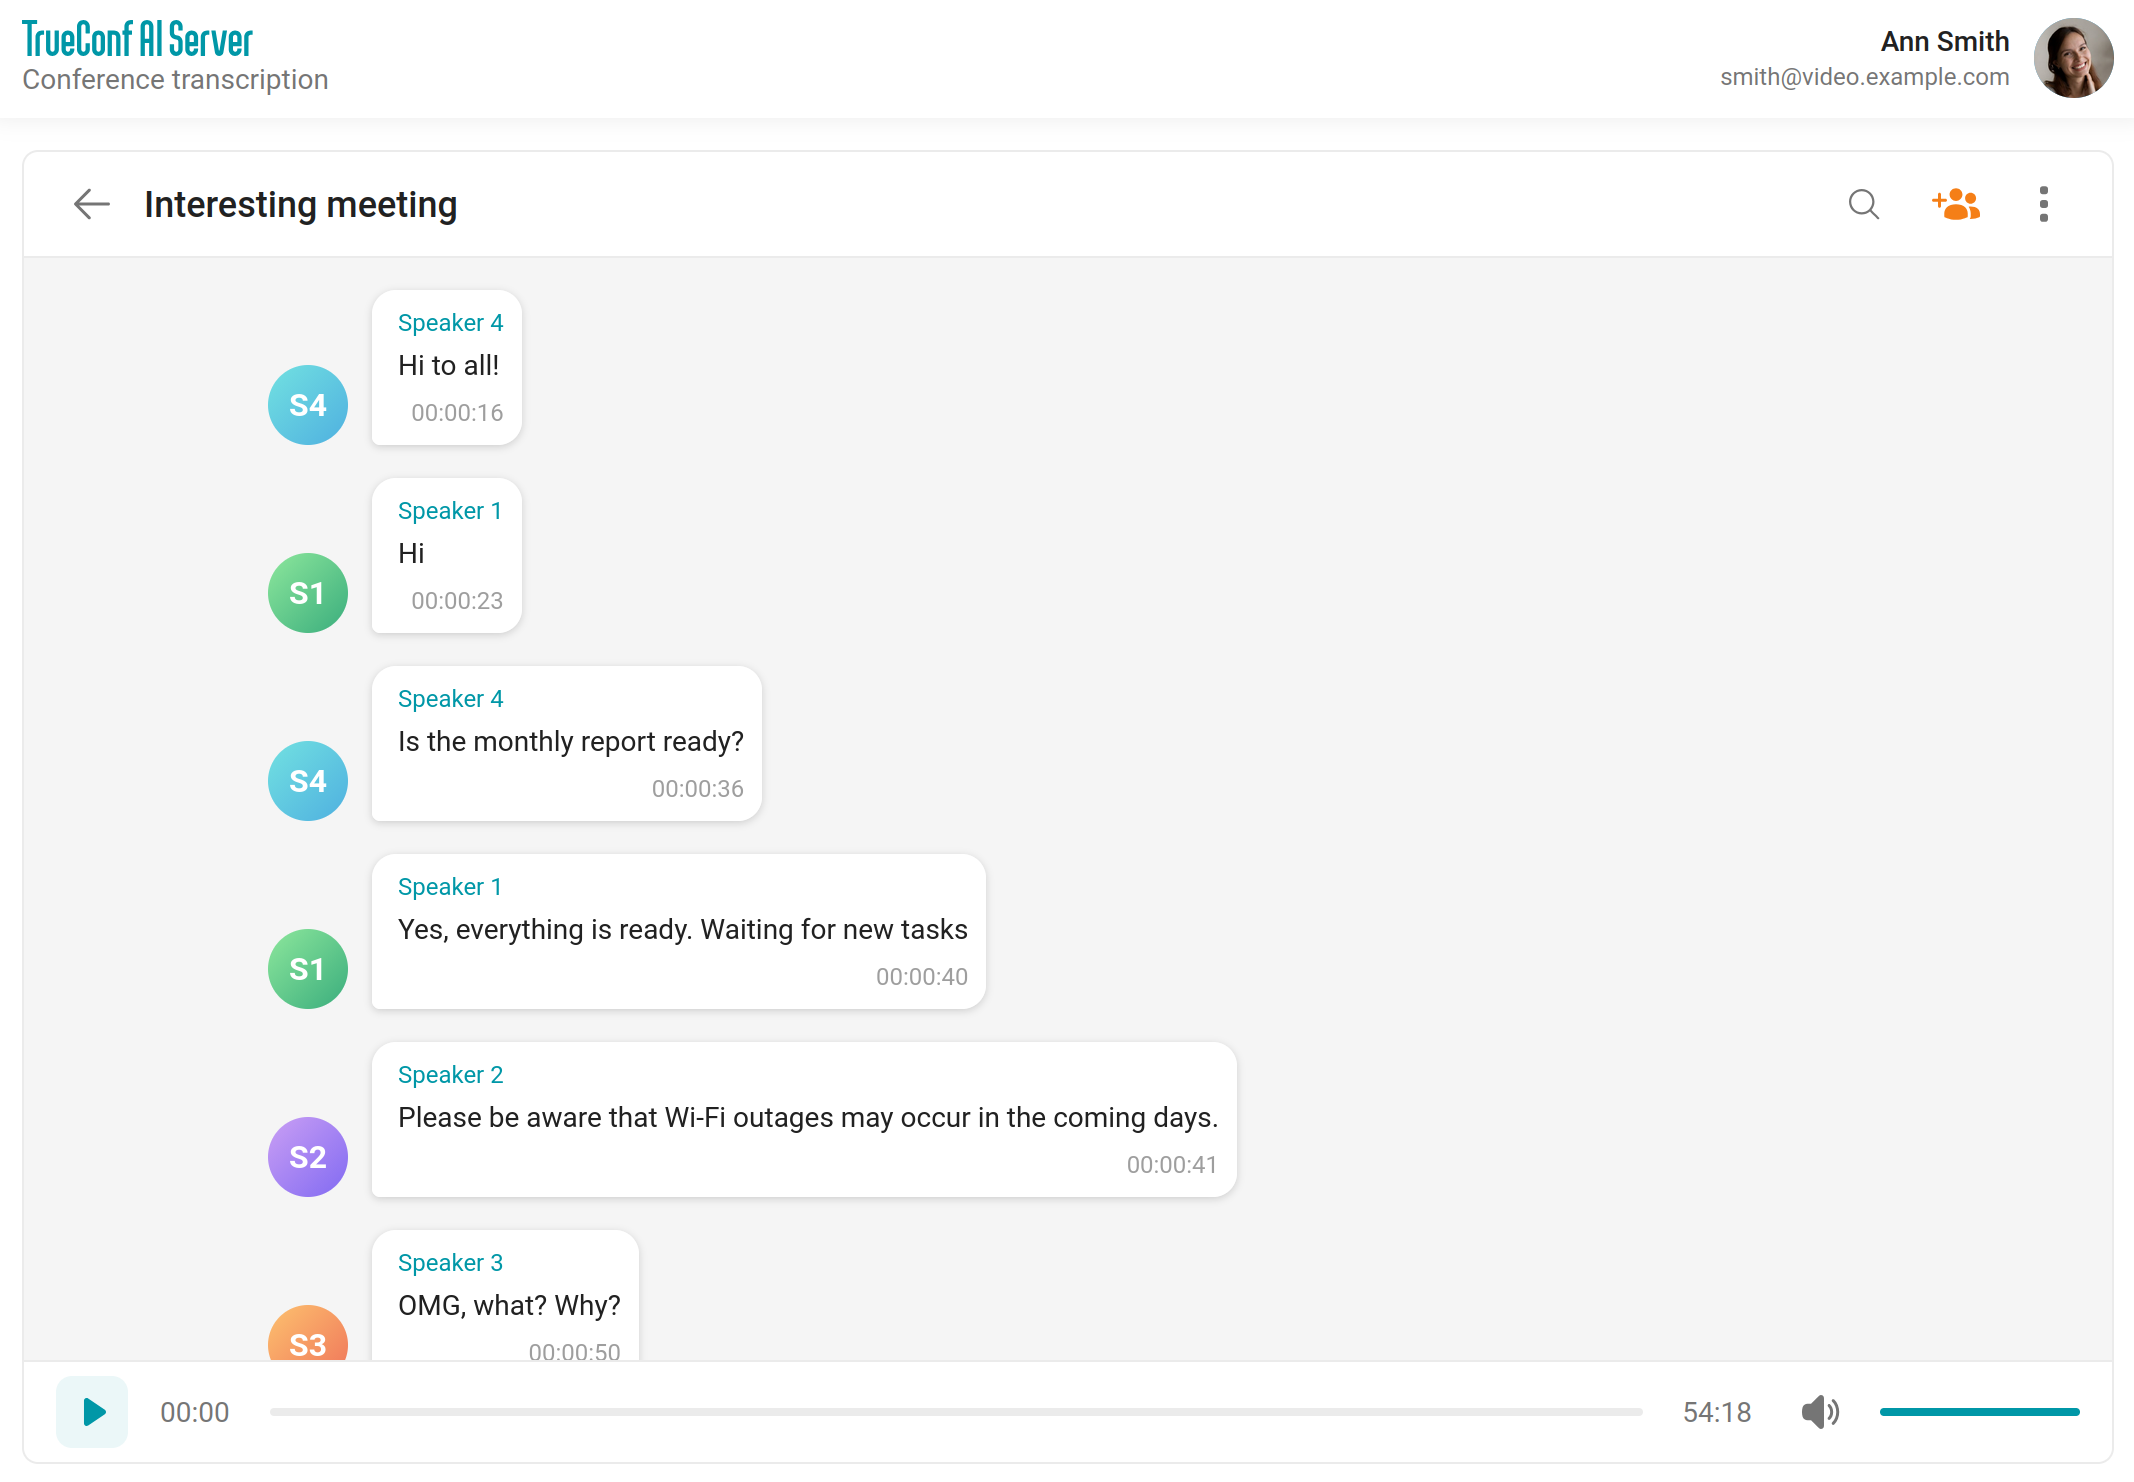
If you know the participants, you can recognize who is who from the first lines and assign them the appropriate names. To rename the speakers, click the button above the transcript. This will open a window for setting access and displaying the names of the participants who spoke:
Click the  button next to the desired speaker and enter the required name, then press the Enter key or click anywhere on the screen—changes will be applied immediately. Configuring speaker names does not affect access permissions; you will need to configure in the list above everyone who should have the ability to work with the text.
If, for any reason, one person appears as two speakers in the transcript (for example, the voice sounded different due to a microphone change), you can assign the same name more than once in the list, so that the comments are attributed to a single participant. Thus, unique signatures are not a mandatory requirement.
It is important to remember that renaming speakers is only available for transcripts from files, and only after accessing the transcript itself.