Connecting the Sennheiser Conference System
Connecting the Sennheiser conferencing system to Weathervane
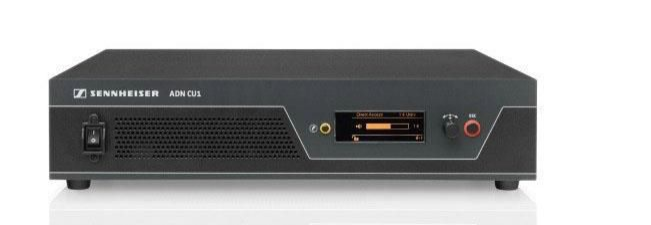
Description of the SENNHEISER ADN CU1 discussion system
SENNHEISER ADN CU1 is a audio equipment kit. It consists of central unit and microphone remotes that are part of conference system.
Control unit is the main device of the conference system, which is designed to configurate the VCS and to manage the conference.
SENNHEISER ADN CU1 image is shown on the picture:
Connecting the central unit
Let's review the necessary operations for connecting the SENNHEISER ADN CU1 control unit to the system using software TrueConf Weathervane.
First of all, you need to create a channel for data transfer from the control unit to the computer which transmits information about active microphones. This allows you to activate necessary cameras and set their positions in order to ensure seamless video meetings.
SENNHEISER ADN CU1 unit transmits the information via Ethernet. Basic cable must be placed into the input on the back panel of a control unit. Please, note that there are similar inputs on the back panels, designed to connect the microphones, so you cannot use them for Ethernet connection.
Setting up the discussion system
To make the system work, you need to configure the Ethernet network and microphone modules.
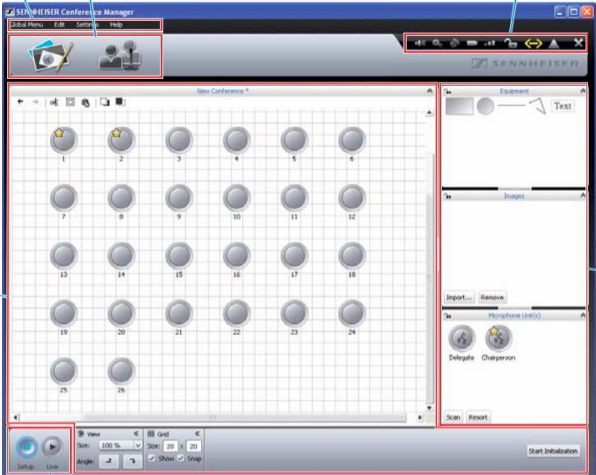
Central unit of a conference system is a full-value PC, so you need a monitor, a keyboard and an optical mouse to configure it. Please, use the SENNHEISER software manual guide during applying changes in Conference Manager. Image of Conference Manager software is shown on the picture:
Initial launch of the Conference Manager program and connection to the central unit
Upon initial startup, you need to connect to the central unit. To do this, in the menu Global Menu, select Connect, then choose the central unit ID from the list that appears and click the OK button.
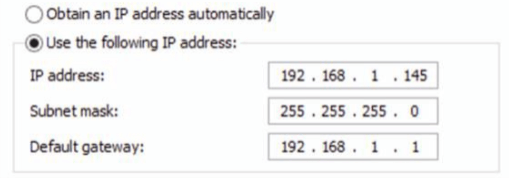
Configuring Network Settings
To configure the Ethernet network, select Network from the menu Settings. In the dialog box that appears, enter the IP address and network mask.
Configuring microphone module settings
After physically connecting the microphone modules to the central unit, they are automatically initialized. However, sometimes a manual scan is required. To perform this, click the Scan button in the Microphone unit(s) window located in the lower right corner of the Conference Manager window.
Notifications about the connected and detected microphone modules should appear in the central (working) area of the window. Each one is assigned a unique numerical identifier (ID). Note that these identifiers should start from 1 and increment sequentially (1, 2, 3, etc.). These values will correspond to the preset camera positions (presets) in the TrueConf Weathervane software. If needed, the identifier value can be changed: to do this, select the microphone in the Conference Manager workspace, and then set the required identifier (ID) in the properties panel of the microphone module (at the bottom).
To save the settings in the Conference Manager program, use the Global Menu menu to select the Save command. It is also recommended to enable the auto-load of the saved configuration so that the conference with the required settings starts when the central module is powered on.
Configuring TrueConf Weathervane Software
To configure the TrueConf Weathervane software, go to the Tools menu and select Settings.
Image of the setting window is shown on the picture:
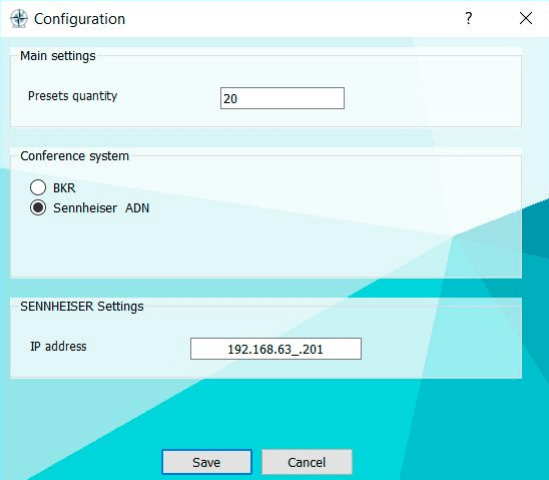
In the settings window, select the Sennheiser ADN conference system and specify the IP address of the central unit.
After entering the IP address, the program will perform a check to determine if the address is accessible on the network. If the check is successful, the input field will be highlighted with a green border.

If the IP address is unreacheable, the entry field will be highlighted in red.

After entering the values, you need to save them by clicking the Save button in the settings window.
We're all set. Good luck with work!