# Installation and registration of the AI Server
General procedure for integrating the AI server with your TrueConf Server or TrueConf Enterprise:
Connect TrueConf AI Server to the corporate network as a hardware device or install it as a software solution (which includes transcription and summarization modules)
register AI server;
generate an integration key on each TrueConf Server that needs to be connected to the AI server;
in the TrueConf AI Server control panel, connect all video communication servers.
Video conferencing servers and AI servers must have mutual FQDN resolution to communicate.
After that, it will be possible to activate the sending of audio for recognition to the AI server directly on the TrueConf Server side or for each conference.
# Where to get an AI server?
TrueConf AI Server is offered as software for installation on a server that meets the following system requirements.We recommend using at least one NVIDIA RTX A4000 level graphics card or higher, as recognition on a GPU is significantly faster than on a CPU. Multiple GPUs can be used, which will proportionally increase the recognition speed.
To purchase TrueConf AI Server, please contact TrueConf managers in any convenient way. Our managers will help you choose the appropriate hardware depending on the expected speed of conference transcription. The speed of audio recognition and transcription is not strictly tied to the event duration, but depends on the number of utterances that have to be transcribed. Generally, you can refer to the following data to create a transcript:
a server with 1 NVIDIA RTX A4000 level graphics card will recognize 60 minutes of audio in an average of 5-7 minutes;
a server with 2 NVIDIA RTX A4000 level video cards will recognize 60 minutes of audio in an average of 3 minutes;
A server with 4 NVIDIA RTX A4000 level video cards will recognize 60 minutes of audio in an average of 1.5 minutes.
Dedicated graphics cards are required for creating summaries (since a separate AI model is used, check the installation description below). The average expected speed of summarization is:
A server with a single NVIDIA RTX A5000 level GPU will summarize 60 minutes of audio in approximately 1 minute
A server with 2 NVIDIA RTX A4000 level video cards will transcribe 60 minutes of audio in approximately 2 minutes.
A server with a single NVIDIA RTX A6000 level GPU will summarize 120 minutes of audio in approximately 1 minute.
The specified characteristics below will allow for the average recognition of 60 minutes of a conference in 5 minutes (the speed heavily depends on participant activity and is just an average guideline).
# System Requirements
| Parameter | Value |
|---|---|
| Operating system | A modern Linux-based OS with Docker support, such as Debian 12+ etc. |
| CPU | Intel Xeon Silver 4310T level and above (3rd generation Intel Scalable with 10+ cores). Only the x86-64 CPU architecture is supported (also known as AMD64 or x86_64). |
| Graphics card (GPU) | For transcription: 1 NVIDIA RTX A4000 16 GB or better For summarization: 1 NVIDIA RTX A5000 24 GB or better |
| RAM | At least 16 GB in dual-channel mode, 32 GB is recommended |
| Internal storage | SSD with at least 512 GB, generally, the size depends on how long you will keep the data |
It is recommended to discuss the detailed system requirements for the expected load in advance with representatives of TrueConf.
# Module installation
TrueConf AI Server consists of two separate and independent modules: transcription (speech recognition) and summarization. When this solution is deployed, both modules need to be installed and configured. You can install these modules either on a single machine or separately on two machines.
We recommend installing modules on a single machine with multiple GPUs. In this case each module will operate on a separate GPU which will minimize latency and accelerate the data exchange between modules.
Contact the manager at TrueConf to obtain two .deb packages that contain the 2 AI server modules.
Before installation, make sure that you have the latest NVIDIA drivers installed.
To run the commands, the OS user, who installs the software, has to have sudo privileges.
# Installing drivers for graphics cards (GPU)
Depending on the operating system you are using, you need to install drivers for NVIDIA graphics cards and the CUDA library files. If you have a limited version of the AI server that operates on a CPU and only supports transcription, you can skip this step. Below are installation examples for the main operating systems.
On Debian 12, 13
- Update system packages and install dependencies for building kernel modules:
sudo apt update && sudo apt upgrade -y && sudo apt -y install build-essential dkms linux-headers-$(uname -r) ca-certificates wget
2. Execute the following command to create the file /etc/modprobe.d/blacklist.conf with the required content:
echo "blacklist nouveau
options nouveau modeset=0" | sudo tee /etc/modprobe.d/blacklist.conf > /dev/null
3. Run the command:
sudo update-initramfs -u -k all
4. If the Internet connection is working, execute the following commands:
- Add required TrueConf repositories:
echo "deb [trusted=yes]  https://mirror.trueconf.com/nvidia/libnvidia-container/stable/deb/amd64 ./" | sudo tee -a /etc/apt/sources.list.d/nvidia-container-toolkit.list > /dev/null

echo "deb [trusted=yes] https://mirror.trueconf.com/nvidia/nvidia-cuda/debian ./" | sudo tee -a /etc/apt/sources.list.d/nvidia-cuda.list > /dev/null
- Update information about packages:
sudo apt update
- Install the libraries and CUDA:
sudo apt install nvidia-container-toolkit nvidia-driver cuda-drivers
5. If the internet connection is NOT working on the machine where you are installing the AI server, execute the following commands:
From another machine with internet access, download the archive https://mirror.trueconf.ru/nvidia/libnvidia-container-repo.tar.gz (opens new window) and extract it to any directory on the AI server, for example,
/opt/libnvidia-container-repo.From another machine with internet access, download another archive https://mirror.trueconf.ru/nvidia/nvidia-cuda.tar.gz (opens new window) and extract it to any directory on the AI server, for example,
/opt/nvidia-cuda-repo.Add the repositories by running the following commands:
echo "deb [trusted=yes]  file:/opt/libnvidia-container-repo ./" | sudo tee -a /etc/apt/sources.list.d/nvidia-container-toolkit-local.list > /dev/null

echo "deb [trusted=yes]  file:/opt/nvidia-cuda-repo ./" | sudo tee -a /etc/apt/sources.list.d/nvidia-cuda-local.list > /dev/null
- Update information about packages:
sudo apt update
- Install the libraries and CUDA:
sudo apt install nvidia-container-toolkit nvidia-driver cuda-drivers
6. Check the installation status with the command:
nvidia-smi
7. Restart the machine:
sudo reboot
8. Install TrueConf AI Server modules as shown below.
9. To make sure that Docker containers can use NVIDIA graphics cards, execute the command:
sudo nvidia-ctk runtime configure --runtime=docker
10. Restart Docker:
sudo systemctl restart docker
Later, you will be able to manage the AI server by using trueconf-ai-transcription and trueconf-ai-summarization services.
# Installation of the transcription module
- Open the terminal in the OS where you are installing TrueConf AI Server and run the following command:
sudo apt update
2. Install the module by running the following command:
sudo apt install ./trueconf-ai-server.deb
When the module is installed, additional files will be downloaded from the packages.trueconf.com repository; so, you need to make sure that the computer has access to the external network and the port 443 is open. Since the AI models are quite large, the download may take some time.
After installation you will need to edit the file config_transcription_node.toml which is in the directory /opt/trueconf/ai-server/etc/transcription/. Edit the following lines:
workers = x— whereХis the number of instances of the AI transcription model.cores_per_worker = x— whereXis the number of CPU threads allocated for one transcriber. The recommended value is no more than 8.
When using a GPU for transcription, you need to edit the line device_ids: ['X'] in the file docker-compose-conf.yaml which is in the same directory — here X is the GPU id. It can be recorded as an array. For example, device_ids: ['0'] if there is only one graphics card in the system, or device_ids: ['0,1,2'] if there are multiple GPUs in the system.
To check the number of GPUs and their IDs, execute the command:
sudo lshw -c display
To find the id, check the line physical id: for each GPU in the terminal.
Example docker-compose-conf.yaml file for running shorthand on 3 GPUs:
services:
  trueconf-ai-transcription-supervisor:
    volumes:
      - /opt/trueconf/ai-server/etc/transcription/config_supervisor.toml:/usr/src/app/config_supervisor.toml
      - /opt/trueconf/ai-server/tmp/recognition:/usr/src/app/files
      - /opt/trueconf/ai-server/var/lib/files/raw:/opt/trueconf/ai-server/var/lib/files/raw
      - /opt/trueconf/ai-server/var/log/transcription/supervisor:/usr/src/app/logs
    network_mode: host
    restart: unless-stopped
  trueconf-ai-transcription-node:
    volumes:
      - /opt/trueconf/ai-server/etc/transcription/config_transcription_node.toml:/usr/src/app/config_transcription_node.toml
      - /opt/trueconf/ai-server/var/cache/model/transcription:/usr/src/app/model
      - /opt/trueconf/ai-server/tmp/recognition:/usr/src/app/files
      - /opt/trueconf/ai-server/var/lib/files/raw:/opt/trueconf/ai-server/var/lib/files/raw
      - /opt/trueconf/ai-server/var/log/transcription/node:/usr/src/app/logs
    runtime: nvidia
    deploy:
        resources:
          reservations:
            devices:
              - driver: nvidia
                device_ids: ['0,1,2']
                capabilities: [gpu]
    network_mode: host
    restart: unless-stopped
After installing the module and editing the configuration files, start the service with the command:
sudo systemctl start trueconf-ai-transcription
# Installation of the summarization module
The summarization module cannot be used independently; the transcription module has to be installed first.
- Open the terminal in the OS where the summarization module will be installed and run the following command:
sudo apt update
2. Install the module by running the following command:
sudo apt install ./trueconf-ai-summarization.deb
When the module is installed, additional files will be downloaded from the packages.trueconf.com repository; so, you need to make sure that the computer has access to the external network and the port 443 is open.
After installation, open the directory /opt/trueconf/ai-server/etc/summarization/ and edit the file config_summary_node.toml. Change the following lines:
workers = x— whereХis the number of concurrent instances of the AI summarization model.
If you are using a GPU for summarization, make the following changes in the file /opt/trueconf/ai-server/etc/summarization/docker-compose-conf.yaml which is in the same directory:
- Delete comments (i.e., delete the
#characters at the beginning) in the block:
#runtime: nvidia
    #deploy:
    #    resources:
    #      reservations:
    #        devices:
    #          - driver: nvidia
    #            device_ids: ['0']
    #            capabilities: [gpu]
2. Edit the line device_ids: ['X'] — where X is the GPU id, and it can be recorded as an array. For example, specify device_ids: ['0'] if there is only one graphics card in the system, or device_ids: ['0,1,2'] if the system has multiple GPUs.
To check the number of GPUs and their IDs, execute the command:
sudo lshw -c display
To find the id, check the line physical id: for each GPU in the terminal.
3. To run the program on multiple GPUs, you must specify the number of GPUs using the --tensor-parallel-size [number] parameter in the command block.
Example of the docker-compose-conf.yaml file for running the training process on 3 GPUs:
services:
trueconf-ai-summarization-vllm:
    runtime: nvidia
    ipc: host
    ports:
      - "8000:8000"
    volumes:
      - /opt/trueconf/ai-server/var/cache/model/summarization:/llm_model
    deploy:
      resources:
        reservations:
          devices:
            - driver: nvidia
              device_ids: ['0,1,2']
              capabilities: [gpu]
    command: >
      --trust-remote-code
      --model /llm_model
      --served-model-name custom_model
      --max-model-len 50000
      --gpu-memory-utilization 0.9
      --tensor-parallel-size 3
  trueconf-ai-summarization-node:
    restart: unless-stopped
    volumes:
      - /opt/trueconf/ai-server/var/log/summarization/node:/usr/src/app/logs
      - /opt/trueconf/ai-server/etc/summarization/config_summary_node.toml:/usr/src/app/config_summary_node.toml
    network_mode: host
After installing the module and editing the configuration files, start the service with the command:
sudo systemctl start trueconf-ai-summarization
# Login to Control Panel
After installing TrueConf AI Server, ensure that the machines with it and TrueConf Server can see each other by domain names.You can now log into the TrueConf AI Server control panel with an administrator account via the following link: https://[ai-address]/admin/, where [ai-address] is the IP or FQDN (domain name) of your AI server. Alternatively, simply go to the server address and click the Sign in as administrator link at the bottom.
Default login data:
Login: admin
Password: admin
Remember to change the default password after registering your AI server!To do this, go to the Accounts section and select your account. There you can also add other accounts for AI server administration as shown below.
# Registration (activation)
The license for TrueConf AI Server defines:
the number of video communication servers that can be connected to this AI server in full access mode;
number of video cards installed on the machine with the AI server;
(optionally) the license may also specify a list of TrueConf Server that can be integrated with full access.
Until you register TrueConf AI Server, its control panel will be locked, and only the registration form will be displayed on your screen. Two registration methods are available: online and offline.
Immediately after registration, you need to proceed to setting up integration with video communication servers.
# Online registration
For online registration, the machine with TrueConf AI Server must have access to the registration server reg.trueconf.com via TCP port 443. This method is offered by default:
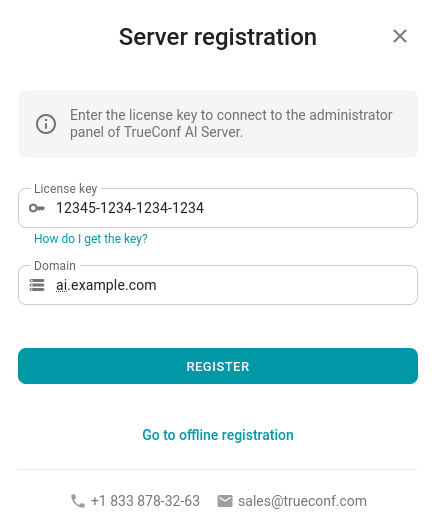
Enter your key in the registration window (you most likely received it from your manager by email), and the domain name under which the AI server will be accessible to the video conferencing servers. After that, simply click the Register button and wait for the process to complete.
# Offline registration
If there is no possibility to arrange access to reg.trueconf.com, then use the offline registration option. For this, also specify the registration key and the domain name under which the AI server will be available for video conferencing servers. Then click the Go to offline registration button:
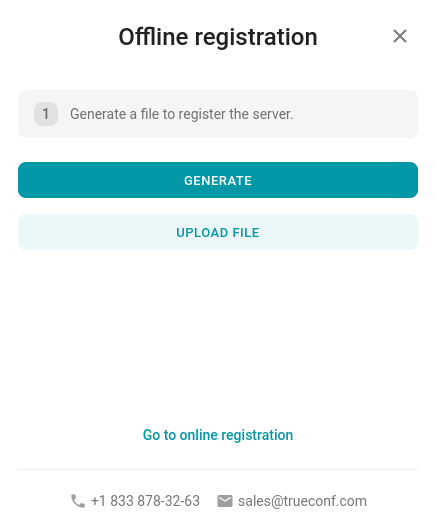
Click the Go to offline registration button to create a special .srg file.
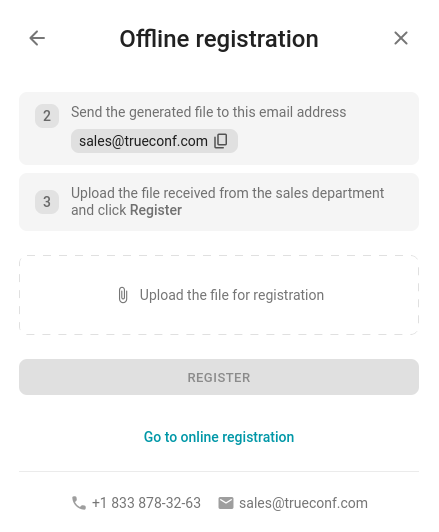
Send this file to the company TrueConf, for example, by email or through technical support. You will receive another file in response, which you will need to upload to the appropriate field and click the Register button.
# View license information
To view the details of the current license at any time after registering TrueConf AI Server, go to the License information section:
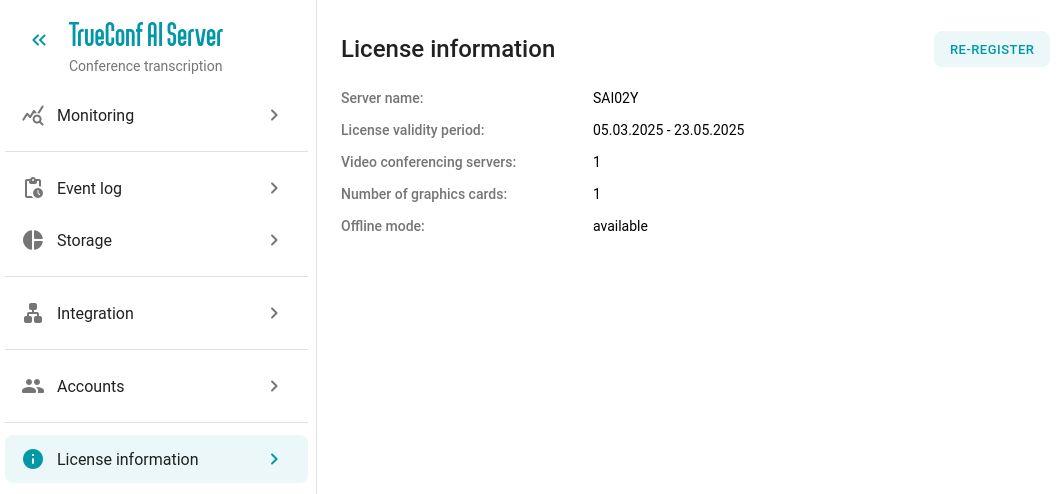
There you will be able to re-register the server with a new key using the Re-register button. You can also update the license from the registration server reg.trueconf.com with the current key, for example, if the number of licensed video cards has changed. To do this, press the Renew license button.
# Updating from the version 1.0.0 to 1.0.1
Before updating, make sure that you have installed the following:
The latest NVIDIA drivers
CUDA package version 12, higher than 12.6, but not 13.
If necessary, contact TrueConf technical support to get the script for installing required versions.
TrueConf AI Server 1.0.1 provides a number of new features which led to some changes in the internal structure of the software. So, to successfully update from 1.0.0 to 1.0.1, you have to follow these guidelines:
Contact technical support to get the
sai-backup.shscript file.Move the file to a convenient location on the machine where the AI server is installed, for example,
/home/$USER$/sai-backup.sh.Go to the directory with the file and run the command:
sudo ./sai-backup.sh --create
4. Next to the script, two directories, database-backup and files-backup, will be created. These directories will include important data from the AI server.
5. Delete the AI server with the command:
sudo apt purge trueconf-ai-server
Make sure that the directory /opt/trueconf/ai-server is empty (for example, by using the command ls /opt/trueconf/ai-server).
6. Install the AI server as shown above.
7. Open the directory with the sai-backup.sh script and execute the command:
sudo ./sai-backup.sh --restore=database-backup/[db-dump].dump
where [db-dump].dump is the name of the only .dump file in the database-backup directory.
8. Start each AI server module with the commands:
sudo systemctl start trueconf-ai-transcription
sudo systemctl start trueconf-ai-summarization
9. Make sure that everything is working properly. If not, contact technical support.